
Practical Malware Analysis - Chapter 17 Lab Write-up

Chapter 17. Anti-Virtual Machine Techniques
Note: This chapter is becoming less applicable due to the increase in legitimately virtualised hosts which may be of interest to infect.
VMware Artefacts:
Malware can check for virtual machine artefacts, for example by checking if any processes or services exist containing the word “vmware”, looking for associated files, or by checking residue in the registry. This tactic expands beyond Vmware and is generally also used to identify targets which may be using a particular AntiVirus product.
- First 3 bytes of NIC MAC generally narrow down the vendor. 00:0C:29 generally signifies VMWare.
Mitigations: Patch binary on disk or binary in memory to bypass checks or uninstall VMware Tools.
- Searching through memory often finds artefacts that are difficult or impossible to remove.
Vulnerable Instructions:
- VMWare emulates via binary translation.
- Many kernel-mode instructions are hooked and emulated so they don’t run on the host physical processor.
- User-mode instructions run directly on the processor.
- Almost all instructions which interact with hardware generates a kernel trap/interrupt or is privileged and VMware processes the interrupts to simulate a real OS.
- Some x86 instructions don’t generate interrupts but access hadware-information (e.g. sidt, sgdt, sldt, cpuid), and as such to reduce performance issues VMWare allows these to execute without virtualisation. This in turn leads to discrepencies which can be monitored to detect virtualisation.
Key structures are loaded at different offsets by a processor. These include:
- Interrupt Descriptor Table (IDT): Data structure, internal to CPU. Used by OS to determine response for each interrupt or exception. IDTR = IDT Register which contains address size and tables.
- Global Descriptor Table (GDT): On x86 OS all memory accesses go via this or the LDT. Contains segment descriptors that point to each segment, such as base address, type, length, access rights etc. GDTR = GDT Register which contains address size and tables.
- Local Descriptor Table (LDT): On x86 OS all memory accesses go via this or the GDT. Contains segment descriptors that point to each segment, such as base address, type, length, access rights etc. LDTR = LDT Register which contains address size and tables.
Windows only needs to use the GDT by default. Instructions such as sidt, sgdt, amd sldt can be used to read the location of these tables, and because they’re not privileged in x86 and run without virtualisation, they can be used to infer differences between a host and guest OS to detect virtualisation.
- Using the Red Pill Anti-VM Technique: Executes sidt to get IDTR. This is 6 bytes, with the 5th byte pointing to the start of the base memory address. In this instance 0xFF is known to be the VMwaresignature.
- Note: This won’t run reliably on multi-processor machines, and as such this is not likely to be used.
- Using the No Pill Technique: sldt and sgdt Anti-VM commonly known as “No Pill”. Windows does not normally use LDT, but VMWare has support for it, so looking for a nonzero value helps determine if you’re in a VM.
- Note: This can be mitigated by disabling acceleration (VM > Settings > Processors > Disable Acceleration). At this point smsw will be used by No Pill instead.
- Querying the I/O Communication Port: One of the most popular techniques. Depends on x86 ‘in’ instruction which copies data to an I/O port. Vmware needs to load 0x5658 (VX) into the I/O destination but only when EAX contains 0x564D5868 (VMXh) as this is the magic number Vmware uses. ECX must also be loaded with a number that corresponds to an element you wish to retrieve from the port. 0xA=”Vmware version”, 0x14=”Memory size”, with 0xA being one of the more popular values to use.
- Note: We can overcome this by changing the operation to a NOP or patching the relevant jump.
- Using the str Instruction: Retrieves the segment selector from task register. This points to the task state segment (TSS) and differences exist in this when running in Vmware over a host OS.
- Note: This won’t run on multi-processor machines, and as such is not likely to be used.
- Using ScoopyNG: Tool used to detect if it is running in a VM. Performs checks for ‘Red Pill’ and ‘No Pill’ instructions, str checks, querying the I/O COM port, and checking for a known bug in older VMWare versions.
Tweaking Settings: A number of projects exist to help harden Vmware from detection such as the VmwareHardenedLoader. Some of this involves tweaking settings assigned to .vmx files, and the most common modifications to this can be found below. It should be noted that it may be much easier to patch out the binary or use different virtualisation software given the restrictions these modifications can put on your VM.
hypervisor.cpuid.v0 = "FALSE"
board-id.reflectHost = "TRUE"
hw.model.reflectHost = "TRUE"
serialNumber.reflectHost = "TRUE"
smbios.reflectHost = "TRUE"
SMBIOS.noOEMStrings = "TRUE"
isolation.tools.getPtrLocation.disable = "TRUE"
isolation.tools.setPtrLocation.disable = "TRUE"
isolation.tools.setVersion.disable = "TRUE"
isolation.tools.getVersion.disable = "TRUE"
monitor_control.disable_directexec = "TRUE"
monitor_control.disable_chksimd = "TRUE"
monitor_control.disable_ntreloc = "TRUE"
monitor_control.disable_selfmod = "TRUE"
monitor_control.disable_reloc = "TRUE"
monitor_control.disable_btinout = "TRUE"
monitor_control.disable_btmemspace = "TRUE"
monitor_control.disable_btpriv = "TRUE"
monitor_control.disable_btseg = "TRUE"
monitor_control.restrict_backdoor = "TRUE"
Escaping the Virtual Machine: Lots of vulnerabilities have been found in VMware Tools, and VMWare’s shared folder functionality. Although these get patched once they become known, given the history of vulnerabilities present, disabling these features and finding alternatives such as temporarily mounting a USB, or using 3rd party software remote admin tools may be safer in the long run. As always if you’re running malware and you’re unsure of its capabilities, it’s safer to ensure these are being run in a virtual machine on a non-critical host OS, particularly if the host OS is running a different operating system to the VM.
Lab 17-1
Analyze the malware found in Lab17-01.exe inside VMware. This is the same malware as Lab07-01.exe, with added Anti-VMware techniques. The Anti-VM techniques found in this lab may not work in your environment.
Question 1
What Anti-VM techniques does this malware use?
Answer 1
As this sample comes with a file called findAntiVM.py, we can take a look into this to see what it is doing as a start.
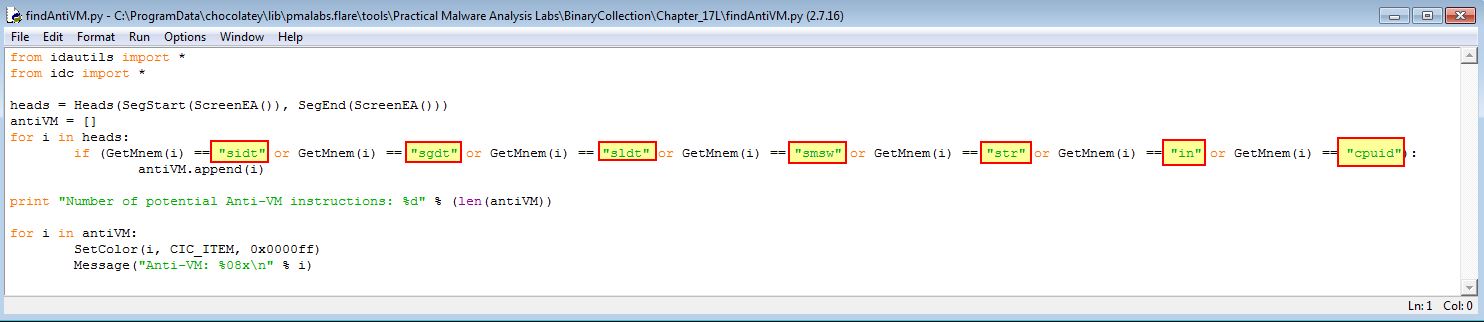
At a glance we can see it is getting any references to any of the following 7 mneumonic assembly commands:
- sidt
- sgdt
- sldt
- smsw
- str
- in
- cpuid
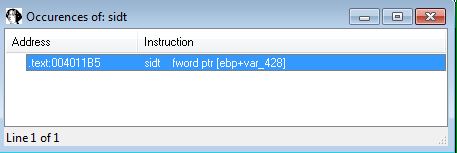
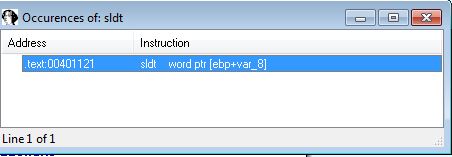
If we were using the commercial version of IDA Pro we could run this using File > Script File to run this script; however, as we’re doing this freely, we’ll need to do this using multiple text searches for each mneumonic (ALT+T). This reveals 3 entries of interest.
SIDT:
STR:

SLDT:
From this we can infer that this is using vulnerable x86 instructions to detect if it is in a VM. We will examine how this works in the following questions.
Question 2
If you have the commercial version of IDA Pro, run the IDA Python script from Listing 17-4 in Chapter 17 (provided here as findAntiVM.py). What does it find?
Answer 2
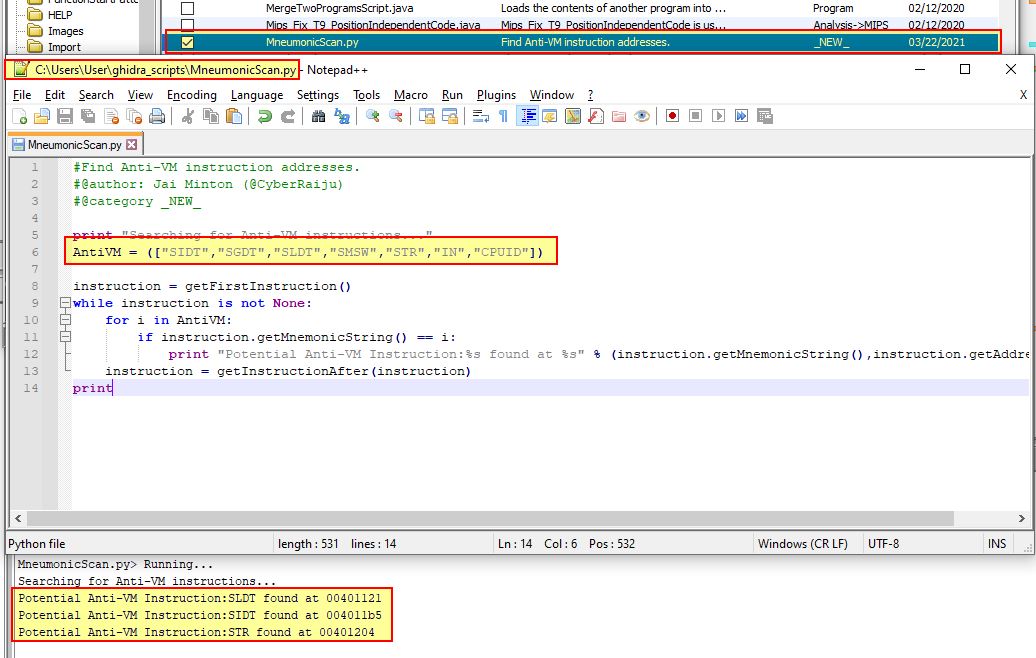
Although we don’t have the commercial version of IDA Pro, we can create a similar script for Ghidra (we touched on this tool back in Lab13 when using FindCrypt), and use this to find the banned instructions. A script which does this has been created and included below.
#Find Anti-VM instruction addresses.
#@author: Jai Minton (@CyberRaiju)
#@category _NEW_

print "Searching for Anti-VM instructions..."
AntiVM = (["SIDT","SGDT","SLDT","SMSW","STR","IN","CPUID"])

instruction = getFirstInstruction()
while instruction is not None:
	for i in AntiVM:
		if instruction.getMnemonicString() == i:
			print "Potential Anti-VM Instruction:%s found at %s" % (instruction.getMnemonicString(),instruction.getAddress())
	instruction = getInstructionAfter(instruction)
print
By adding this to a directory of usable Ghidra scripts, we can run it across our decompiled binary and get a list of the 3 instructions we previously identified.
Question 3
What happens when each Anti-VM technique succeeds?
Answer 3
Examining the instructions we identified in question 2, we find the following:
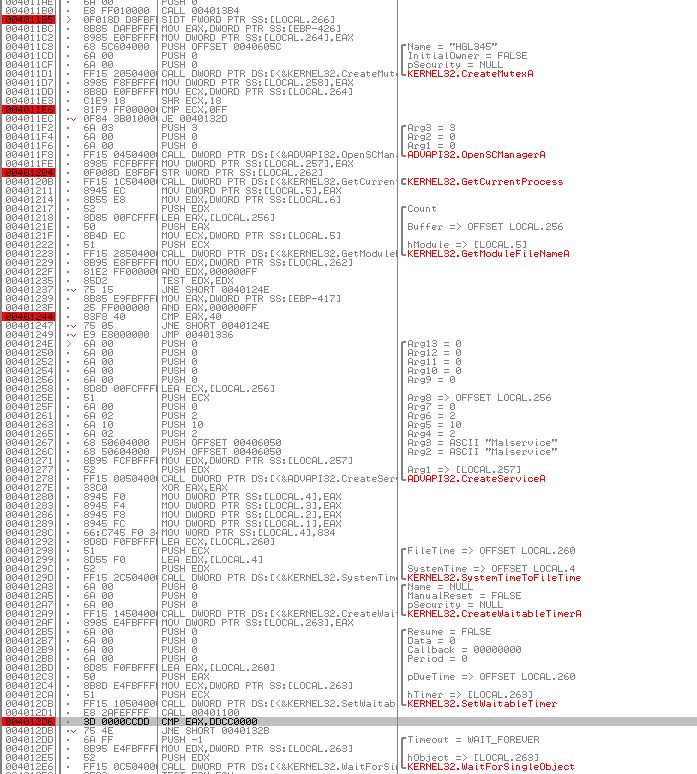
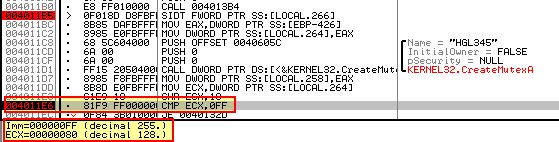
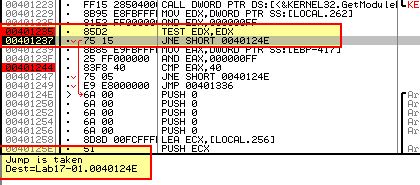
SIDT - Red Pill Technique:
The SIDT instruction occurs at 0x4011B5 if no Mutex exists with the name ‘HGL345’. This takes the Interrupt Descriptor Table (6 bytes) and takes the 2 least significant bytes off of this using an offset of 0x2. To get to an offset of 0x5 (where the Vmware signature FF starts), the malware then shifts 18h (24) bits to the right, and as we know there’s 8 bits in a byte, this means it shifts another 3 bytes taking us to an offset of 0x5 prior to comparing the value 0xFF.
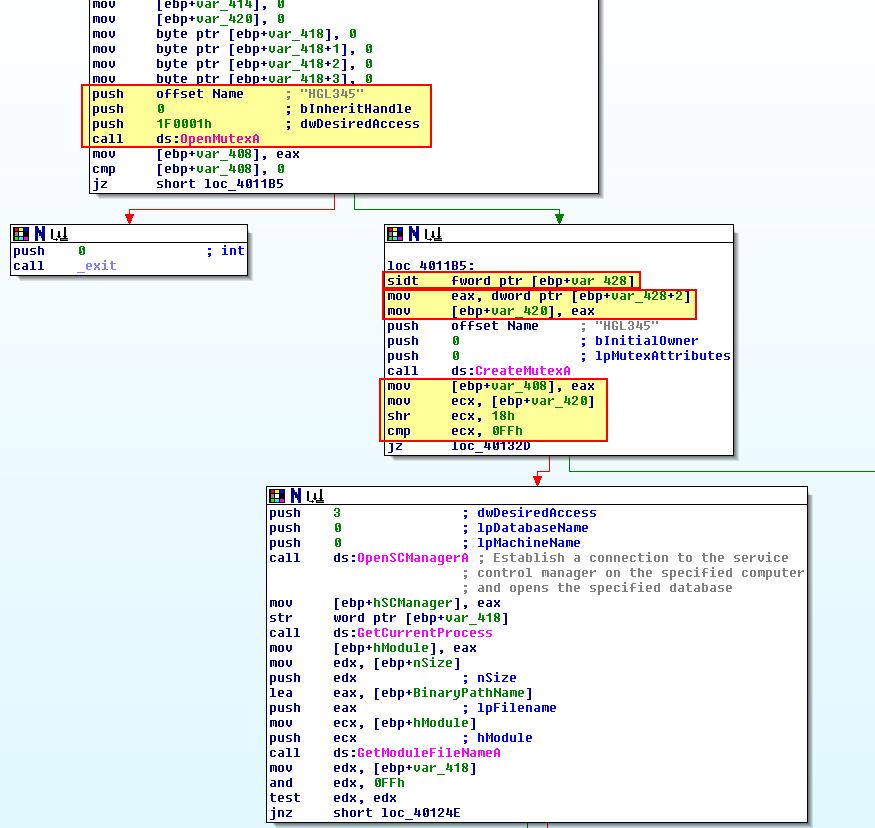
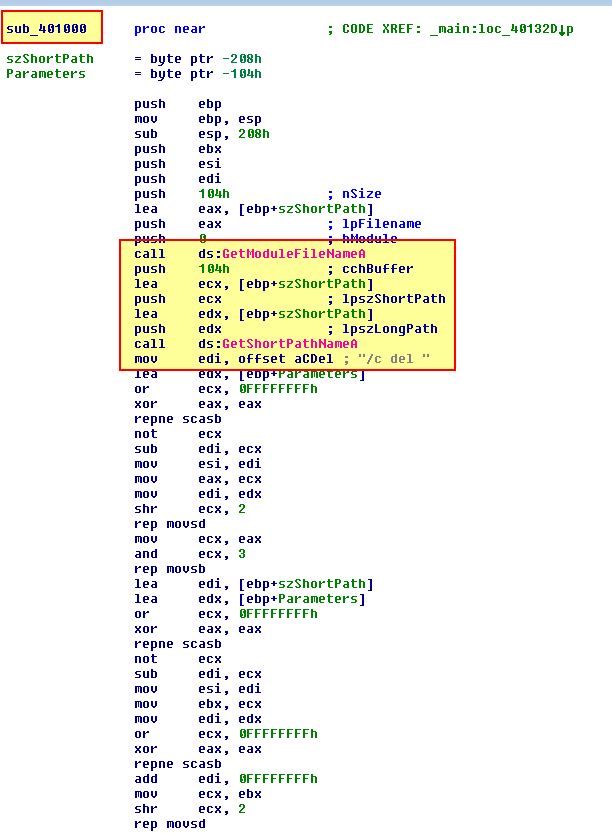
Where this Anti-VM check succeeds, the malware will call ‘sub_401000’ which we can see attempts to end the process and remove it from disk.
STR:
The STR instruction occurs at 0x401204 if the previous check passes. This takes the Task State Segment and loads it into var_418. This then checks if the first byte returned is ‘0’, if this is the case a second check will occur to see if the second byte is 0x40.
Where this Anti-VM check succeeds, the malware will reach ‘loc_401336’ which will inevitably call ‘sub_401000’ again.
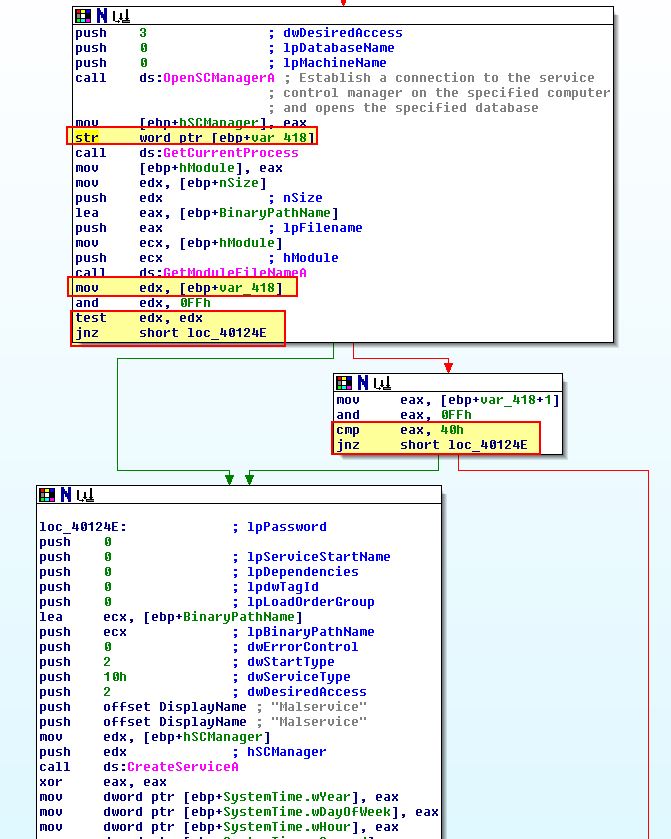
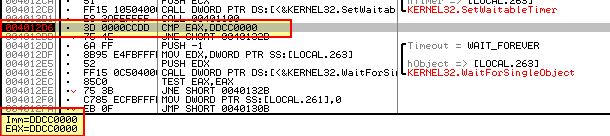
SLDT - No Pill Technique:
The SLDT instruction occurs at 0x401121 if the previous check passes. This is stored in an earlier offset as this check occurs within sub_401100 which is called at 0x4012D1 after Malservice is created.
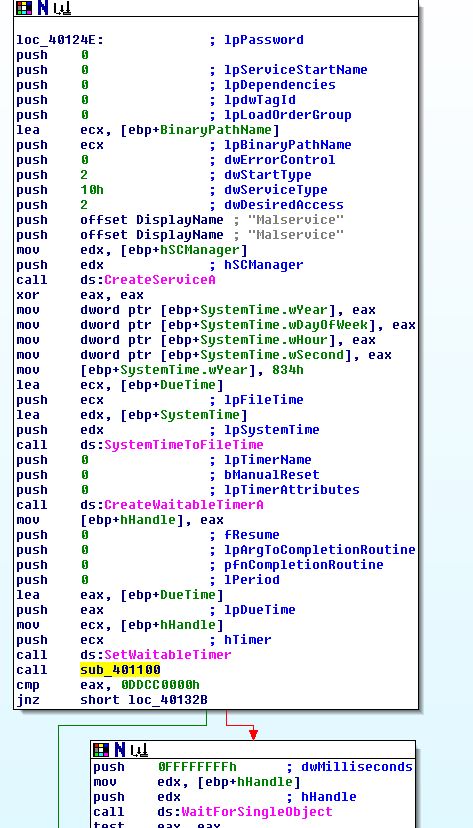
Examining sub_401100 we find that the value 0x0DDCCBBAA is assigned to EAX which is then stored at ‘[ebp+var_8]’ (this value is purely used fo initialisation and is never seen again). The SLDT operation then occurs with the output falling into this location of memory. This output is then stored into ‘[ebp+var_C]’, and then EAX, which is returned from this subroutine.
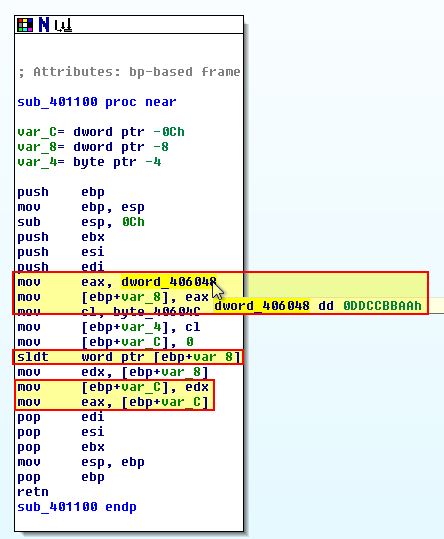
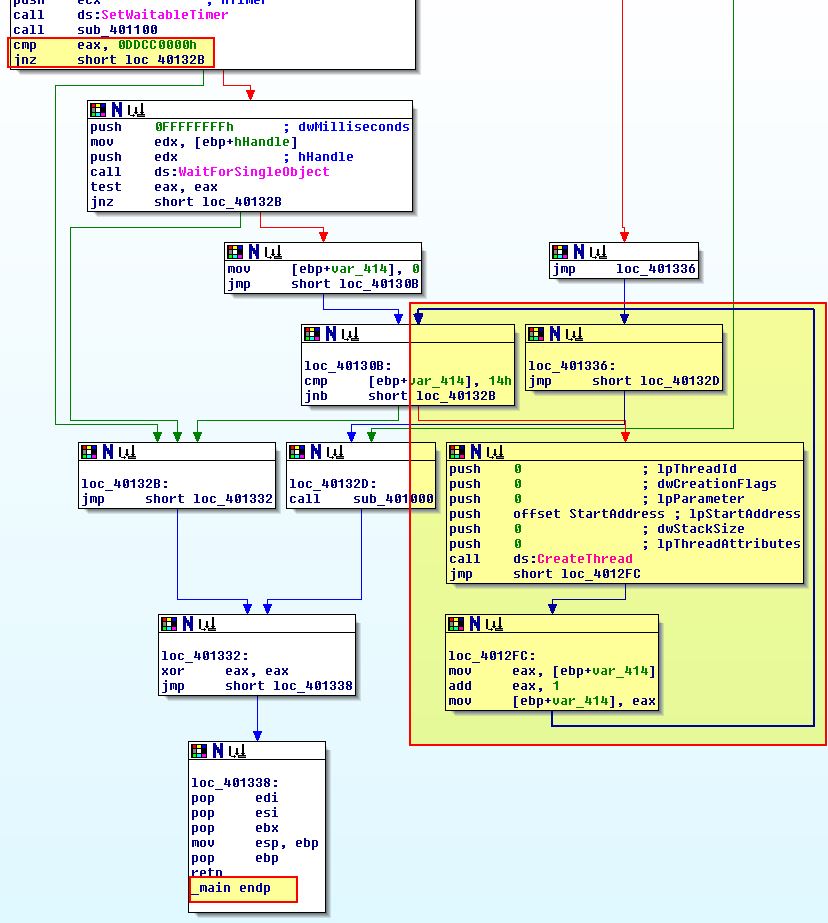
If we go back to what calls sub_401100 we can see that a check is made against the value ‘0x0DDCC0000’, where this is not the case a jump will occur which inevitably causes the malware to terminate, otherwise this will create a new thread of ‘StartAddress’ over and over again in a loop, which is the same as we saw in Lab07-01.exe functioning as a Denial of Service catalyst.
Question 4
Which of these Anti-VM techniques work against your virtual machine?
Answer 4
Firing up VMware Workstation (in this instance it will be our 32-bit Windows XP machine), we can run this in OllyDbg and place break points (F2) at the below locations we identified a check was being made, in addition to placing a breakpoint at the conditional jump which occurs directly after these checks are made.
- 0x4011B5 (SIDT - Red Pill Technique)
- 0x401204 (STR)
- 0x401121 (SLDT - No Pill Technique)
This will look similar to the following for each address.
If we then run the program with ‘F9’ until we reach our comparisons we can see the following:
- 0x4011B5 (SIDT - Red Pill Technique)
This instruction has resulted in a comparison against the decimal value 128 instead of 255.
Based on this the Anti-VM check failed, likely due to multi-processors being in use.
- 0x401204 (STR)
This instruction has resulted in the first byte being returned with a value which isn’t 0, and as such no further Anti-VM checks occur.
Based on this the Anti-VM check failed, once again because this won’t run on multi-processor machines.
- 0x401121 (SLDT - No Pill Technique)
This instruction has resulted in a comparison against the expected value 0x0DDCC0000.
Based on this the Anti-VM check failed, likely due to hardware acceleration not being enabled in this version of Vmware Workstation.
Question 5
Why does each Anti-VM technique work or fail?
Answer 5
From the above analysis we have adequately described why each Anti-VM technique either worked or failed.
Question 6
How could you disable these Anti-VM techniques and get the malware to run?
Answer 6
The easiest way to disable these Anti-VM techniques is to ‘NOP’ out the associated instructions to ensure only the required jumps are taken, or modify the jump flags via a debugger.
Lab 17-2
Analyze the malware found in the file Lab17-02.dll inside VMware. After answering the first question in this lab, try to run the installation exports using rundll32.exe and monitor them with a tool like procmon. The following is an example command line for executing the DLL:
rundll32.exe Lab17-02.dll,InstallRT (or InstallSA/InstallSB)
Question 1
What are the exports for this DLL?
Answer 1
Opening this up in peview we can find it has 9 exported functions.
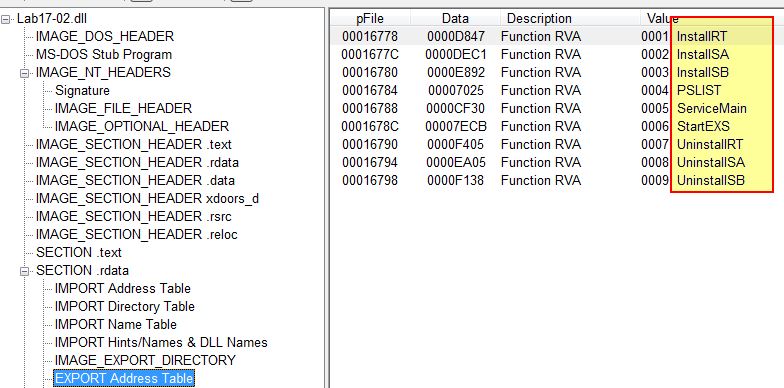
- InstallRT
- InstallSA
- InstallSB
- PSLIST
- ServiceMain
- StartEXS
- UninstallRT
- UninstallSA
- UninstallSB
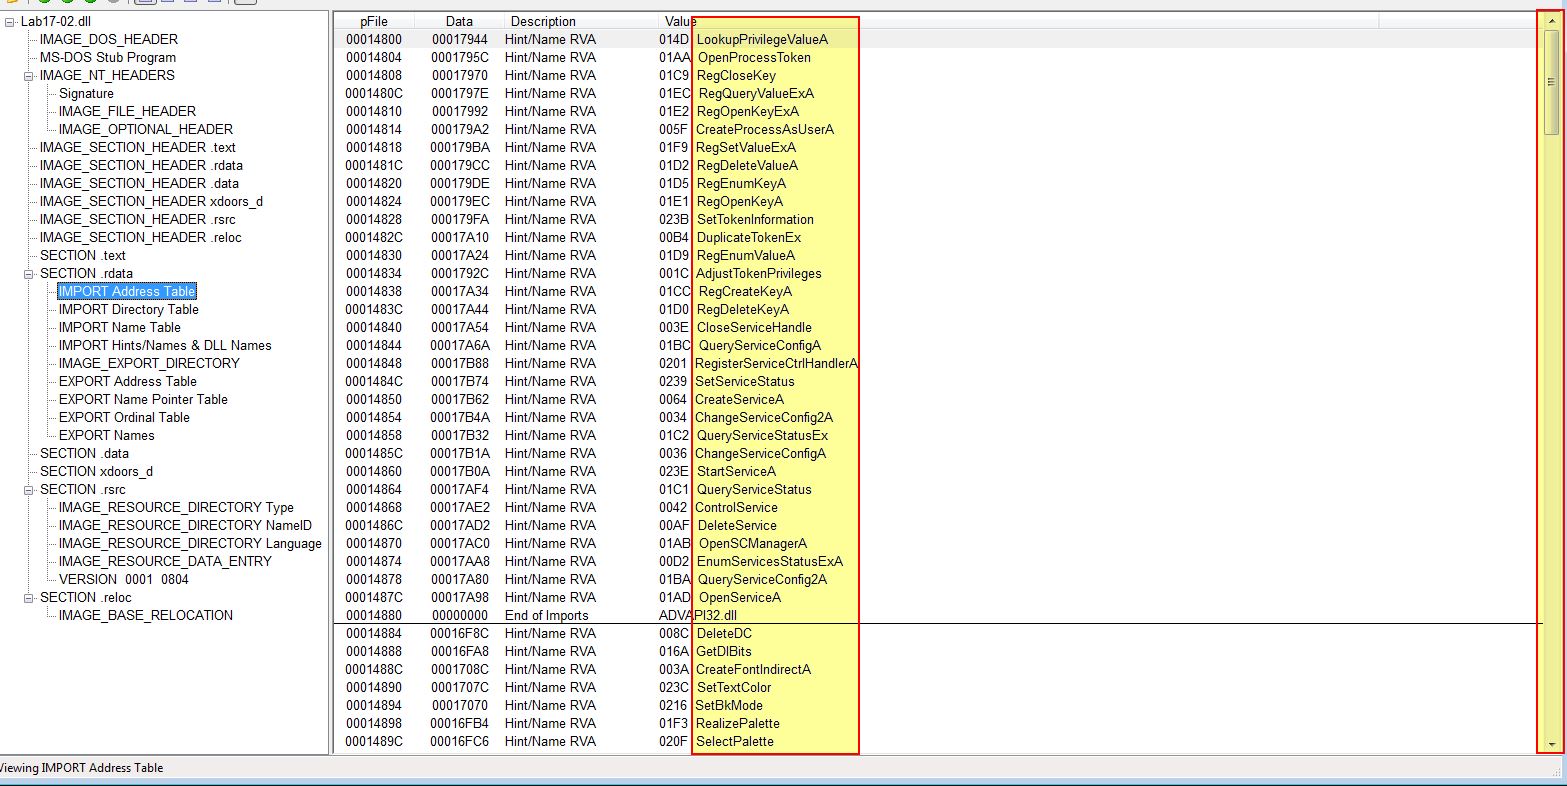
Examining the imports reveals a significant amount of imported functions.
Question 2
What happens after the attempted installation using rundll32.exe?
Answer 2
First we can run procmon to keep track of what is happening on the OS and add in some filters such as the below:
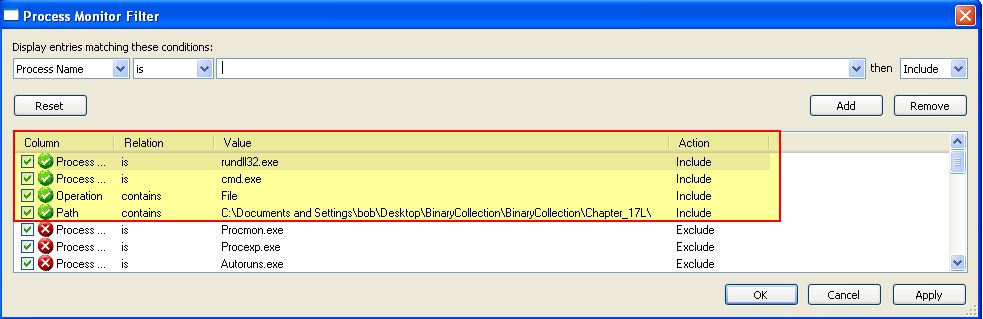
Next we will create a backup of the file, just in case. If we then attempt to install this in our Windows XP VM (Vmware) by using the below command line:
rundll32.exe Lab17-02.dll,InstallRT
We find that this creates 2 files of interest before deleting one of them, and deleting the DLL.
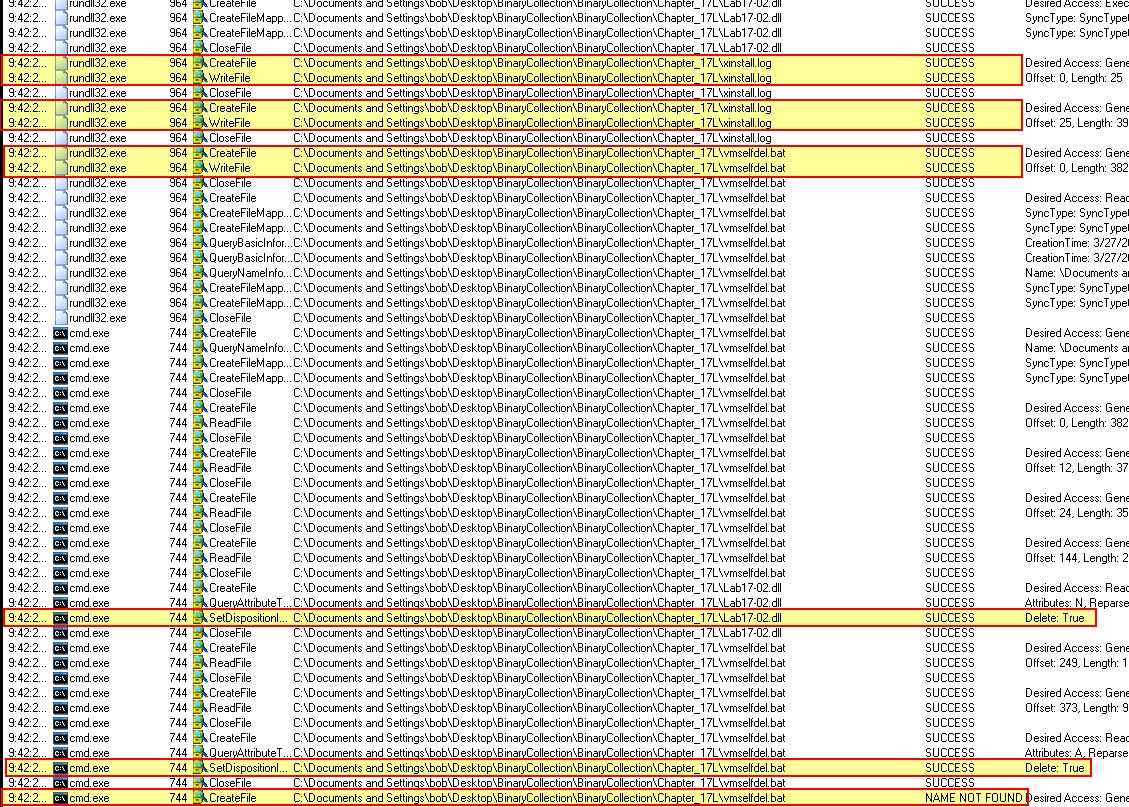
- vmselfdel.bat
- xinstall.log
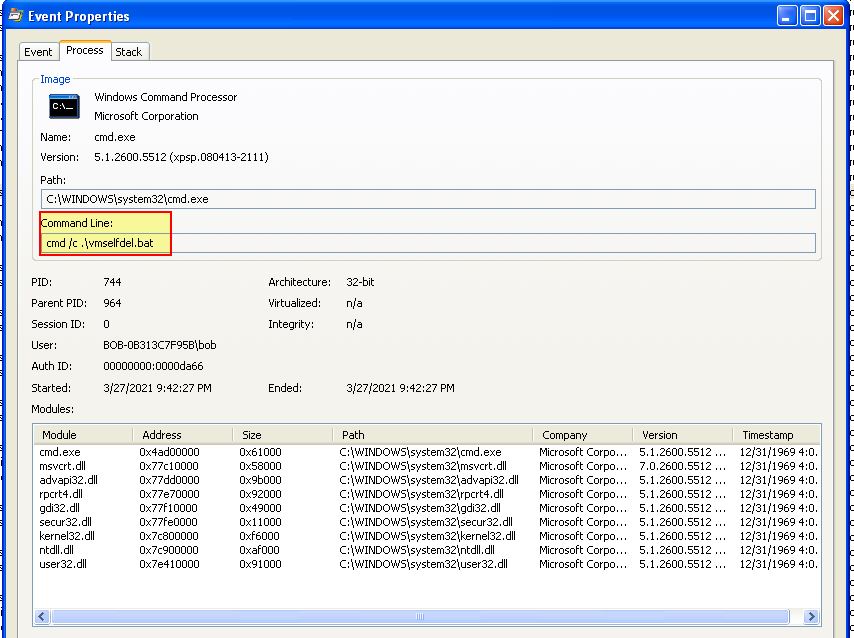
Because the deletion occured from cmd.exe after a .bat file was written, we can infer that deletion was caused by the vmselfdel.bat file. By viewing the cmd.exe command-line we can validate this hypothesis.
Question 3
Which files are created and what do they contain?
Answer 3
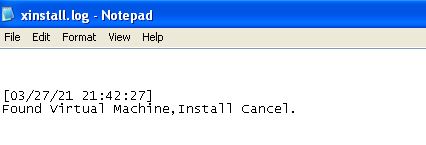
Examining xinstall.log still on disk we can see that it contains what looks to be a log of the malware identifying it is being run in a VM, and cancelling the malware installation.
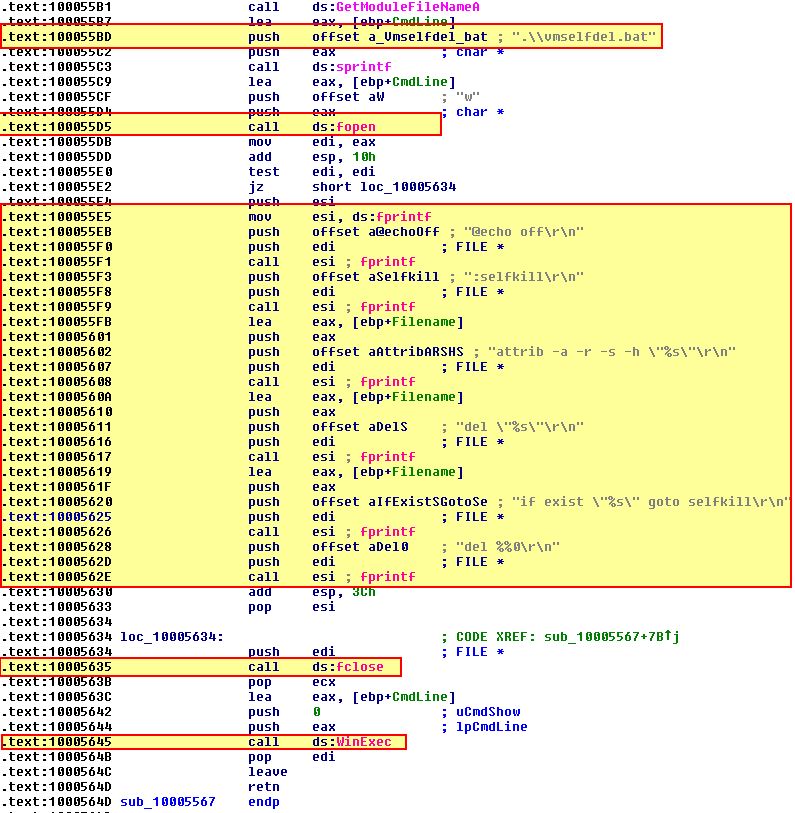
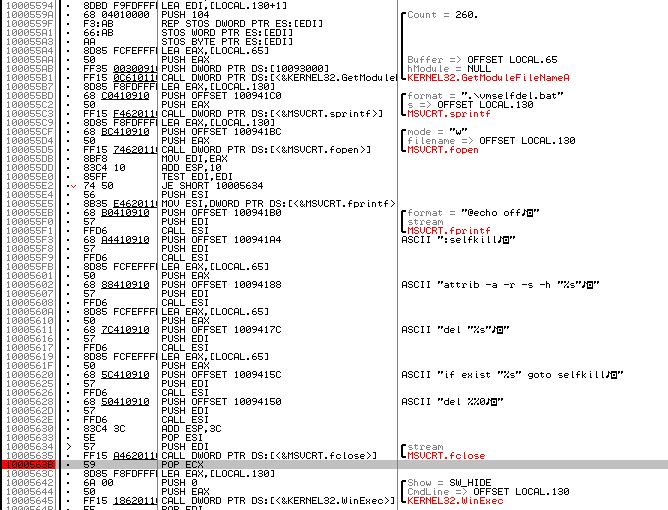
To view the contents of vmselfdel.bat we can first identify where this file is written to disk by examining the program in IDA. Starting at the exported function we just ran ‘InstallRT’, we can see that this looks to write xinstall.log at ‘sub_10003592’, and then calls another function at ‘sub_10005567’.
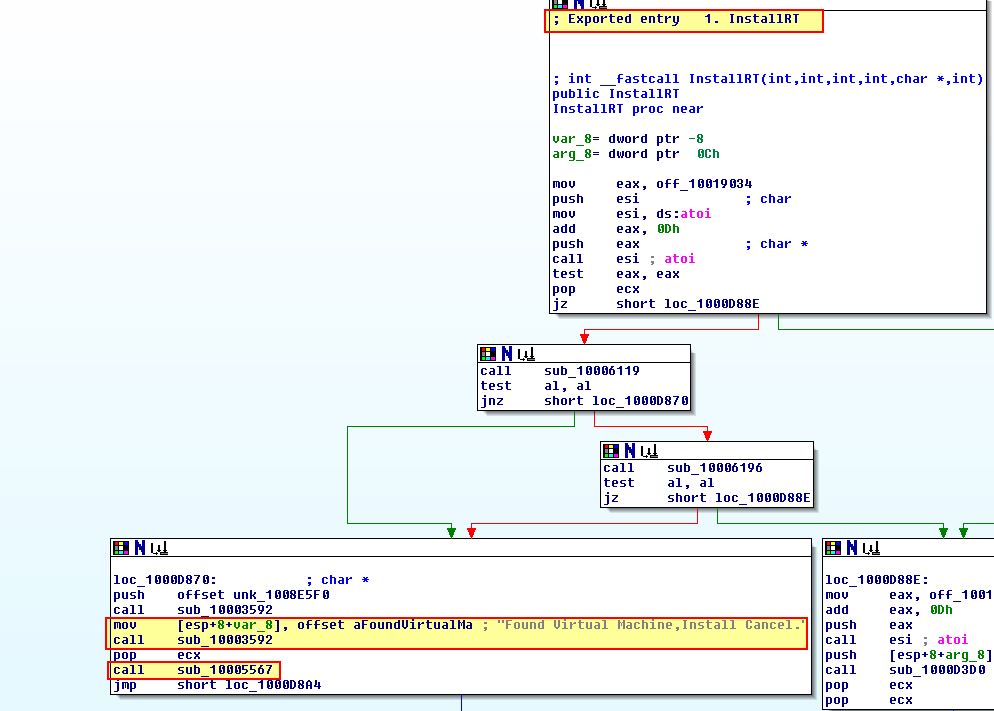
Examining ‘sub_10005567’ we can see what looks to be the creation of a file named ‘vmselfdel.bat’ in addition to the content which will be written to it before execution.
If we run this again in a debugger such as OllyDbg2 and create a breakpoint after the file creation e.g. at 0x1000563B:
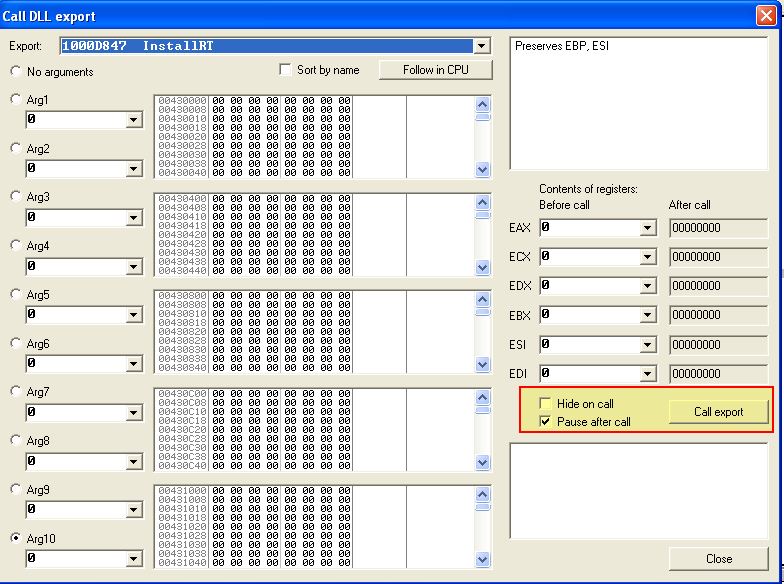
We can then call the relevant export using ALT + F6 which will then hit our breakpoint.
At this point we can now examine the file vmselfdel.bat.
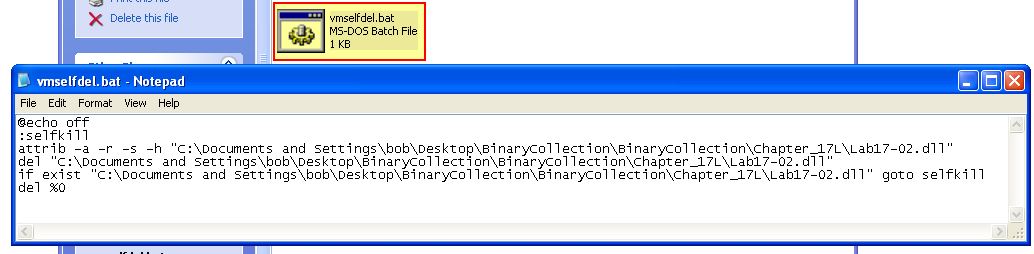
Taking a look at the file we can see that it first turns ‘echo’ off so that nothing will be shown in a command prompt. Next it defines a function called ‘selfkill’. This function attempts to remove all attributes from the DLL which may prevent it from being removed prior to attempting to delete the file. Finally it checks if the file exists, and if it does it attempts to run ‘selfkill’ prior to attempting to delete itself which is exactly the behaviour we saw during dynamic analysis.
Question 4
What method of Anti-VM is in use?
Answer 4
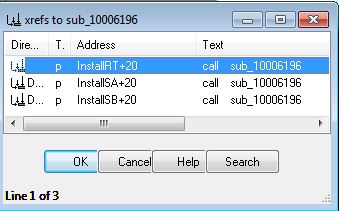
Looking back at this DLL using IDA we can revisit the exported function ‘InstallRT’ to examine a check within ‘sub_10006196’ which occurs just before the ‘Found Virtual Machine’ file is written to disk. If we check cross-references to this we can see it is called by all installation exports which gives us a good idea that it may be related to this Anti-VM check.
Examining this we can see 2 process flows which is due to a custom exception handler being created before some unusual checks are made.
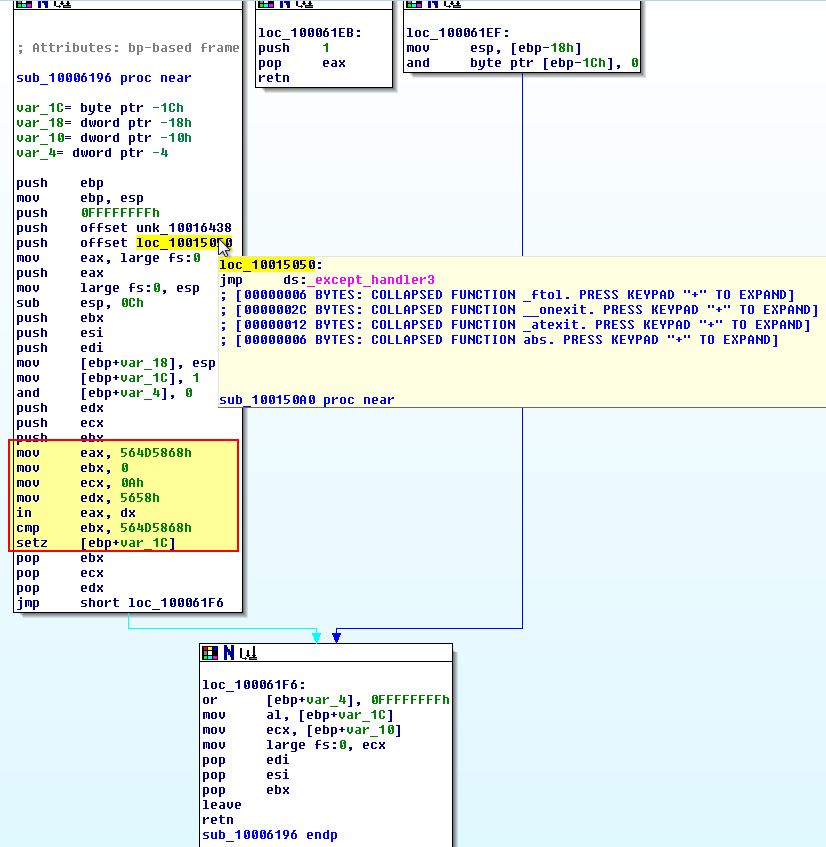
By converting some of these to their ascii character constants (using ‘R’), we get a slightly different picture.
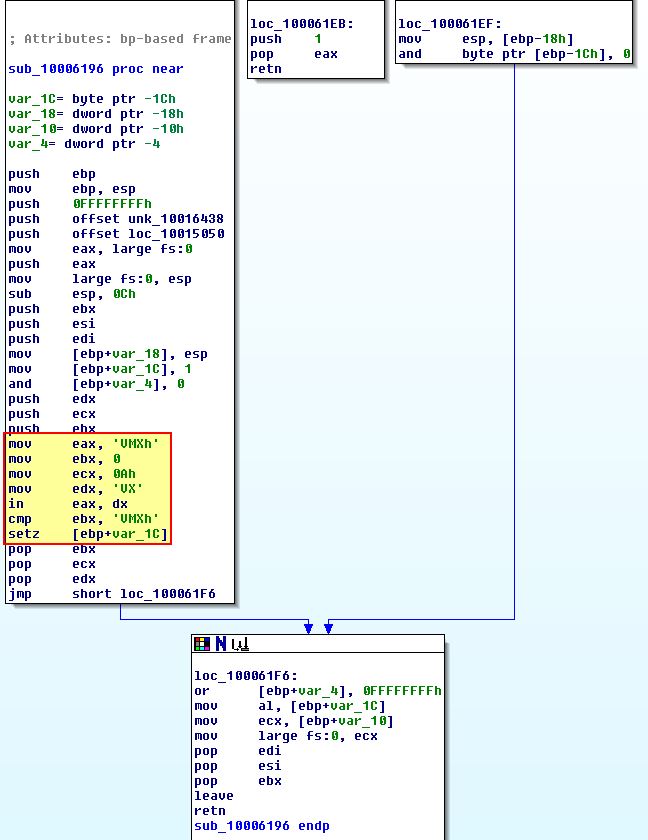
From the above we see that there’s an operation ‘IN’ which occurs over the data register ‘dx’ (used for I/O operations, in this case it is ‘VX’) to ‘eax’ (VMXh). The ‘IN’ x86 instruction is essentially looking for input from the I/O port ‘VX’ (this is used by Vmware), and where this is found it is ensuring the magic number for Vmware is present. This is taking an instruction of 0xA which is asking to retrieve the Vmware version from this I/O virtual port.
Based on this comparison the result is returned to ‘al’ before the function returning.

Looking back at the ‘InstallRT’ exported function we can see that a ‘TEST’ is performed against ‘al’ which will set the zero-flag (ZF) to ‘1’ if al is equivalent to 0, otherwise if it contains output it knows it is running in a VM, and the malware doesn’t take the jump.

Question 5
How could you force the malware to install during runtime?
Answer 5
To force the malware to install during runtime we can modify the ‘jz’ jump flag at 0x1000D86E to instead be ‘jnz’, or alternatively patch the ‘IN’ instruction at 0x100061DB with NOP instructions to bypass the check like we’ve done previously.
Question 6
How could you permanently disable the Anti-VM technique?
Answer 6
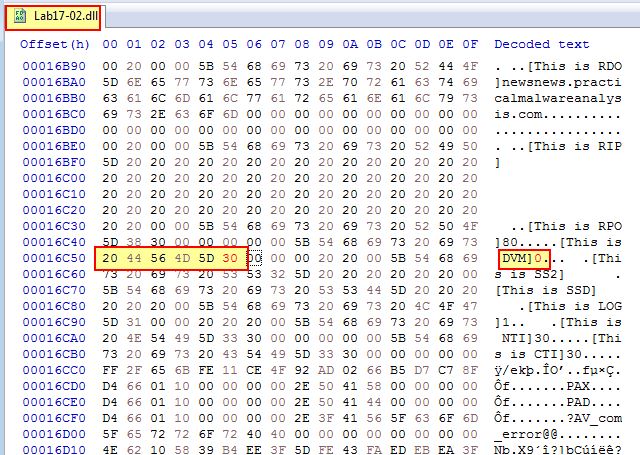
If we re-examine ‘InstallRT’ at 0x1000D847 we can see there’s a conditional jump prior to the Anti-VM techniques which leverages ‘off_10019034’. This is the same in all the exported functions.
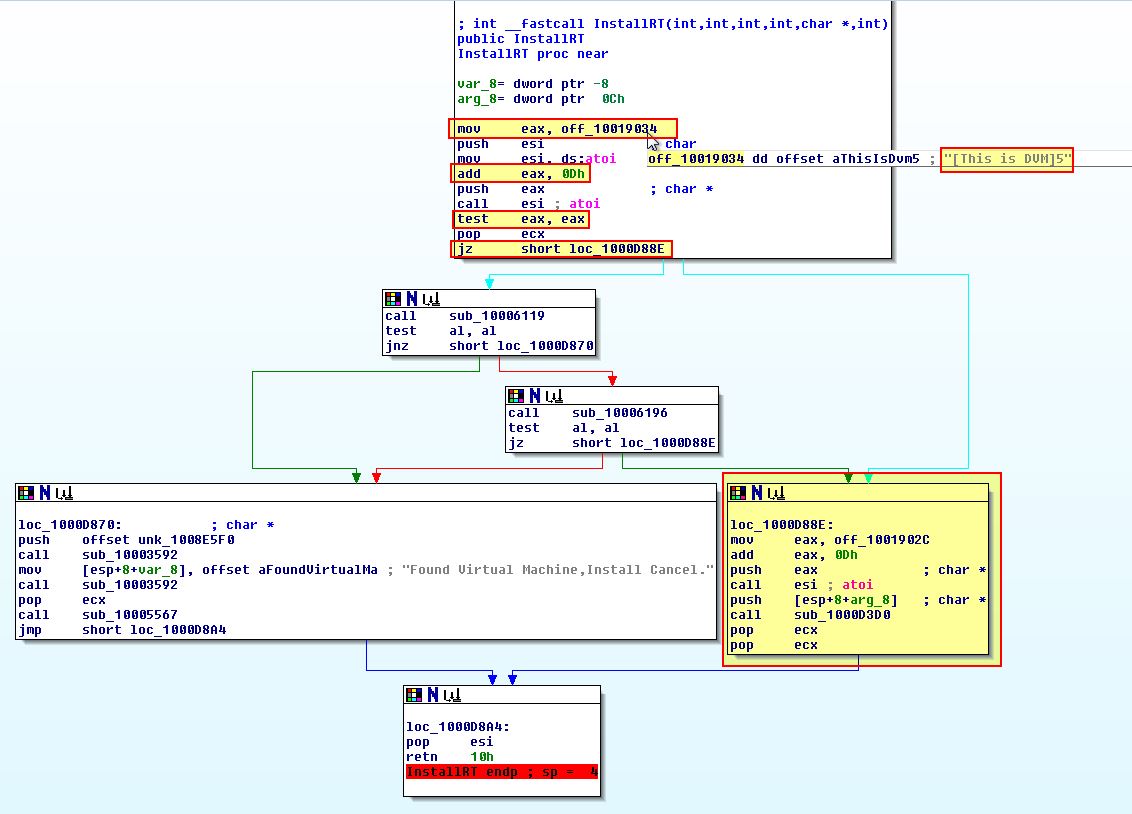
If we examine the above closely we can see the string “[This is DVM]5” is stored at ‘off_10019034’ with 0xD (13) being added to this pointer. This in turn moves the pointer past “[This is DVM]” and onto ‘5’ which is then converted to a number and compared to the value ‘0’ (the test instruction will cause a jump to occur if the value is 0).
By opening this in a hex editor such as HxD we can locate the string in question and change the value ‘5’ to be ‘0’.
This will cause the check to always pass and jump, and as such permanently disable the Anti-VM check.
Question 7
How does each installation export function work?
Answer 7
The following installation exports are present within this malware:
- InstallRT (0x1000D847)
- InstallSA (0x1000DEC1)
- InstallSB (0x1000E892)
After passing the relevant Anti-VM checks:
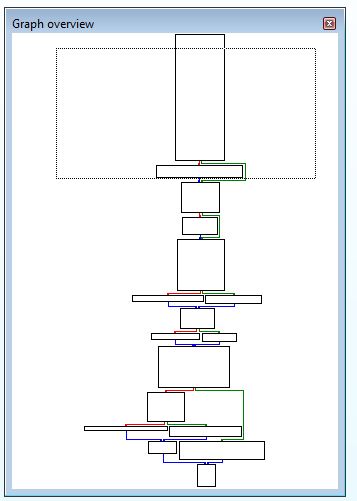
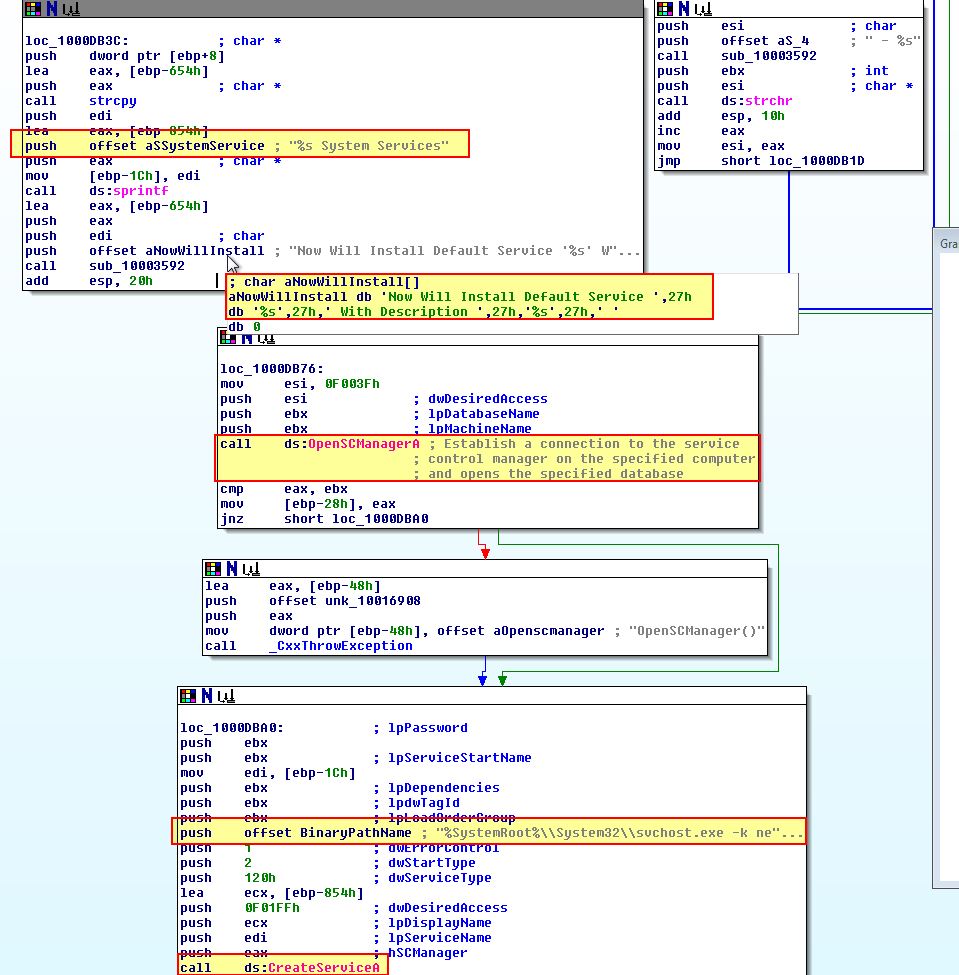
InstallRT causes an installation of the malware to occur within sub_1000D3D0. The graphed overview of this function is shown below.
InstallSA causes an installation of the malware to occur within sub_1000D920. The graphed overview of this function is shown below.
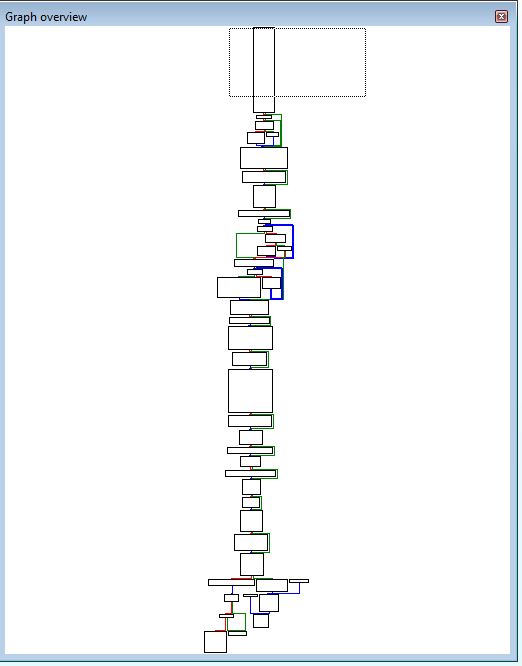
InstallSB causes an installation of the malware to occur within sub_1000DF22. The graphed overview of this function is shown below.

Although these functions may seem to have a lot to them, we can break them all down to understand what is going on.
- InstallRT
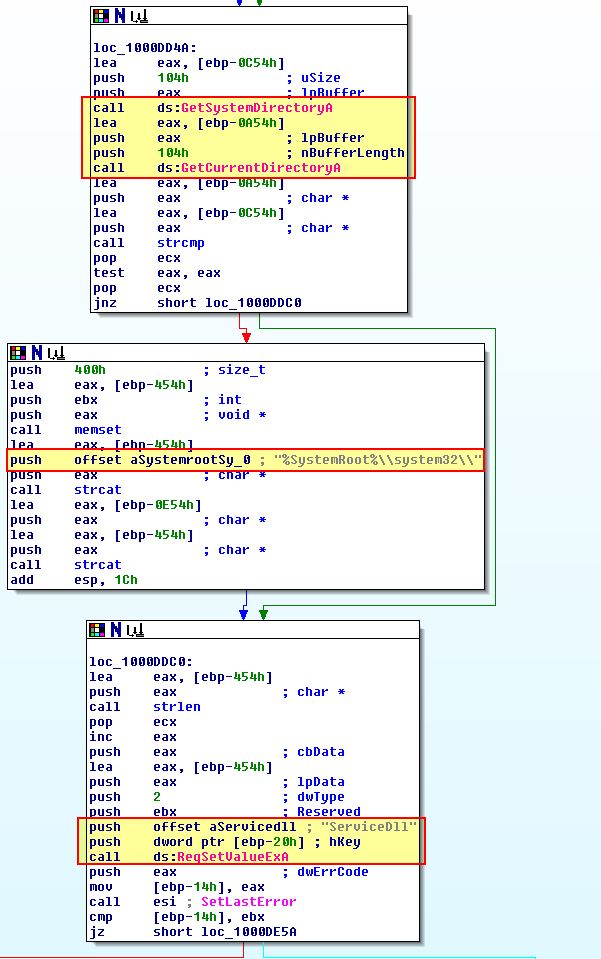
This is the smallest of all the installation exported functions. Looking over the first half of the exported function, this looks to copy the malware into the System directory of windows using ‘GetSystemDirectoryA’ e.g. C:\Windows\System32.
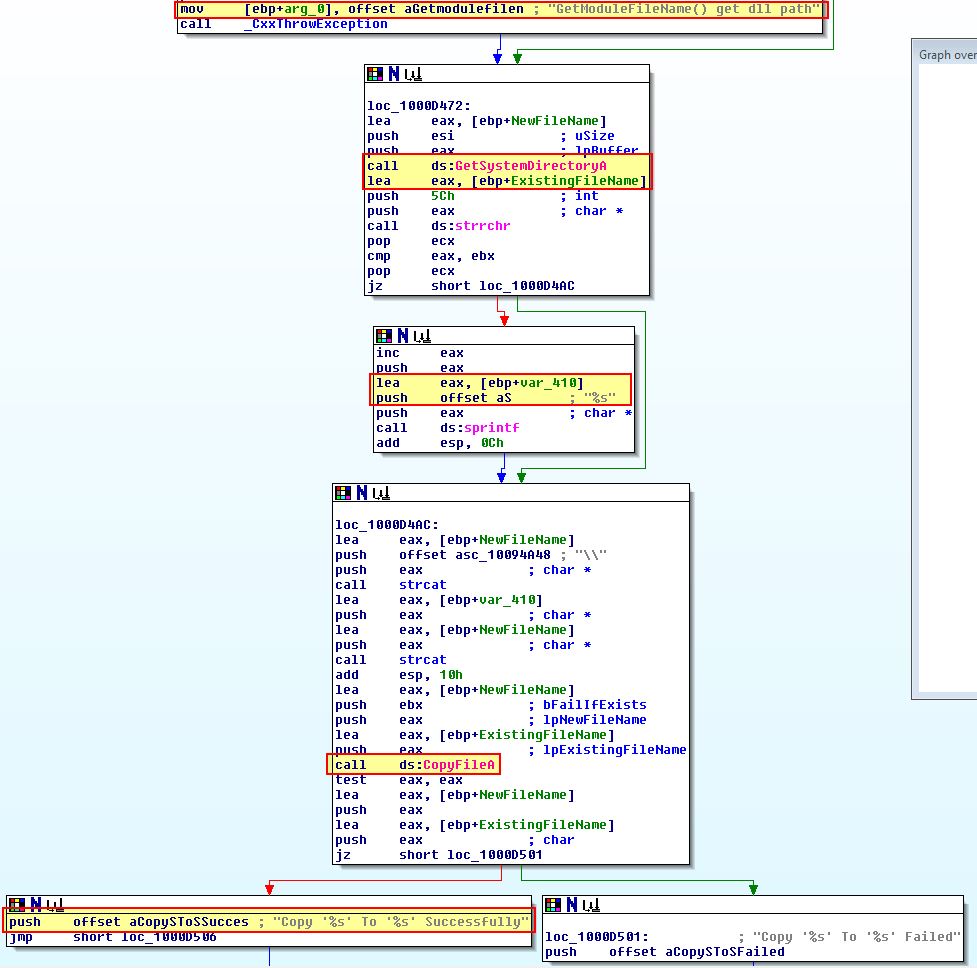
Following on from this it should be first noted that ‘sub_10003592’ seems to be a logging routine to record data about whether or not installation has been successful into xinstall.log. Besides this we can break the function down to see that this functions by first taking an argument of a process to inject into. Where this fails (no arguiment is given) it will use iexplore.exe, before it uses VirtualAllocEx, WriteProcessMemory, and CreateRemoteThread to create a remote thread inside the process containing our reflectively loaded DLL.

We can confirm this by running the install function from our patched binary (from question 6, used to bypass the Anti-VM check), and examine this is Process Explorer in addition to reviewing the contents of xinstall.log
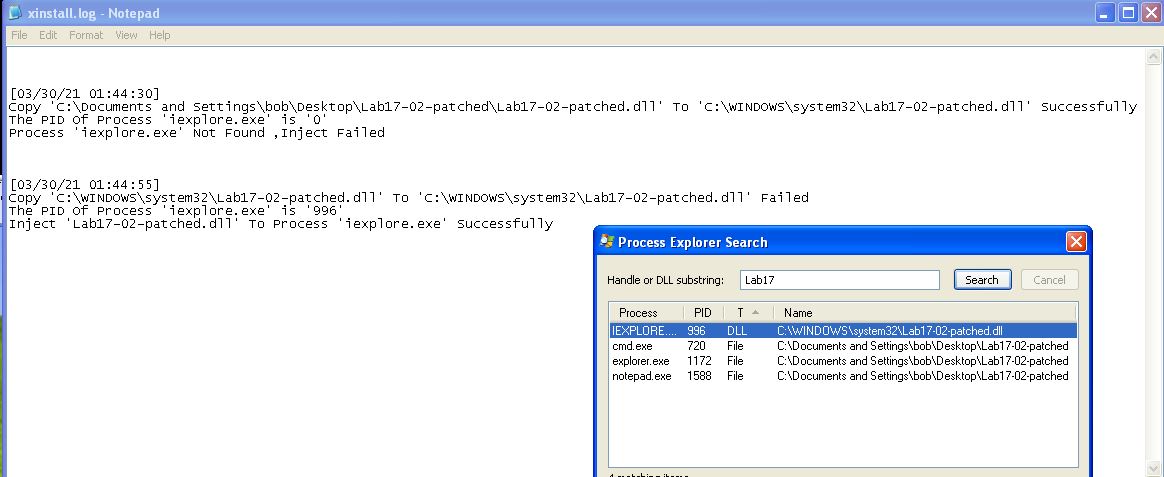
From this we can conclude that ‘InstallRT’ likely means ‘Install Remote Thread’ and is used to reflectively load a DLL into a remote thread inside a process specified as an argument, or if no argument is provided, internet explorer.
- InstallSA
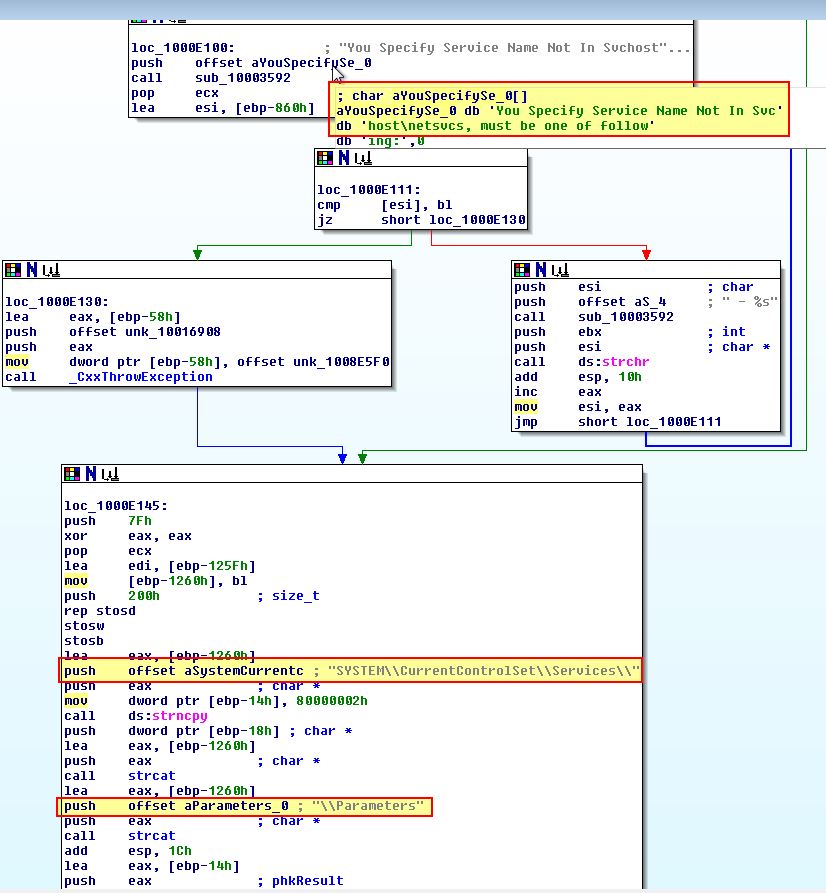
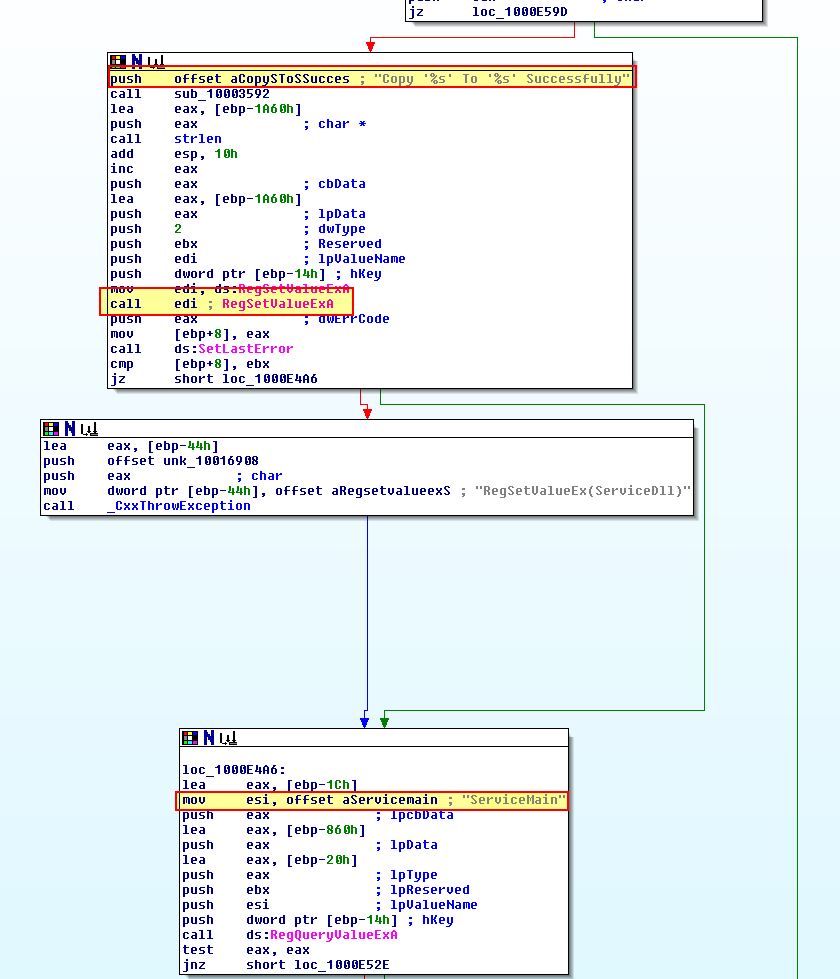
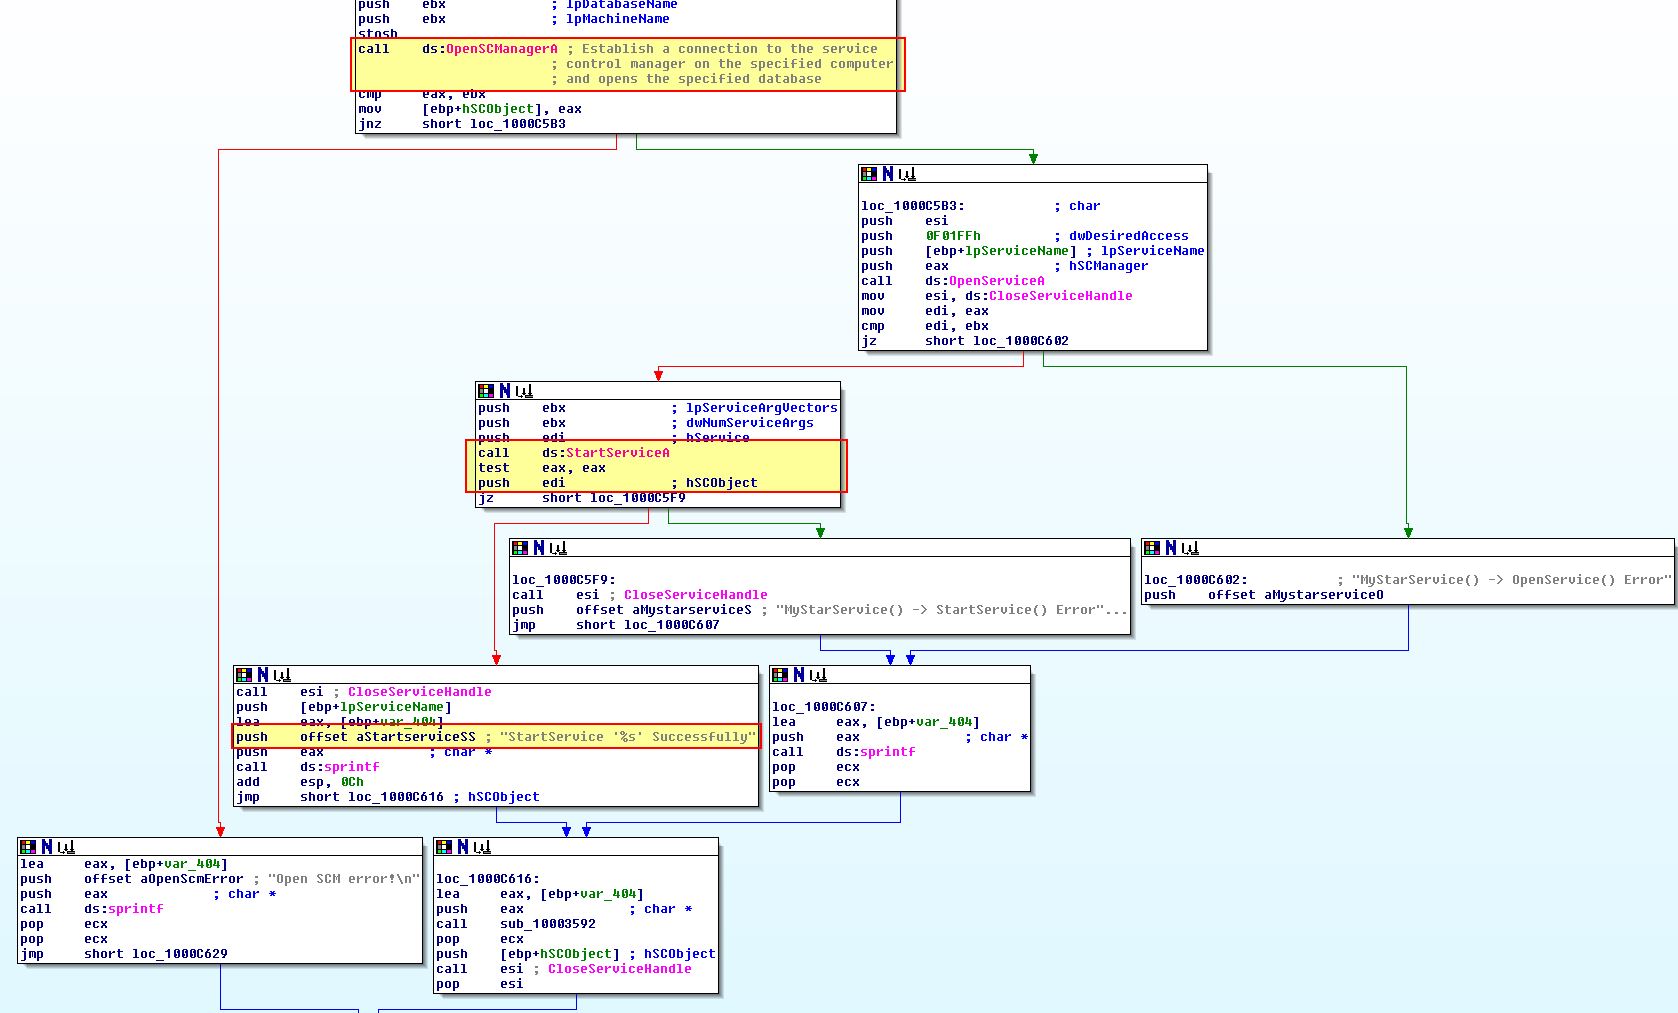
Looking over the start of this exported function (more specifically sub_1000D920), we can see that this looks to be taking a default string of ‘Irmon’ which appears to be searched to see if it exists as a service using the registry.
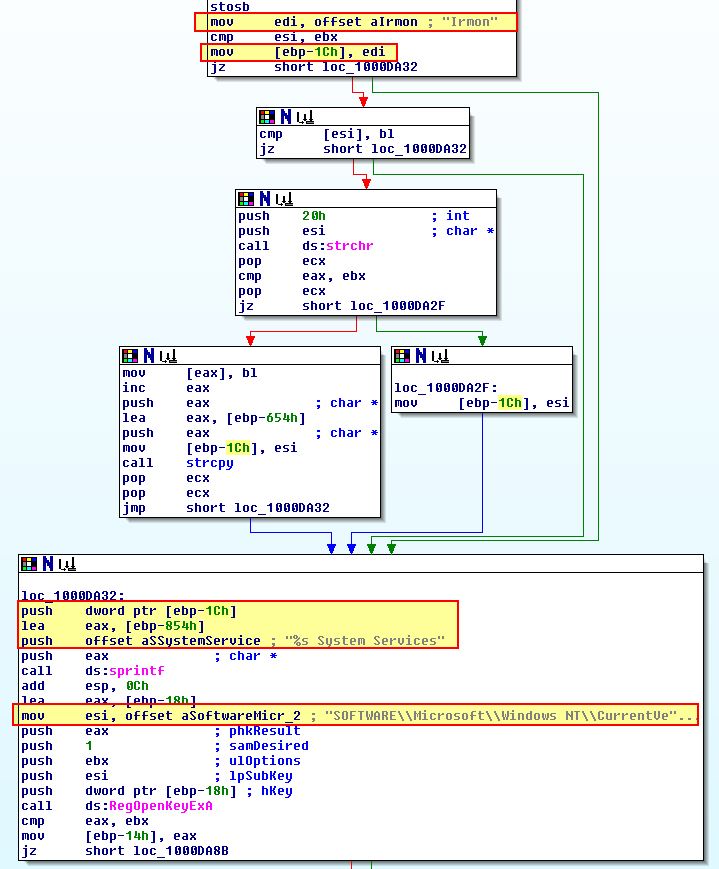
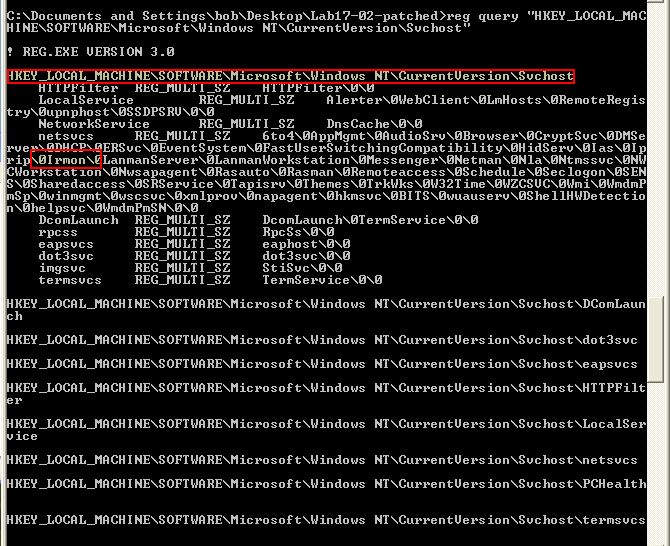
Looking further if given an argument this seems to perform a check within “HKEY_LOCAL_MACHINE\SOFTWARE\Microsoft\Windows NT\CurrentVersion\Svchost” for a value of ‘netsvcs’ which is then checked to see if it contains the argument given.
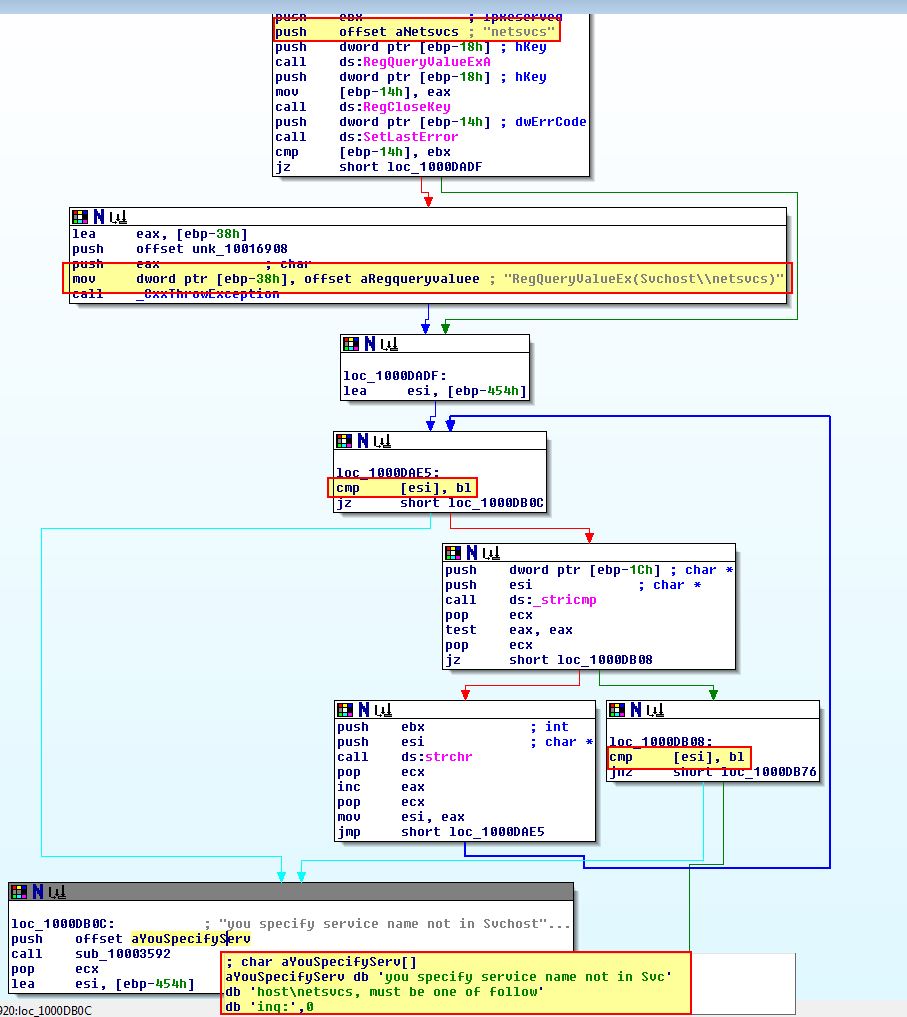
If the argument provided exists in this key, the malware looks to install a service under “HKEY_LOCAL_MACHINE\SYSTEM\CurrentControlSet\Services” with the name provided and makes sure this a part of the netsvcs group within “HKEY_LOCAL_MACHINE\SOFTWARE\Microsoft\Windows NT\CurrentVersion\Svchost”.
As shown above the service is created with the description “
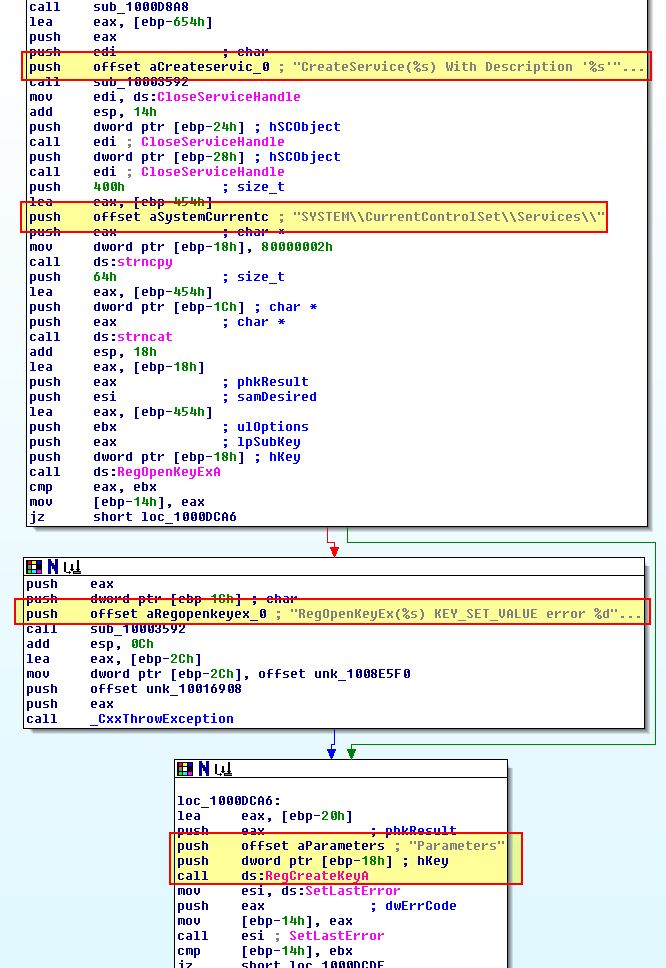
What’s interesting is that although this attempts to set the ServiceDLL to be Lab17-02.dll which is currently running;
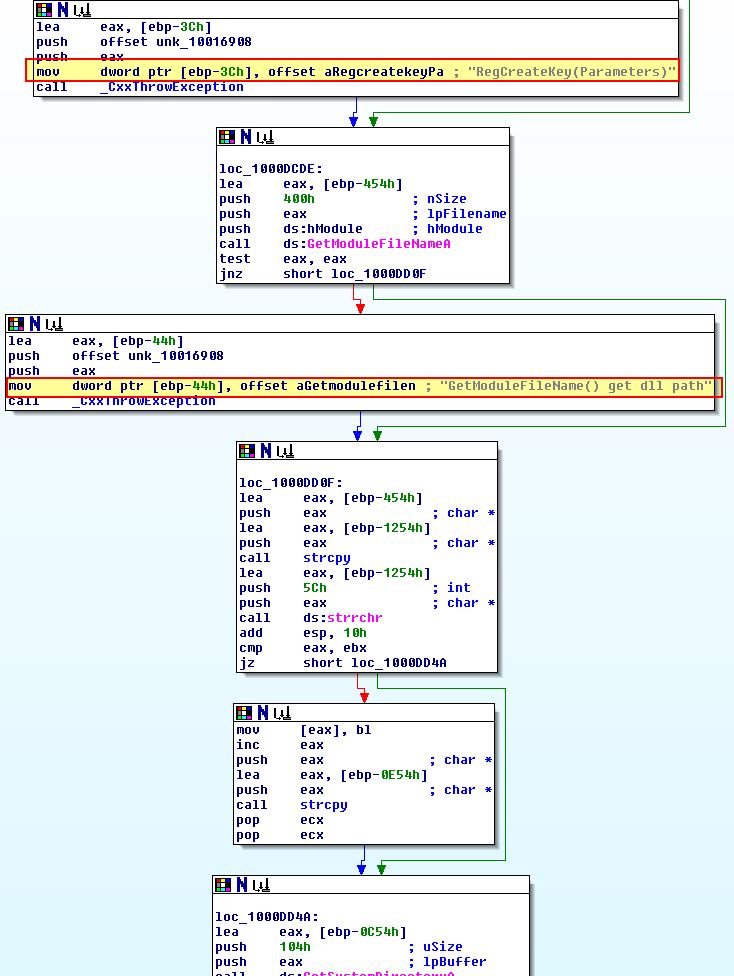
It never actually copies the DLL to the system directory where it is attempting to run from, and as such the service never installs properly solely using InstallSA.
Finally we can confirm this by installing the malware using the ‘InstallSA’ export and taking a look at the registered services.
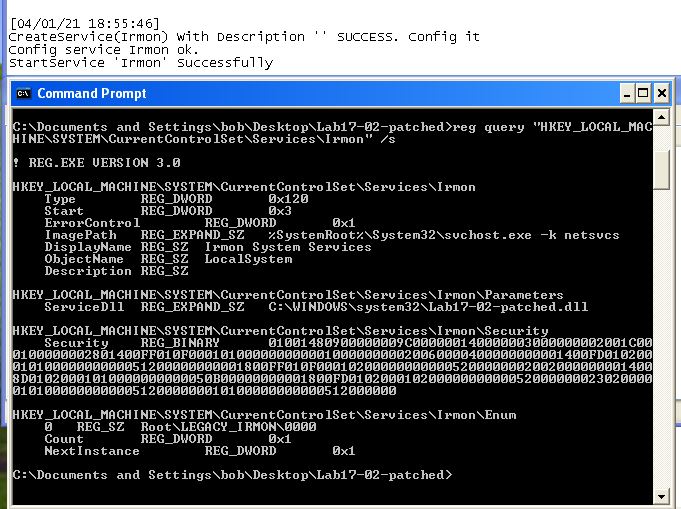
From this we can conclude that ‘InstallSA’ likely means ‘Install Service A’ and is used to install the malware as a Service DLL into a given service specified within netsvcs, or a new service called ‘Irmon’ if no parameter is provided.
- InstallSB
Before diving into ‘sub_1000DF22’ which performs the crux of InstallSB, we can examine ‘sub_10005A0A’ which occurs before it.
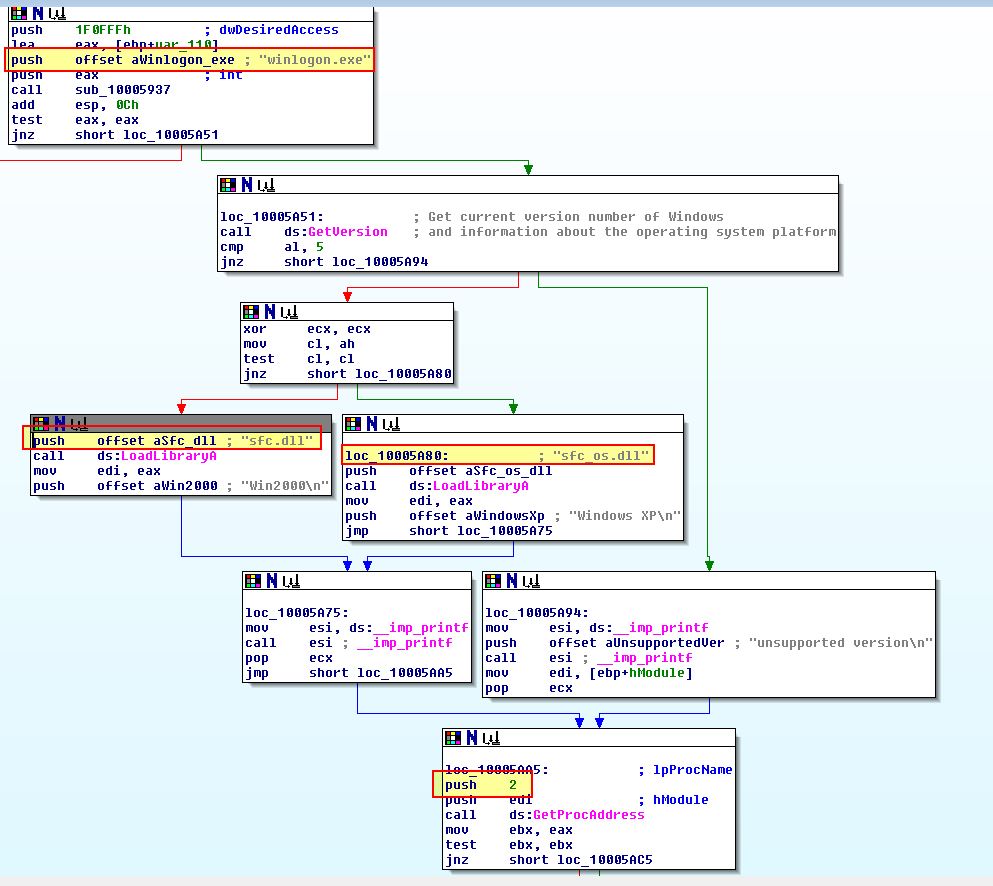
Here we can see something similar to what we saw in Lab12-04.exe question 3 where sfc_os.dll or sfc.dll are being loaded in an attempt to disable Windows File Protection through the ‘SfcTerminateWatcherThread’ export ‘2’.
Examining the start of ‘sub_1000DF22’ reveals what looks to be similar to InstallSA, only this time it is looking for the service name NtmsSvc if no parameters are passed.
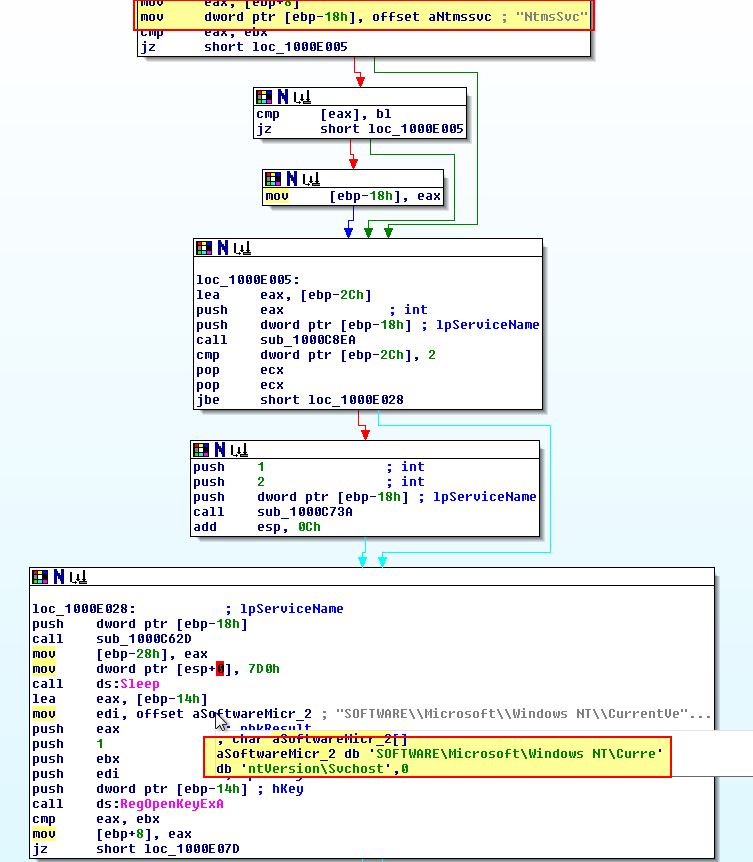
This remains consistent in the way it is checking for services as part of netsvcs if an argument is specified.
If we continue analysis it appears as if this backs up the existing service to a new service called ‘ServiceMainbak’ prior to attempting to install itself. This is likely to allow removal of the implant at another date and prevent impacting the system.
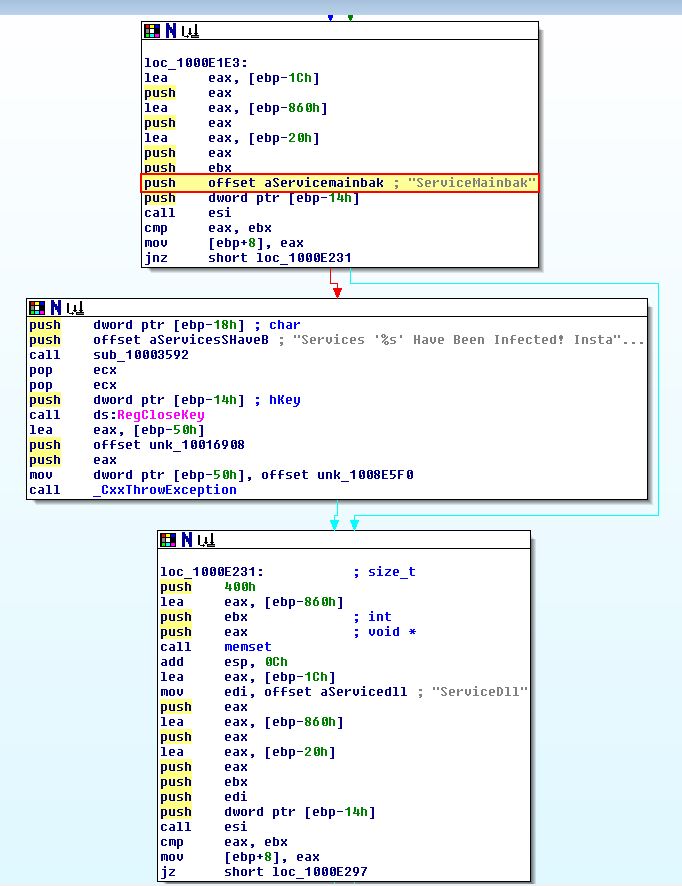
Continuing through this execution we see what looks to be a fork, or crossroad where one of the paths more resembles updating to an existing installation of the malware, and the other more resembles a fresh infection taking place.
Following the fresh installation fork, we can see evidence that this will be copying the malware and setting up persistence in the form of a service.
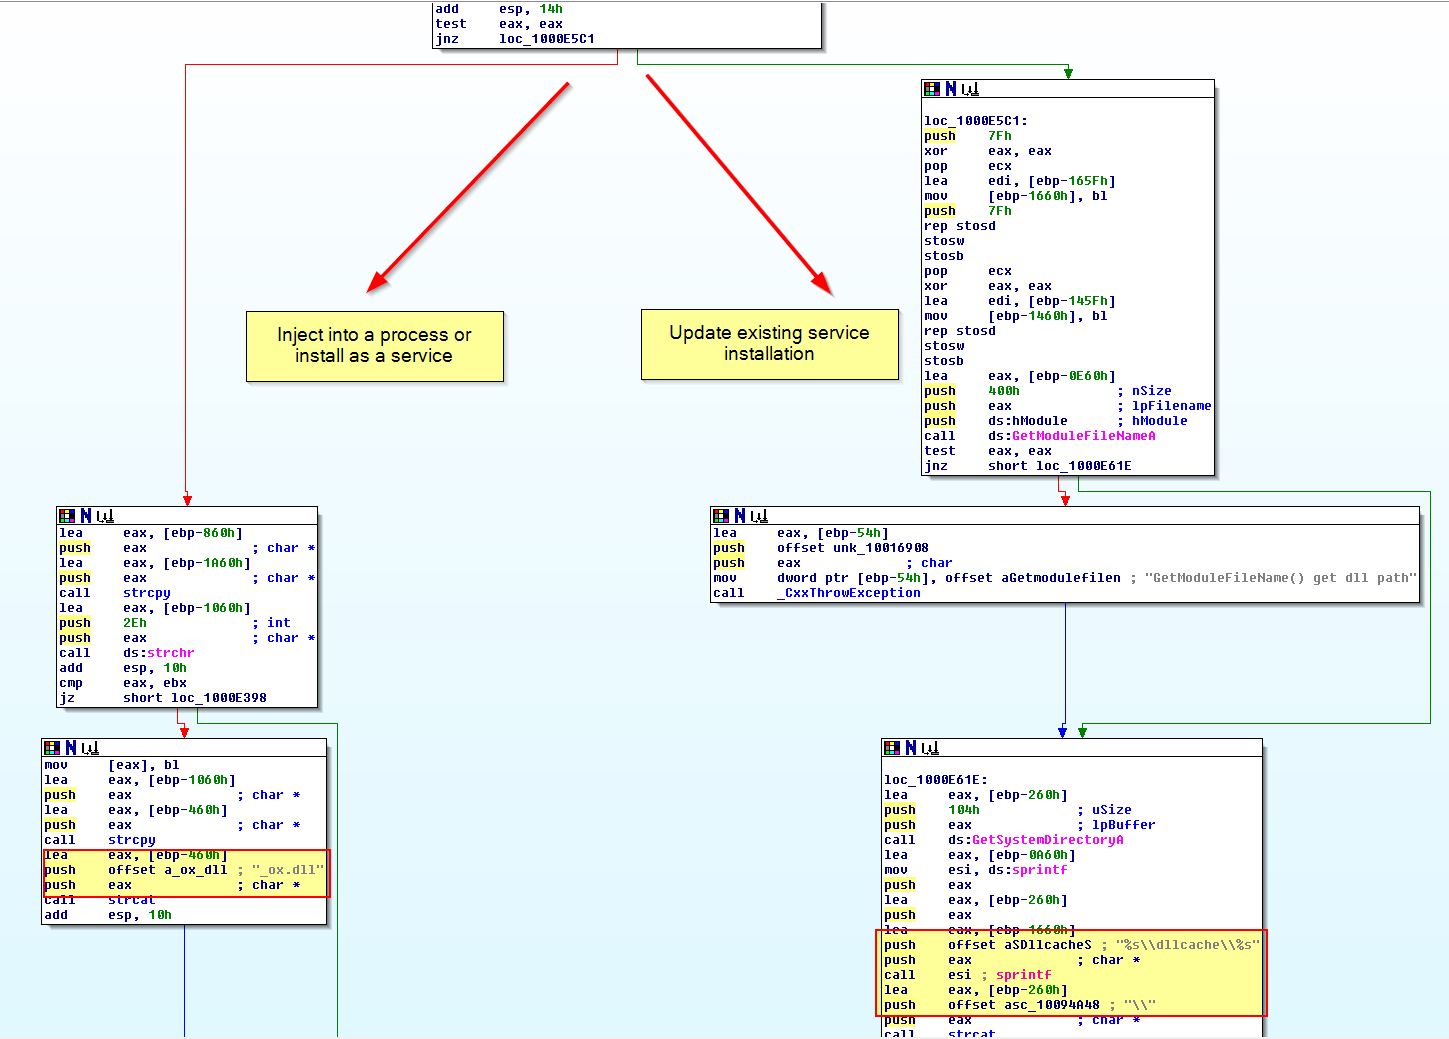
What is interesting here is we can see another check taking place to see a call to ‘sub_1000D10D’ prior to a call to ‘sub_1000C564’.
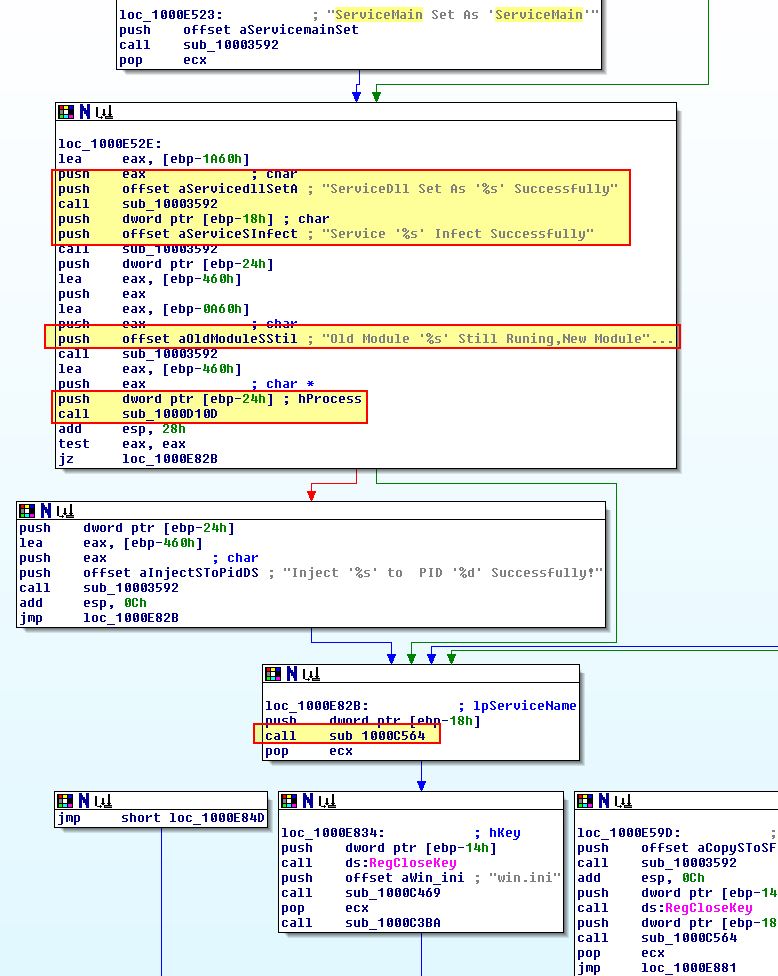
If we examine ‘sub_1000D10D’ closer we can see that this has all the trademarks of a remote thread being used to inject into a process, the same technique as used in InstallRT.

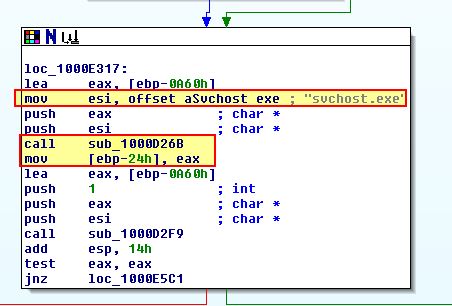
Of interest is what process this is injecting into, in this instance the process specified is stored at [ebp-24h]. If we look back where the first fork was we can see that this is actually an instance of svchost.exe which has been located within ‘sub_1000D26B’.
‘sub_1000C564’ looks to be more around starting the malicious service we just attempted to setup to trigger the payload.
From this we can conclude that ‘InstallSB’ likely means ‘Install Service B’ and is used to install the malware as a Service DLL into a given service specified within netsvcs, or an existing service called ‘NtmsSvc’ if no parameter is provided. This also attempts to inject into svchost.exe.
Lab 17-3
Analyze the malware Lab17-03.exe inside VMware. This lab is similar to Lab12-02.exe, with added Anti-VMware techniques.
Question 1
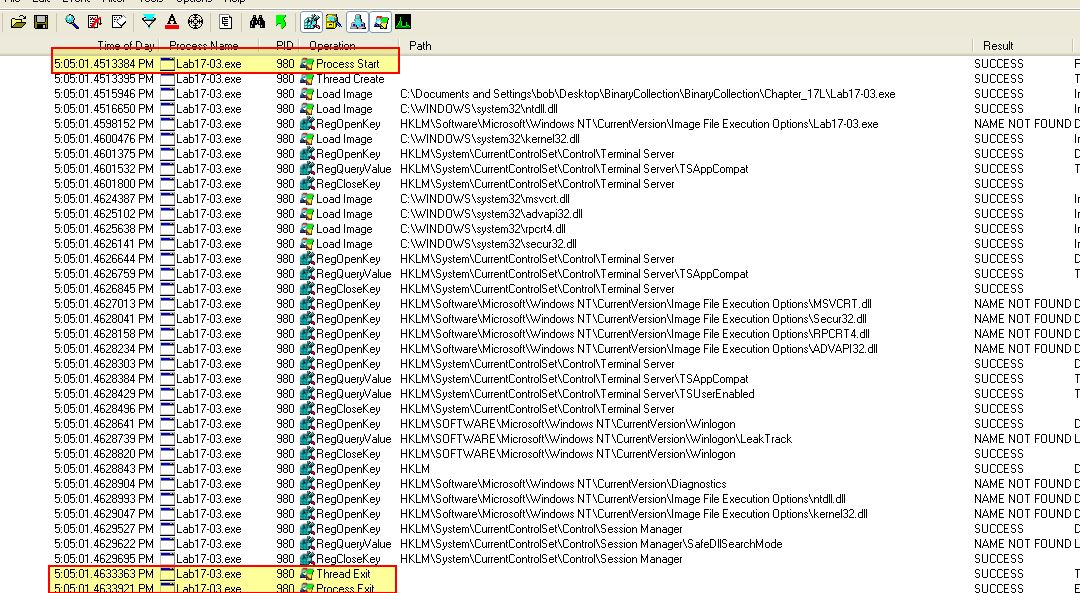
What happens when you run this malware in a virtual machine?
Answer 1
Opening this in Vmware and running it we can see that it terminates upon running without any indication that process hollowing has occurred within svchost.exe (which is what we saw in Lab12-02.exe).
Question 2
How could you get this malware to run and drop its keylogger?
Answer 2
Opening this in PE-bear we can see that this contains a similar resource to Lab12-02.exe which was previously identified as being a keylogger.
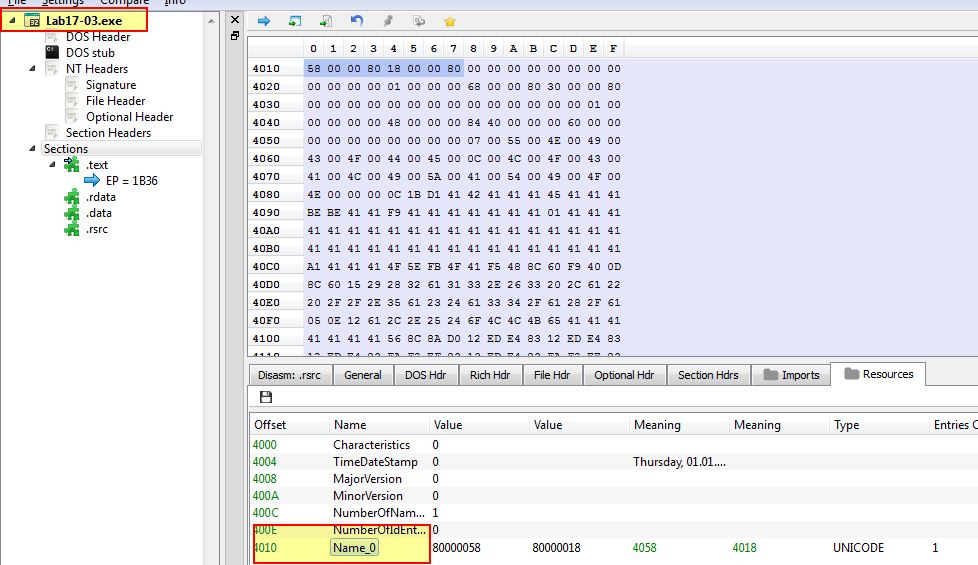
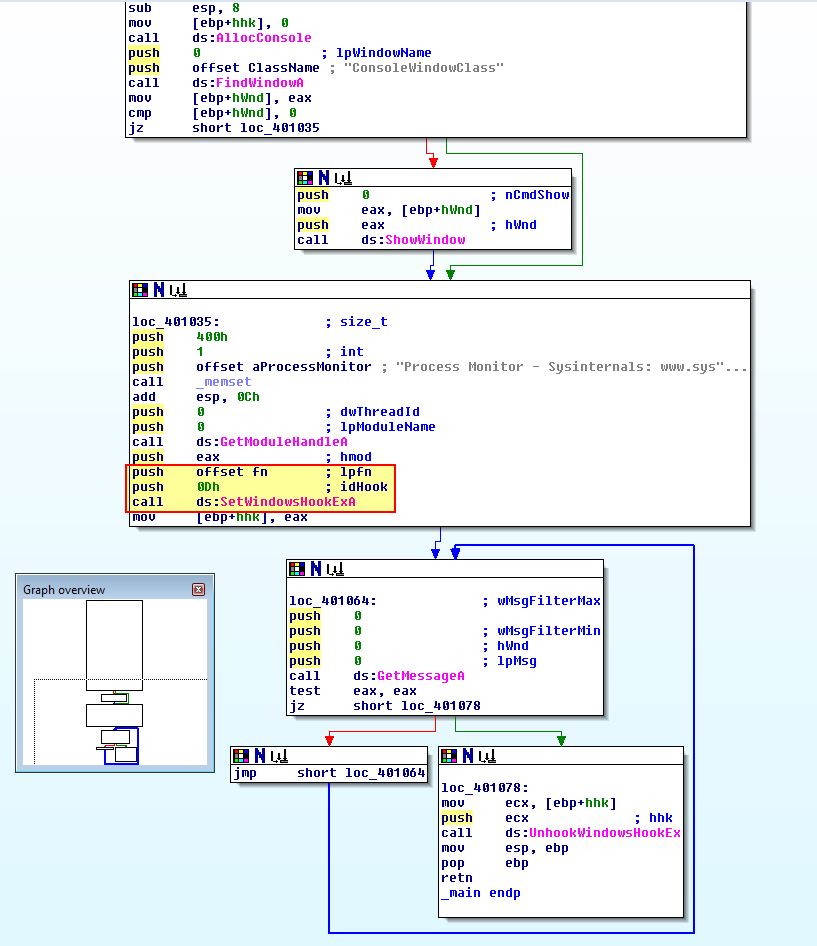
Based on this it’s likely that some Anti-VM techniques have been implemented to prevent dropping of the keylogger. Opening this in IDA we can look at cross-references to ‘FindResourceA’ to find where this resource is likely being used.
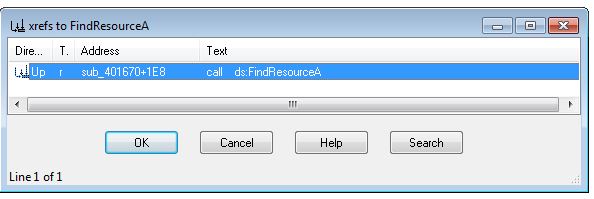
This looks to be getting extracted and decoded through ‘sub_401670’. Working our way back by examining cross-references to ‘sub_401670’, we can see this is called within the main method, with at least 3 other checks taking place before this which have process flows that bypass the injection routine and may be Anti-VM checks. The call proceeding this (‘sub_401400’) looks to perform the actual injection, and as such there looks to be at least 2 jumps we want to take, and 2 jumps we don’t want to take highlighted in green and red respectively.
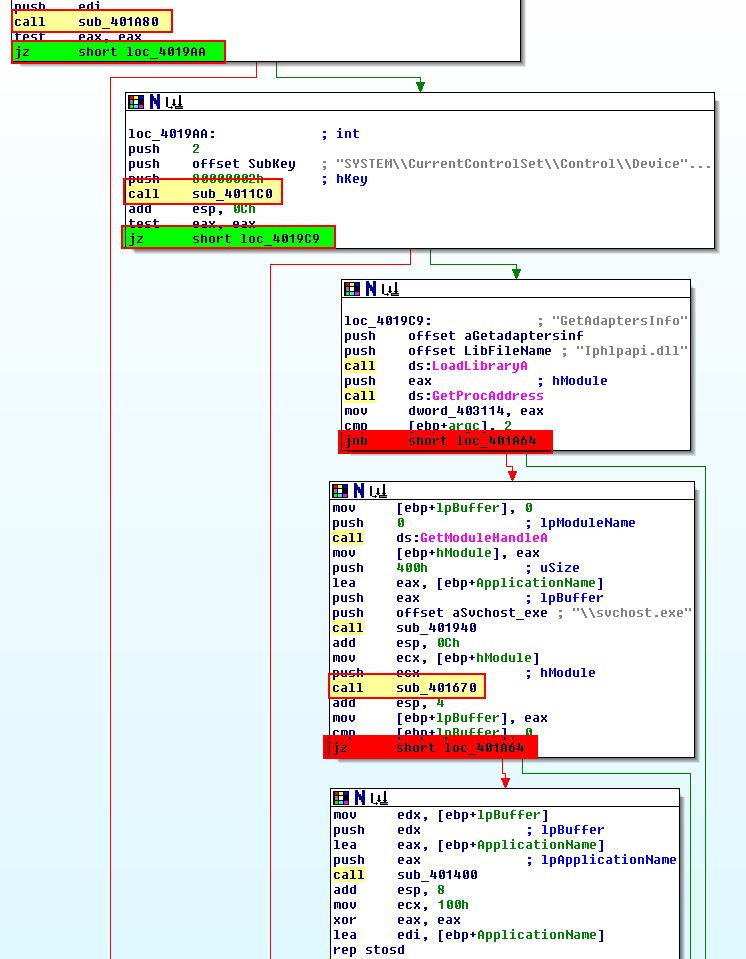
Within ‘sub_401400’ there’s one jump we want to occur (highlighted in green) in particular which may be a part of another Anti-VM check.

Enabling line-prefixes by using Options > General > Line Prefixes, we can pinpoint where we need jumps to be taken and where we need the jumps to fail.
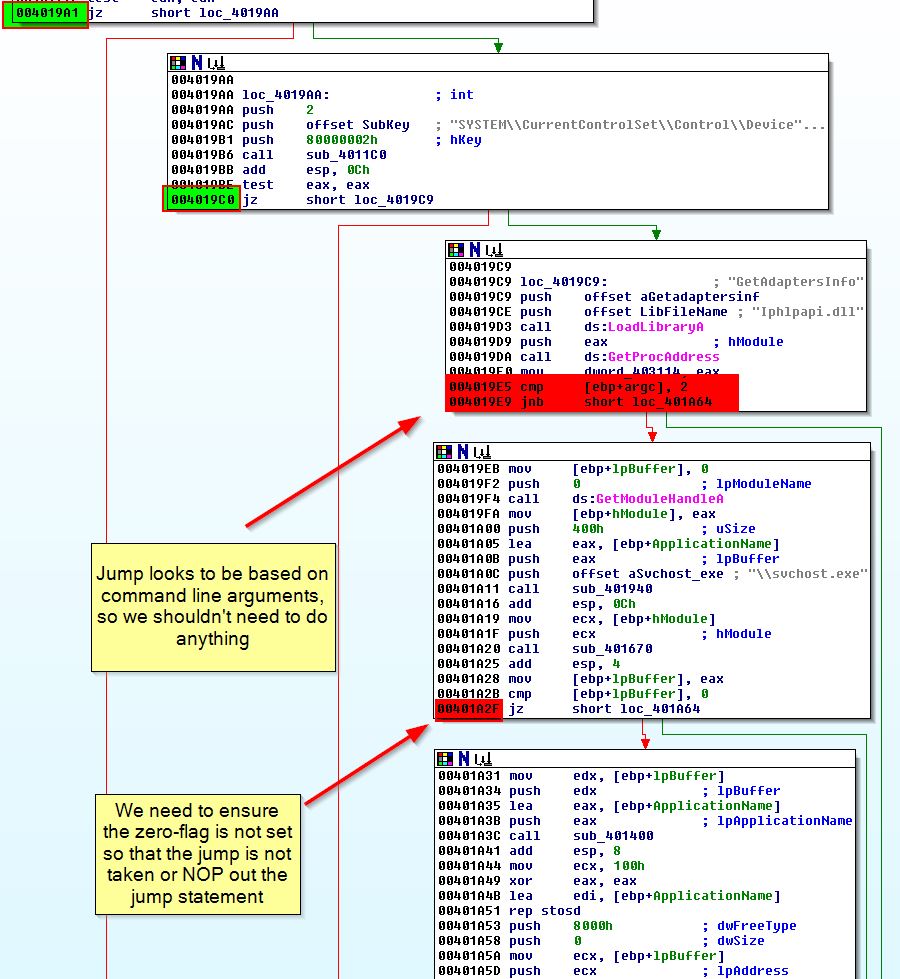
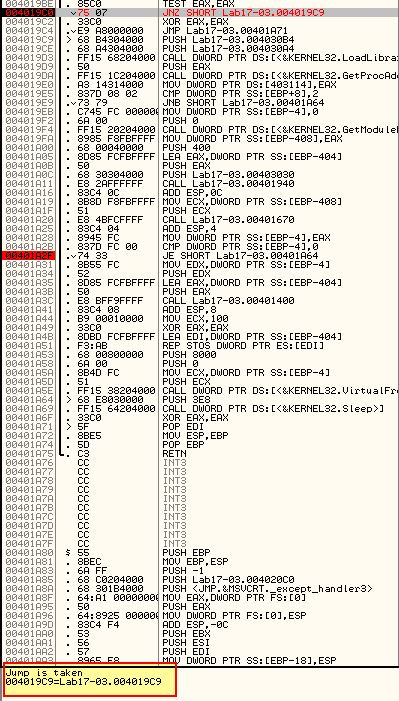
By running this in OllyDbg and setting breakpoints at the below addresses, we can modify the jump flags as appropriate to ensure our flow is not interrupted.
- 0x4019A1 (Jump needs to be taken)
- 0x4019C0 (Jump needs to be taken)
- 0x401A2F (Jump must not be taken)
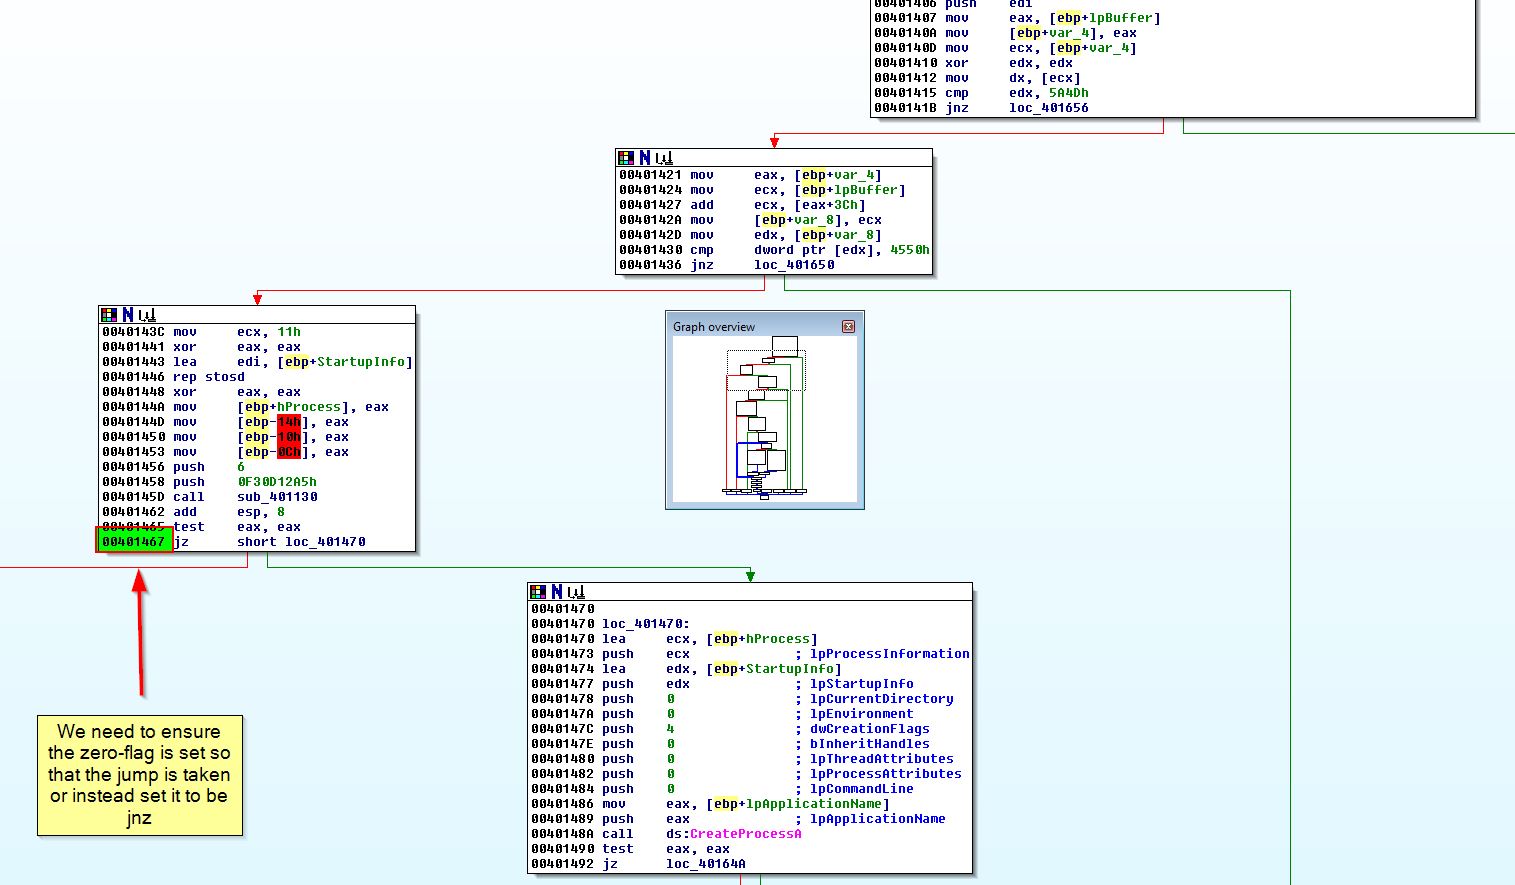
- 0x401467 (Jump needs to be taken)
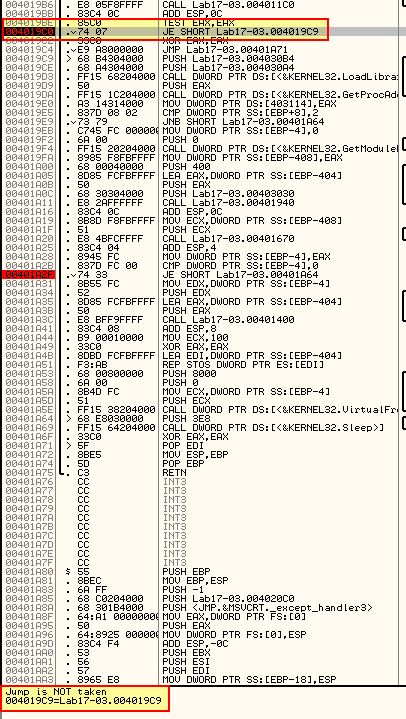
Debugging the program using F9, we reach our first breakpoint (0x4019A1).
As we need the jump to be taken, we can use ‘assemble’ (space) at this jump to change the jump from ‘JE’ to ‘JNZ’ to force the jump to be taken.
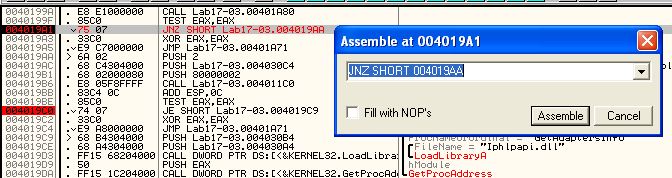
Continuing with the debugger using F9, we reach our second breakpoint (0x4019C0).
Once again the jump will not be taken, so we assemble at this location and change the jump from ‘JE’ to ‘JNZ’ to force the jump to be taken.
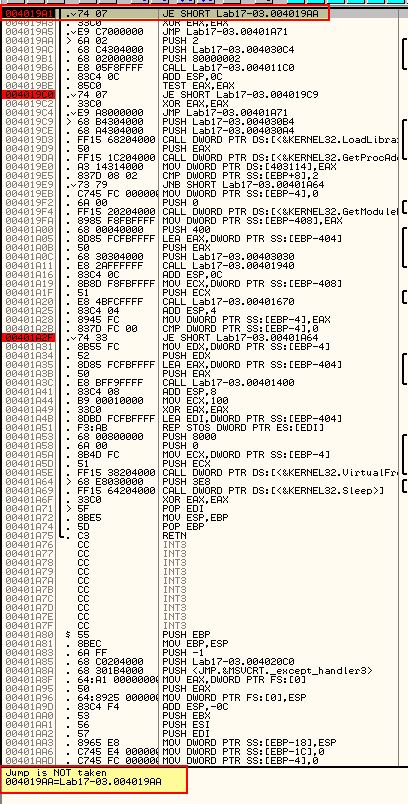
Pressing F9 once again we reach our third breakpoint (0x401A2F).
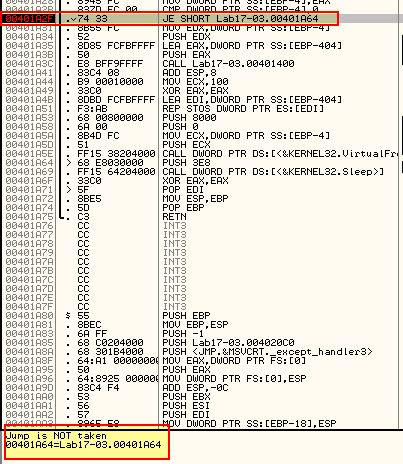
In this instance it looks like the jump will not be taken. As this is what we want to occur we can just continue with F9 hitting our final breakpoint (0x401467)
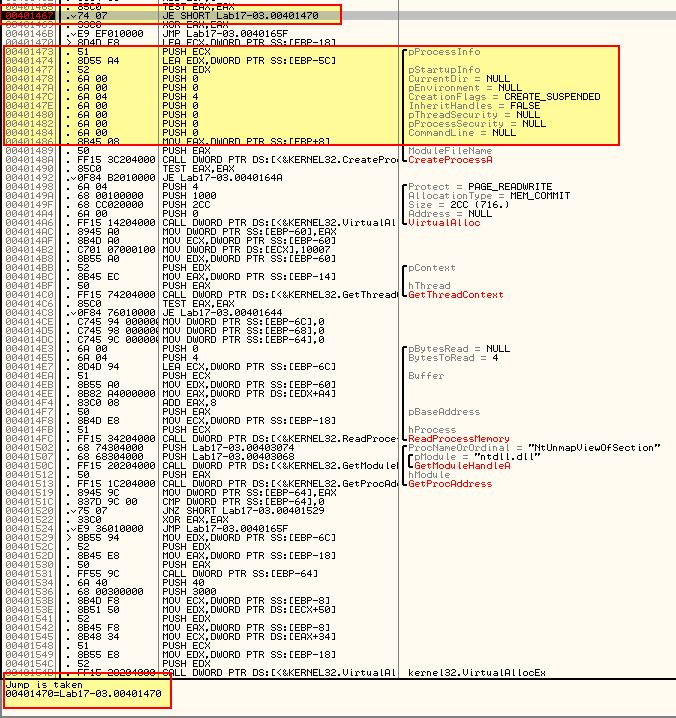
Here we can see we’ve made it to the section that looks to be creating a suspended process ready for hollowing out to inject the keylogger into. It’s also shown that we will be taking the jump which is what we need to occur.
If we now run procmon and filter for svchost.exe in addition to lab17-03.exe.

We can then press F9 and see what happens. At this point it’s also worthwhile to examine process execution through Process Explorer.
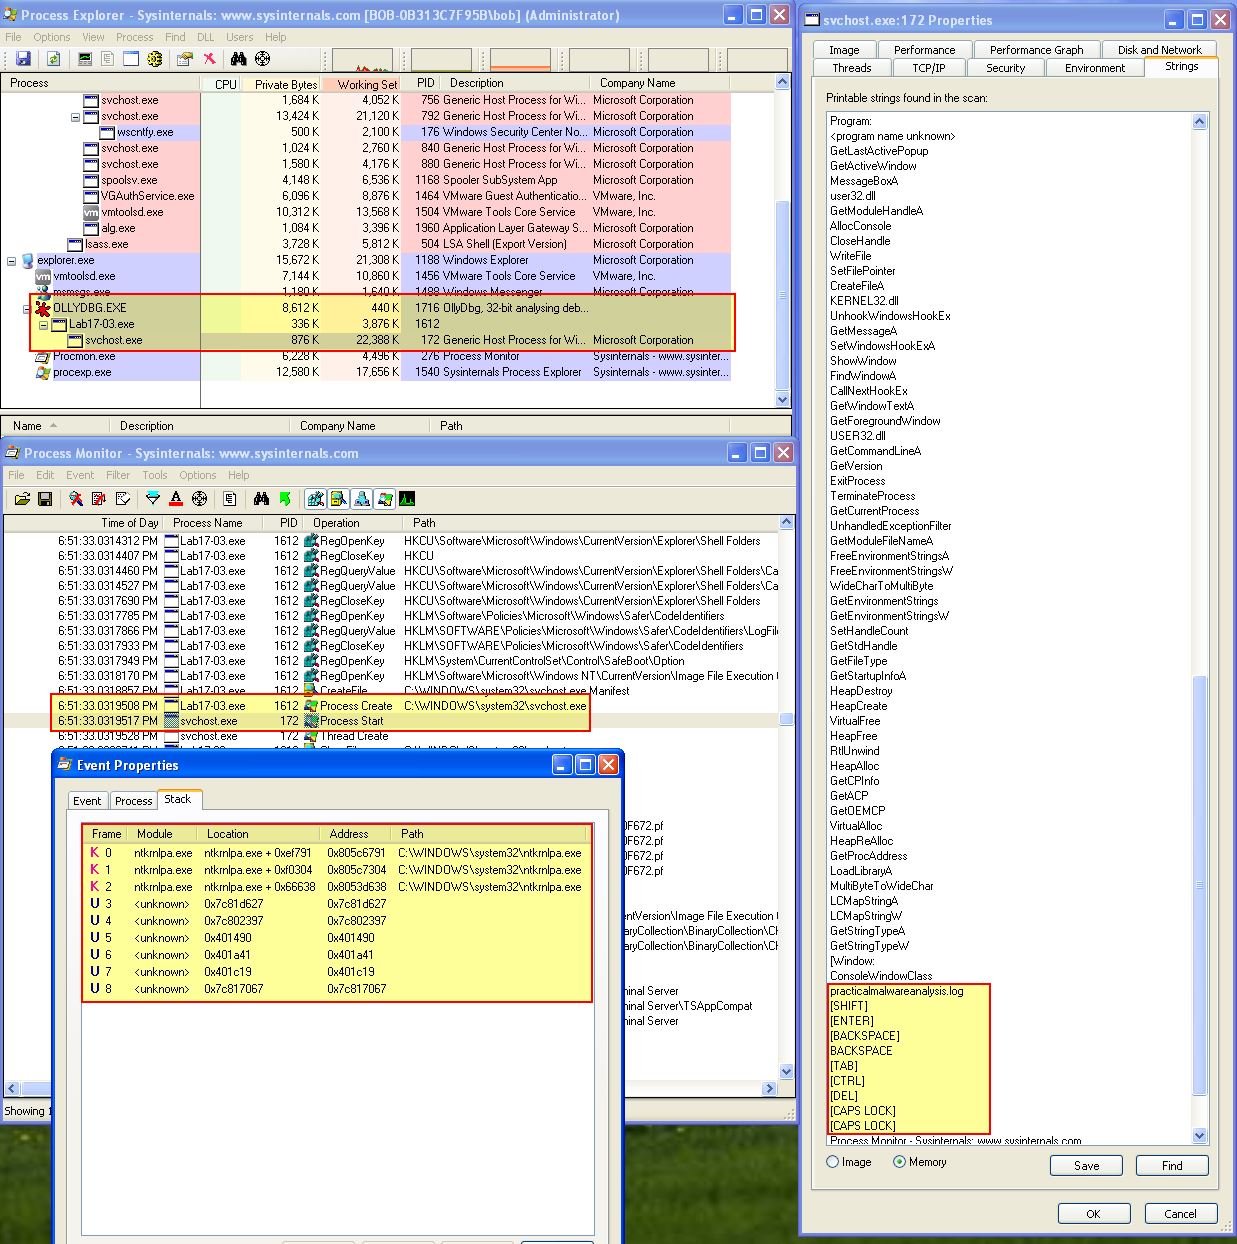
The above is interesting as we can clearly see that Lab17-03.exe has launched svchost with an unusual Call Stack, and if we view the memory of svchost.exe we can see reference to the keylogger file we identified back in Lab12-02.exe. This file is also now on disk to examine. Using Process Explorer we can take a full dump svchost.exe memory which can later be used to retrieve the keylogger as it exists in memory (Right Click > Create Dump > Create Full Dump).
If we want to analyse the dump file we could open it in WinDbg using File > Open Crash Dump.

From here we can use ‘LM’ to list the modules and find where svchost starts and finishes.
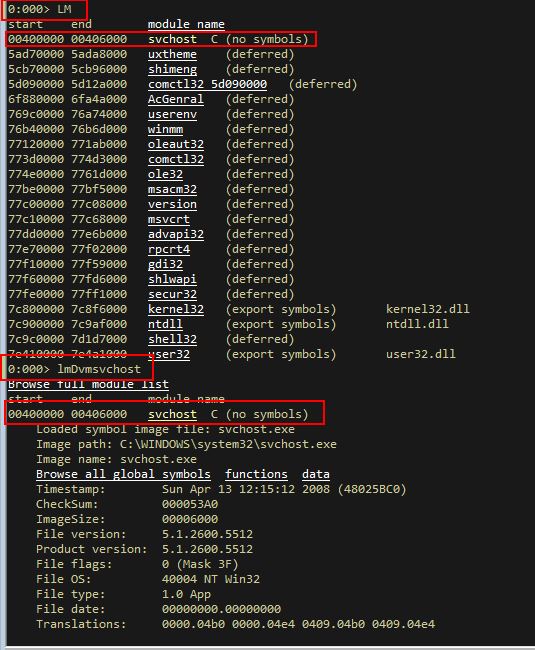
We can also use ‘.imgscan’ to scan and find images in this memory dump similar to ‘LM’.
.imgscan
At this point we know where the svchost.exe process resides which has been hollowed into and how big it is, and can use WinDbg to write this out to an executable file by using ‘.writemem’. The syntax is:
.writemem <outputfile> <start> <end>
.writemem C:\Users\IEUser\Desktop\keylog.exe 00400000 00407000

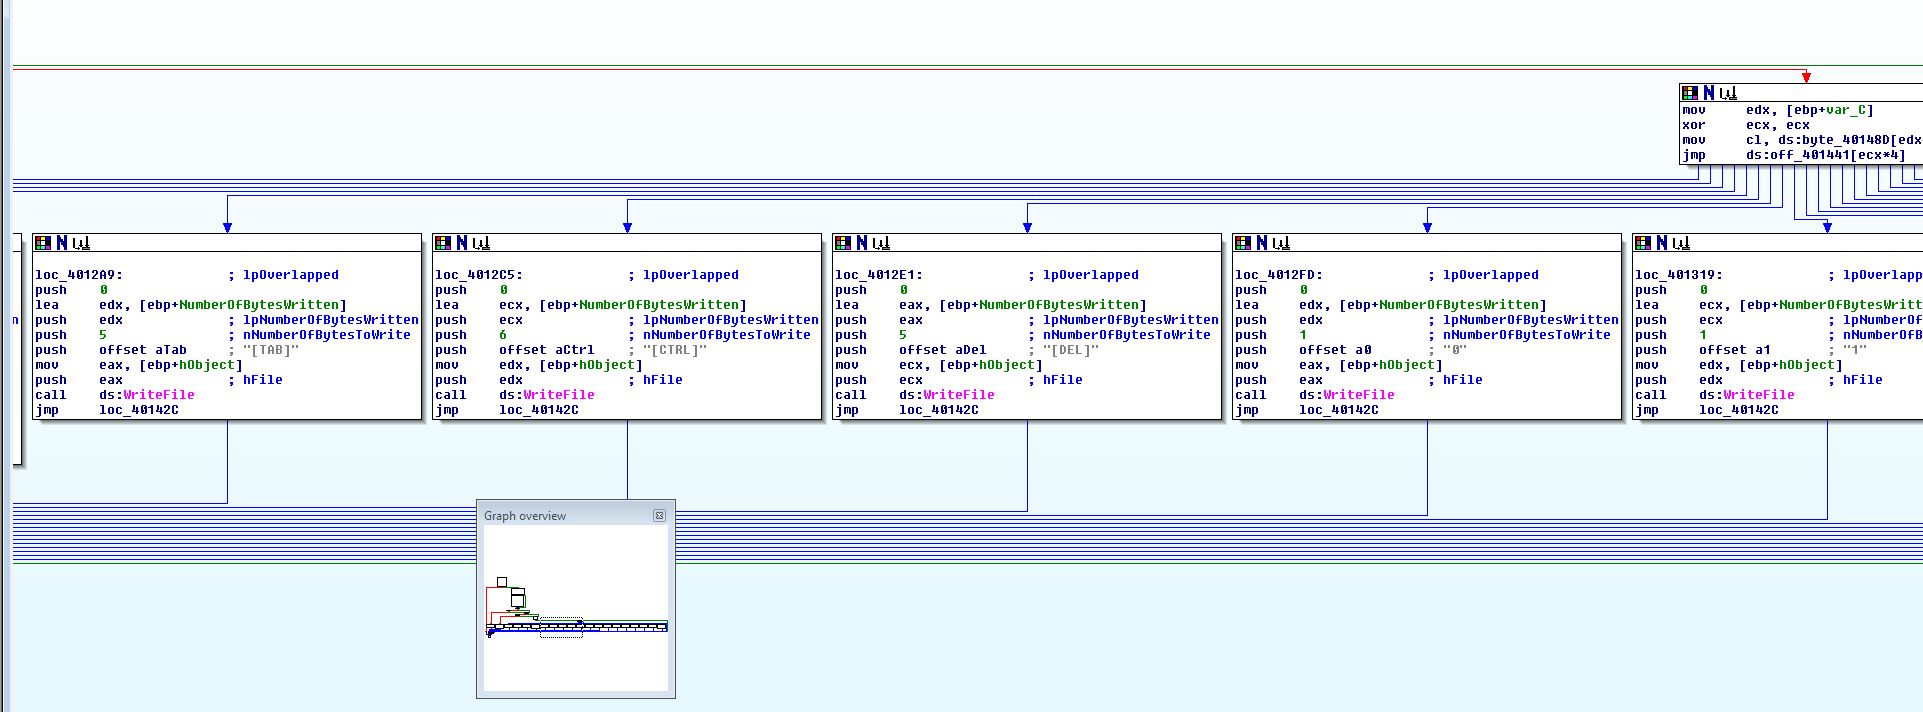
Although we get an error, the crux of the code is there and can now be disassembled successfully in IDA. This may initially seem small; however, the keylogger is present within the offset ‘fn’.
Looking specifically within sub_4010C7 of offset ‘fn’, we can see a familiar disassembled function involved in keylogging.
At this point we’ve well and truly got the malware to run and drop its keylogger, and have extended this analysis by dumping it from memory for disassembling.
Question 3
Which Anti-VM techniques does this malware use?
Answer 3
To determine what Anti-VM techniques are in use we need to examine what determines whether jumps are taken as identified in the previous question.
- 0x4019A1
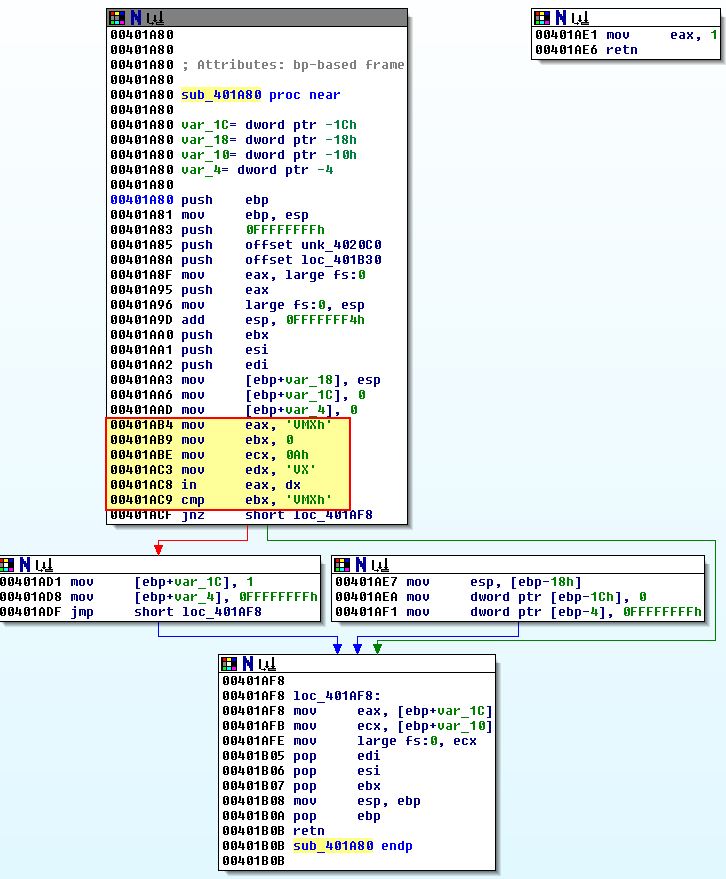
This Anti-VM check is based off of a call to ‘sub_401A80’. Examining this we can see it uses the ‘IN’ Anti-VM technique to query the IO Communication Port for known Vmware values the same as we identified in a previous lab.
- 0x4019C0
This Anti-VM check is based off of a call to ‘sub_4011C0’ with an argument of ‘SYSTEM\CurrentControlSet\Control\DeviceClasses’.
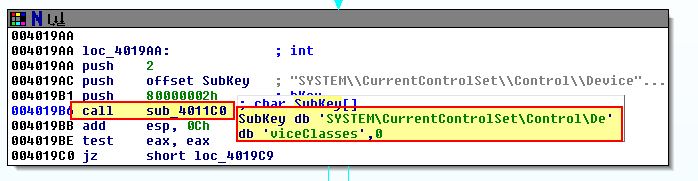
Examining this we find a looping function that looks to be comparing any registry keys under the provided location to the string ‘vmware’ recursively.
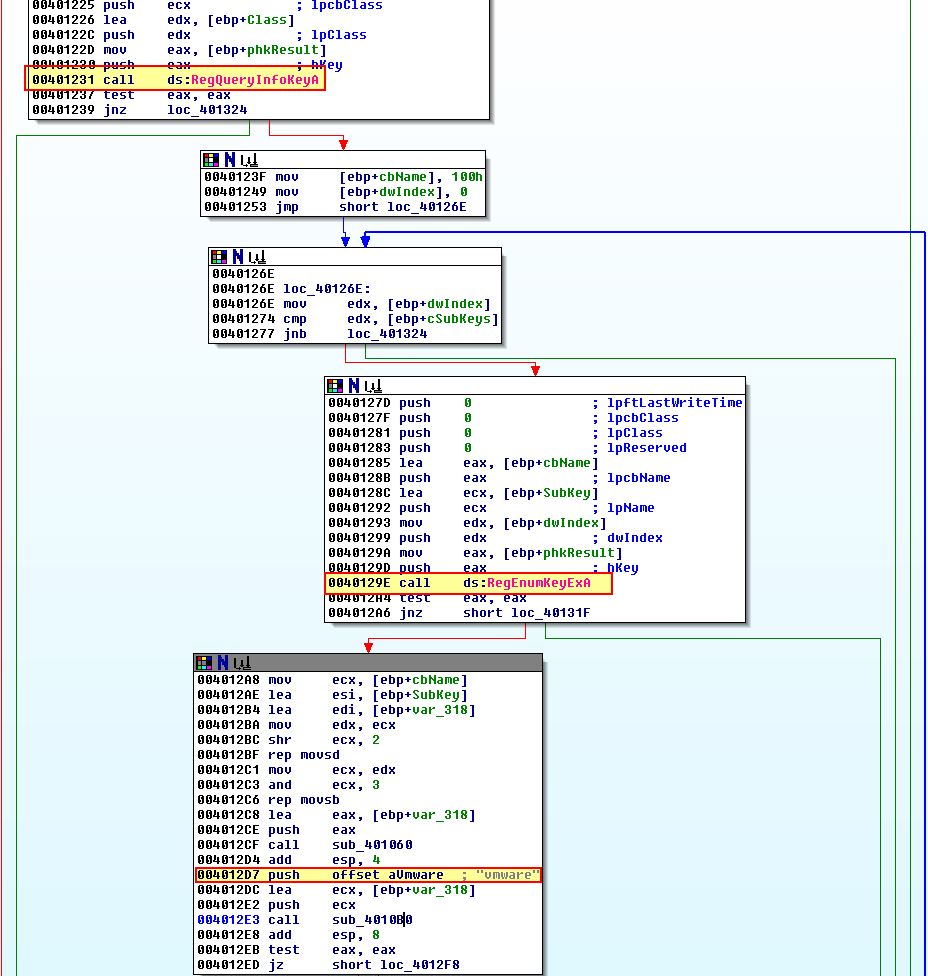
Based on this we can infer it is looking for some sort of system residue that would indicate this host is running within VMware.
- 0x401A2F
This Anti-VM check appears to be based off of a call to ‘sub_401670’; however, what is interesting is that it is preceeding what looks to be enumeration of Adapter information which hasn’t been used anywhere (stored into dword_403114).
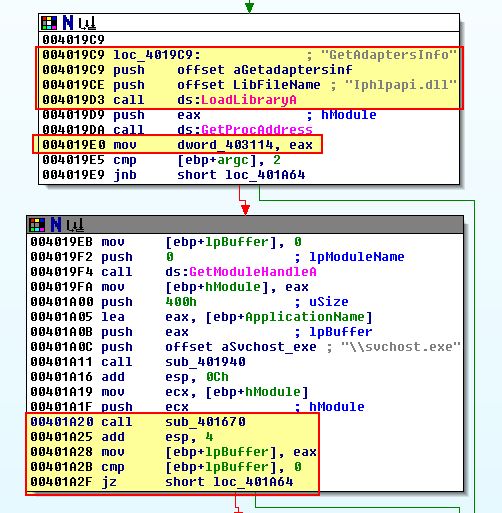
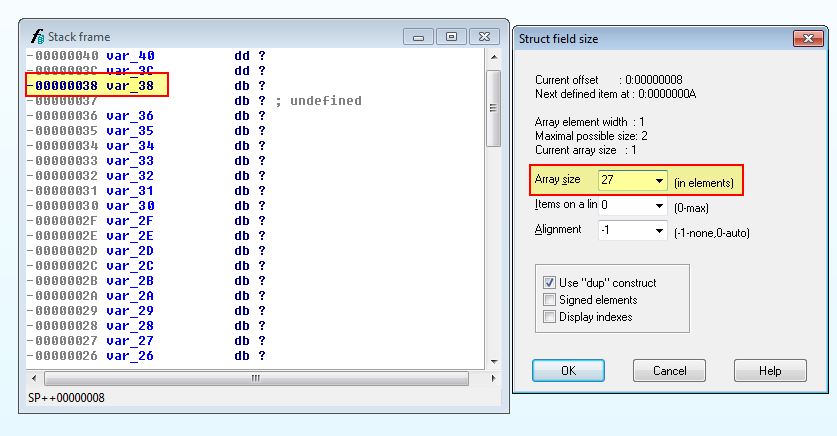
If we look at cross-references to dword_403114 we see that it is referenced twice within ‘sub_401670’ which makes this subroutine a good spot to start. Examining the operations before the first reference of dword_403114 reveals that there’s a number of mov operations on 27 different bytes.
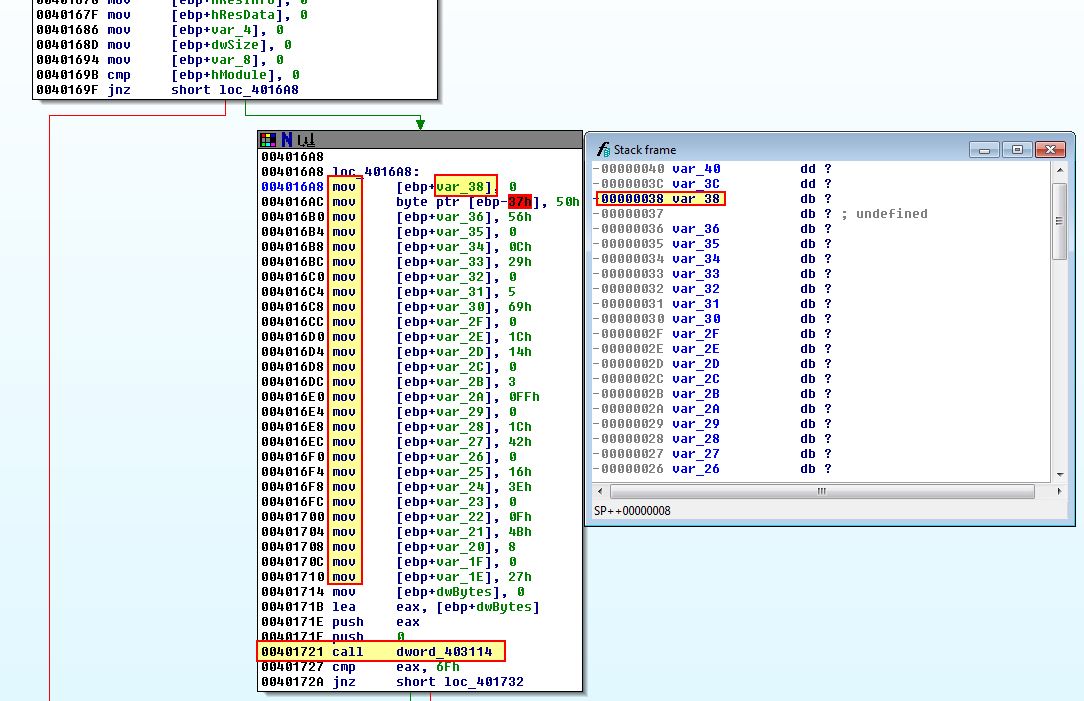
By double clicking the variable reference and modifying the stack frame, we can set var_38 to an array size of 27 given the bytes seem to all be related.
Where any call to ‘dword_403114’ is we can assume it is making a call to the GetAdaptersInfo API based on what we discovered when dword_403114 was first defined. In this instance it needs to be passed 2 parameters.
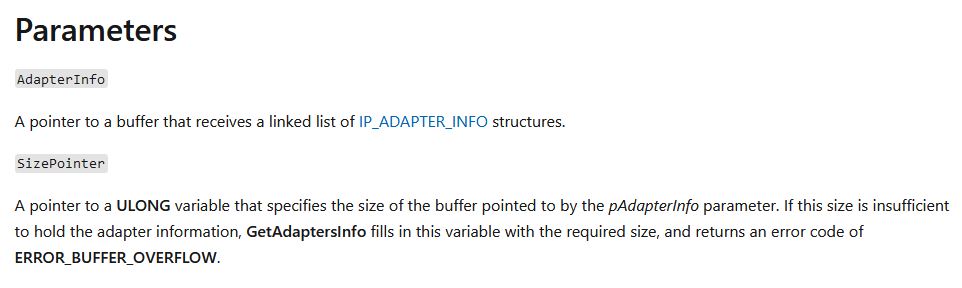
- AdapterInfo
This points to a buffer containing the a linked list of IP_ADAPTER_INFO structures.
- SizePointer
This is a ULONG variable containing a buffer size used by pAdapterInfo.
In the first call to this EAX ([ebp+dwBytes]) and ‘0’ are pushed to the stack before the call which resulted in a linked list containing nothing, and a size being specified as [ebp+dwBytes]. In turn [ebp+dwBytes] is then filled with the required buffer size to store a linked list of IP_ADAPTER_INFO structures.
In the second call [ebp+dwBytes] is once again used, this time with a proper linked list being passed. After this we see what looks to be unusual comparisons taking place.
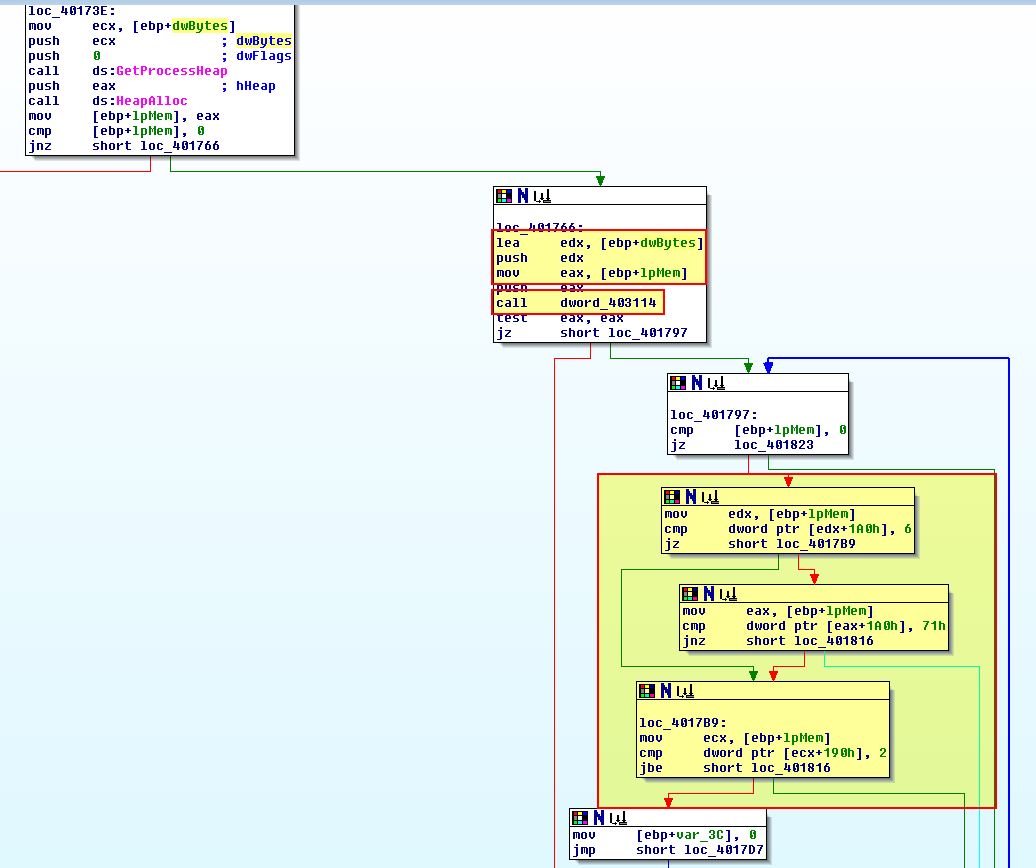
These comparisons are contained within a loop which takes the linked list of IP adapter information from [ebp+lpMem], and if we look closely we can see that these comparisons map to elements within the IP_ADAPTER_INFO structure as a ‘Type’ at [eax+1A0h].
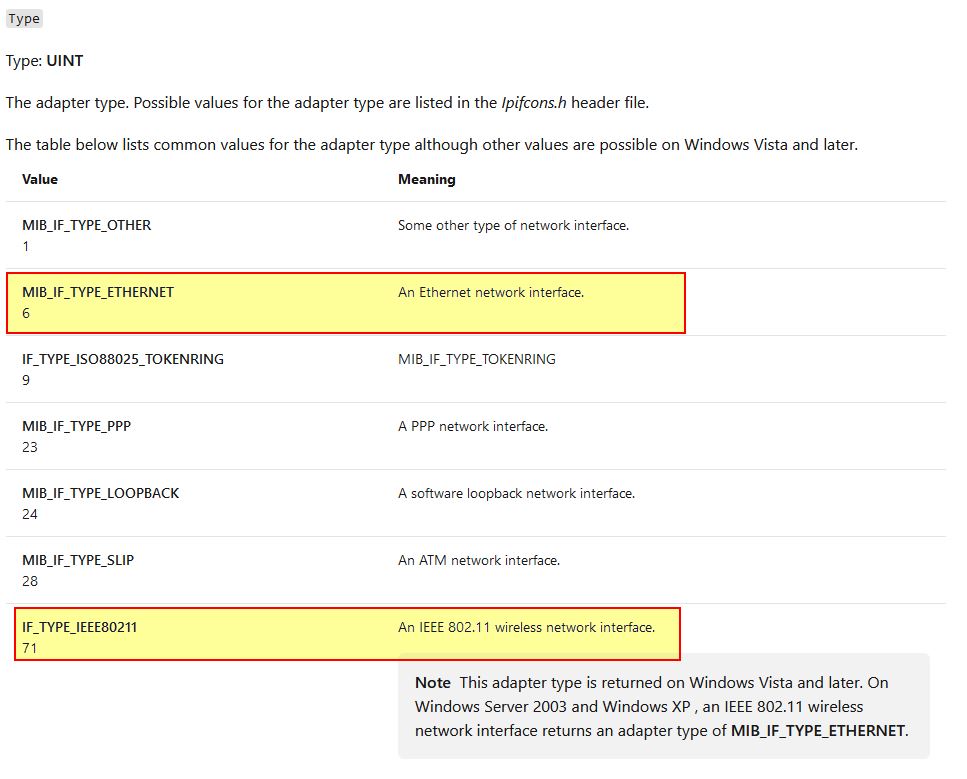
From this we know it is looking for an adapter which is either ethernet or WiFi with a length greater than 2 (this correlates to what is at [ecx+190h]). If we look down to where the looping function of enumerating adapters concludes, we can see more comparisons taking place, but this time against an offset 0x194 of [ebp+lpMem] (a linked list of IP Adapter information).
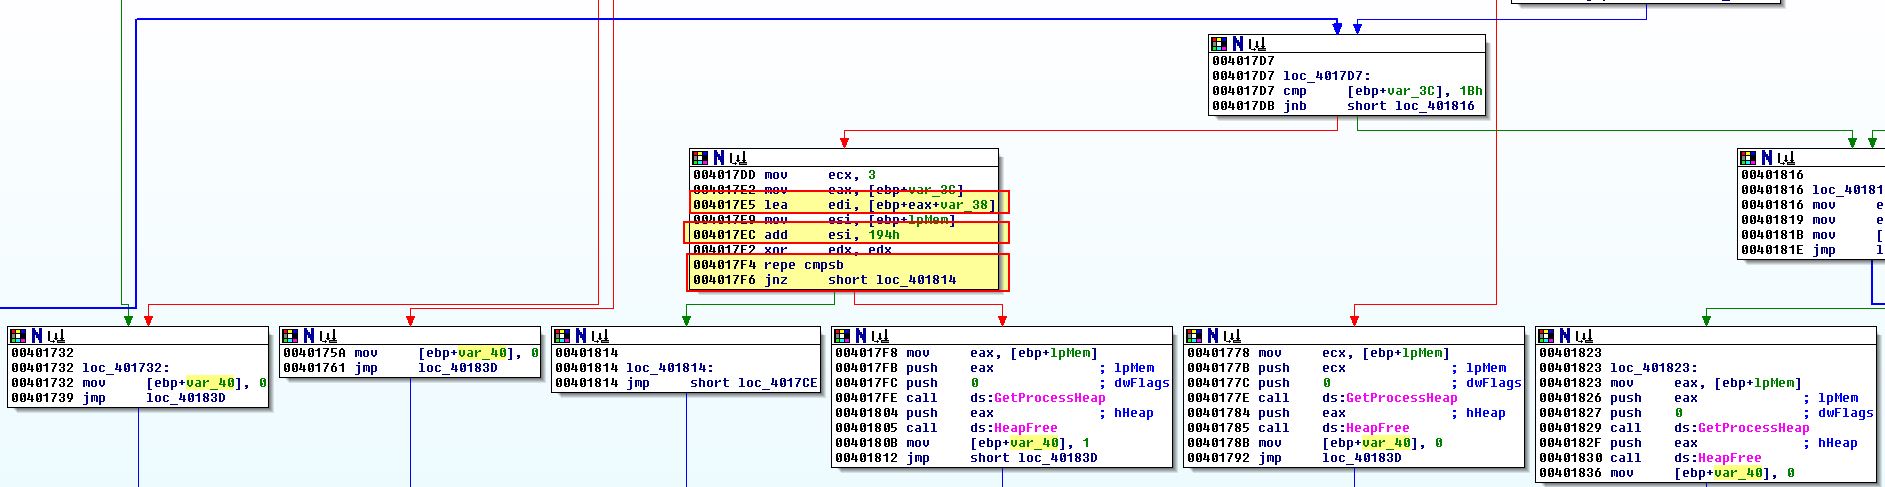
Given we know the offset 0x190 was the IP_ADAPTER_INFO AddressLength, we can gather based on the structure that 0x194 will contain the ‘Address’ of the Adapter, or more specifically its MAC address. Something that should be noted is we see reference to var_38 which is the array of 27 characters we defined not long ago. Based on these characters we can infer that the first 3 characters of them are being compared to the gathered VM adapter MAC address. The characters we have in this array are as follows:
0
50h
56h
0
0Ch
29h
0
5
69h
0
1Ch
14h
0
3
0FFh
0
1Ch
42h
0
16h
3Eh
0
0Fh
4Bh
8
0
27h
Putting these in order we find the following comparisons on MAC addresses is taking place:
- 00:50:56
- 00:0C:29
- 00:05:69
- 00:1C:14
- 00:03:FF
- 00:1C:42
- 00:16:3E
- 00:0F:4B
- 08:00:27
If we look these up online, for example using maclookup, we find that most resolve to Vmware in addition to Oracle and other virtualisation vendors indicating this is likely an Anti-VM check against 9 MAC addresses which would indicate it is running in a VM.
- 0x401467
This final Anti-VM check is based off of a call to ‘sub_401130’. Examining the call to this we can see it is passed ‘0x0F30D12A5’ as an argument which is interesting.

Examining inside of this we find that this takes a snapshot of running processes and there are 2 more subroutines called (sub_401060 and sub_401000) before a comparison is made against the passed argument.
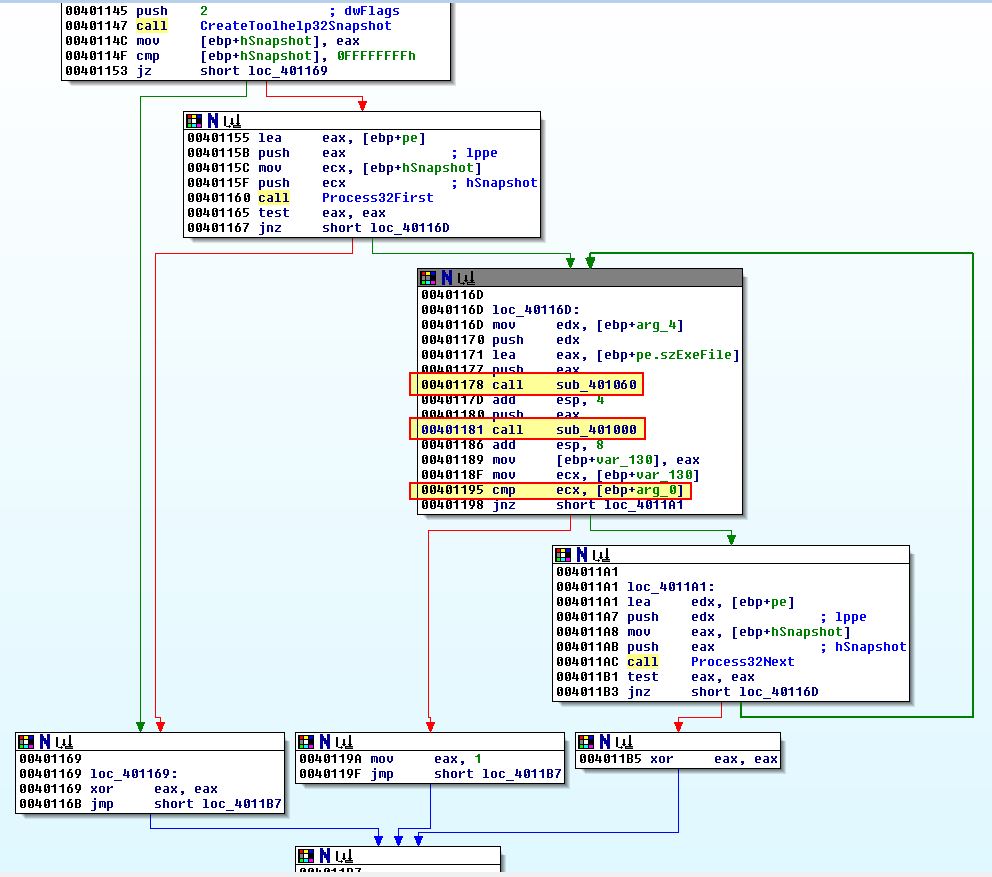
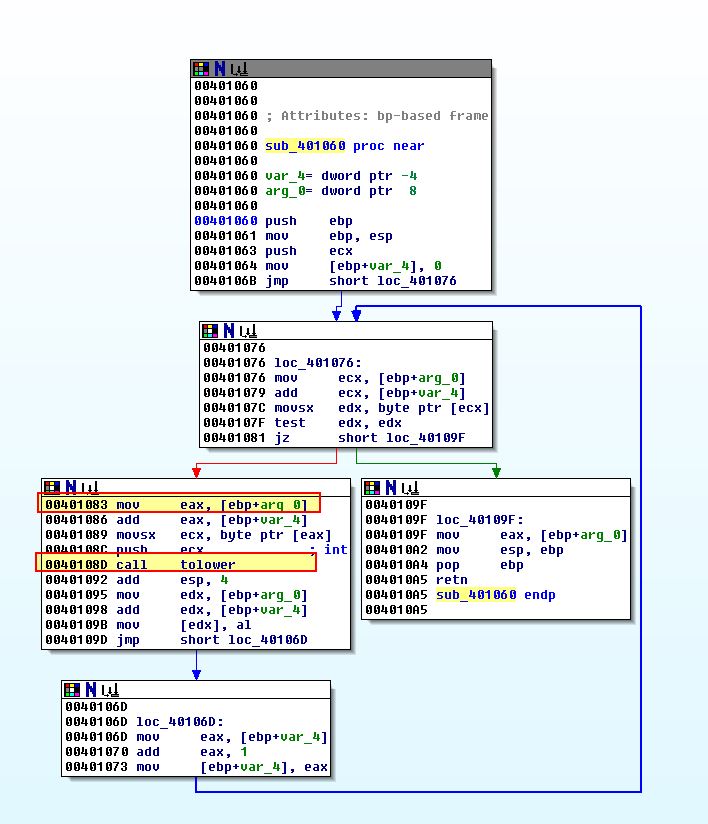
Examining sub_401060 we can see a familiar construct which looks to convert the given process EXE file names to lowercase.
Examining sub_401000 we can see another familiar construct, this time what looks to be a hashing function.
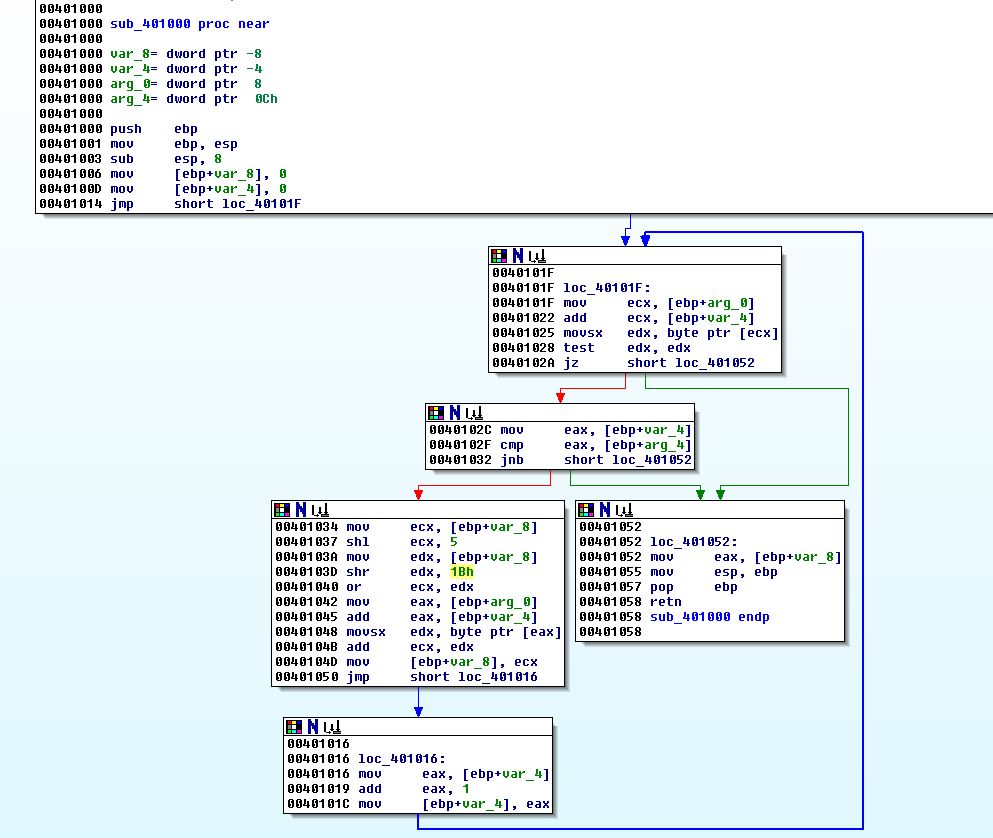
It would take a bit of time to properly reverse this hashing function, but given the theme we are seeing it is likely that this is enumerating processes running which contain ‘vmware’. We can also run this in a debugger setting breakpoints at 0x401181 and 0x401186 to see the before and after hash comparisons taking place.
Question 4
What system changes could you make to permanently avoid the Anti-VM techniques used by this malware?
Answer 4
Permanently avoiding all of these Anti-VM techniques is a challenge; however we can fix most of the low hanging fruit by:
- Removing VMware tools.
- Removing any registry keys under SYSTEM\CurrentControlSet\Control\DeviceClasses with the string ‘vmware’.
- Changing the MAC address to one not being checked for.
- Ensuring no process is running starting with the string ‘vmware’.
Question 5
How could you patch the binary in OllyDbg to force the Anti-VM techniques to permanently fail?
Answer 5
If we look back at question 2 we patched the binary in memory using OllyDbg to force the Anti-VM techniques to fail; however, this was in context to our current running process and OS/VM. To make the Anti-VM checks we previously identified fail, we just need to ensure the correct jumps are taken for the above Anti-VM checks no matter how or where the malware is run.
Starting with the first jump at 0x4019A1, we can change the operation before it to ensure it is zero as the jump needs to be taken. This bypasses the first Anti-VM check indefinitely.
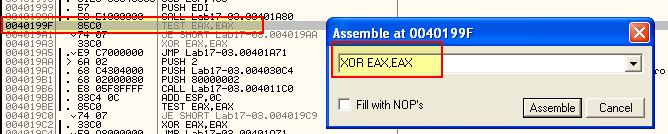
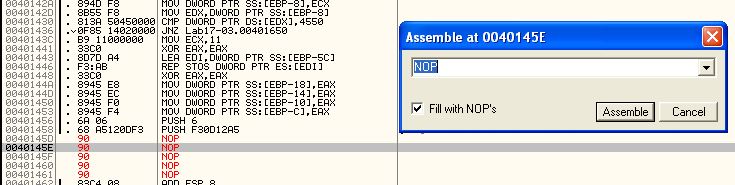
This same technique can be used at the operation before 0x4019C0 to ensure it is zero and the jump will be taken. The next jumps of interest are 0x40169F and 0x401467. 0x401467 is simple as it relies on a call to sub_401130 at 0x401450 to come back with a confirmed hit on the hash string, so by changing this call to a NOP we can bypass this check.
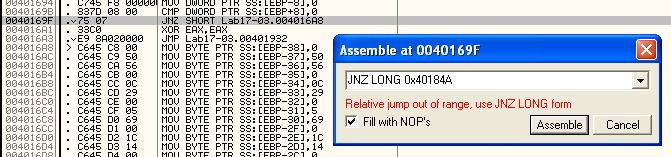
Finally the jump at 0x40169F can be modified to jump directly to 0x40184A which will bypass the MAC checks while still retaining the rest of the malware functions as required to inject shellcode.
This concludes chapter 17, proceed to the next chapter.