
Pwn Adventure 3 - Pwnie Island

📓 Overview and History
Excerpt from Official Site
Pwn Adventure 3: Pwnie Island - “Pwn Adventure 3: Pwnie Island is a limited-release, first-person, true open-world MMORPG set on a beautiful island where anything could happen. That’s because this game is intentionally vulnerable to all kinds of silly hacks! Flying, endless cash, and more are all one client change or network proxy away. Are you ready for the mayhem?!”
History
Pwn Adventure 3 was created from 2014-2015 by Rusty Wagner(Github - Twitter) who later became one of the founding members of Vector 35 (the same team who developed Binary Ninja). The initial vision for Pwn Adventure 3 at the time of its release can be found on YouTube. This also features Jordan Wiens another founding member of Vector 35 and was released as part of the annual ‘Ghost in the Shellcode’ CTF which had been created every year since it began running back in 2010. Pwn Adventure 3 premiered back in January of 2015, and what wasn’t known at the time is that this was going to be the final year that the Ghost in the Shellcode CTF would be run.
Ryan Stortz blogged back in 2022 about how this CTF came to be, how it was ahead of its time, and how it changed over many years. I’d highly recommend this as reading and it is a key source used in the history mentioned above.
The final scoreboard for Ghost in the Shellcode 2015 and the challenges it entailed is currently still available. Specifically for ‘Choose your Pwn Adventure 3’ there are 7 challenges worth 1950 points.

📃 Introduction
Notable Write-ups and Videos
2 of the most notable write-ups/videos for Pwn Adventure 3 include:
Why Do Game Hacking?
I first heard about Pwn Adventure 3: Pwnie Island from LiveOverflow. The aim of this write-up isn’t to just replicate the great work others have already done, but rather complete the challenges with my own understanding and way of thinking. This post is also used to showcase core elements and techniques involved in game hacking, and how these same concepts and techniques are used to hack computer systems in general. Many concepts discussed here also tie back to reverse engineering activities, and understanding system memory which are excellent skills to have as an IT or Cyber Security practitioner.
🌐 Getting Started
Part 1: Setting up the Game Server and Client
Although the game can be played offline, this provides limited challenges given you control the game logic in question. By having a back-end master server setup to enable game saving, managing your inventory, creating characters, and processing some game logic server-side, you’ll have a more challenging and worthwhile experience undertaking Pwn Adventure 3. The easiest way to perform this with minimal issues is to use beaujent’s PwnAdventure3Servers-docker solution. Not only does Docker do all the heavy lifting for you with minimal setup commands, but it also contains persistent database storage so that if you bring down the server you won’t lose your progress. Other options of setting this up are clearly outlined by LiveOverflow who also has their own Docker solution (although without the persistent database). I will note that it’s recommended this be hosted locally and not exposed to the internet given the automated server configuration and known credentials in use; however if you have dedicated infrastructure and want to play with friends it may be worthwhile changing the credentials of your server and setting this up manually.
The client can be downloaded directly from pwnadventure.com and only requires the server.ini file to be modified to allow connecting to your locally hosted instance.
My setup process was as follows:
1️⃣ Using a NAT’d Virtual Machine (VM), clone and spin up beaujeant’s version of PwnAdventure3Servers
git clone https://github.com/beaujeant/PwnAdventure3Servers-docker.git
cd PwnAdventure3Servers-docker
sudo docker-compose build
sudo docker-compose up -d
2️⃣ Change VM to be on a Host-Only network
3️⃣ Take a snapshot of VM
4️⃣ Note IP address on host machine tied to Host-Only network adapter
5️⃣ Note IP address on VM which is the same IP range as host machine’s Host-Only network adapter (also tied to Host-Only network adapter - mine shown below)
inet 192.168.56.106 netmask 255.255.255.0 broadcast 192.168.56.255
6️⃣ Modify server.ini file on host system within PwnAdventure3 directory to point the MasterServer Hostname to master.pwn3 and GameServer Hostname to game.pwn3 (example below)
[MasterServer]
Hostname=master.pwn3
Port=3333

[GameServer]
Hostname=game.pwn3
Port=3000
Username=
Password=
7️⃣ Modify /etc/hosts file (Linux) or %SystemRoot%\Windows\System32\drivers\etc\hosts (Windows) to include a line redirecting master.pwn3 and game.pwn3 to the host (example below)
192.168.56.106 master.pwn3 game.pwn3
Part 2: Connecting to the Game Server
Hitting ‘Play Game’ should successfully connect to the server if it has been configured correctly and is running.
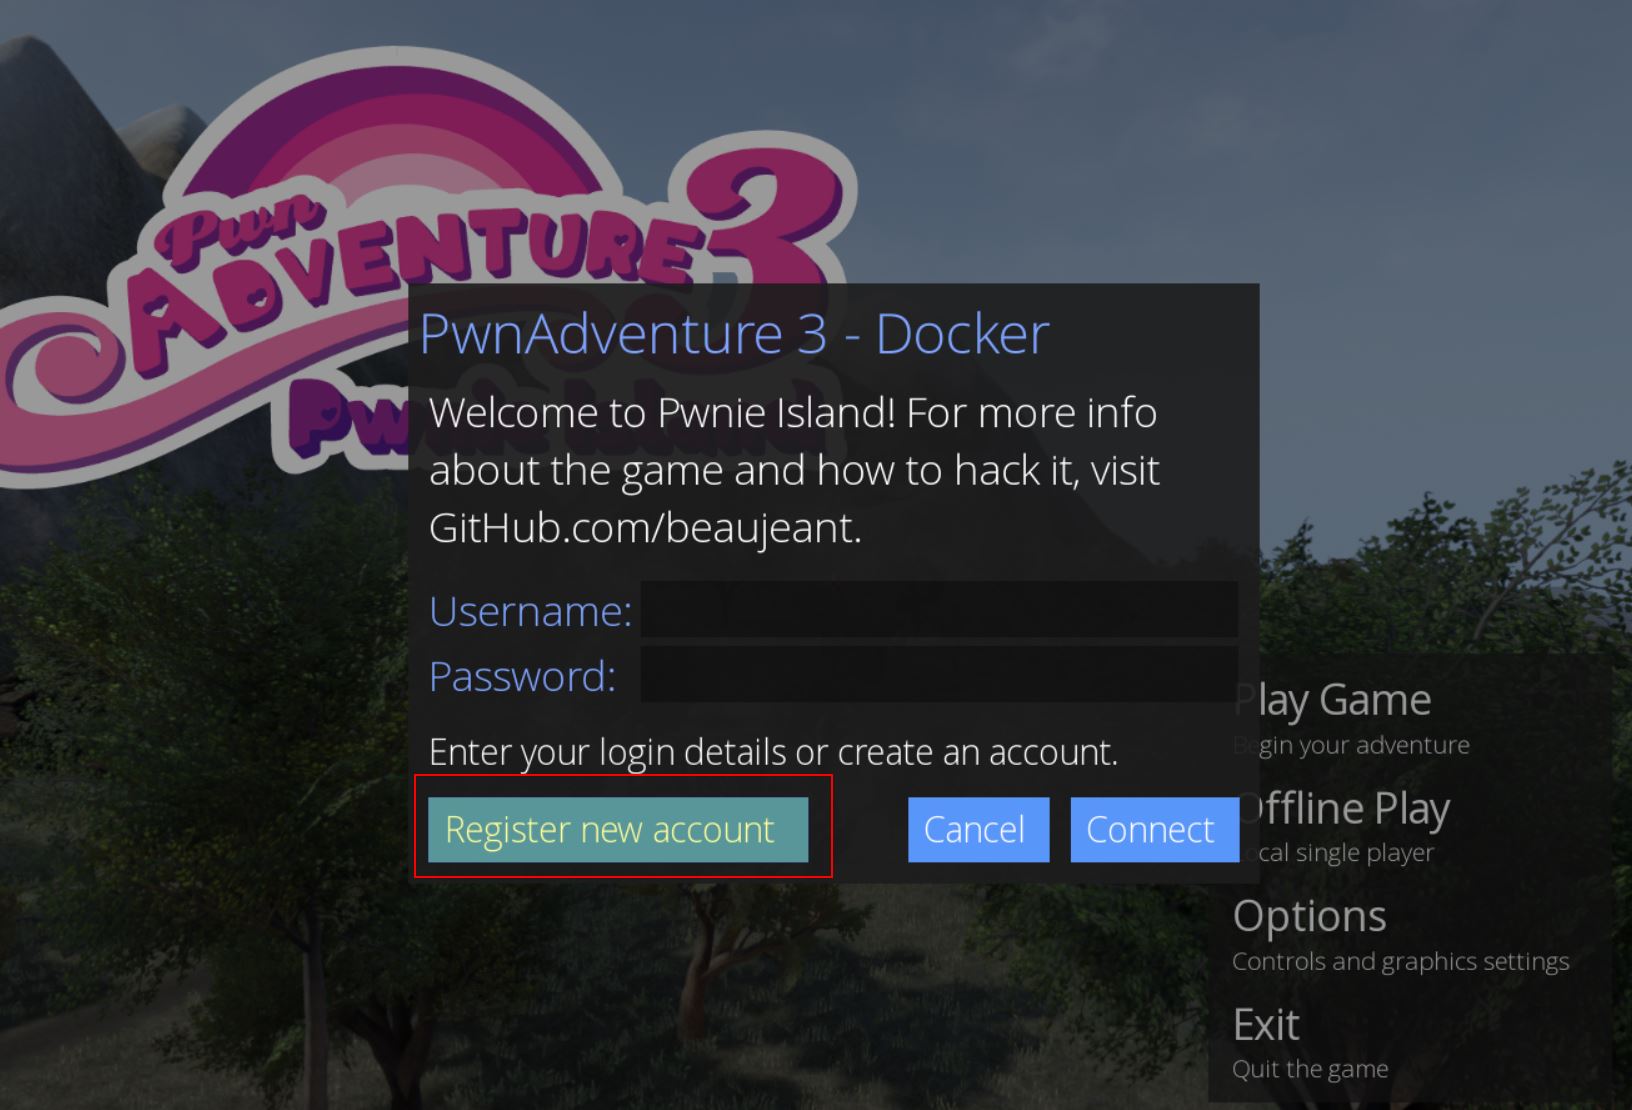
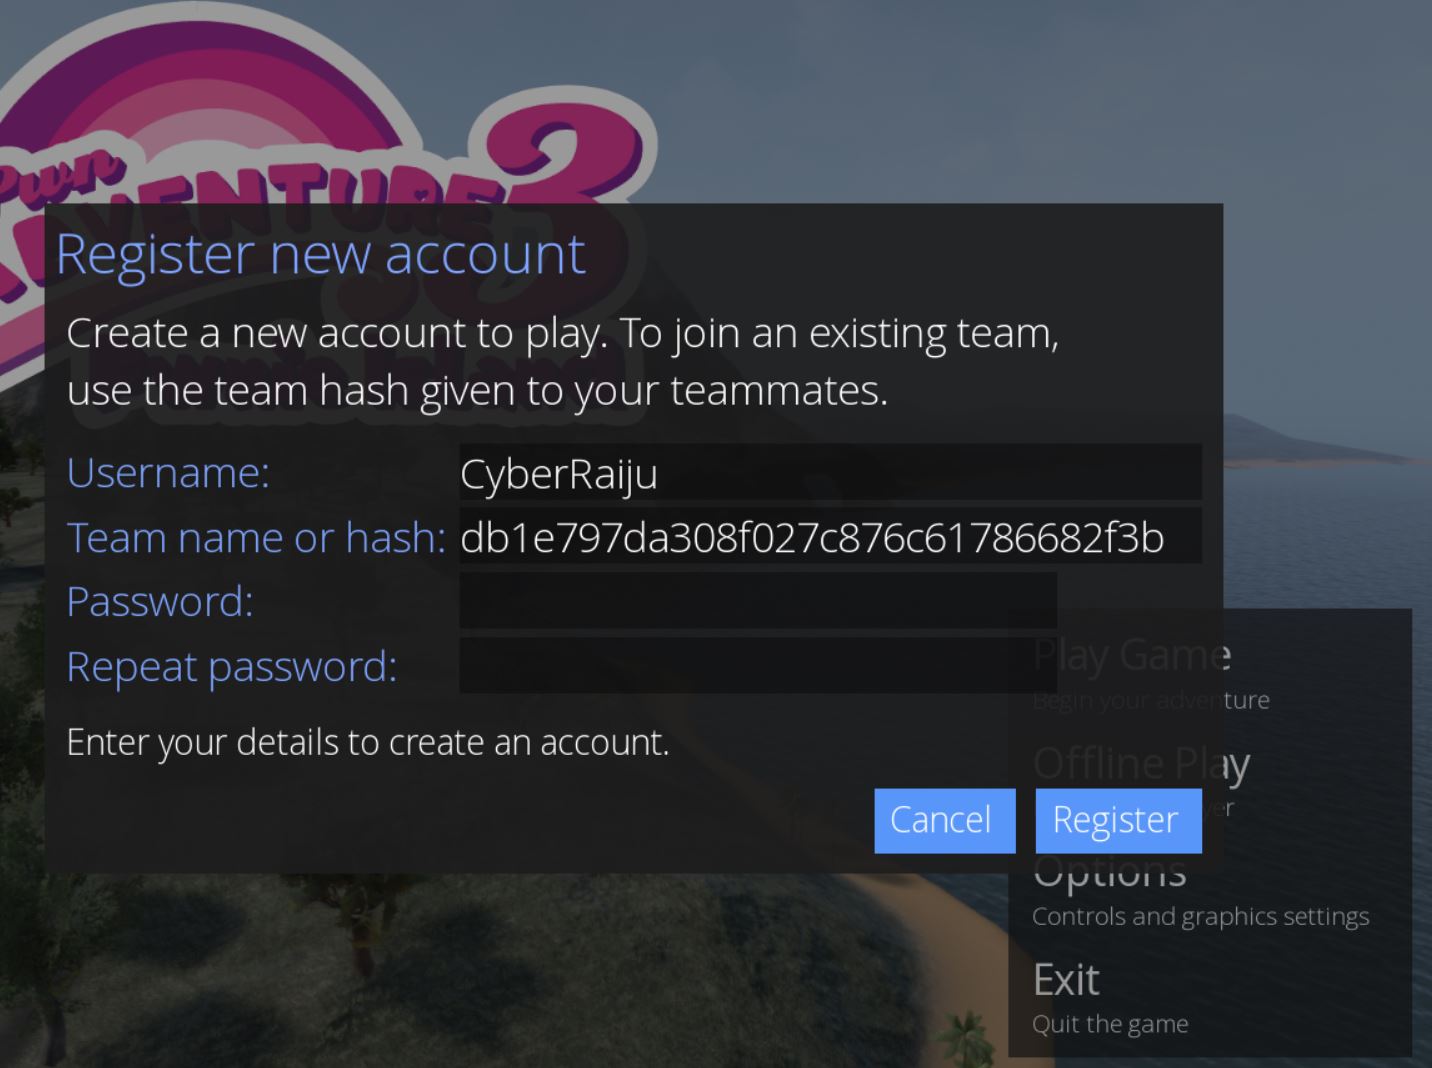
At this point an account can be created. There’s a default admin team setup which can be joined by using the hash ‘db1e797da308f027c876c61786682f3b’.
Before joining the server and playing online, we’ll investigate how the game can be hacked when playing offline first. The reason this is important is because when playing a single player game which doesn’t connect to a server, 100% of the logic is stored locally on your system and in memory, which means anything can be tampered with. In contrast a game which is online may have a number of checks and logic taking place on the server which aren’t inherently visible to you. This means that manipulating your local machine (the client) can often be detected by the server and rectified, or completely ignored if it is trusting the server logic, which results in more difficulty hacking the game.
Part 3: Character Selection and Situational Awareness
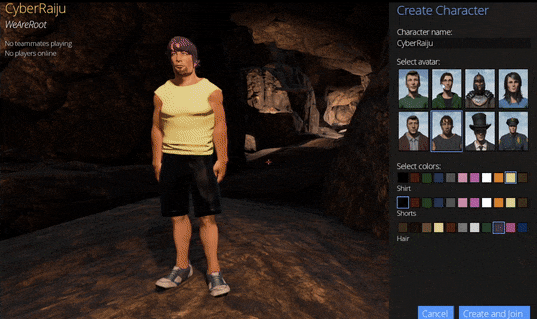
Proceeding with the game in offline mode, you can choose your own customisable character and begin your adventure.
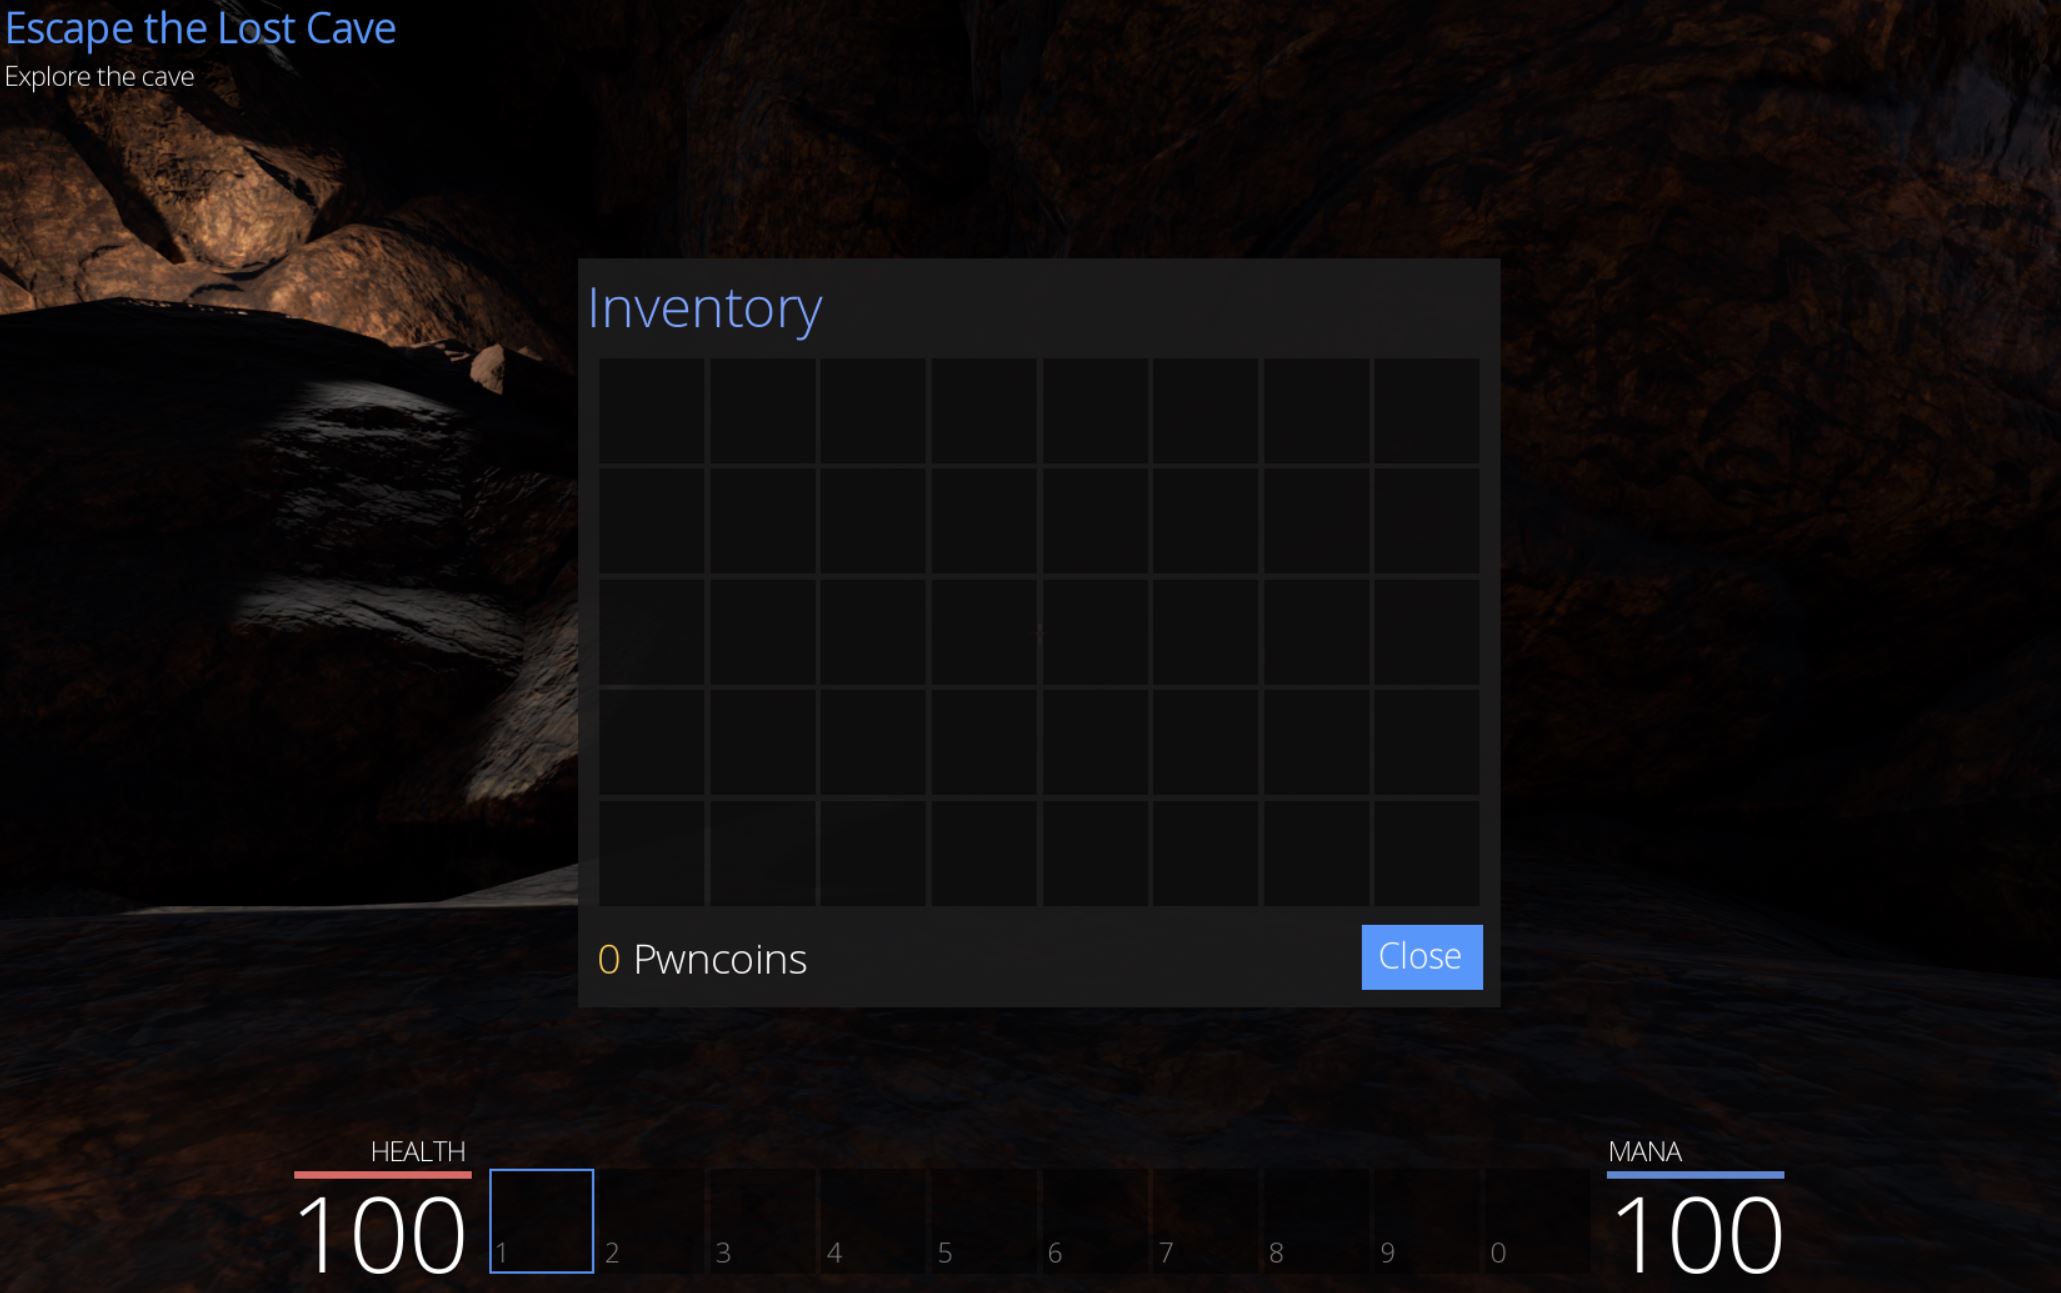
Entering the game presents a simplistic user interface and intuitive controls. A mission is displayed in the top left with health and mana on the bottom bar with what looks to be an inventory system.
- ‘I’ can be used to open your inventory
- ‘WASD’ or the arrow keys can be used to move around
- ‘Space’ allows jumping
- The mouse controls your directional viewing
Exploring the cave an alter is found with a floating book that says ‘Press E to learn spell’.
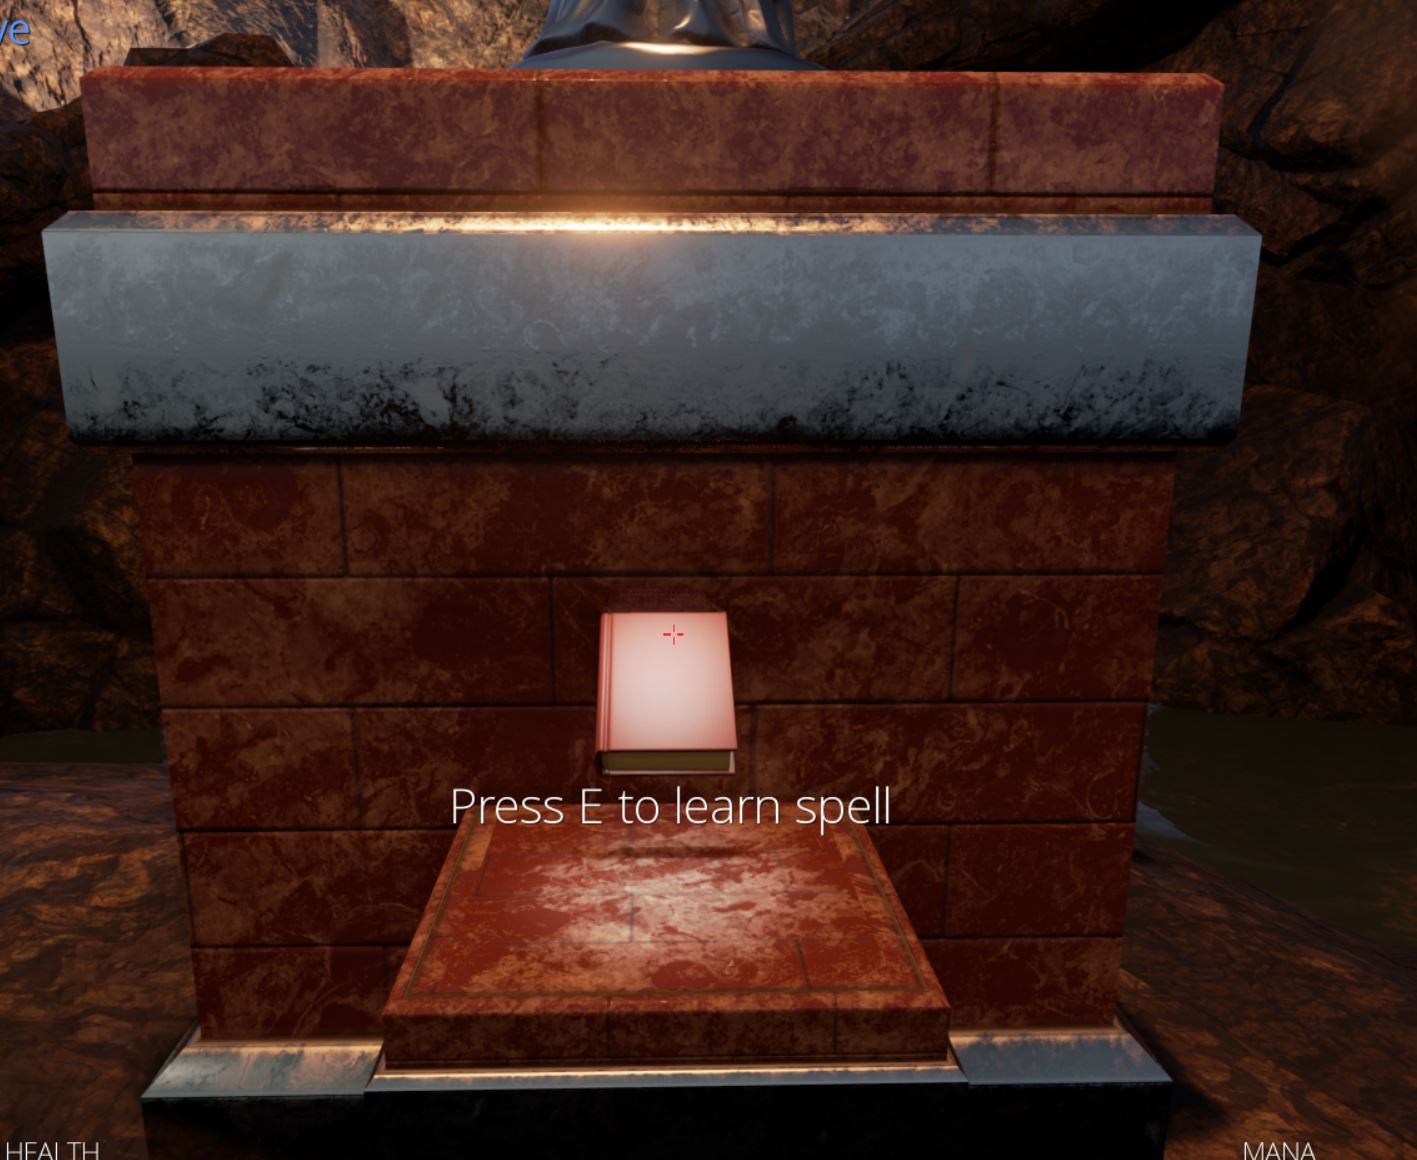
Learning the spell results in our first achievement ‘Goodness Gracious’ by learning ‘Great Balls of Fire’ (nice little Jerry Lee Lewis tribute there).
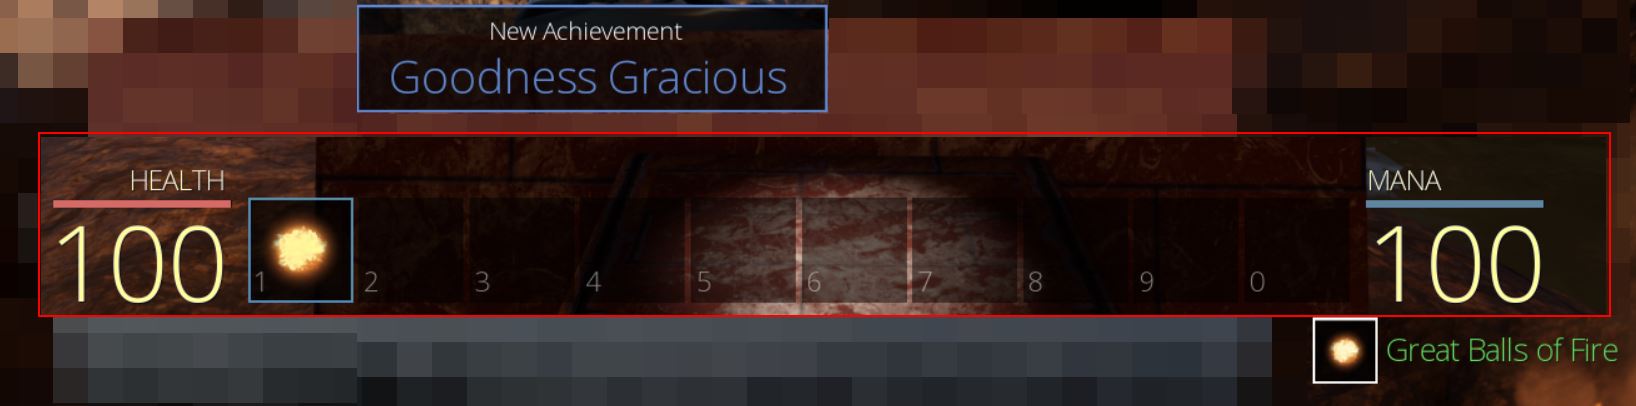
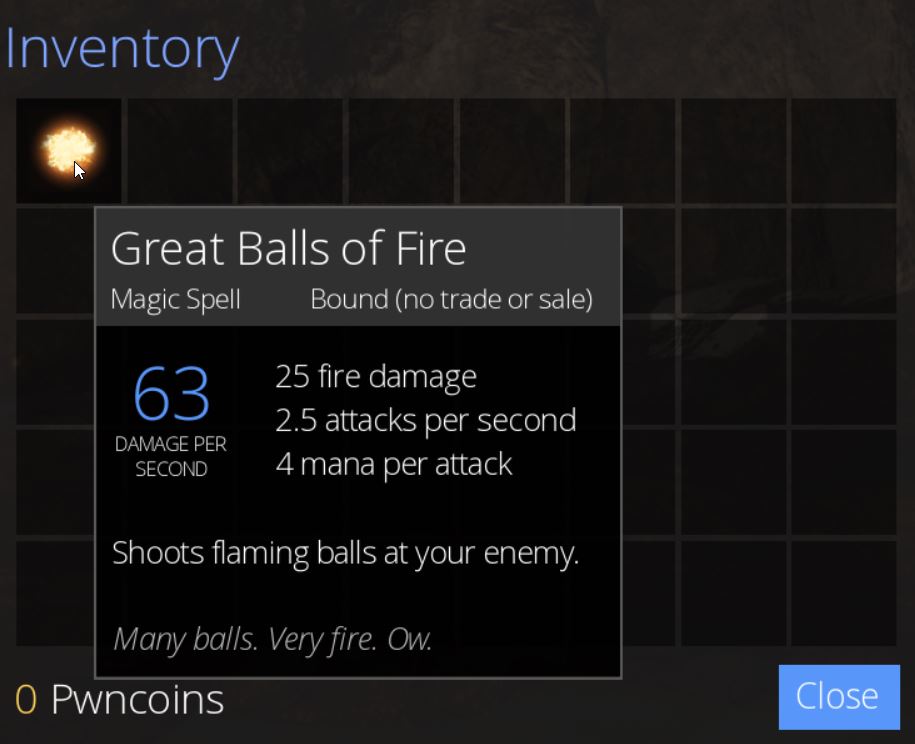
At this point clicking causes a fireball to be shot and our mana to be reduced by ‘4’. Hovering over this in our inventory provides far more details about the spell including its damage and mana used per attack.
This is a key point in which we can start hacking the game for profit.
🎮 Single-Player Offline Hacking
Background Knowledge
As some background knowledge, all variables in software (or our case a video game) have a data type. In a lot of games a single numerical value greater than 0 will be stored as an unsigned integer. Where this needs negative values it will be stored as a signed integer, and knowing about different Data Types helps to make more sense of limitations each data type has and how they can be recognised. For example if a game has a value which caps out at a max of 65535 for any given variable, this is a good sign that a WORD data type has been used given a WORD data type is a 16-bit (2 byte) unsigned integer which can only store a decimal value between 0 and 65535. 32-bit games are also commonly using 4-bytes (a DWORD) to store variables and this is one of the most common data types, whereas 64-bit games may instead opt for 8-bytes (QWORD).
Part 1: 🔮 Memory Hacking for Pseudo-Infinite Mana
Because we lose 4 mana whenever a fireball is cast, we can eventually run out of magic until it recovers over time. To hack this component in memory, we’ll need to find the variable which is storing this value, and ensure that it remains at a fixed value which we control. A useful tool to do this is Cheat Engine; however, be warned this can flag as a potentially unwanted program and is InstallCore adware bundled (clicking ‘Next’ throughout the entire installer will wind up accepting offers to install affiliate software). Take care to declide any additional software you don’t want during the install process.
This program must be run with Administrator rights. Upon running it ensures the process has a number of privileges such as ‘SeDebugPrivilege’, ‘SeLoadDriverPrivilege’, and advanced permissions including the ability to create new threads, and reading/writing to process memory. All of this is generally essential for accesssing other process memory and allowing games to be hacked.

Using Cheat Engine a handle to the process can be opened so that memory can be read. There’s 5 main types of scans which can be performed each of which have their pros and cons depending on how much information you have.
- Exact Value: Useful for locating variables with a current known value
- Bigger than: Useful for locating unknown variables which are greater than a known value
- Smaller than: Useful for locating unknown variables which are less than a known value
- Value between: Useful for locating unknown variables which are between 2 known values
- Unknown initial value: Useful for locating variables which are unknown
There’s also support for different value (data) types which makes this a very powerful memory scanner and a number of hotkeys can be setup to make this process easier in the options menu.
- Binary
- Byte
- 2 Bytes
- 4 Bytes
- 8 Bytes
- Float
- Double
- String
- Array of byte
- All
- Grouped

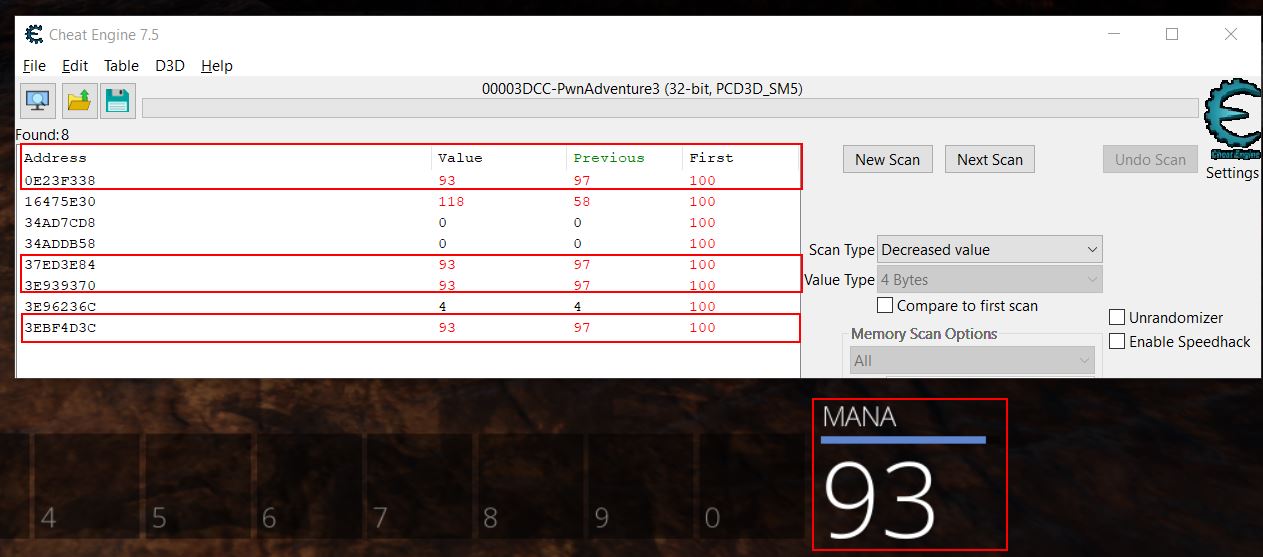
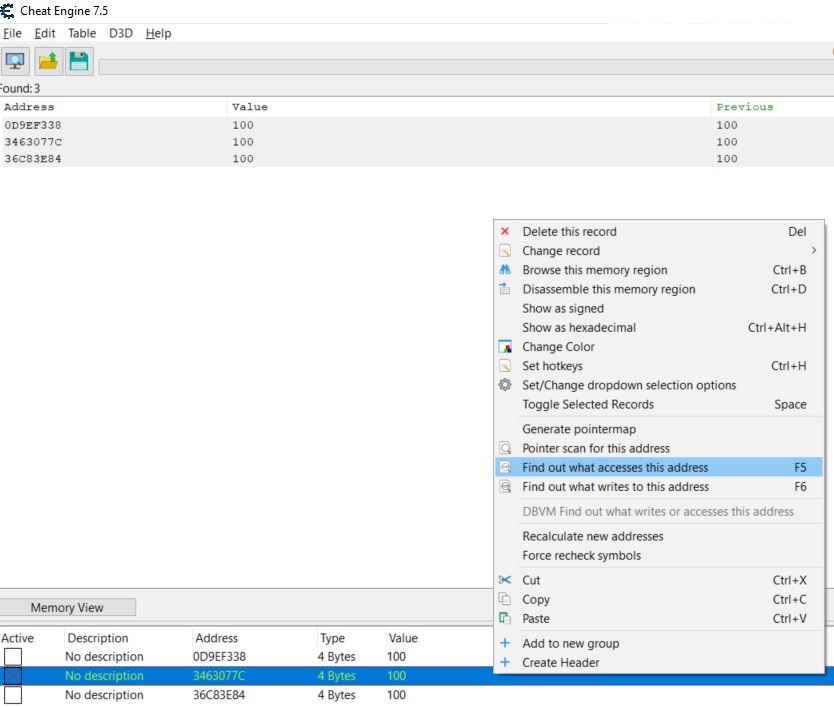
Starting out with our mana at 100, we can use the ‘Exact Value’ search as a starting point. This won’t always work if the variables have been stored in obscure formats or data types, but for most there won’t be any issue. By default the Value Type is set to ‘4 Bytes’ (noting 8 bits are in a byte), and this is more often than not going to find any 32-bit unsigned integer’s in memory without any issues.
Starting a new scan for the value 100 shows more than 11,000 possible addresses. It should be noted that there’s a viewer which shows a column containing the current Value, Previous value, and First value since ‘New Scan’ was run. Some values may also turn red indicating their contents have changed since the last scan.
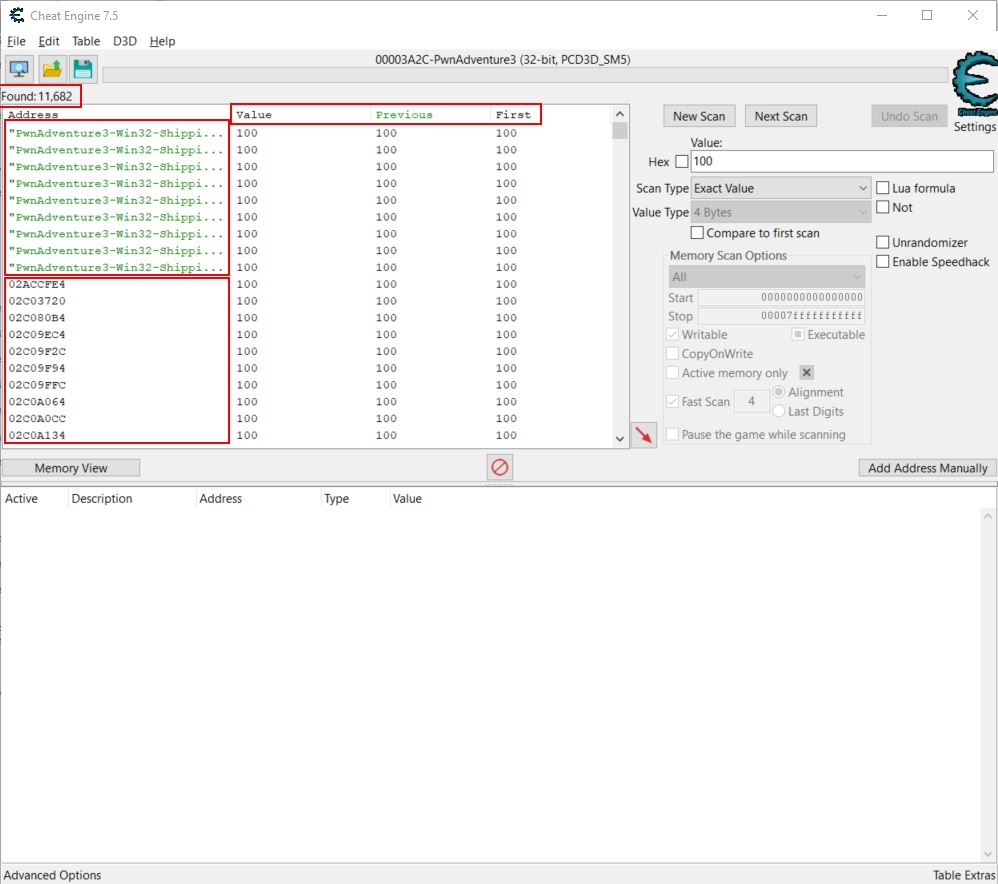
You’ll also notice that some entries in the address column are green which indicate they are statically allocated in memory. This occurs whenever the word ‘static’ is used in: a variable definition, any global variables, and any file scope variables. The green static variables are also shown as an offset (shown by a value of module+hexoffset) because they will always reside at that offset no matter how many times the program is restarted, whilst addresses in black are subject to change location depending on where they are loaded into system memory.
After performing the first scan, more ‘Scan Types’ become available to pivot from:
- Bigger than
- Smaller than
- Value between
- Increased value
- Increased value by
- Decreased value
- Decreased value by
- Changed value
- Unchanged value
- Ignore value
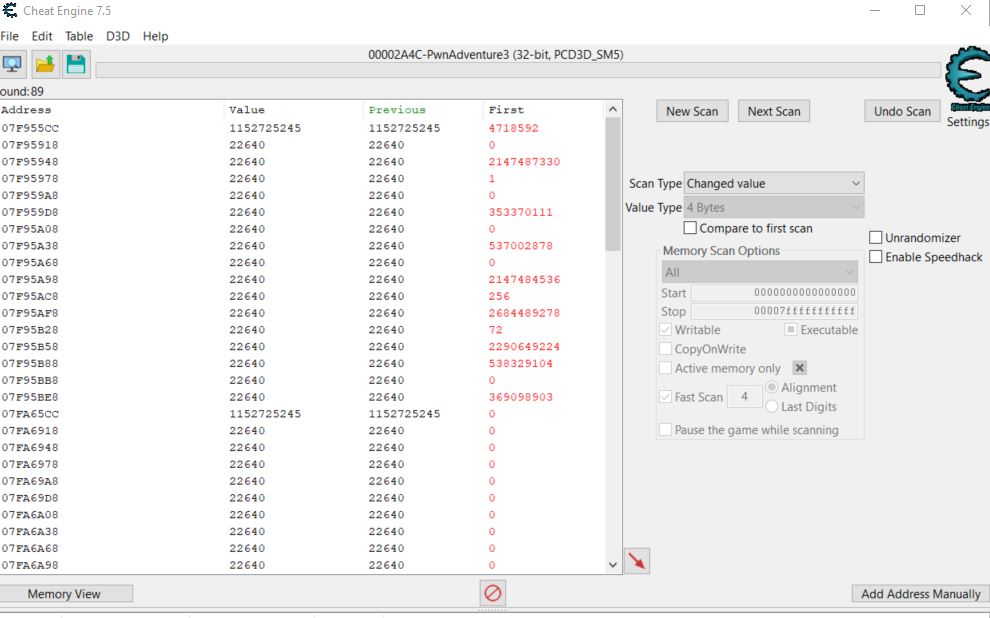
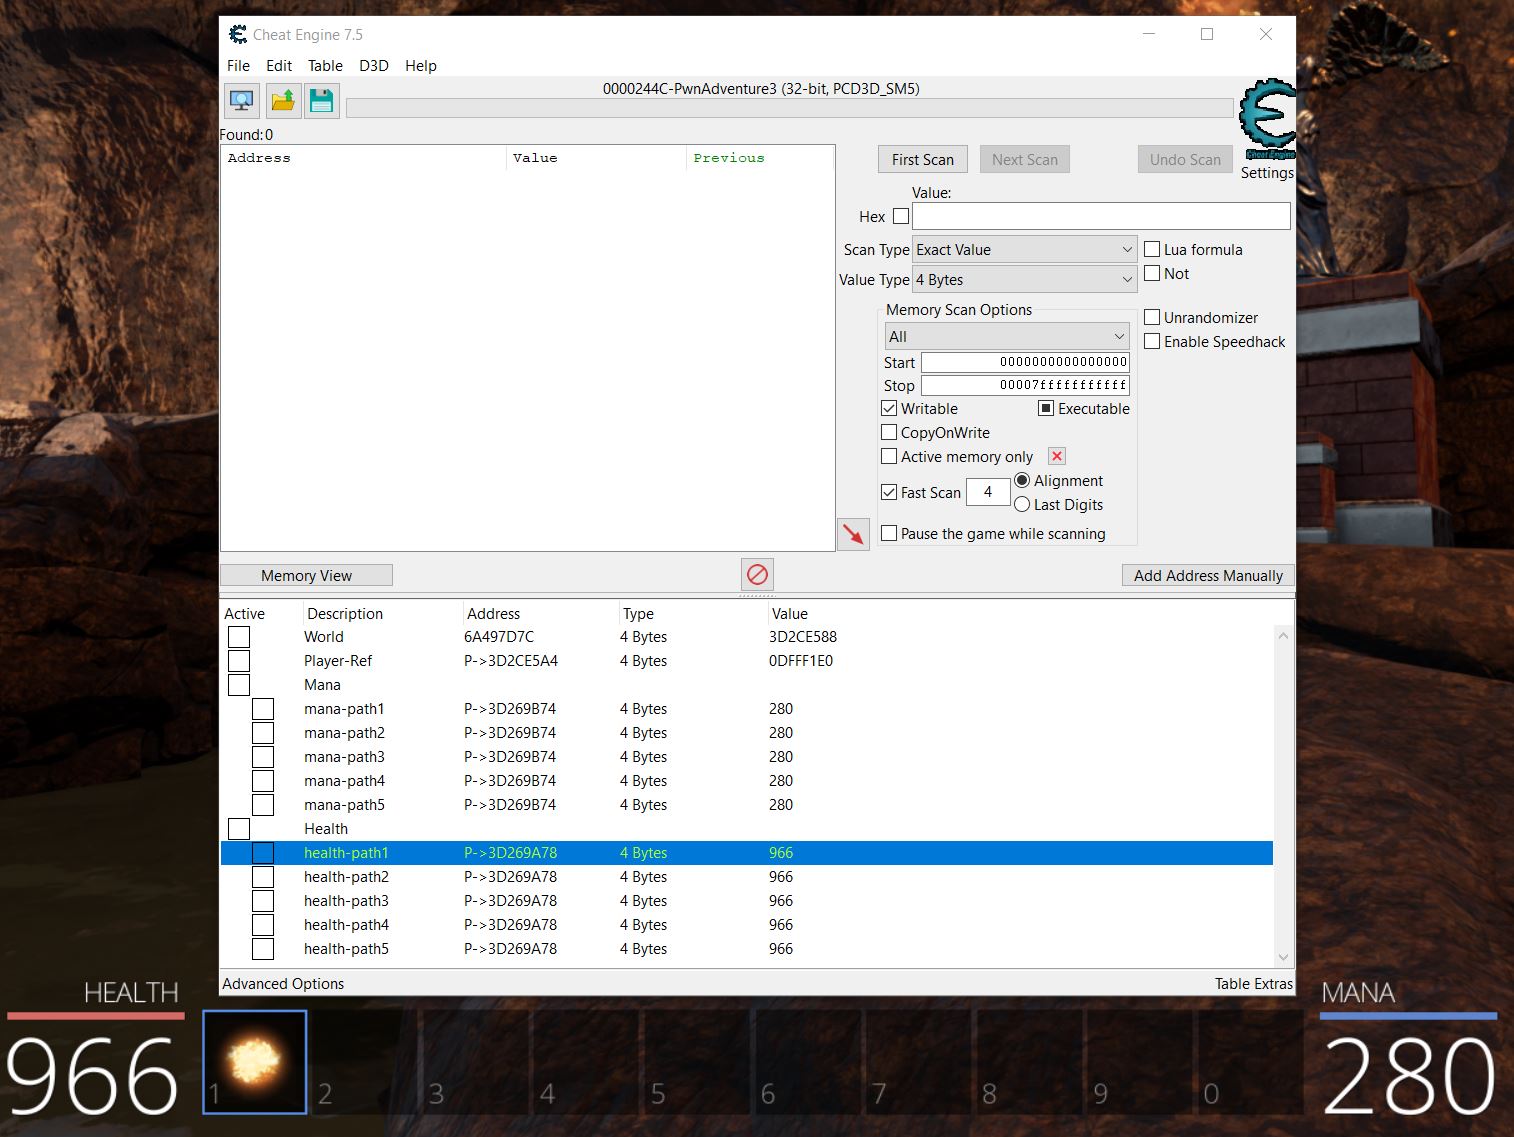
Each of these scan types are run only against the current found addresses meaning you can control different conditions in the game you’d expect to cause the variable to change (e.g. casting a fireball spell to reduce your mana), and filter this list down until the address that contains your mana is found. Using this technique (reduce mana > check for decreased value) a few times shows this list reduced to a more manageable 8 addresses, of which 4 change in sync with the amount of mana the player currently has.
By adding these addresses to the addresslist in the bottom pane og Chear Engine, these addresses in memory can then be made ‘Active’ or ‘inactive’. For all intensive purposes ‘Active’ signifies that the address is being actively monitored by Cheat Engine and whenever the value changes Cheat Engine will set this value back to the value it was at when the Active toggle was enabled. From here on out this technique will be known as an address being ‘frozen’. If these addresses are frozen when playing offline they will remain at the value we set. In an online game, although the variables can be frozen in memory and consistently update your mana to show 100, this can still result in the actual amount of mana you have being reduced to 0. This is because your mana is actually being stored server-side with all logic on whether you can cast a spell or not coming from the server. This means the server is the central point of truth which replicates the value it knows back to your game client.
Trying other scanning methods in an online version of the game shows a number of other values in memory which appear directly linked to mana consumption.
Through this process it can be shown that mana is frozen properly when playing offline, but not when playing online, and so this technique can be leveraged offline for pseudo-infinite mana. The term pseudo used here is because your mana is set to immediately jump back to 100 after it changes rather than remaining indefinitely at 100.
It’s important to realise that because the address which contains mana isn’t static, upon restarting the game the address is likely to change and has to be found again. By finding relative offsets to this address from a static variable this issue is resolved, more on this will be discussed later on.
Continuing through the cave normally shows a bush is blocking the exit. By burning this the achievement ‘Escape the Lost Cave’ is complete.

Part 2: ❤️ Memory Hacking for Pseudo-Infinite Health
At this point there’s a new mechanic with enemies and health reduction. Entering the next room shows a number of ‘Giant Rats’ which proceed to attack the player. Using the same process as before, except this time with your health, you can let the rats attack you so that the address containing your health variable can be located. A simple way of doing this is as follows:
- Scan for any 4-byte non-executable code which contains the value 100
- Get hit by a rat
- Scan for any addresses which have decreased
- Repeat steps 2 and 3 until any addresses containing player health are found
At this point there should be a number of seemingly linked addresses which control your heatlh. These can be changed to a particular value e.g. 200 and frozen to give you pseudo-infinite health. Once again the term pseudo is used because if an attack hits you which does 200 or more damage, this will still result in death if the check on your player health is faster than Cheat Engine in replacing these address values back to 200.
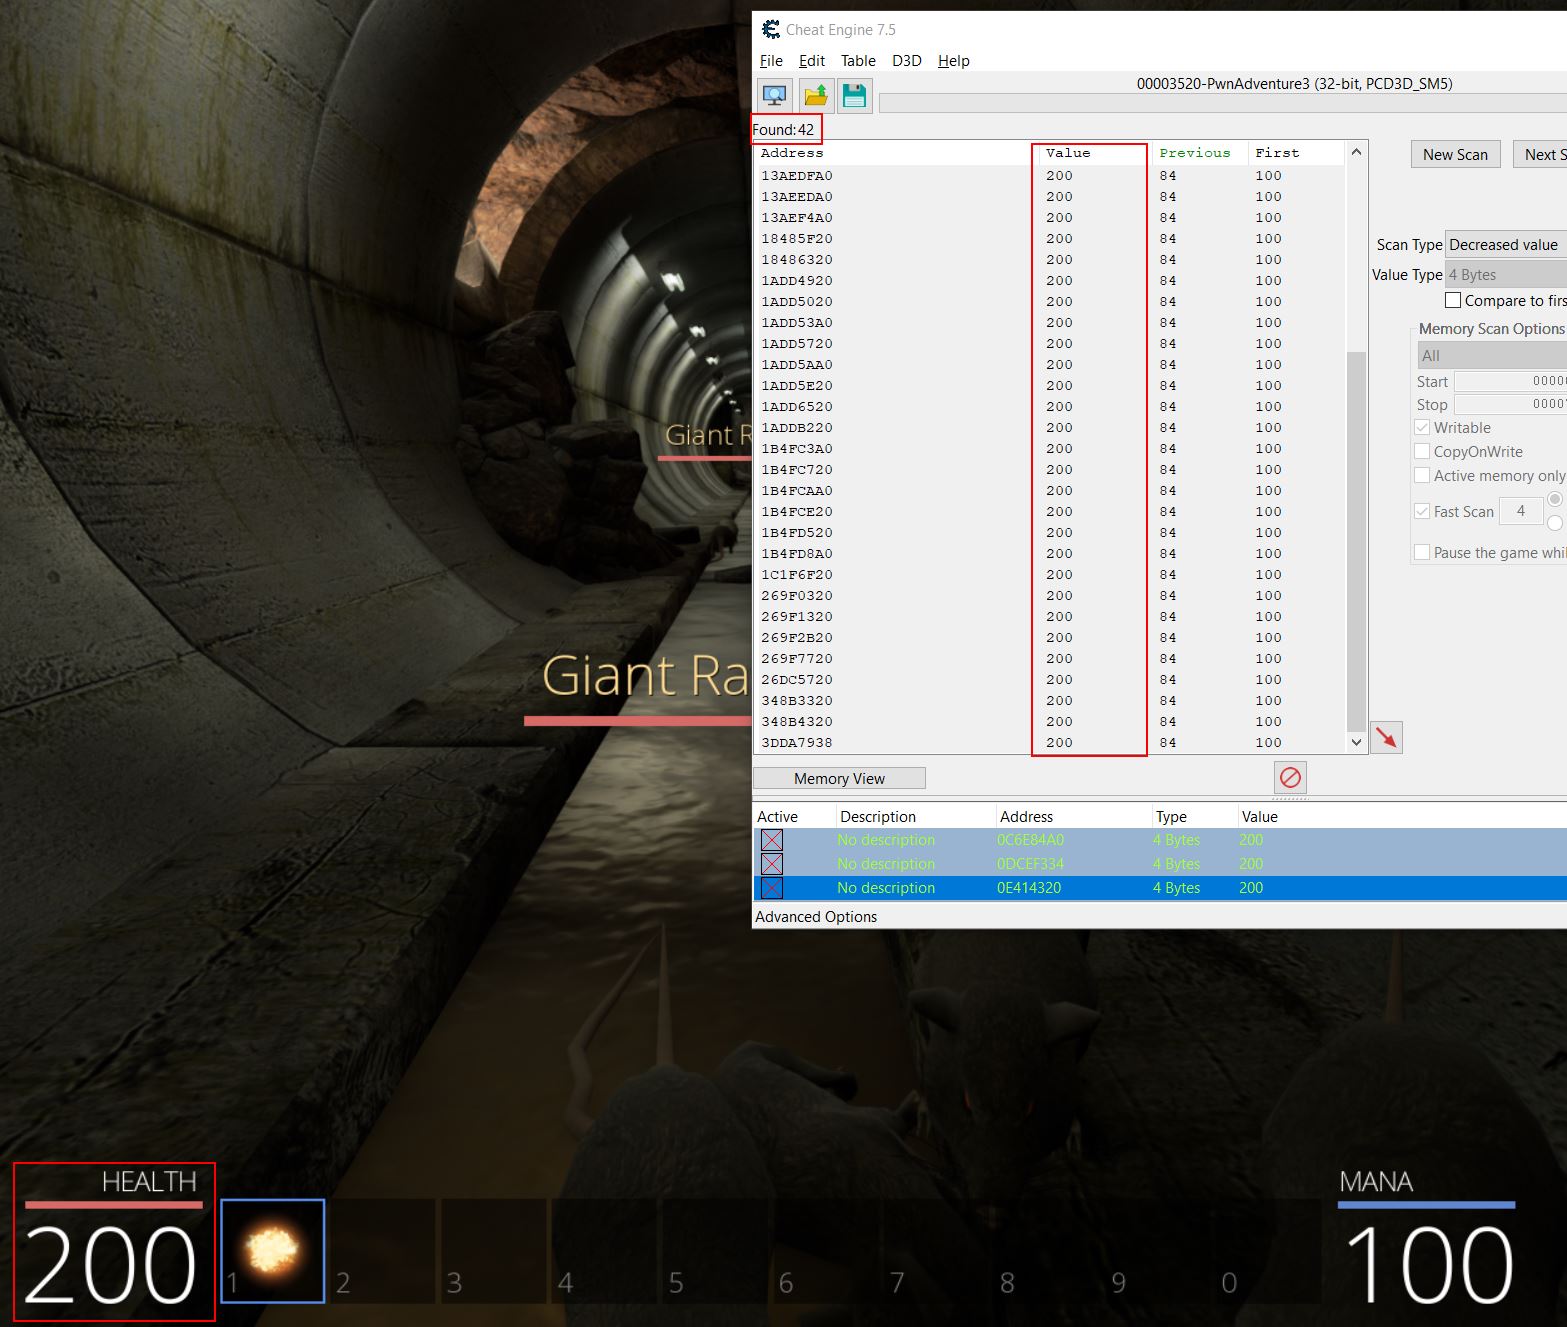
By unfreezing the addresses 1 at a time, the specific address used to control your health can be found as once it is unfrozen you’ll begin taking damage again. In this case it was at address 3DDA7938. Once again it’s important to note that upon the game crashing or restarting these addresses will no longer be accurate the next time you start the game, and in this instance by even logging out and starting a new game the same addresses also don’t apply as they’re now tied to a new game object.
Modifying Offline Game Logic
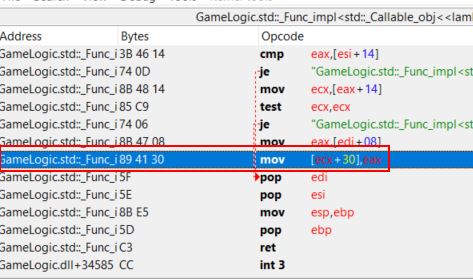
Another aspect of in-memory game hacking is to modify the game logic taking place. Using Cheat Engine we can examine where in the game’s logic the health address is written to, and this shows only one value.
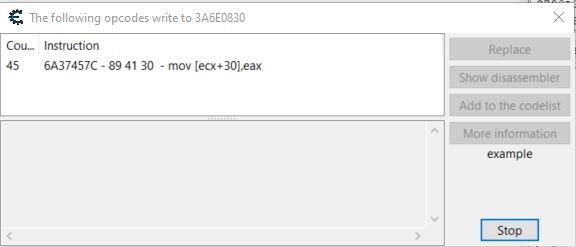
This is occurring within the GameLogic dll when eax is moved into the address ecx+30.
Using Cheat Engine we can replace game logic with null operations to prevent taking damage altogether; however, this still has some unintended impact to the game.
By doing this your health no longer is shown to decrease; however, you’re also unable to deal any damage to the enemies which indicates that any damage logic in the game is likely being shared amongst all game objects. This is an issue because you can no longer kill enemies, and is a complete disadvantage in an online game where your health is still decreasing server-side, but your game client no longer sends any of your attack damage so you wind up dying.
Part 3: 💰 Memory Hacking for Infinite Pwncoins
When killing rats, sometimes Pwncoins or ammo are dropped. By knowing the exact value of Pwncoins or ammo you currently have and comparing this to the amount you have after picking up the dropped object, it’s trivial to repeat the memory scanning process to find this new variable value which allows you to easy give yourself however much money you like by changing the variable in memory.
Once again this only works offline given your actual Pwncoins are being tracked server-side when online.
All of these tips and tricks generally work wonders in single player games where you control all the game logic and variables in your own system memory; however, where these rely on server-side code or checks different techniques are required.
Part 4: 👉🔮 Locating Mana Pointer Path for Persistence
Although the above tips and tricks are usseful for manipulating memory within a game, the fact these addresses are randomised every time the game starts or a particular object is instantiated makes this a fairly tedious undertaking every single time.
One of the handy features of Cheat Engine is its ability to find out what accesses or writes to a particular address. This can be used to locate pointers which lead back to a global or static object at the same relative offset every time the game launches, and it’s with these static variables that a persistent path can be located to our intended memory address despite the game restarting.
When using these functions a debugger is required to be attached. Detecting these debuggers (and the presence of cheating tools like Cheat Engine and the drivers it uses) are just some of the ways anti-cheat systems can work. Other methods include monitoring memory addresses for abnormal or unexpected changes. Upon attaching a debugger through Cheat Engine, we can see the engine itself has located and loaded the GameLogic PDB. This PDB file is a program database which contains symbols that enable us to make sense of classes within the program without too many problems, without it they’d all be generically named and provide no immediate context.

Examining the operations accessing our mana register shows 2 which are tied to GameLogic.Player::UseMana, one at offset 28 and one at offset 37, the other 2 instructions are GameLogic.Player::GetMana, and a game tick count.
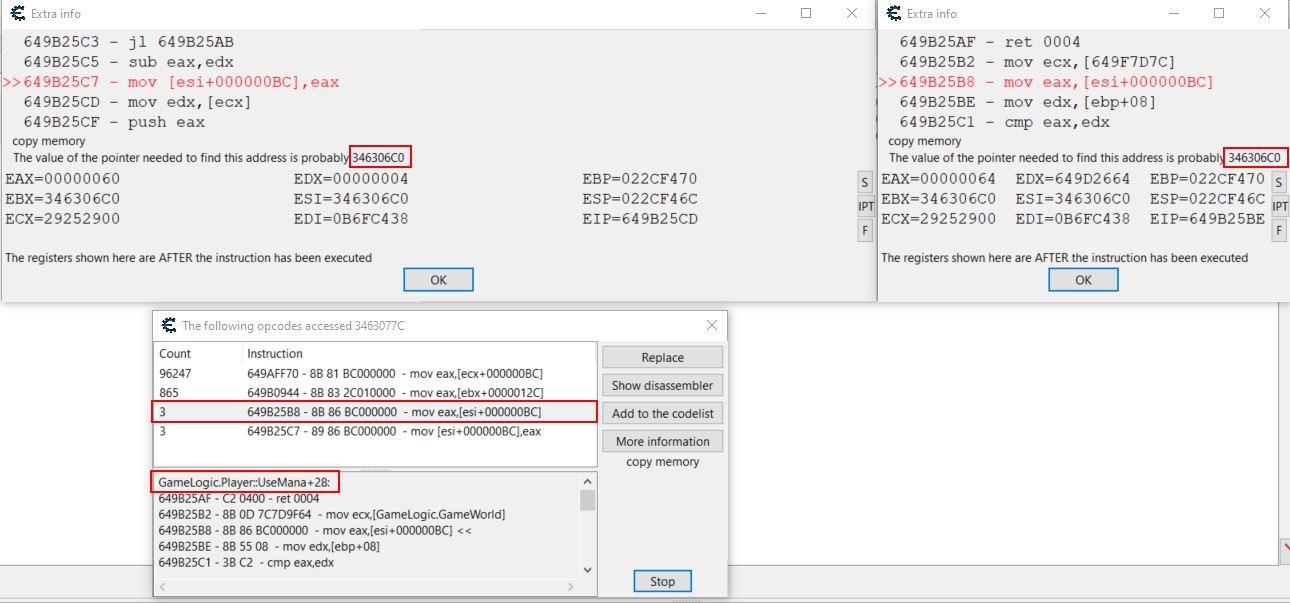
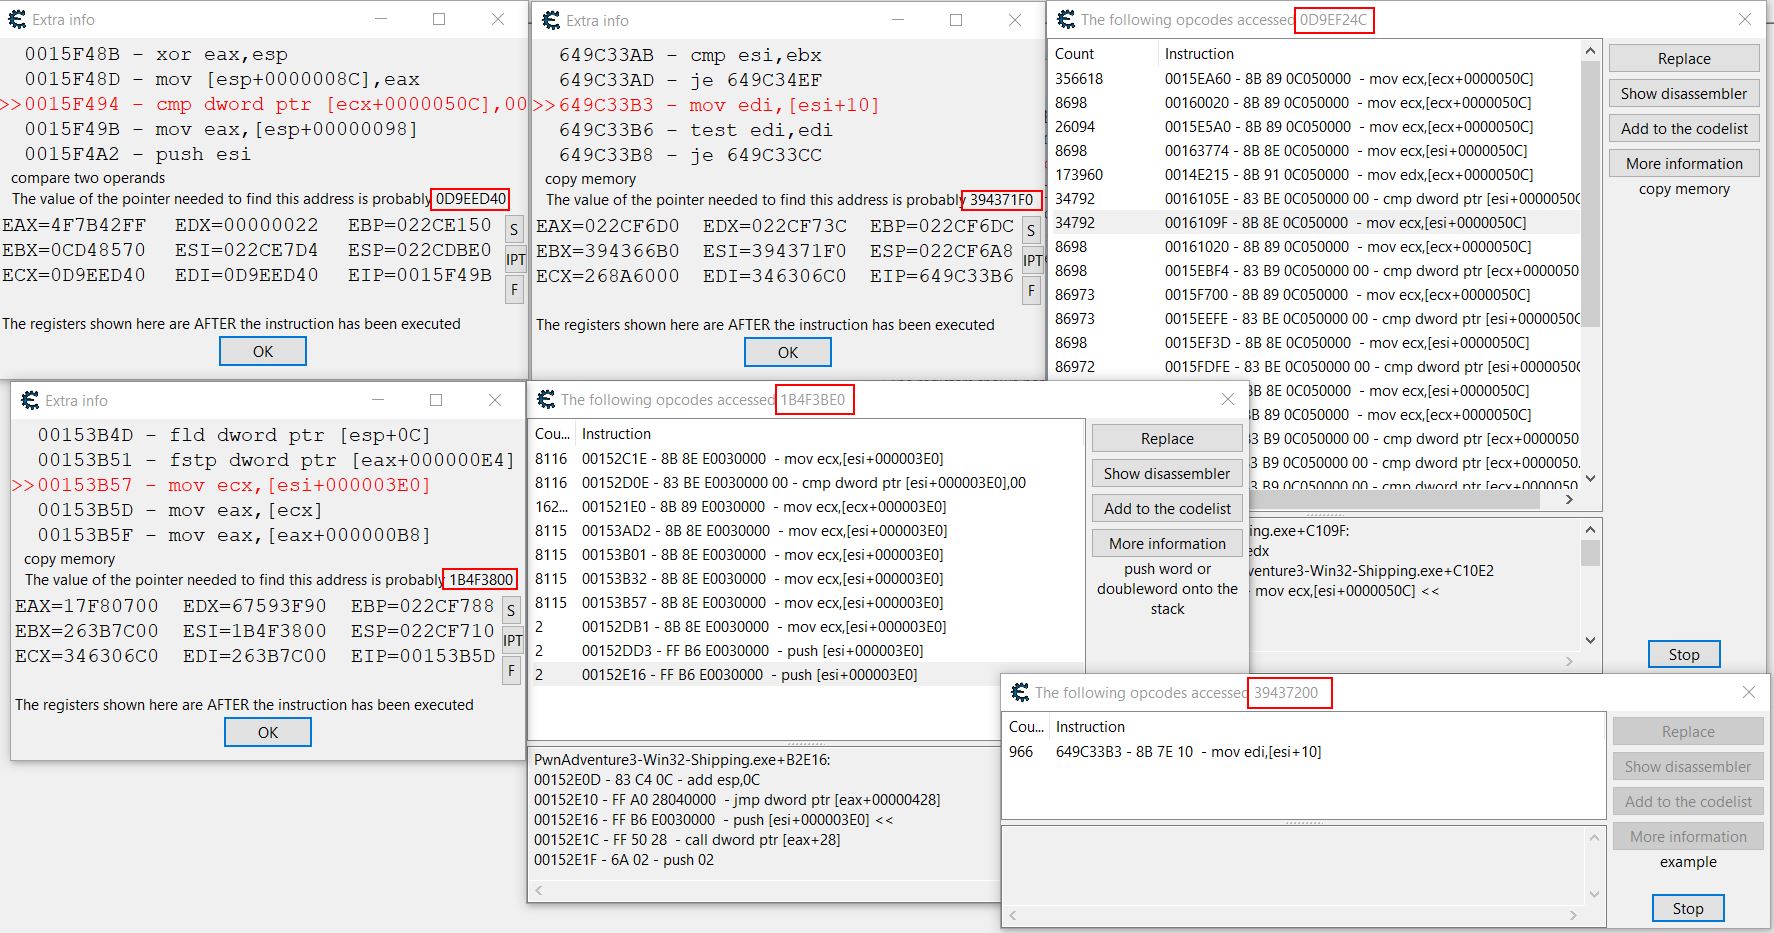
Importantly by viewing both the GetMana and UseMana operations, Cheat Engine reports that the pointer needed to find this address is likely 346306C0. From here a new scan can be ran looking for this value in hex which results in 3 new address pointers which point to the same address.
- 0D9EF24C
- 1B4F3BE0
- 39437200

Because none of these are global statically allocated variables (indicated by an offset and in green) we’ll need to step back further. Examining the opcodes that access these addresses shows a large amount for some, and not many for others. The important thing to realise is that despite all the operations, only 3 pointers come up of interest.
- 0D9EED40
- 1B4F3800
- 394371F0
This manual process can be repeated to try and locate a possible pointer path from the value in question back to a statically allocated global variable; however, this is tedious and can easily lead down wrong pointer paths which wind up being destroyed upon restarting the program. To make this whole process easier we can look into any statically allocated variables in the game, and see how they relate to the underlying code logic by using the GameLogic.dll PDB with symbol information.
Extracting Game Class and Logic in Ghidra
Opening up GameLogic.dll in Ghidra, we can look at the Symbol Table and filter for Classes to find anything of interest. Filtering solely on the Global Namespace shows reference to a lot of in-game classes.
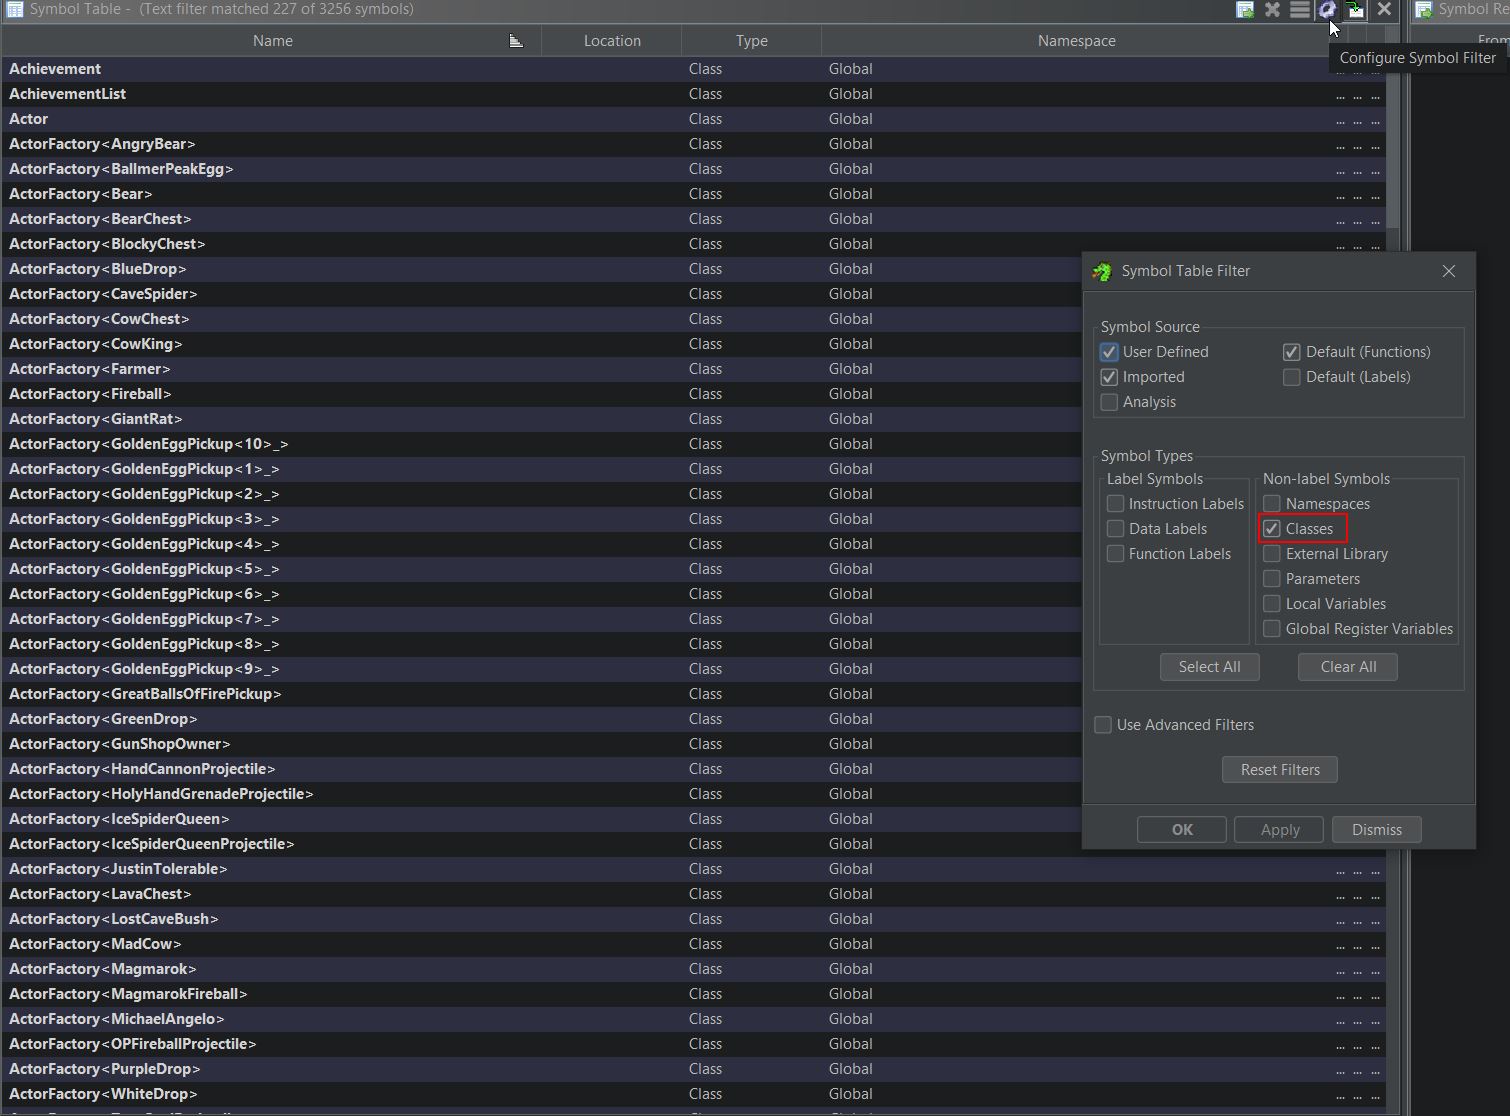
Of particular interest are the classes ‘ClientWorld’, ‘LocalWorld’, ‘ServerWorld’, and ‘World’. When thinking about the order of events in a game, a world needs to be present before any objects like a player object can be spawned into it, and by knowing how to retrieve a pointer to the world object, you can then get a pointer to every object contained within that world object including your own player. To find statically allocated global variables, the symbol table filter can be changed to look for only Data Labels which have been imported. Filtering based on the number of references to these objects shows that ‘Game’ and ‘GameWorld’ are high up on the list.
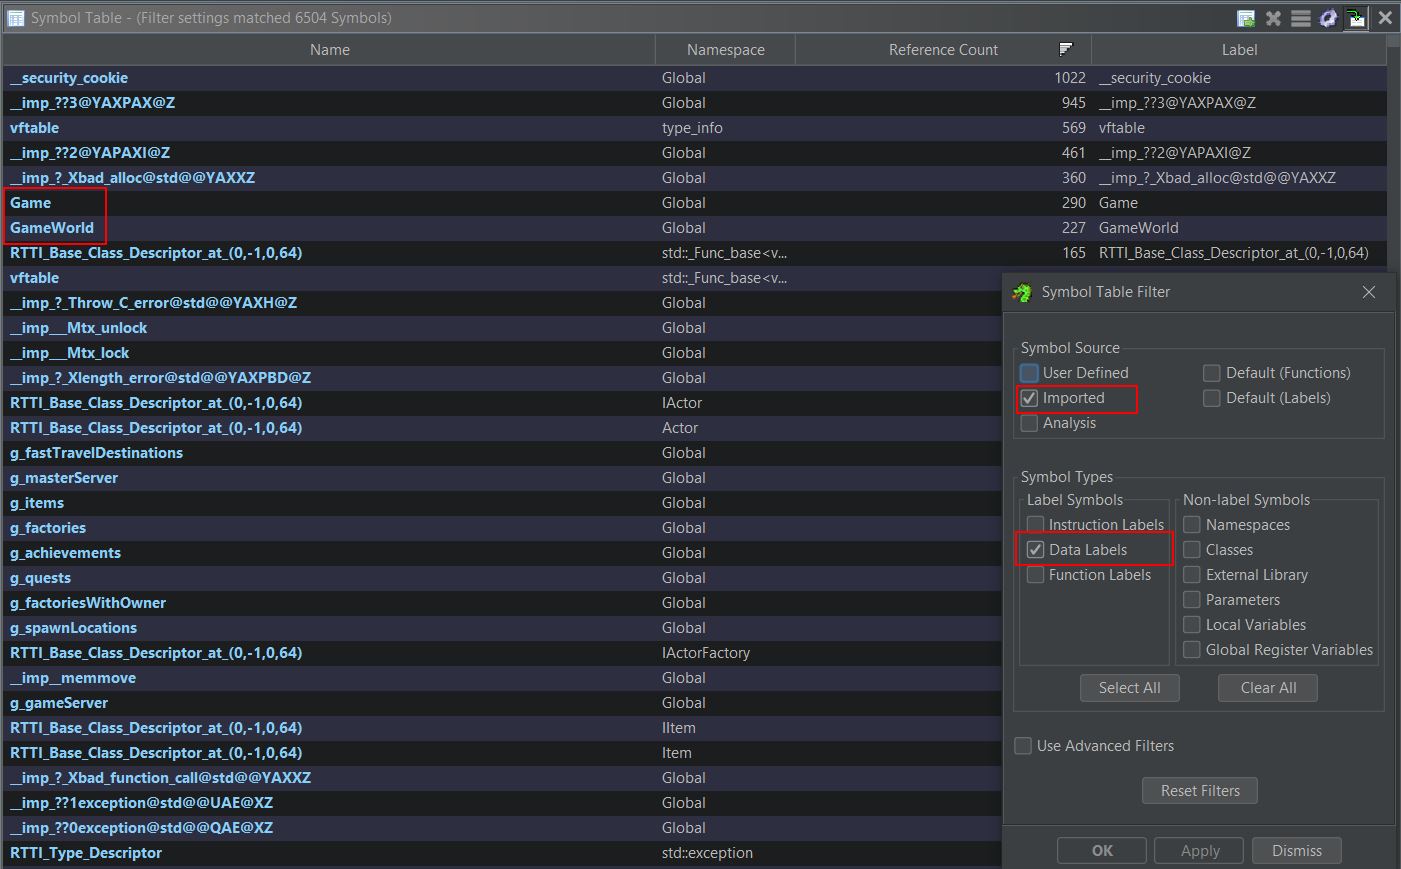
This tells us that there’s likely a global variable called ‘Game’ and ‘GameWorld’ which is referenced a lot throughout this program, and so it’s highly likely this is being used to store our instance of the game and the world which we can use as an anchor. This can be confirmed by jumping to the ‘.bss’ section of the data segment which contains statically allocated variables.
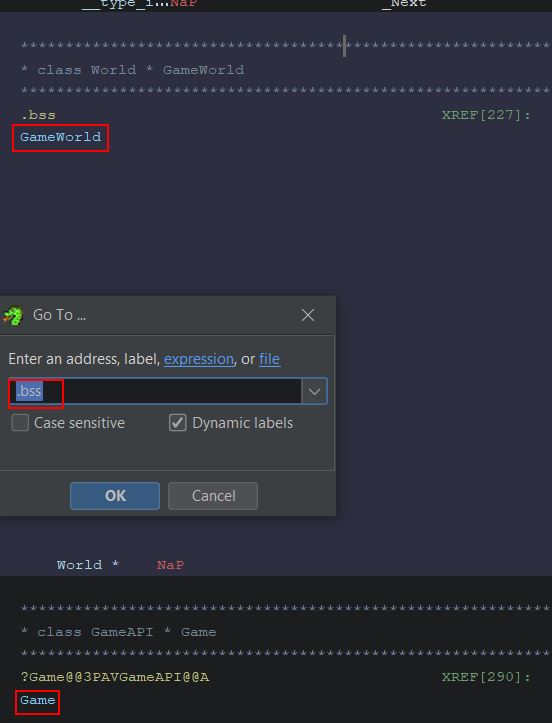
Of interest is that the statically allocated global variable ‘GameWorld’ is located at address ‘10097d7c’ at the moment. By subtracting the base-address this DLL is allocated as shown in the memory map, you can retrive the offset (10097d7c-10000000=0x97D7c) which will always be pointing to the GameWorld instance no matter how many times the game is restarted.
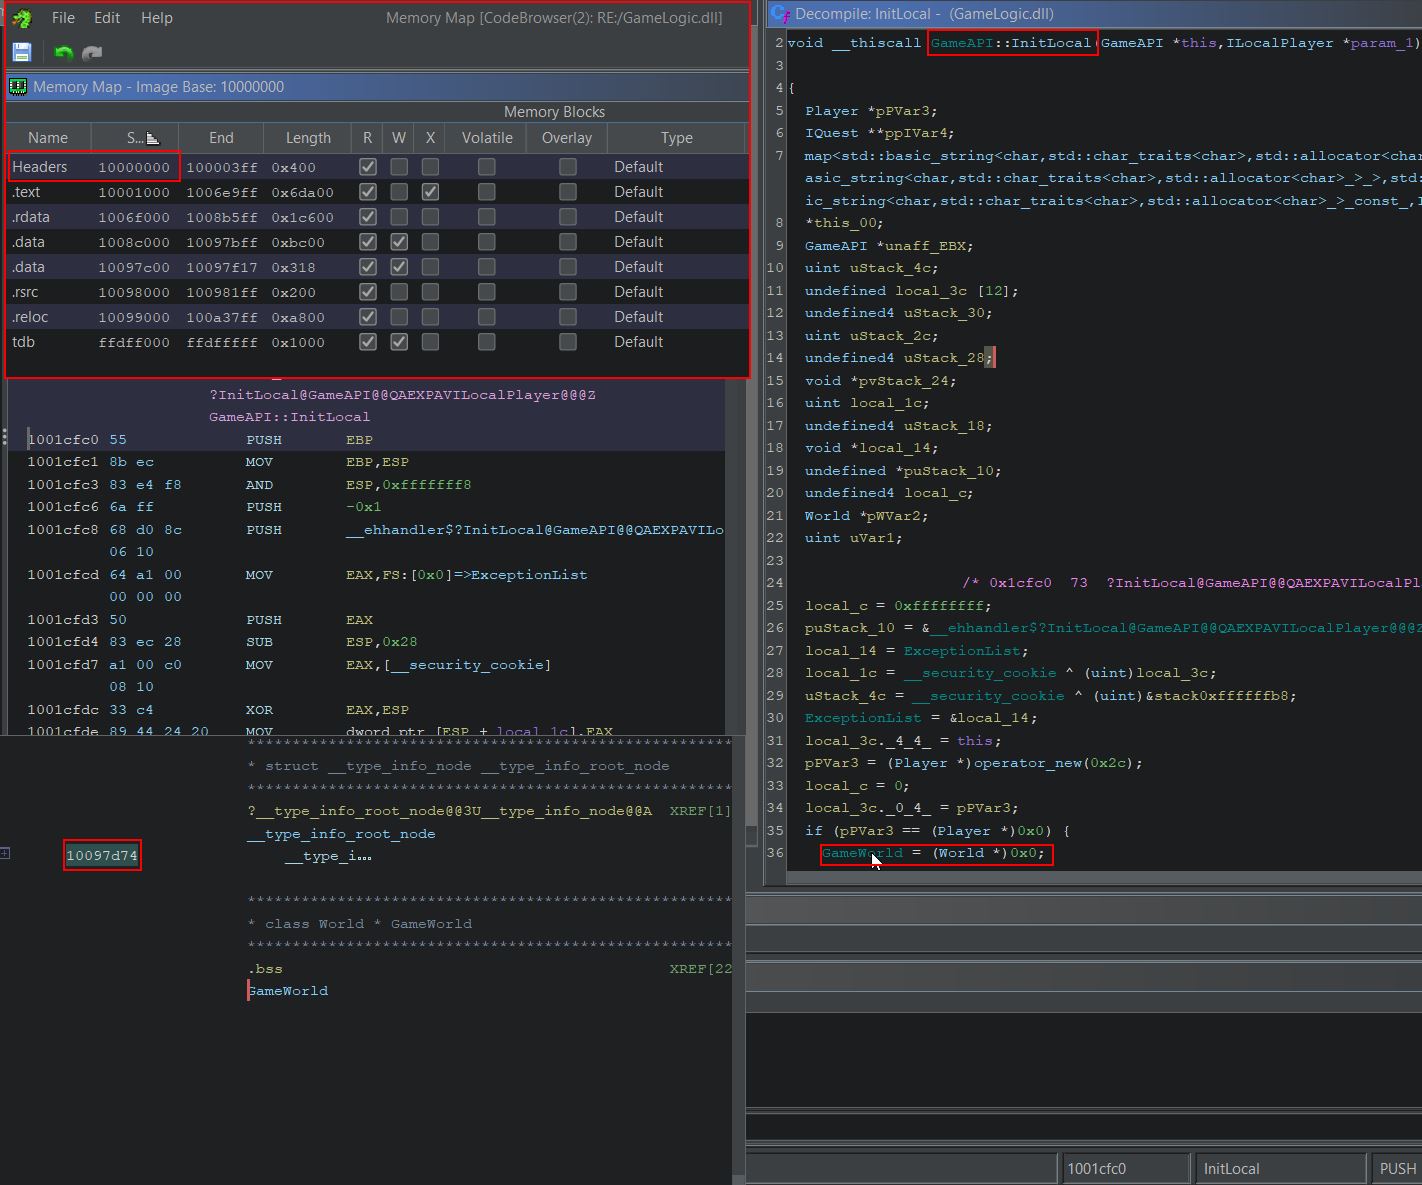
Although this will give us a base address to start from (GameLogic.dll+0x97D7c) it doesn’t land us on our player character let alone a variable we’d like to manipulate like health or mana. Looking at the data structures of ‘World’ shows what appears to be a useful reference to a ‘ILocalPlayer’ object called ‘m_localPlayer’.
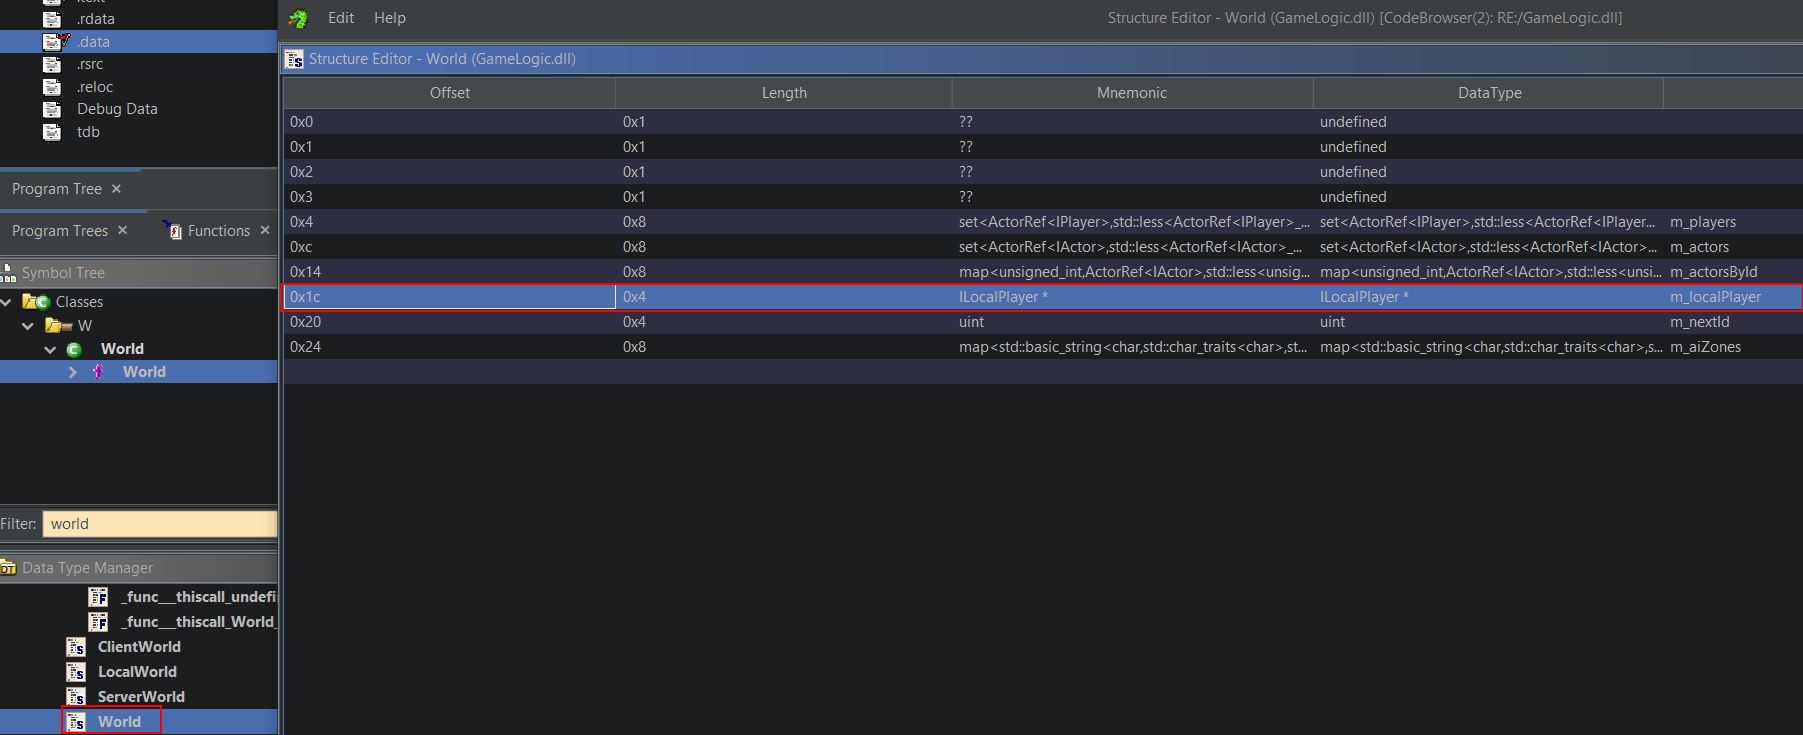
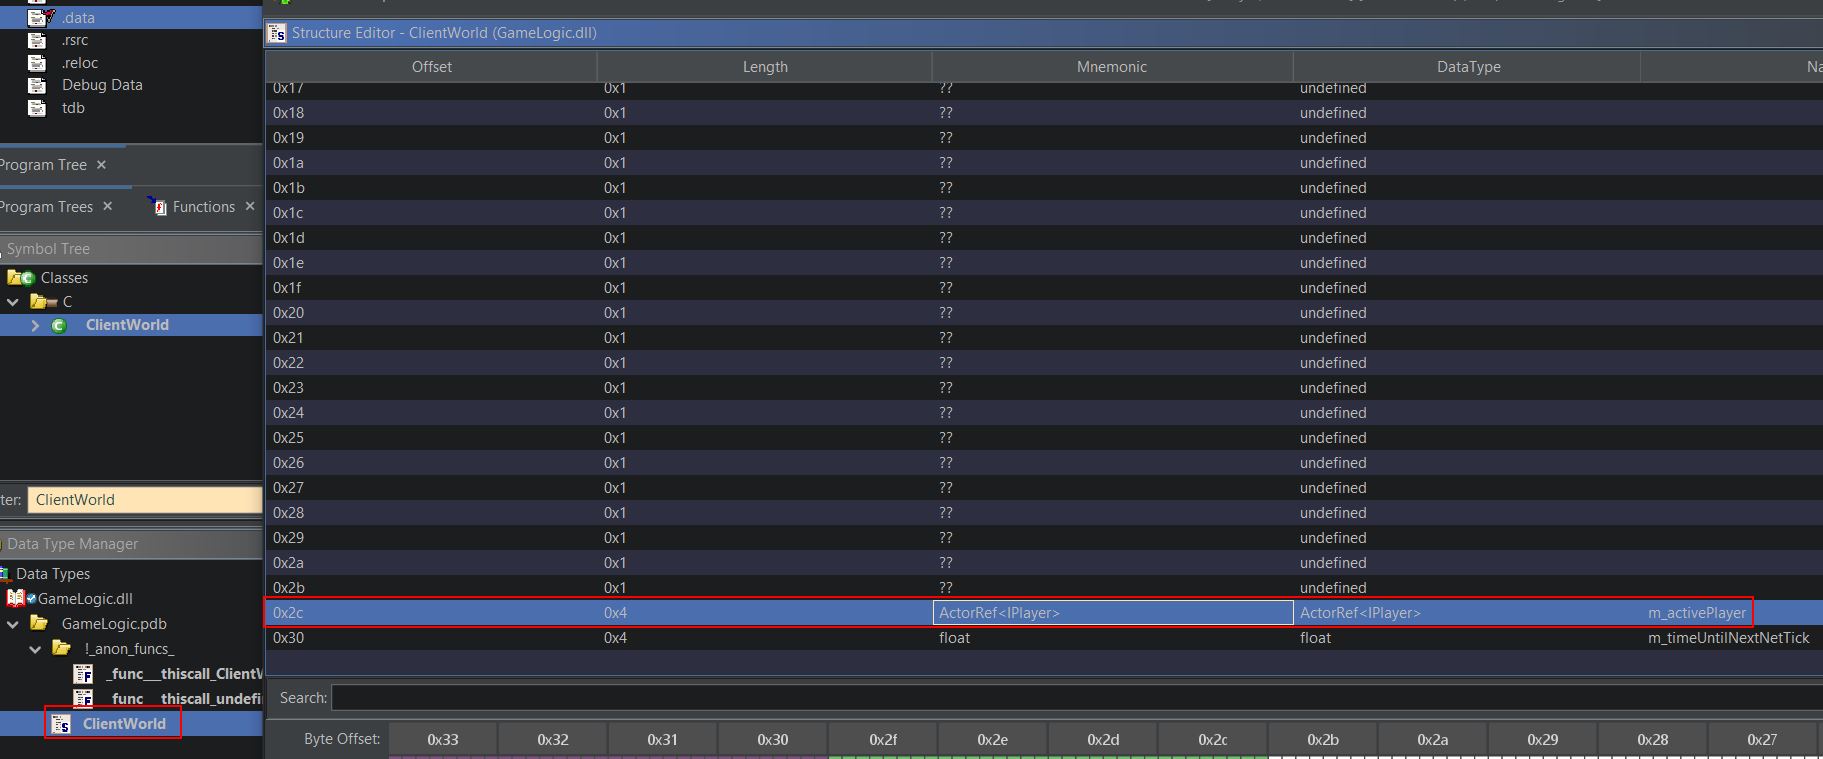
Another reference is present in the data structure of ‘ClientWorld’ which appears to have inherit the ‘World’ class; however, it also contains an ActorRef pointer to an IPlayer object named ‘m_activePlayer’.
Verifying Offsets and Pointers with Windbg
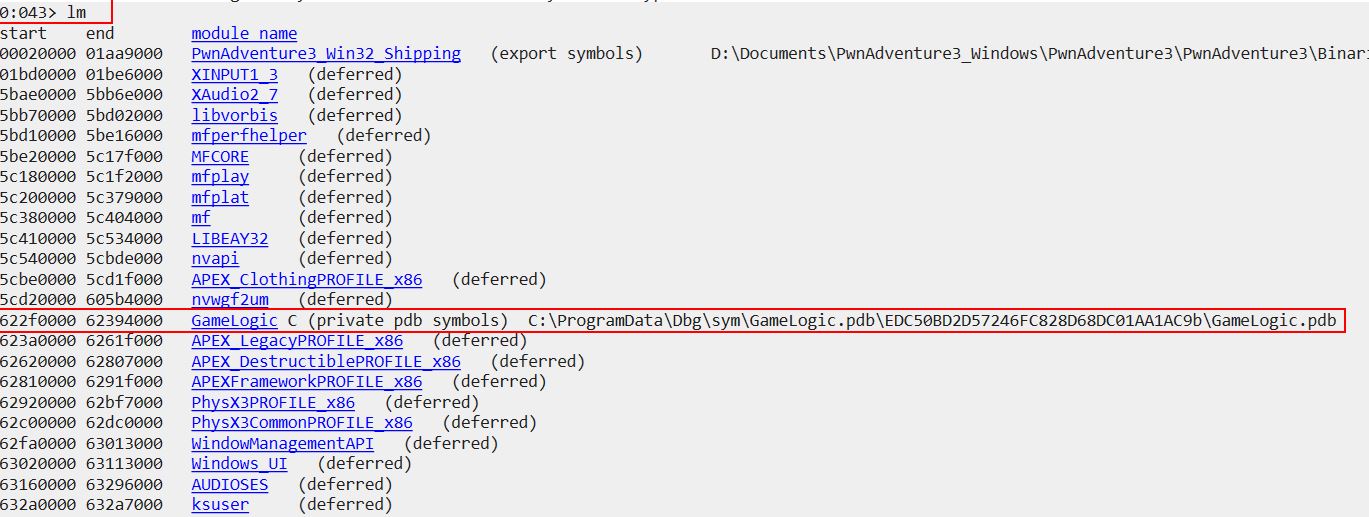
The previously mentioned 2 references seem promising; however, they haven’t been confirmed yet. Using a Debugger like Windbg Preview allows us to understand what exists in memory more easily and to confirm this. By attaching a debugger to the running process (after ensuring Cheat Engine is no longer attached), we can then list loaded modules as a starting point.
lm
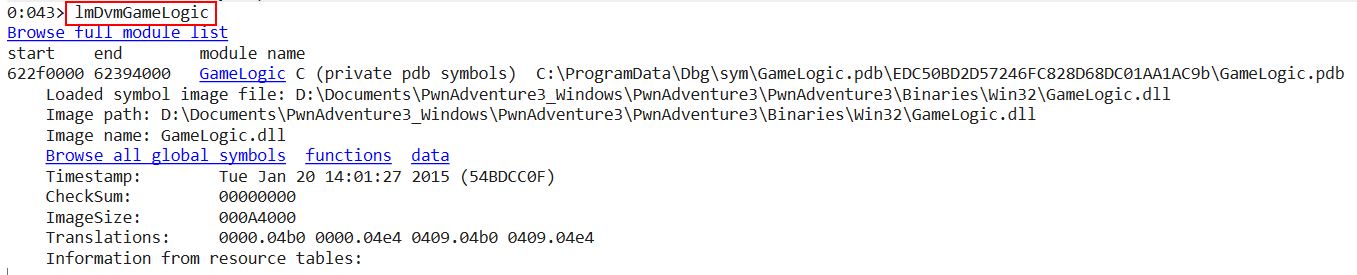
Clicking the GameLogic DLL imediatelly pivots to another command which shows a bit more detail on it.
lmDvmGameLogic
From here all of the global symbols in this DLL can be viewed with the following command.
x /D GameLogic!a*
Individual functions and data can also be viewed based on their name or starting letter. For example ‘/d’ will dump out data in the below commands for anything in GameLogic beginning with the letter ‘g’, whereas ‘/f’ will dump out any function in GameLogic beginning with the letter ‘a’.
x /D /d GameLogic!g*
x /D /f GameLogic!a*
Looking at the data structures we can see references to ClientWorld, and World, but more importantly the statically allocated variable ‘GameWorld’ and what it is pointing to can be found by searching for it.
x /D /d GameLogic!GameWorld*
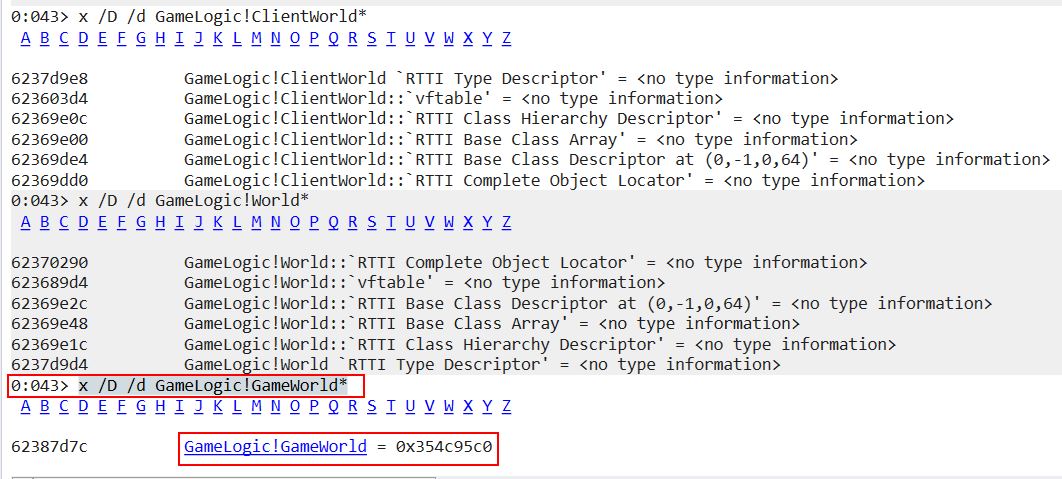
Clicking this runs another command which recursively displays fields in a depth of 1 after casting the object at address 0x354c95c0 as either ClientWorld or World.
dx -r1 ((GameLogic!ClientWorld *)0x354c95c0)
dx -r1 ((GameLogic!World *)0x354c95c0)
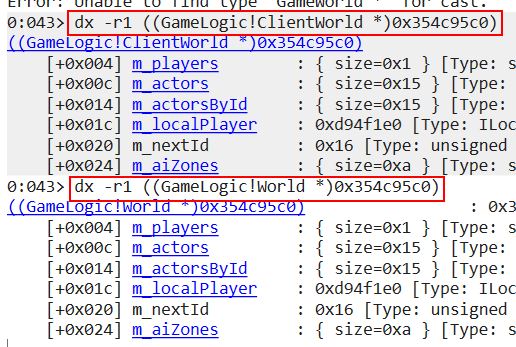
Not only can this be used to locate ‘m_localPlayer’ which references our current player, but it can also be used to find all objects and players currently loaded into the world as a whole. Having this information can be insanely useful if you wanted to know for example how much money and health another player has.
At the moment if ‘m_localPlayer’ is clicked it will attempt to read the address reference as an ‘ILocalPlayer’ type which reveals nothing.
dx -r1 ((GameLogic!ILocalPlayer *)0xd94f1e0)
Comparing what’s contained in the ‘m_players’ set for our player object, and the ‘m_localplayer’ offset of 0x01C shows that these 2 addresses don’t match.
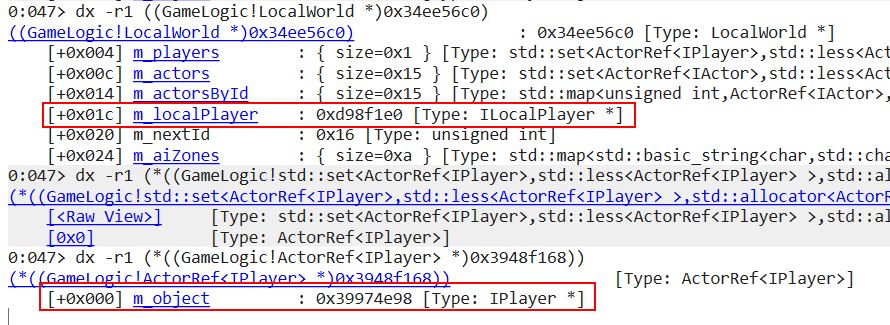
Note: At this point address registers had changed due to the program crashing.
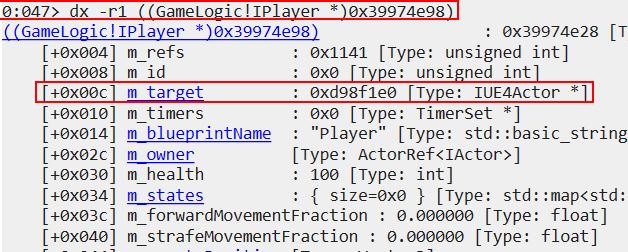
This is because ‘m_localPlayer’ is of type ‘ILocalPlayer’, and the entity within ‘m_object’ is actually an address reference to a type ‘IPlayer’. When comparing to what’s contained within our IPlayer object it can be seen that a reference to ‘m_target’ resolves to the other address seen in ‘m_localPlayer’. This is also seen further on tied to it’s own instance of ‘m_localPlayer’.
Using the Pointer Scanner in Cheat Engine
Now that we have an understanding of how these classes fit together and that we can’t just zero-in on the GameWorld global variable offset, followed by an offset of 0x01C to get our ‘m_localPlayer’ reference, we can use the Pointer scanner in Cheat Engine to our advantage.
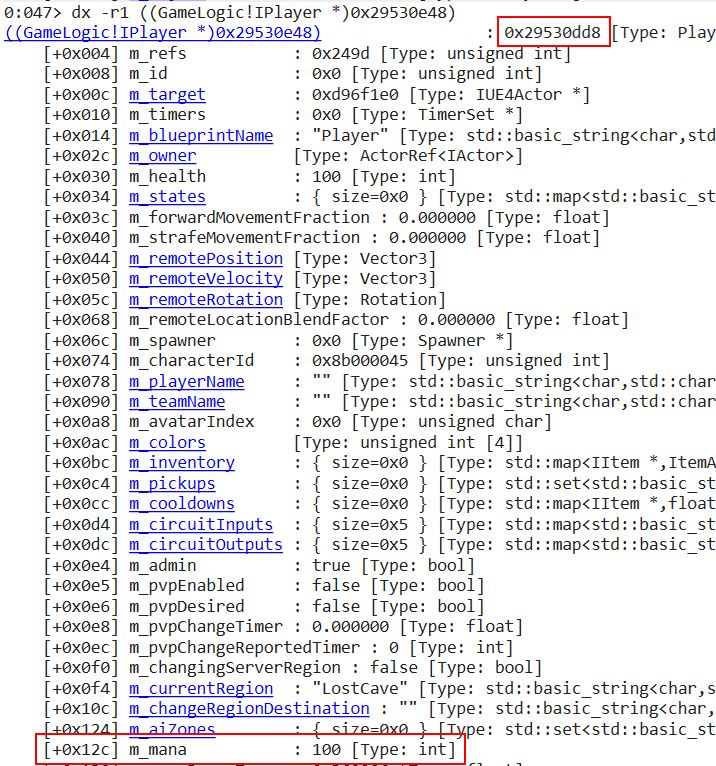
Opening Cheat Engine and attaching it to our game process, we can either perform the same iteritive memory scan > fire spell > memory scan approach as in step 1, or we can simply find our player object in Windbg as we did in the previous step and calculate an additional 0x12C offset to get our mana. In this instance the player object is located at address ‘0x29530dd8’, and our mana variable is located at address ‘0x29530F04’.
Adding an address with an offset into Cheat Engine allows it to perform any address calculation automatically.
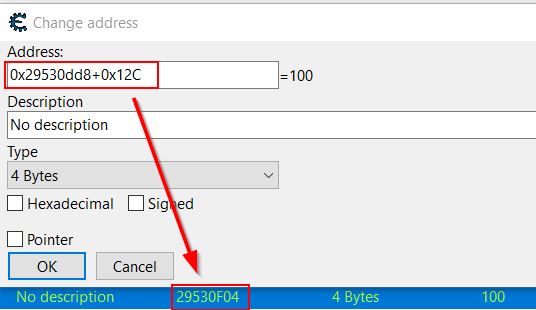
By right clicking the added mana address (0x29530F04) we can now select ‘Pointer Scan for this address’. If done without filters or without using a saved pointermap this can result in a huge amount of results and take some time; however, because we know the base address and offset of the GameWorld global variable we’re targeting, this can be used as a filter in our scan.
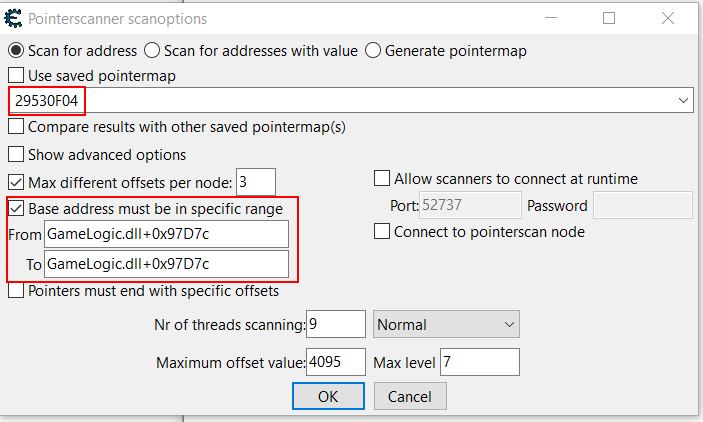
This requires you to save the pointerlist somewhere upon running, and in this instance resulted in 1135 paths. Filtering by Offset 3 often reveals the shortest pointer path to this address, and in this instance shows a small path by using the offsets 0x1C-0x6C-0xBC to reach the intended address.
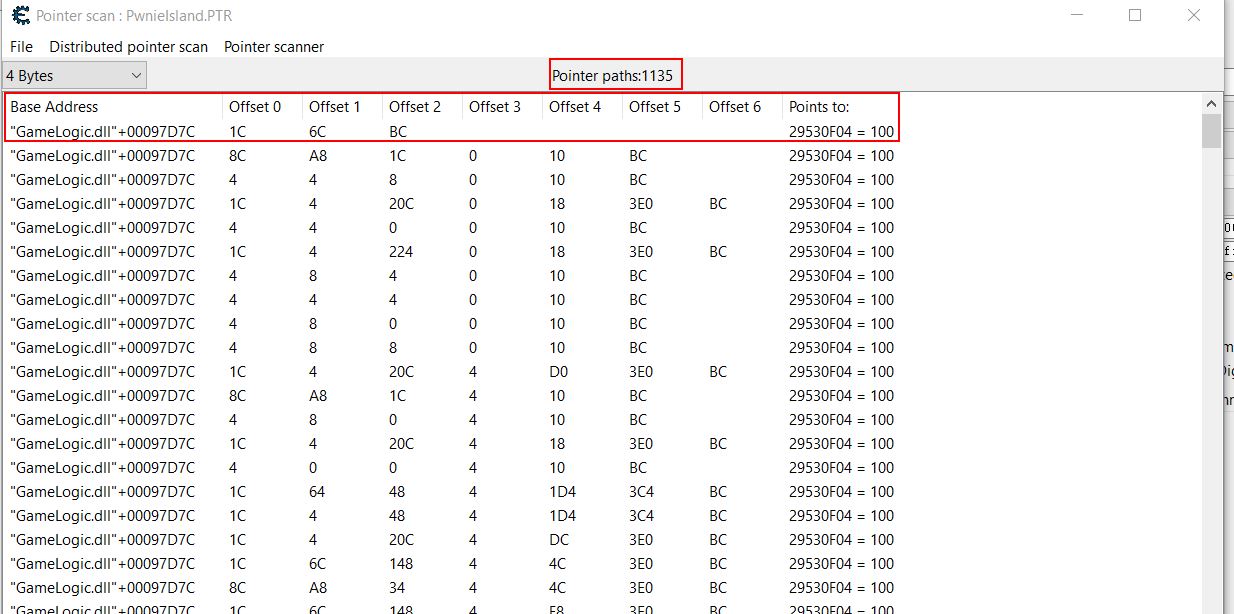
More often than not the smallest path is a path which will remain upon restarting the game or logging out, and in this instance the first offset being used happens to be 0x1C (the offset for ‘m_localPlayer’) which shows there may yet still be a close connection between this identifier in memory, and the player we’re looking for. Double clicking the address adds it for monitoring.
With the Pointer scan results still open, one way of filtering the list down is to log out, start a new game, and close/reopen the game. It’s important to remember if the game is closed to reattach Cheat Engine to the newly running process after a new game is started. From here, by returning to the Pointer scan results, using ‘Pointer scanner > Rescan memory’ the list can be narrowed down. As a new game starts many of the pointers will now either point to a new address with a value of 100, or they will point to nothing.
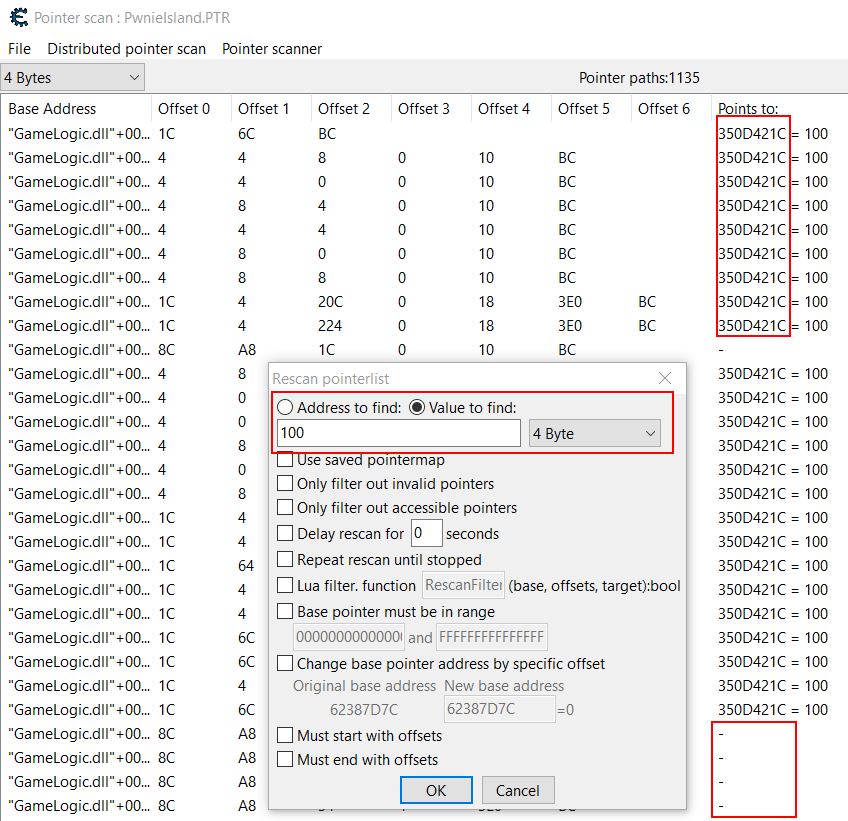
Where these point to nothing they will be filtered out, but any which point to a new address with a value of 100 indicate they are likely valid offsets which can be used to find your mana upon restarting the game. These pointer paths serve as valuable ‘Cheat Engine Tables’ that can be used so long as a future update of the game doesn’t break these paths by changing offsets.
For example at this point a persistent Cheat Table for the game may look like:
(note -> is a pointer offset):
- GameLogic.dll+97D7C (World)
- GameLogic.dll+97D7C -> 1C (Player-Ref)
- GameLogic.dll+97D7C -> 1C -> 6C -> BC (mana-path1)
- GameLogic.dll+97D7C -> 1C -> 4 -> 3E0 -> BC (mana-path2)
- GameLogic.dll+97D7C -> 1C -> 4 -> F8 -> 3E0 -> BC (mana-path3)
- GameLogic.dll+97D7C -> 1C -> 4 -> 254 -> 50C -> BC (mana-path4)
- GameLogic.dll+97D7C -> 1C -> 4 -> 4C -> 3E0 -> BC (mana-path5)
Having multiple pointer paths such as the above can be useful in case one of them breaks with an update.
Part 5: ❤️👈 Locating Health Pointer Path via Relative Offsets
Once a pointer path has been found for a variable which exists within an object (e.g. mana inside of our player object), it’s easy to find other related variable pointer paths by using relative offsets. If we go back to the results of our Windbg query, it was shown that in relation to our player object the ‘m_mana’ variable containing our mana is at offset 0x12C in memory, and the ‘m_heath’ variable containing our health is at offset 0x030 in memory.
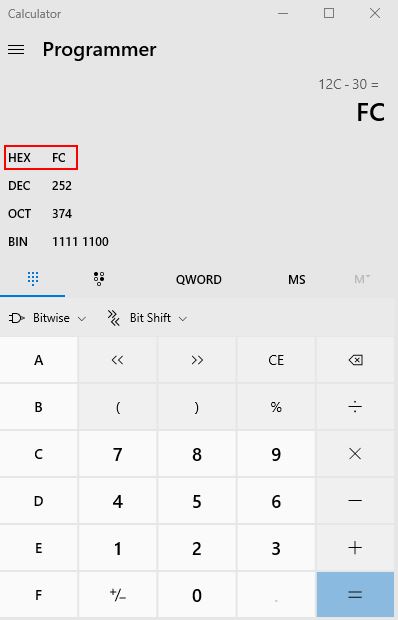
By subtracting the difference between these offsets, a relative offset can be obtained. One simple way of doing this is using the ‘programmer’ version of the Windows calculator.
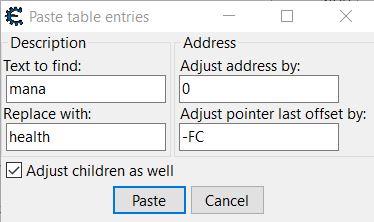
By copying the existing mana pointers, Cheat Engine asks what to replace in the pasted description and what adjustments to make. Because mana is at a larger offset than health, by subtracting the relative offset and pasting these entries, we now have 5 health pointer paths that can be used upon reboot and restart of the program. These can all be grouped with headings for ease of access.
The end result is easily manipulated variables.
Part 6: 👉🎁 Locating Inventory Pointer Path via Relative Offsets
Similar to previous, we can locate a pointer path to our inventory by working out the difference in offset between the path to our mana and the path to our inventory. Mana is at offset 0x12C, and our inventory is at offset 0xBC. By subtracting these we get the value 70. Rather than copying and using the offset feature in Cheat Engine upon pasting, the pointer paths can be manually changed by doing the same calculation.
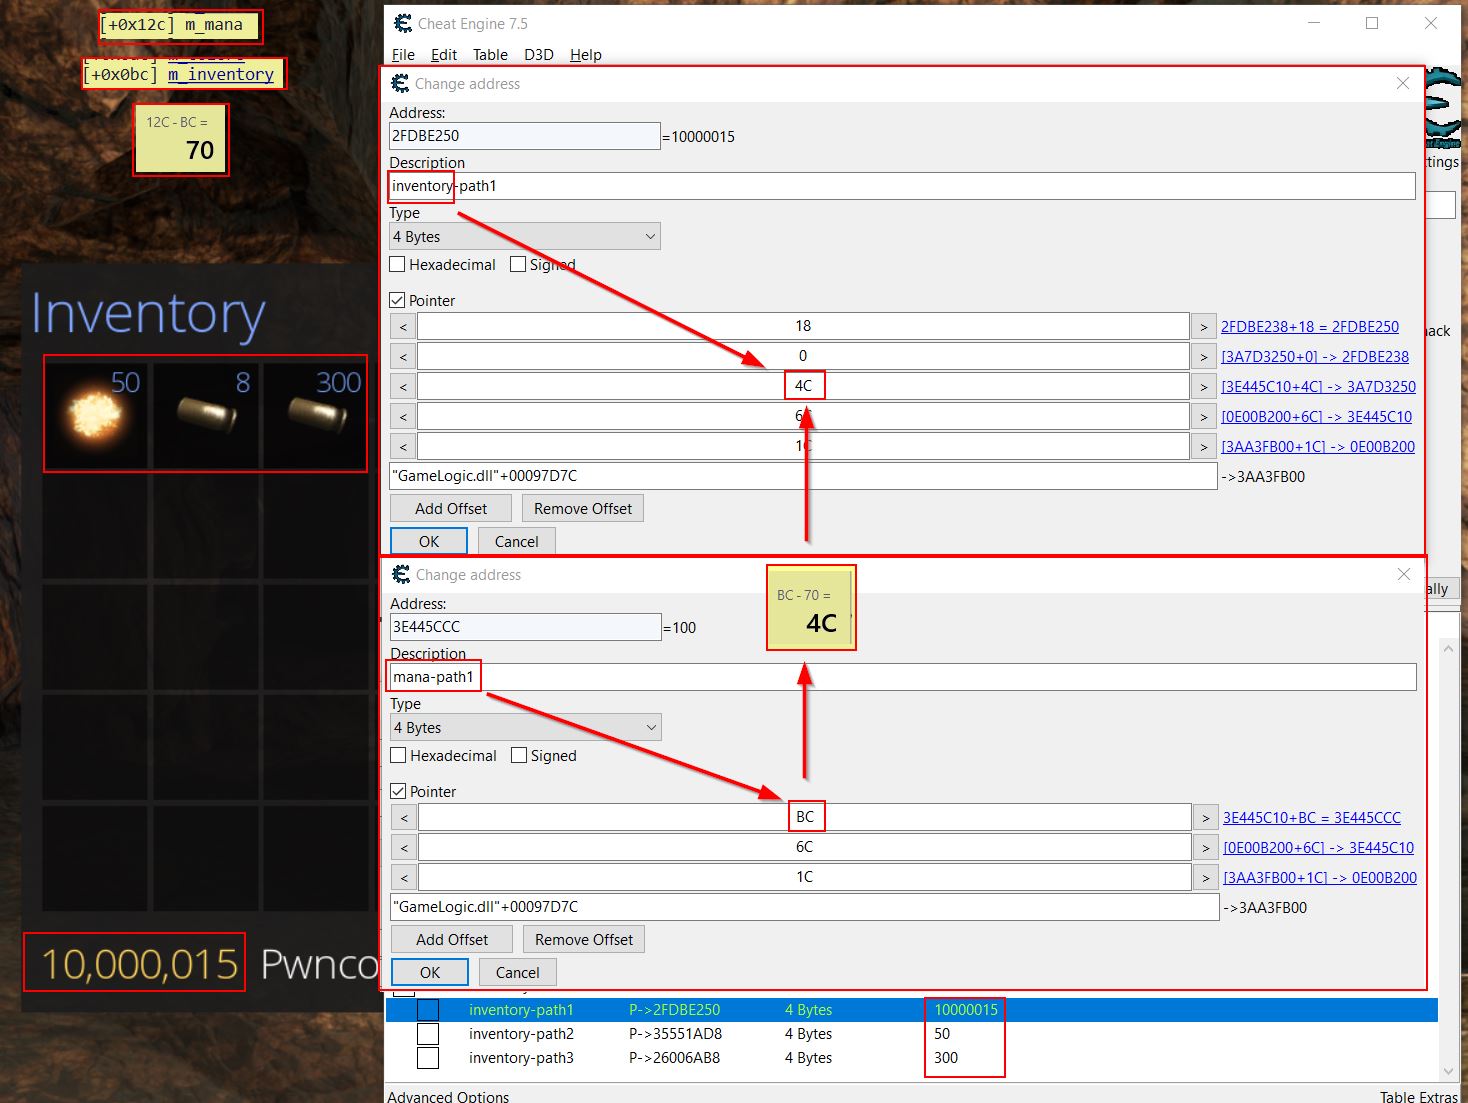
In the above picture it may also be apparent that whilst the inventory is located at offset 0x4C, to properly get to our Pwncoin value this requires another pointer offset by 0 and then 18. The reason for this is because the player inventory is stored as a map structure which maps items and their associated count. This point is more easily demonstrated by comparing the offsets to what is shown in Windbg.
In the below we can see that after adding the offset at 0x4C we land at the head of our inventory in address 0x3A7D3250 (Note: You’ll need to view raw to get the underlying offset structure). From here the 0 offset is telling us to look at the object directly left to us in the node tree, and because all of these contain the value pair ‘_MyVal’ at offset 0x10, this offset needs to be included into the final pointer. Of note is that a value pair isn’t what we want, but rather the second entity of type ItemAndCount is what is required. By fetching the count at offset 0x4 a grand total offset of 18 is required.
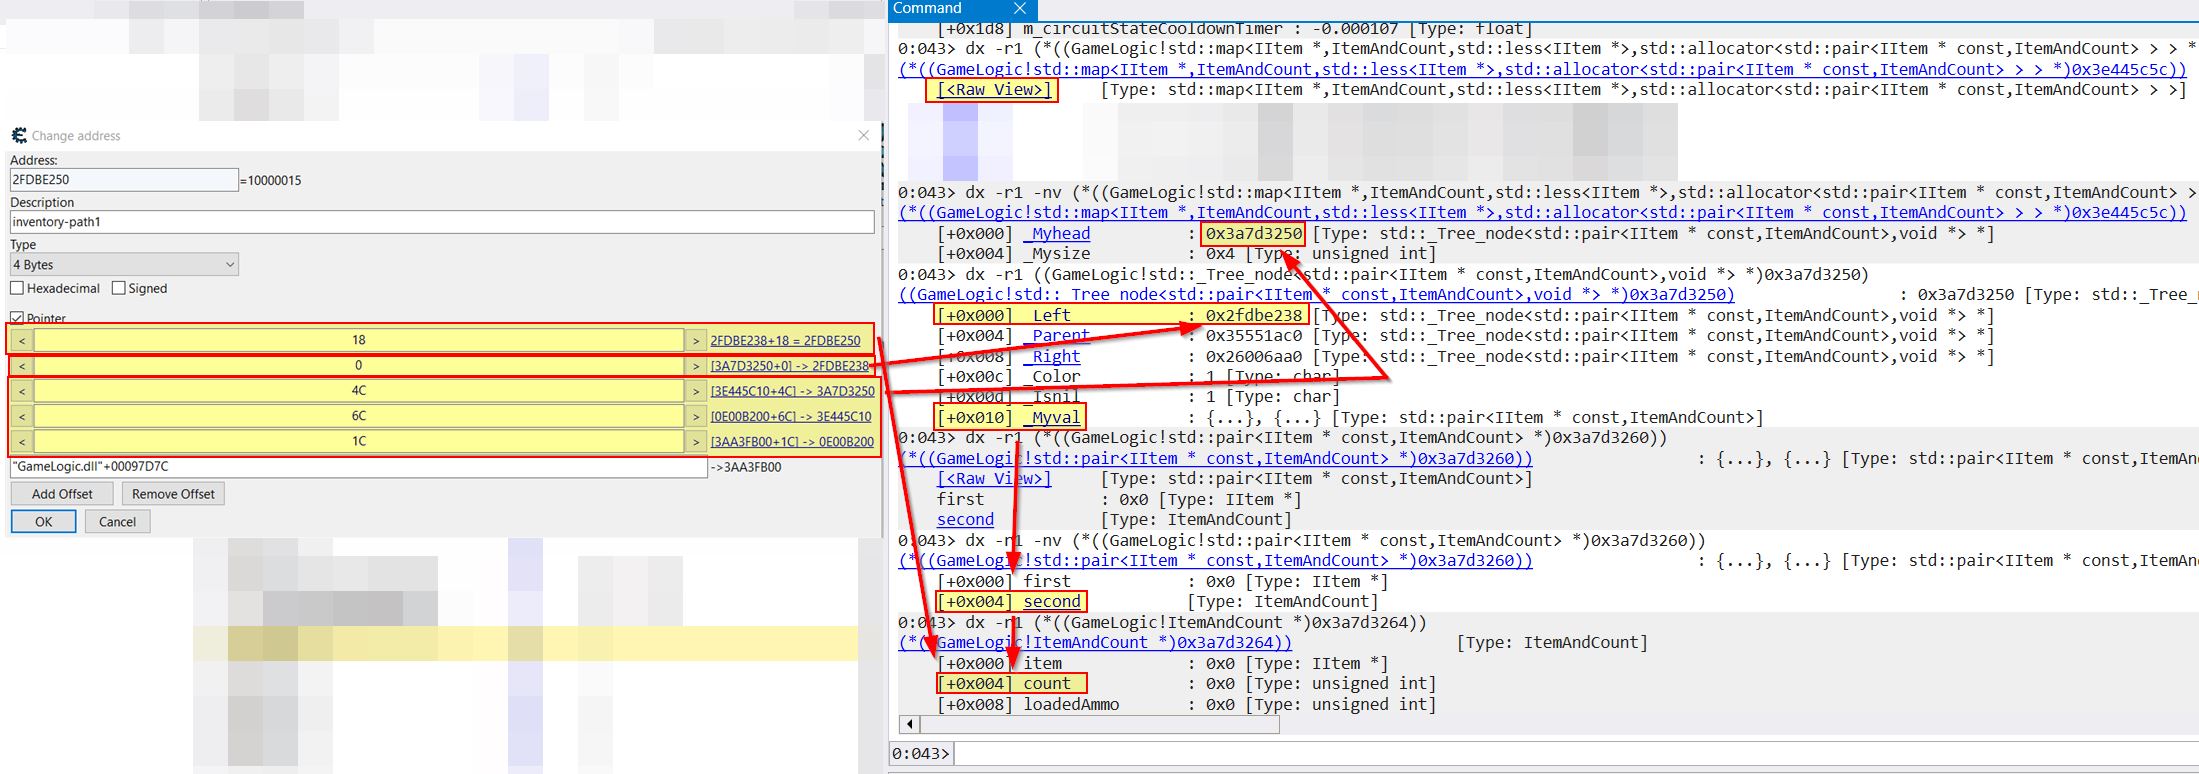
At this point you only have a pointer path to one item in your inventory. A way to easily rectify this and get the parent item and item to the right of this tree node is to change the second to last relative offset in the pointer path.
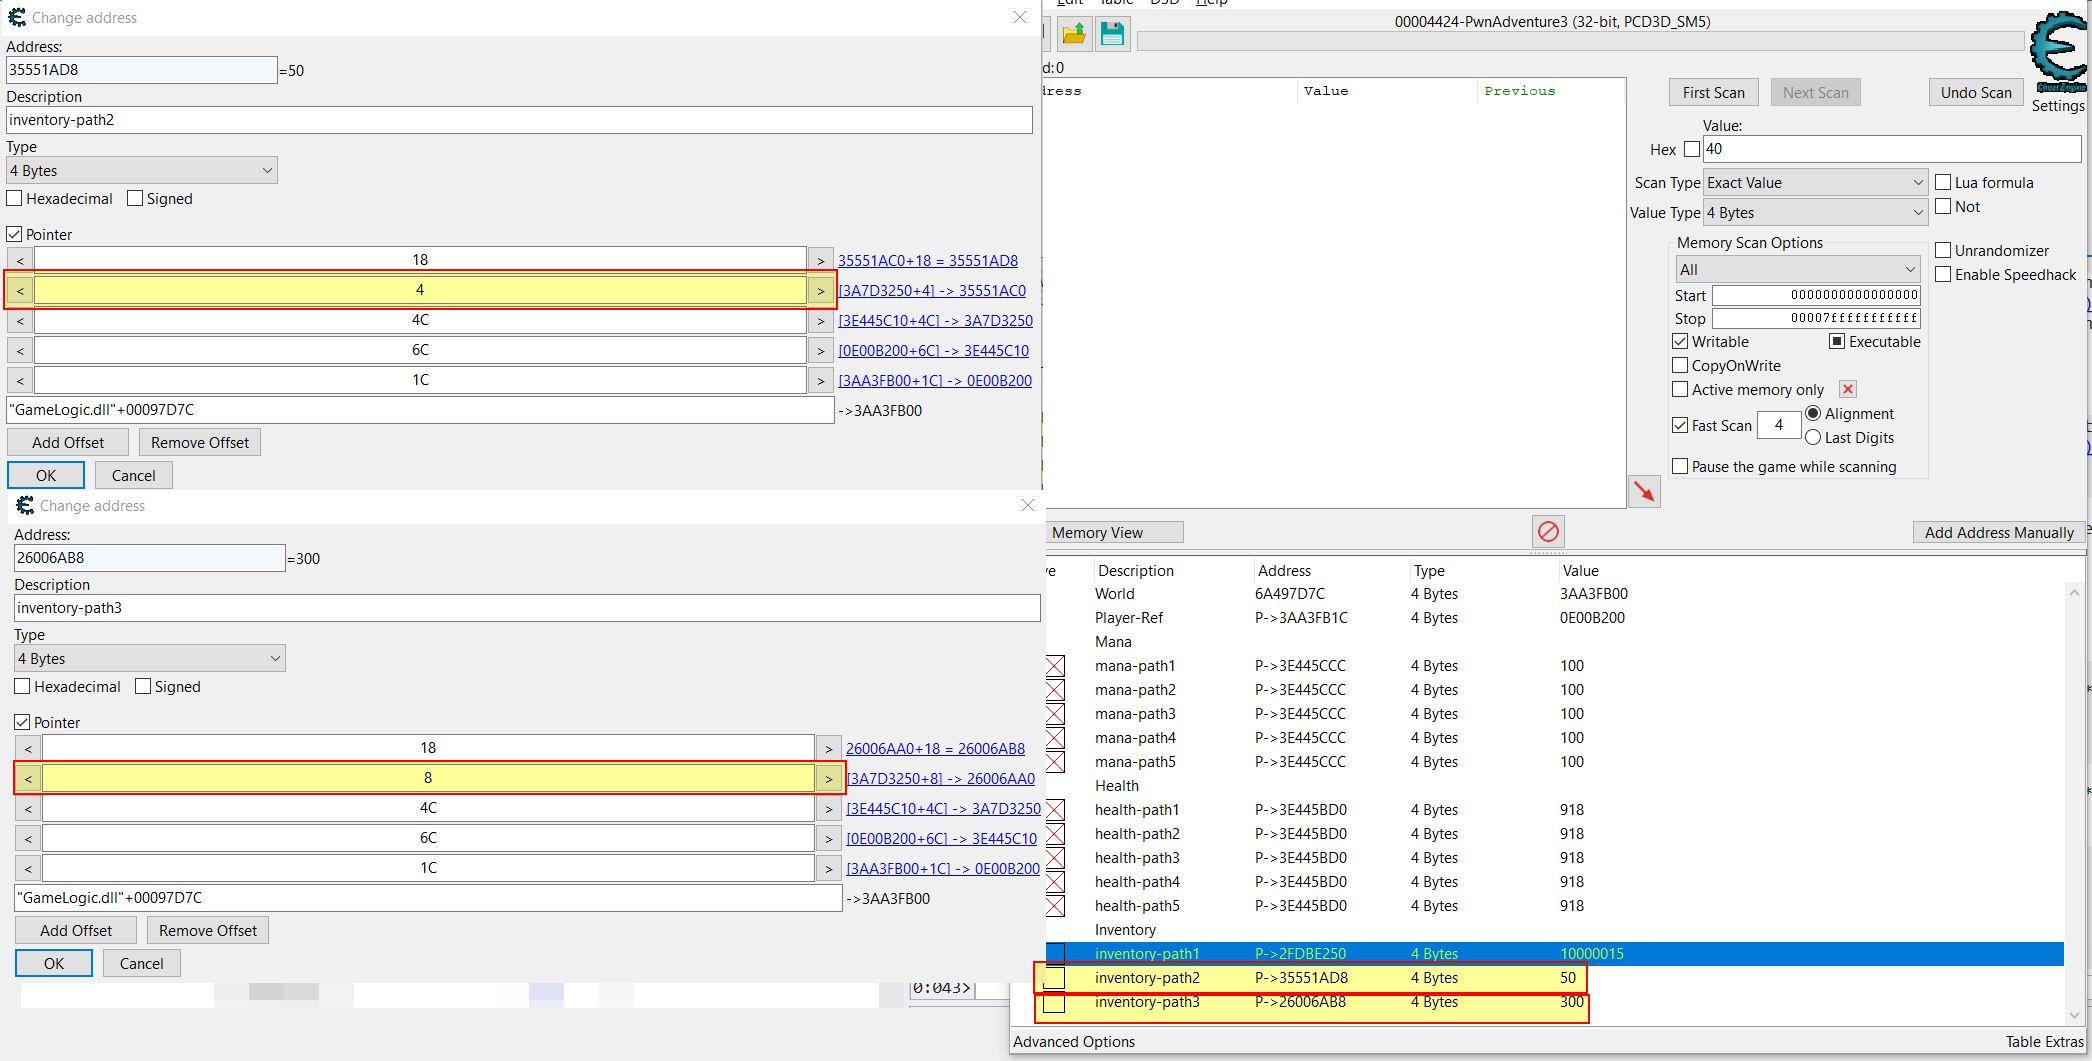
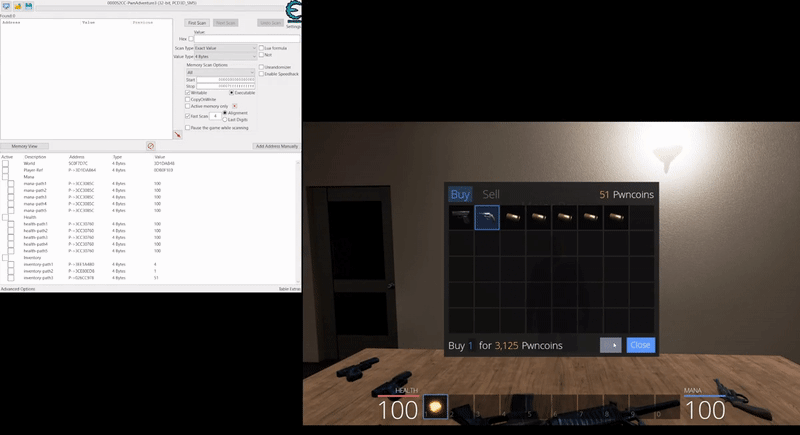
Upon existing the sewers a footpath is available which takes you to Major Payne who is a merchant. By exploiting these pointer paths it’s now trivial to have unlimited Pwncoins and number of items such as ammunition in our inventory.
This same process doesn’t hold true in an online game where although the quantity appears to increase, the actual number of items in your inventory and Pwncoins is governed by the server.
🌏 Multi-Player Online Hacking
Locating Challenges
With the basics of offline game hacking in memory covered, we can now move on to hacking the game when played online. To understand what game hacks may need to be developed, the following challenges must be found at a minimum.
- Unbearable Revenge
- Until the Cows Come Home
- Overachiever
- Egg Hunter
- Pirate’s Treasure
- Fire and Ice
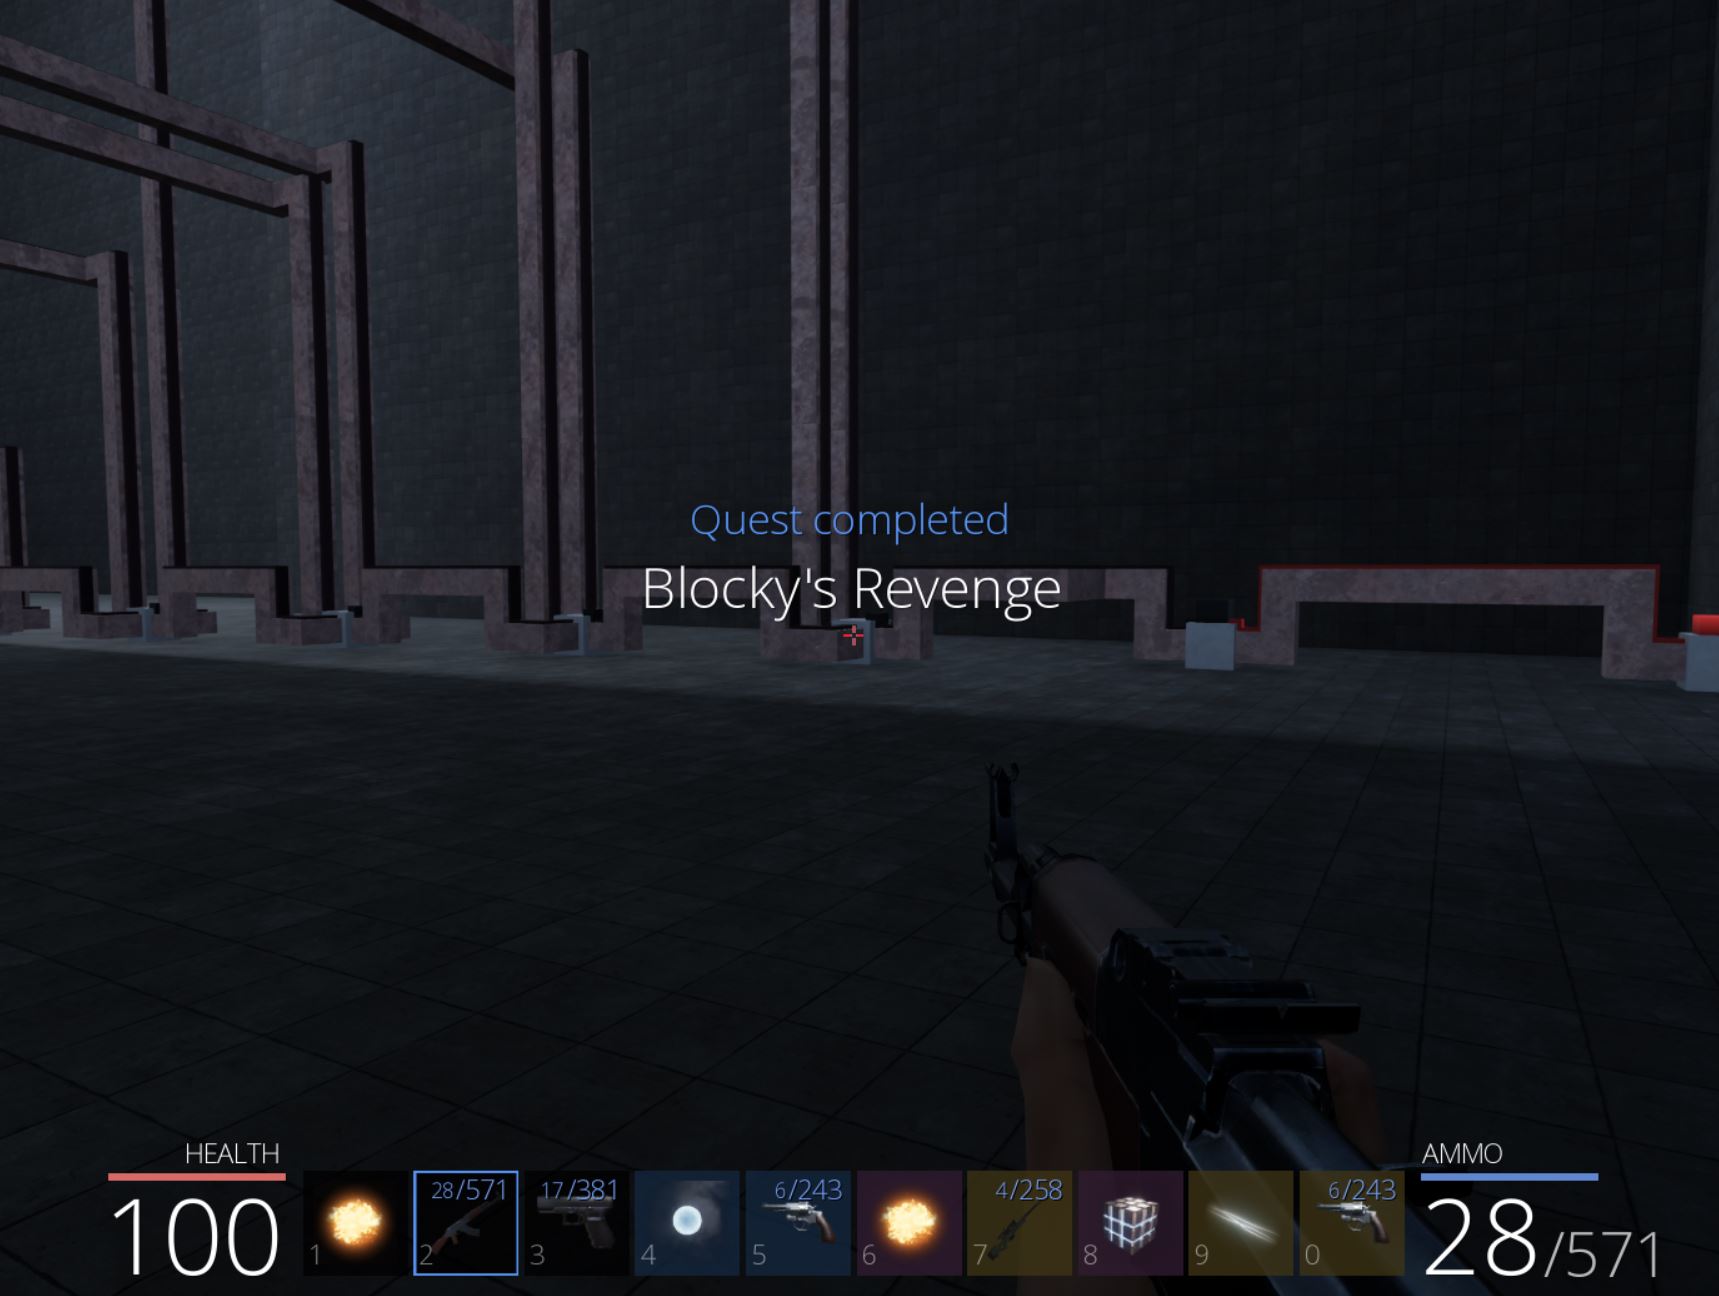
- Blocky’s Revenge
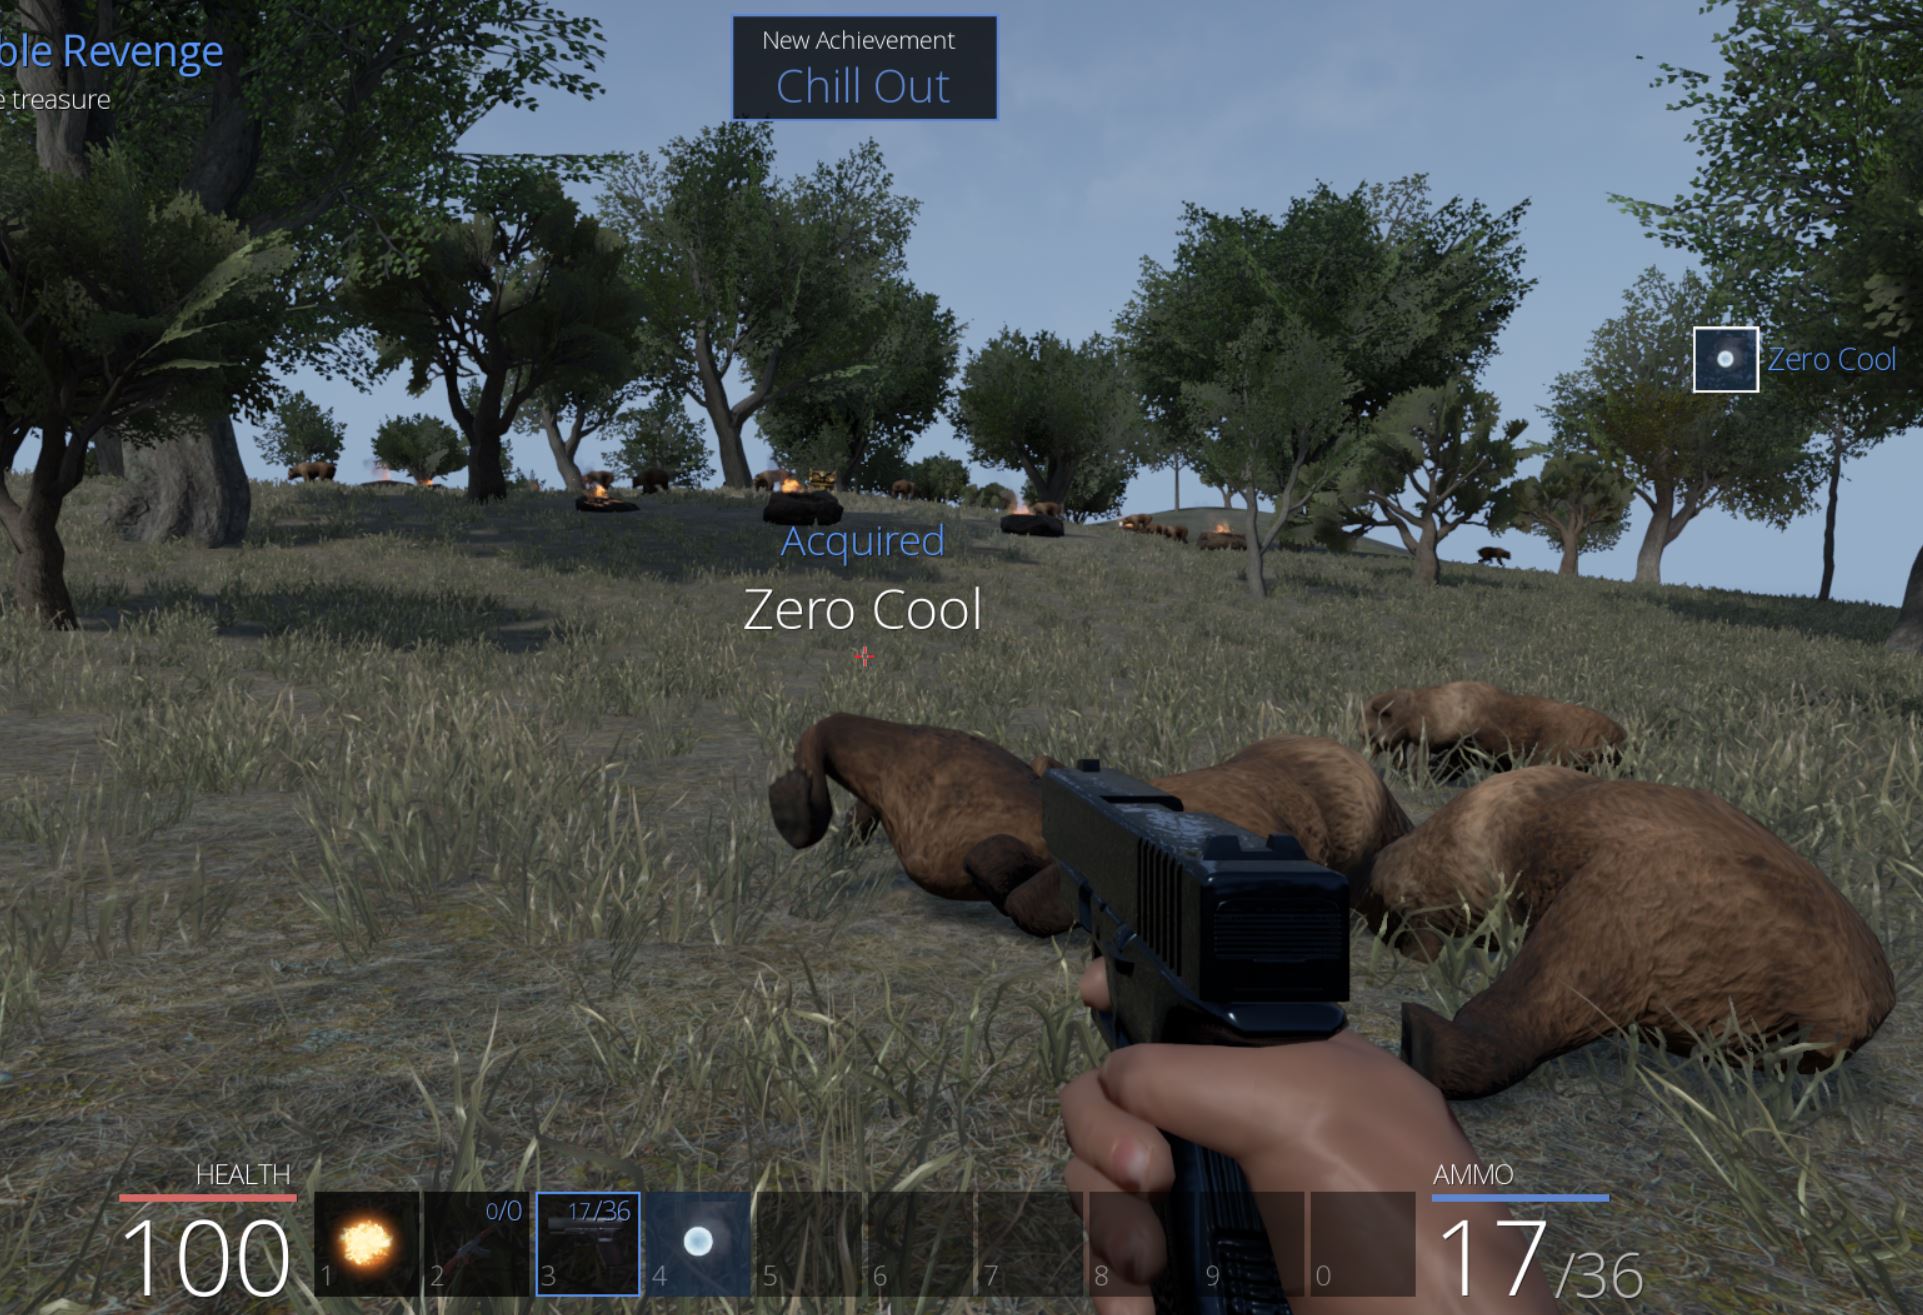
Travelling outside of the Town of Pwnie into the forest immediately reveals ‘Blocky’s Revenge’ and ‘Unbearable Revenge’. Starting with the ‘Unbearable Revenge’ challenge, this requires surviving in the area for 5 minutes whilst a horde of bears attacks. Of note is that the bears can drop useful items upon being killed such as the Zero Cool spell.
Part 1: ❓ Understanding Online and Offline Class Discrepencies
Playing online as opposed to offline results in slightly different behaviour and visible structures in a debugger. For example if using Windbg on the game instance when connected to the server, any prolonged process suspensions will wind up resulting in being disconnected from the server. Despite this it reveals a number of useful offsets we can use for tampering with the game.
In the above there’s a change in available offsets on the player object. This includes interesting variables associated with player movement such as m_jumpSpeed, m_jumpHoldTime, m_walkingSpeed, m_remotePosition, m_remoteVelocity, m_remoteRotation. It also contains variables associated with health and mana recovery such as ‘m_healthRegenTimer’, and ‘m_manaRegenTimer’.
Examining the GameWorld object also reveals it now contains ‘m_activePlayer’ at offset 2C which makes this an easy reference to our own player in a multiplayer game.
Part 2: 💨🐤 Speed and Jump/Glide Game Hack
Using these new offsets we can tamper with parameters to allow us to run really fast, jump really high, and jump for a longer period of time in an attempt to survive the bear attack.
The issue is that too many bears appear, and making your jump extremely high leads to the circle being left (and sometimes escaping the entire stratosphere of the game).
I am a sloth with a hand gun 🔫
One particularly interesting parameter is ‘m_jumpHoldTime’. At present this variable is set with an entremely low value of 0.2 indicating you can hold the jump key for 0.2 seconds before gravity begins bringing you back to Earth. By modifying this to a higher value it is trivial to float safely into the tree next to the chest for safety.

This works up until a point, specifically until the 1 minute 30 mark. Up until that point no bear can hit you and you’re free to pick them off as a sloth with a hand gun; however, at the one and a half minute mark something unusual happens.
The bears pick up guns and immediately kill you?! Okay so at this point it’s clear the game developers aren’t fighting fair and we’ll need to up the game hacking.
Converting an External Game Hack to an Internal Game Hack
At present we’ve been focussing entirely on using Cheat Engine for our heavy lifting. This is to say Cheat Engine opens a handle to our Pwnie Island process, and then uses this to read and write memory back into the game. In the context of game hacking, this process is generally known as using an external game hack, or developing a game ‘trainer’ using Cheat Engine.
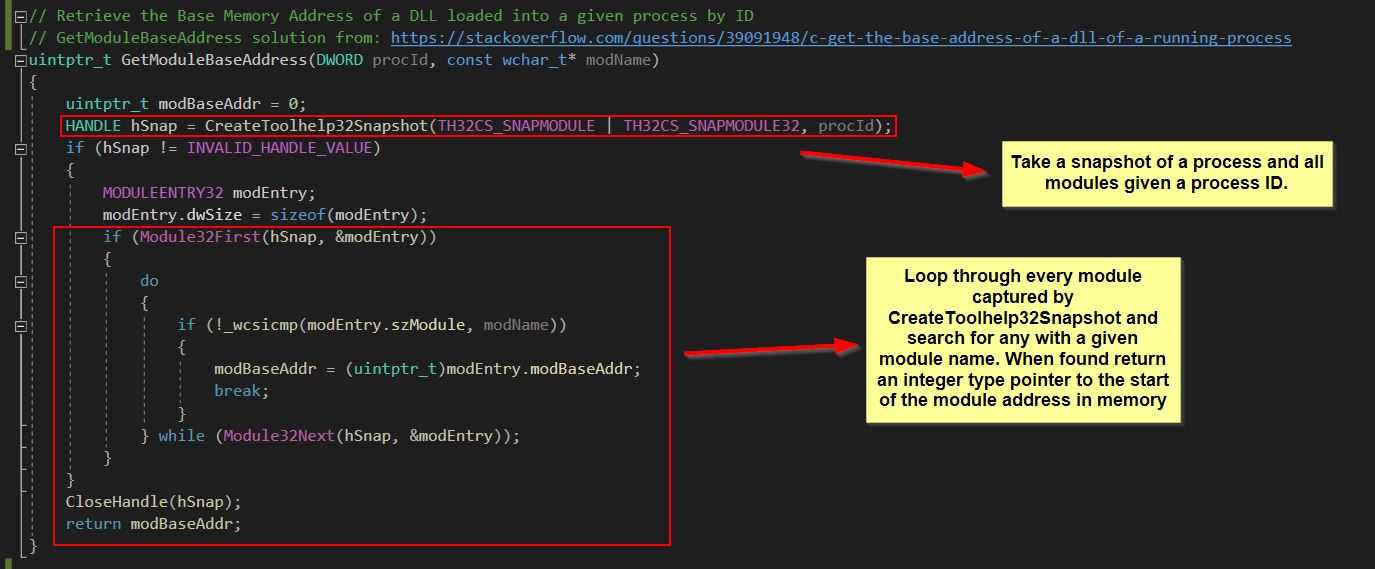
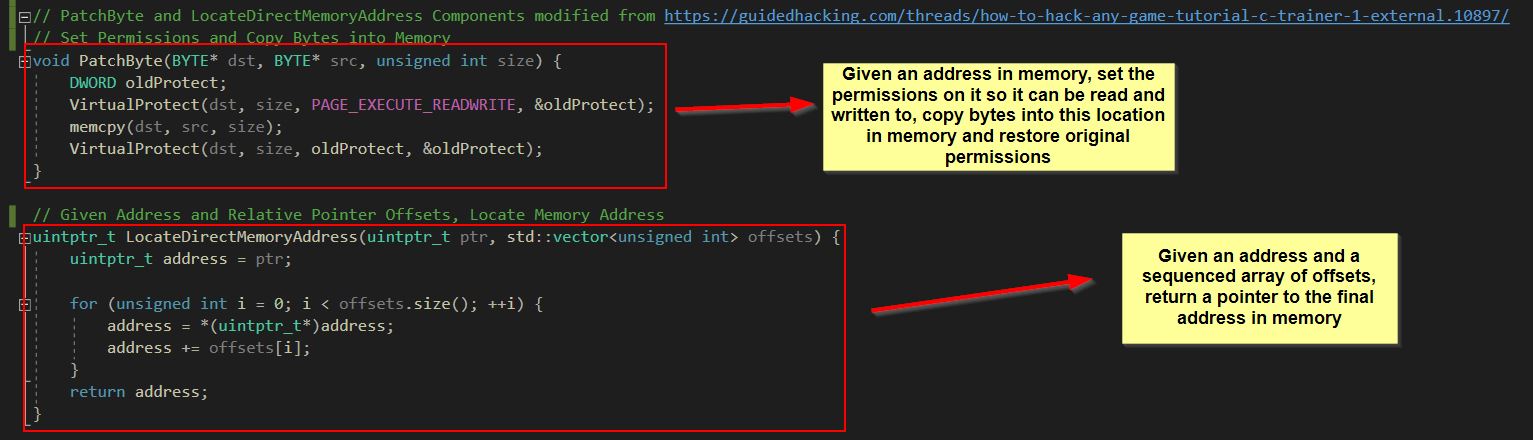
Instead, we can look to develop these same hacks as an internal game hack by creating a dynamic link library which can be injected into the game process on Windows. To make the same game speed and jump/glide hack, we’ll need a DLL which has 4 core components.
- 1: Run a function in a new thread upon being attached to a process.
- 2: Locate the GameLogic.dll module in a given process memory.
- 3: Read and write to an injected process’s memory.
- 4: Trigger each cheat based on set conditions e.g. a hotkey to enable/disable.
Putting this into practice the solution I’ve devised in Visual Studio using C++ is as follows:
1️⃣: Use Create thread to launch the function CyberRaijuPwnIsland.
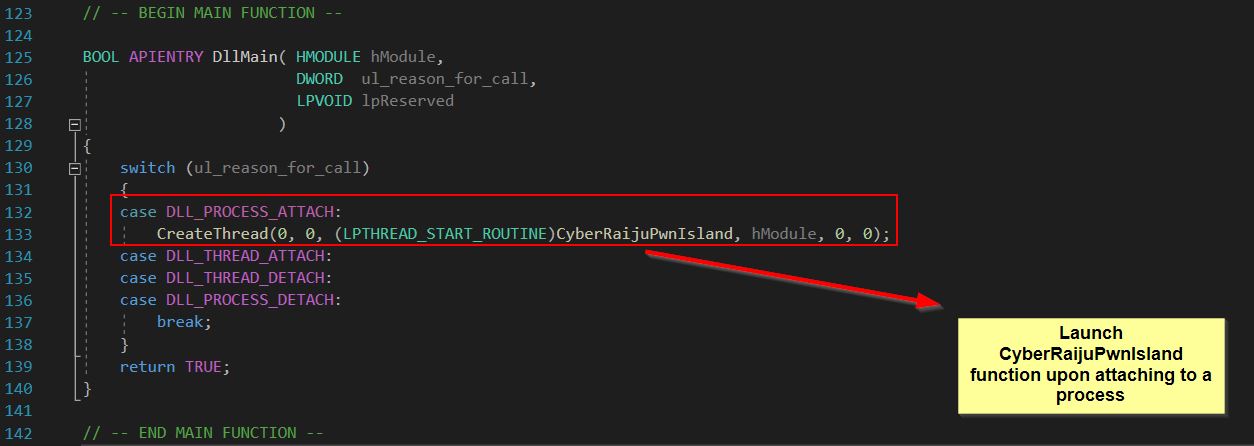
2️⃣: Pass a processId which is scanned for a given module name after collecting information via CreateToolhelp32Snapshot and the MODULEENTRY32 structure.
3️⃣: Setup functions to locate memory addresses based on a pointer format and offset, and set permissions on memory so that content can be written to it similar to the functionality provided by Cheat Engine.
4️⃣: Detect key presses within the function CyberRaijuPwnIsland and modify memory values based on a defined key toggle.
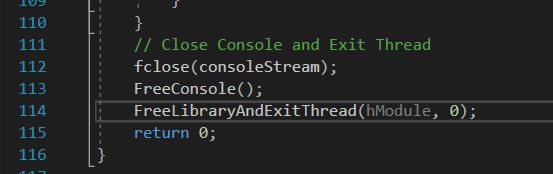
This also included some code to close the console and release the module/exit thread upon closing.
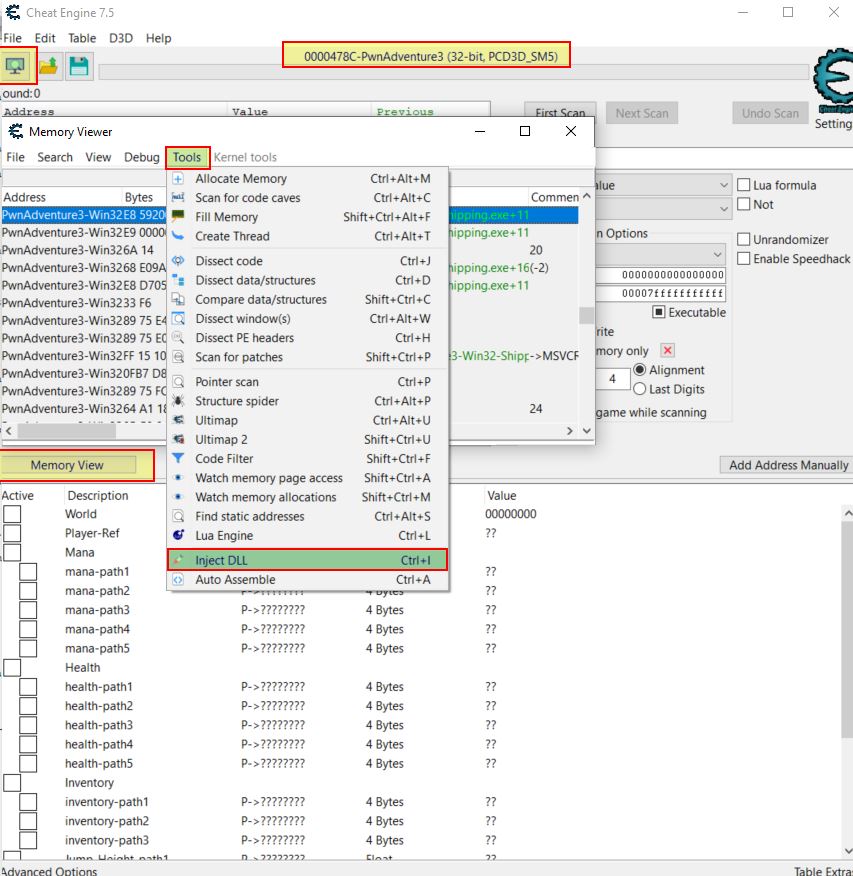
At this point we have an internal game hack which can be injected into memory using a plethora of tools, including Cheat Engine (Attach to process > Memory View > Tools > Inject DLL).
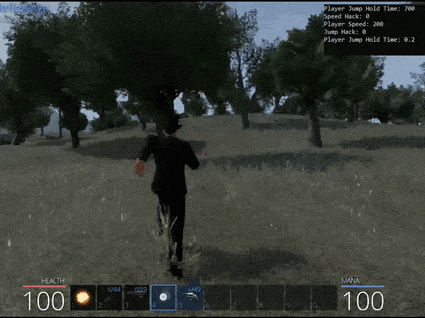
Once injected ‘F1’ and ‘F2’ can be used to toggle each game hack on and off. Note: It’s important to only inject the DLL once in the game given it relies on created game objects which aren’t initialised at the main menu screen.
Part 3: 💎 Modifying Game Logic
Air Hopping/Jumping
When examining the game logic in Ghidra there’s a function at offset 0x51680 of GameLogic.dll within the Player class. This is called ‘CanJump’ and it is returning a boolean value (True or False).
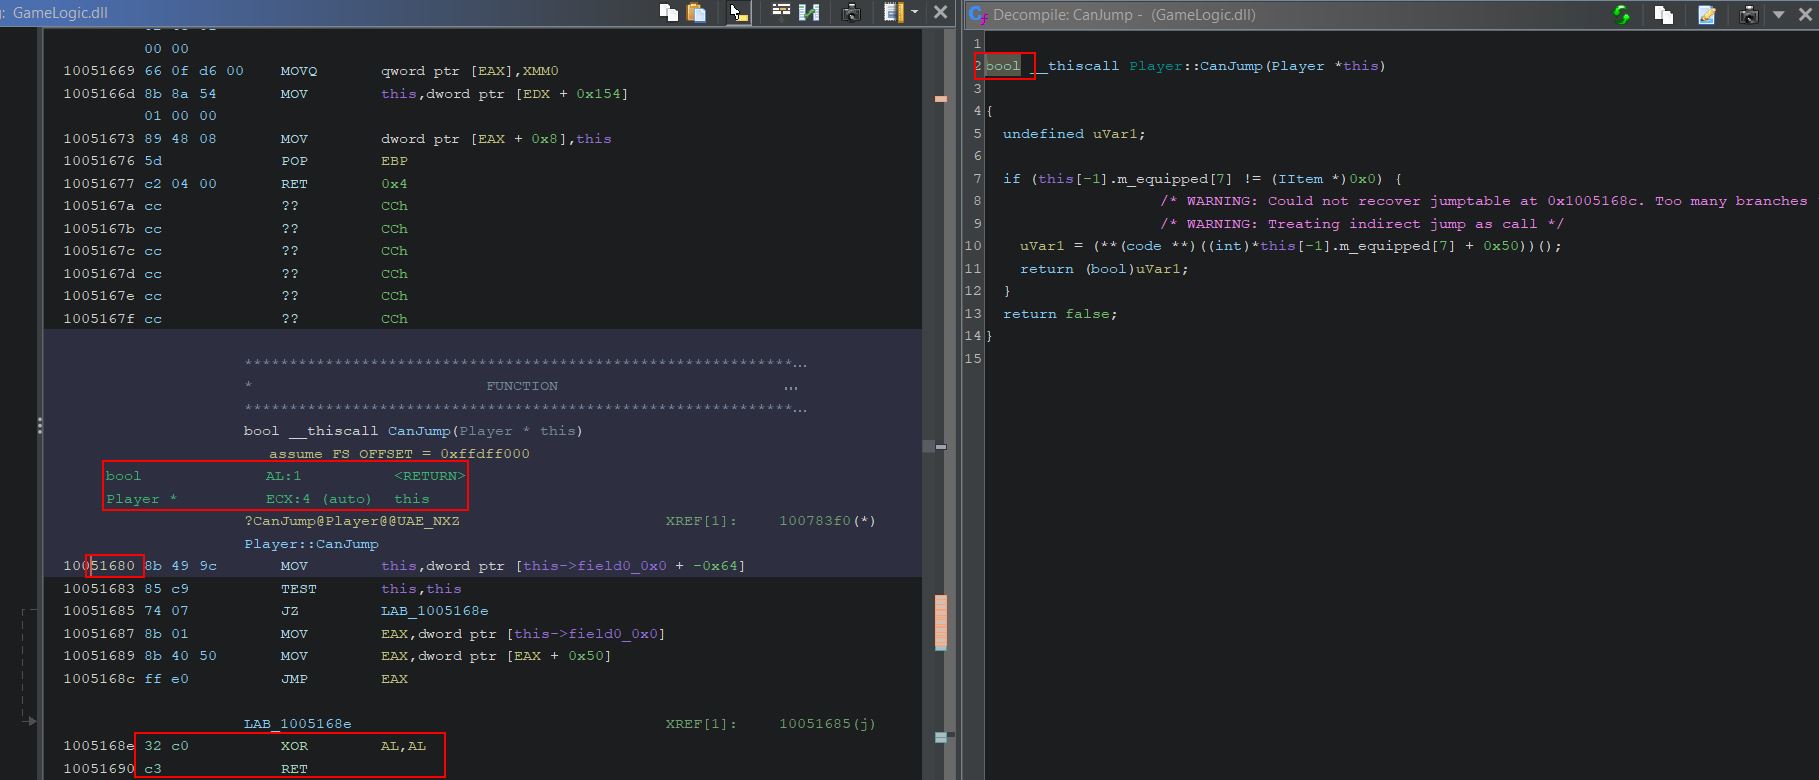
Given this function is effectively deciding if the player can jump or not, we can tamper with the logic of it so that it always returns true by replacing some of the assembly operations in memory with 0x90 (a nop or null operation) so that it progresses with the next instruction.
If we were to do this using the ‘Memory View’ of Cheat Engine it would look like the following.
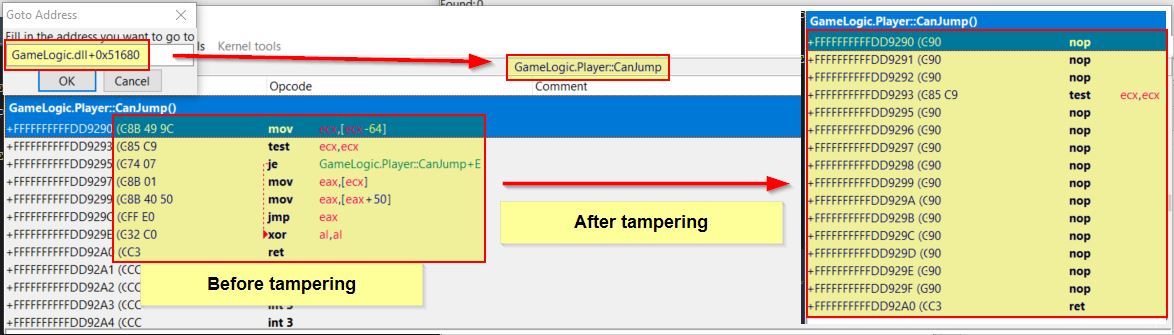
It may be evident that the instruction ‘test ecx,ecx’ remains, and the reason for this is any test of a register against itself will always return 1, which in this case signals true, thus allowing us to jump. Performing such a modification allows us to jump over and over again, even in the air! This differs from just allowing us to jump for longer as it provides a bit more stability with moving or changing direction mid air.
Implementing the same logic within our DLL can be done by hardcoding the required assembly instructions to be replaced. Although there’s possibly more dynamic ways of doing by hooking calls and redirecting flow, modifying the assembly instructions in memory to fill them will NOP instructions will work as an easy solution for what we’re trying to do.
Part 4: ↙️↖️ Tampering with Player Game Object Coordinates
Using the process of elimination with Cheat Engine, we can locate the coordinates for our player object ‘Z’ axis position in the world. The easiest way to get this is as follows:
- Scan for unknown float value
- Jump
- Whilst in the air scan for an increased value
- Upon landing scan for a decreased value
- move the camera (but not player) and scan for an unchanged value
By repeating steps 2-5 eventually a number of registers are found many of which point to a single value. By adding all of these to the address list, the following process can then be taken to find the correct address.
- Freeze a group of addresses
- Attempt to jump
- If there’s no change, delete those frozen addresses and freeze another handful
- Once a group is frozen which causes your player to be unable to jump, unfreeze the addresses until you locate the correct address storing your player game object Z axis position
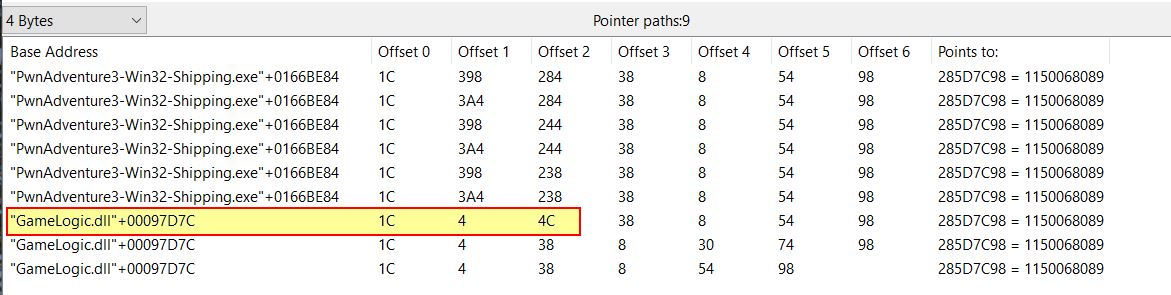
Upon narrowing down the address, we can repeat another pointer scan to locate pointer paths of interest to get to this address. Of interest is any which tie back to GameLogic.dll+00097D7C (our static game world object), or the base PwnAdventure3-Win32-Shipping.exe module. Lots of different pointer paths can be found and some are far more reliable than others, so it’s important to keep the scanner open and try to test the reliability of these by taking any of the following actions:
- Log out and back in
- Close and reopen the game (don’t forget to reattach cheat engine to the new process)
- Start a new offline game
Each time the pointer scan path should point to your current player Z axis, and adding it to the address list to be frozen should have the same result. Where they no longer point to data or irrelevant addresses they aren’t a reliable pointer path.
Some of the strongest pointer paths found were similar to ones which lead to find our player mana, which means they’re likely a good candidate to get our player Z axis. Another strong indicator is the repeated theme amongst these paths where no matter how many offsets there are, they always start with an offset 1C and end in 38 -> 8 -> 54 -> 98
- GameLogic.dll+97D7C -> 1C -> 4 -> 4C -> 3E0 -> BC (mana-path5)
- GameLogic.dll+97D7C -> 1C -> 4 -> 4C -> 38 -> 8 -> 54 -> 98 (player-z-path)
Another positive to this is that the X, Y, and Z axis values are almost certainly going to be next to one another, so by subtracting 4 from the final offset we get the Y axis, with 8 being subtracted leading to the X axis.
- GameLogic.dll+97D7C -> 1C -> 4 -> 4C -> 38 -> 8 -> 54 -> 98 (player-z-path)
- GameLogic.dll+97D7C -> 1C -> 4 -> 4C -> 38 -> 8 -> 54 -> 94 (player-y-path)
- GameLogic.dll+97D7C -> 1C -> 4 -> 4C -> 38 -> 8 -> 54 -> 90 (player-x-path)
🏆 Flag of The Bear (Unbearable Revenge) via Ghosting / NoClipping (200 points)
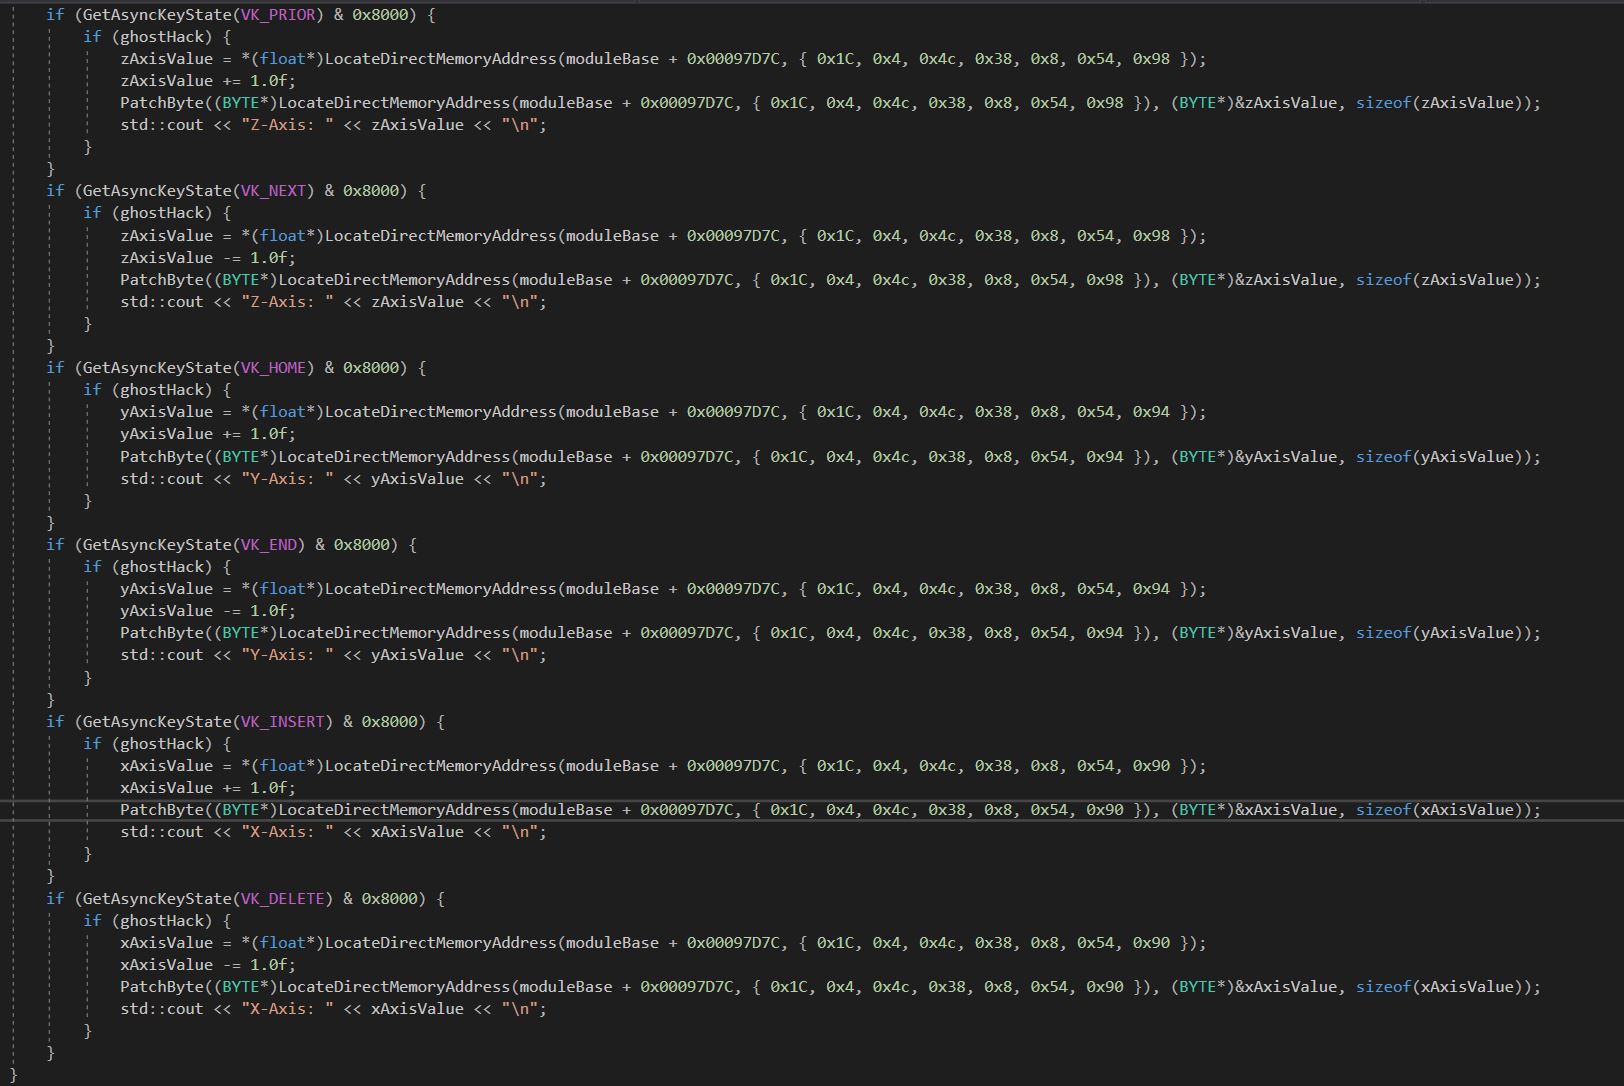
With knowledge of a pointer path to our player X, Y, and Z coordinates, this can now be used to create a Ghost / Noclip internal hack which allows us to move through solid objects. The key aspect here is to load our player’s coordinates, and then either add or remove 1 to the X, Y, or Z coordinates depending on what key is pushed. In this instance we can bind a toggle to also enable and disable the fly hack, but then we’ll also need checks for defined keys to move on these 3 axis. My solution was to bind these operations as follows:
- INSERT: Add 1 to X-Axis
- DELETE: Subtract 1 from X-Axis
- HOME: Add 1 to Y-Axis
- END: Subtract 1 from Y-Axis
- PAGE UP: Add 1 to Z-Axis
- PAGE DOWN: Subtract 1 from Z-Axis
Using this new cheat we can then clip into the tree next to this chest and wait up our time in a location which is technically out of reach both to a normal bear attack, and their vision to shoot you through their AK47s.
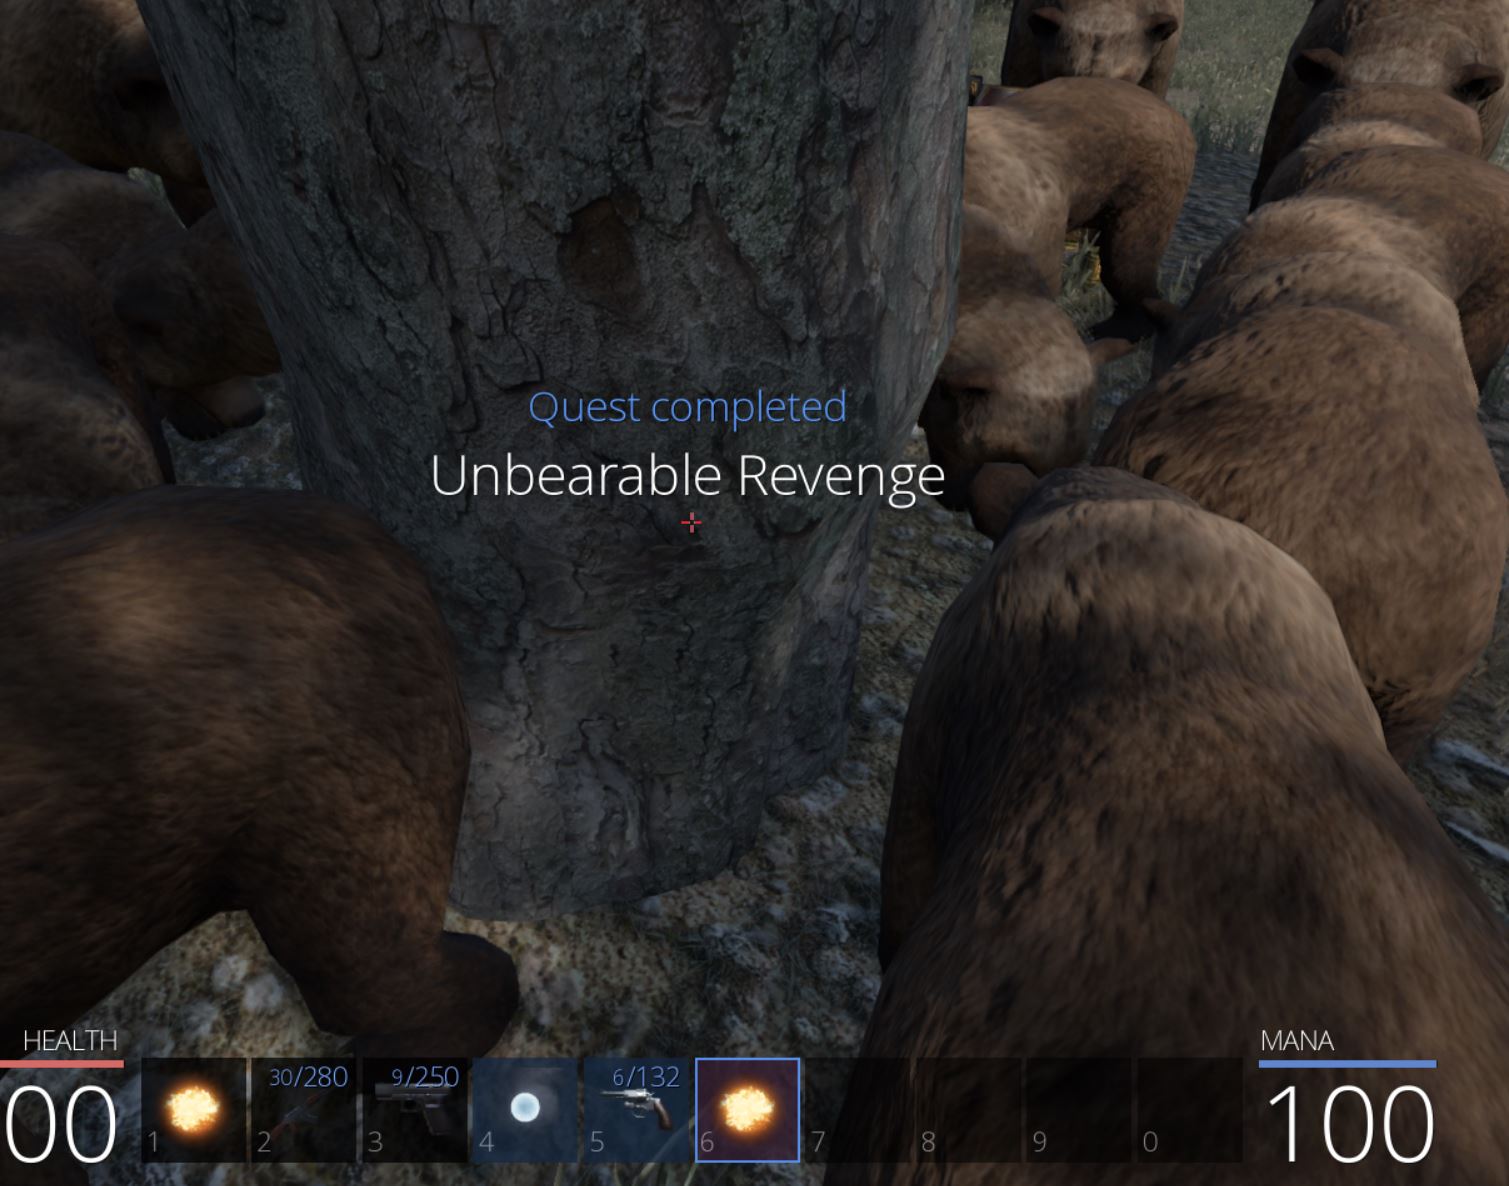
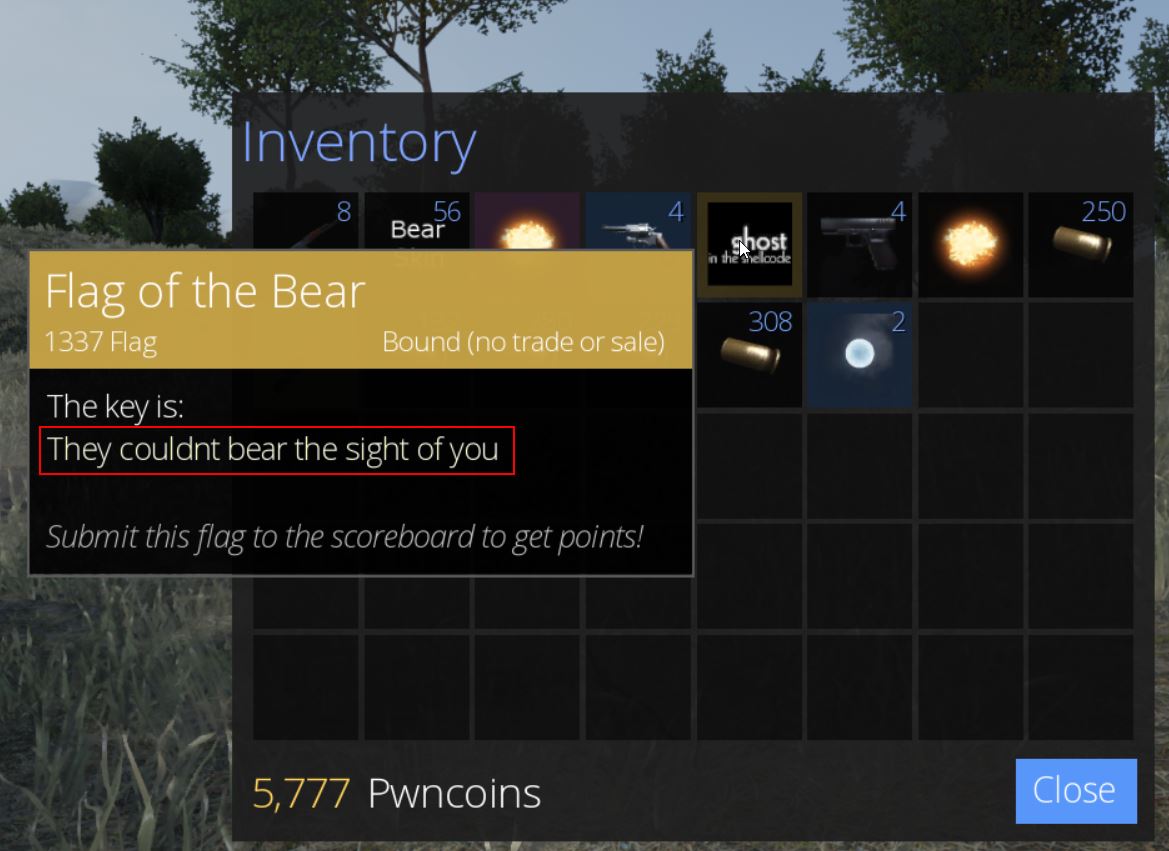
From here so long as we loot the chest we’re able to retrieve ‘Flag of the Bear’ which has the key ‘They couldnt bear the sight of you’, and we have our first flag of the game worth 200 points.
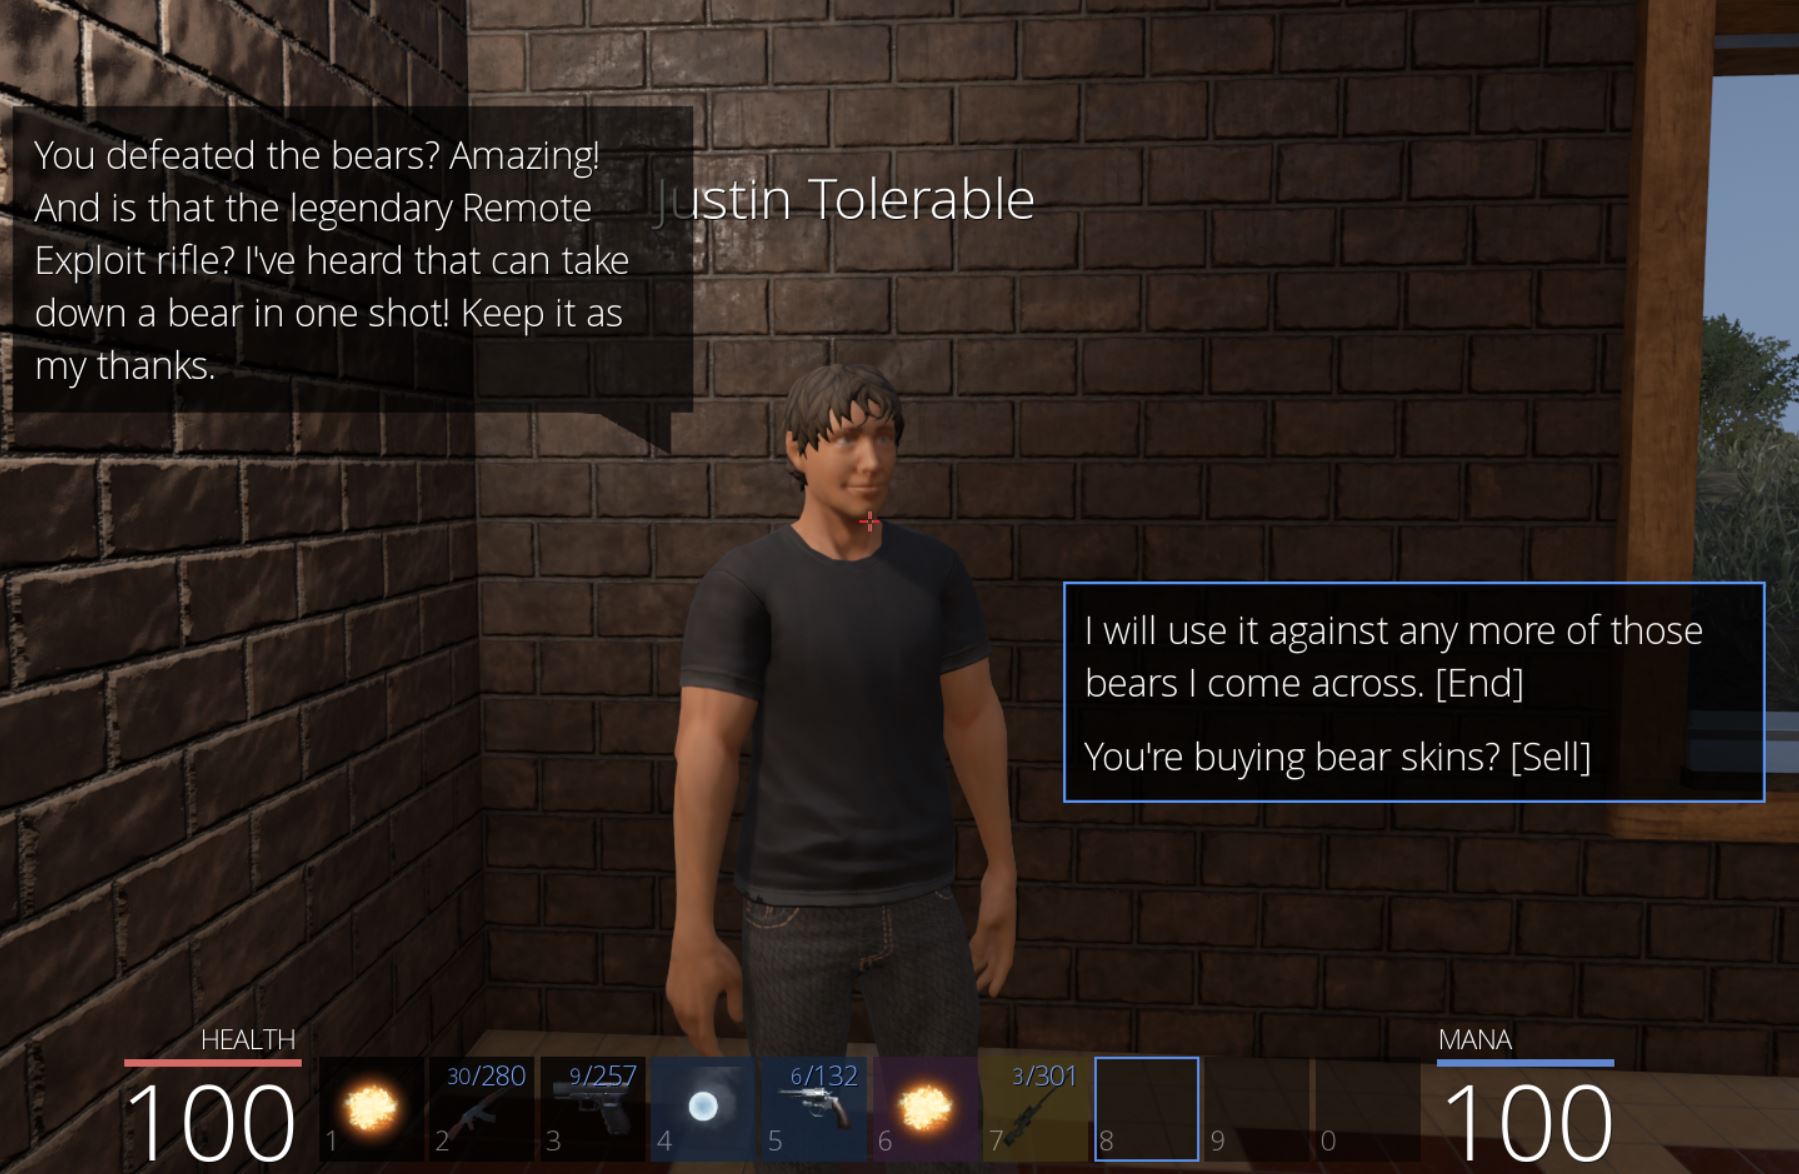
Returning to Justin Tolerable, we receive his thanks and some information on the rifle we just obtained.
Part 5: 🔁 Substituting Parameters Within Functions
Moving through the long and windy path leading out to the opposite side of the town, we eventually reach Gold Farm.
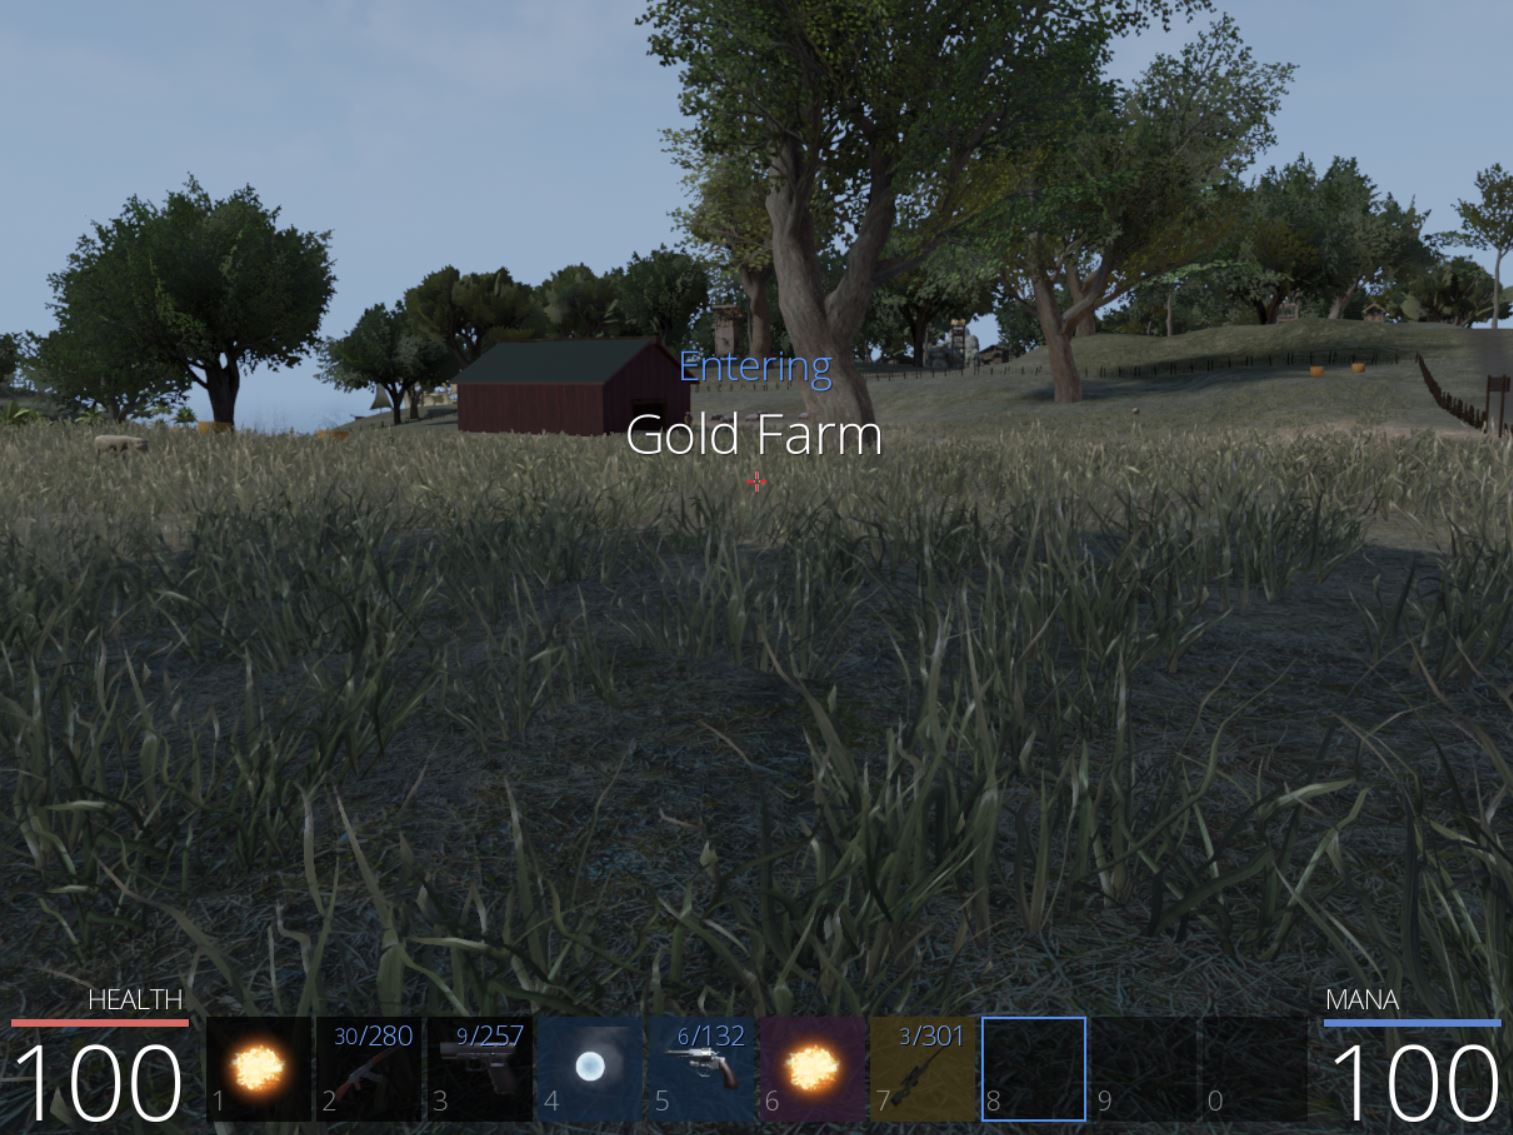
Within this area is a farmer named ‘Sum Ting Wong’ who is having difficulties as his cows have been abducted overnight.
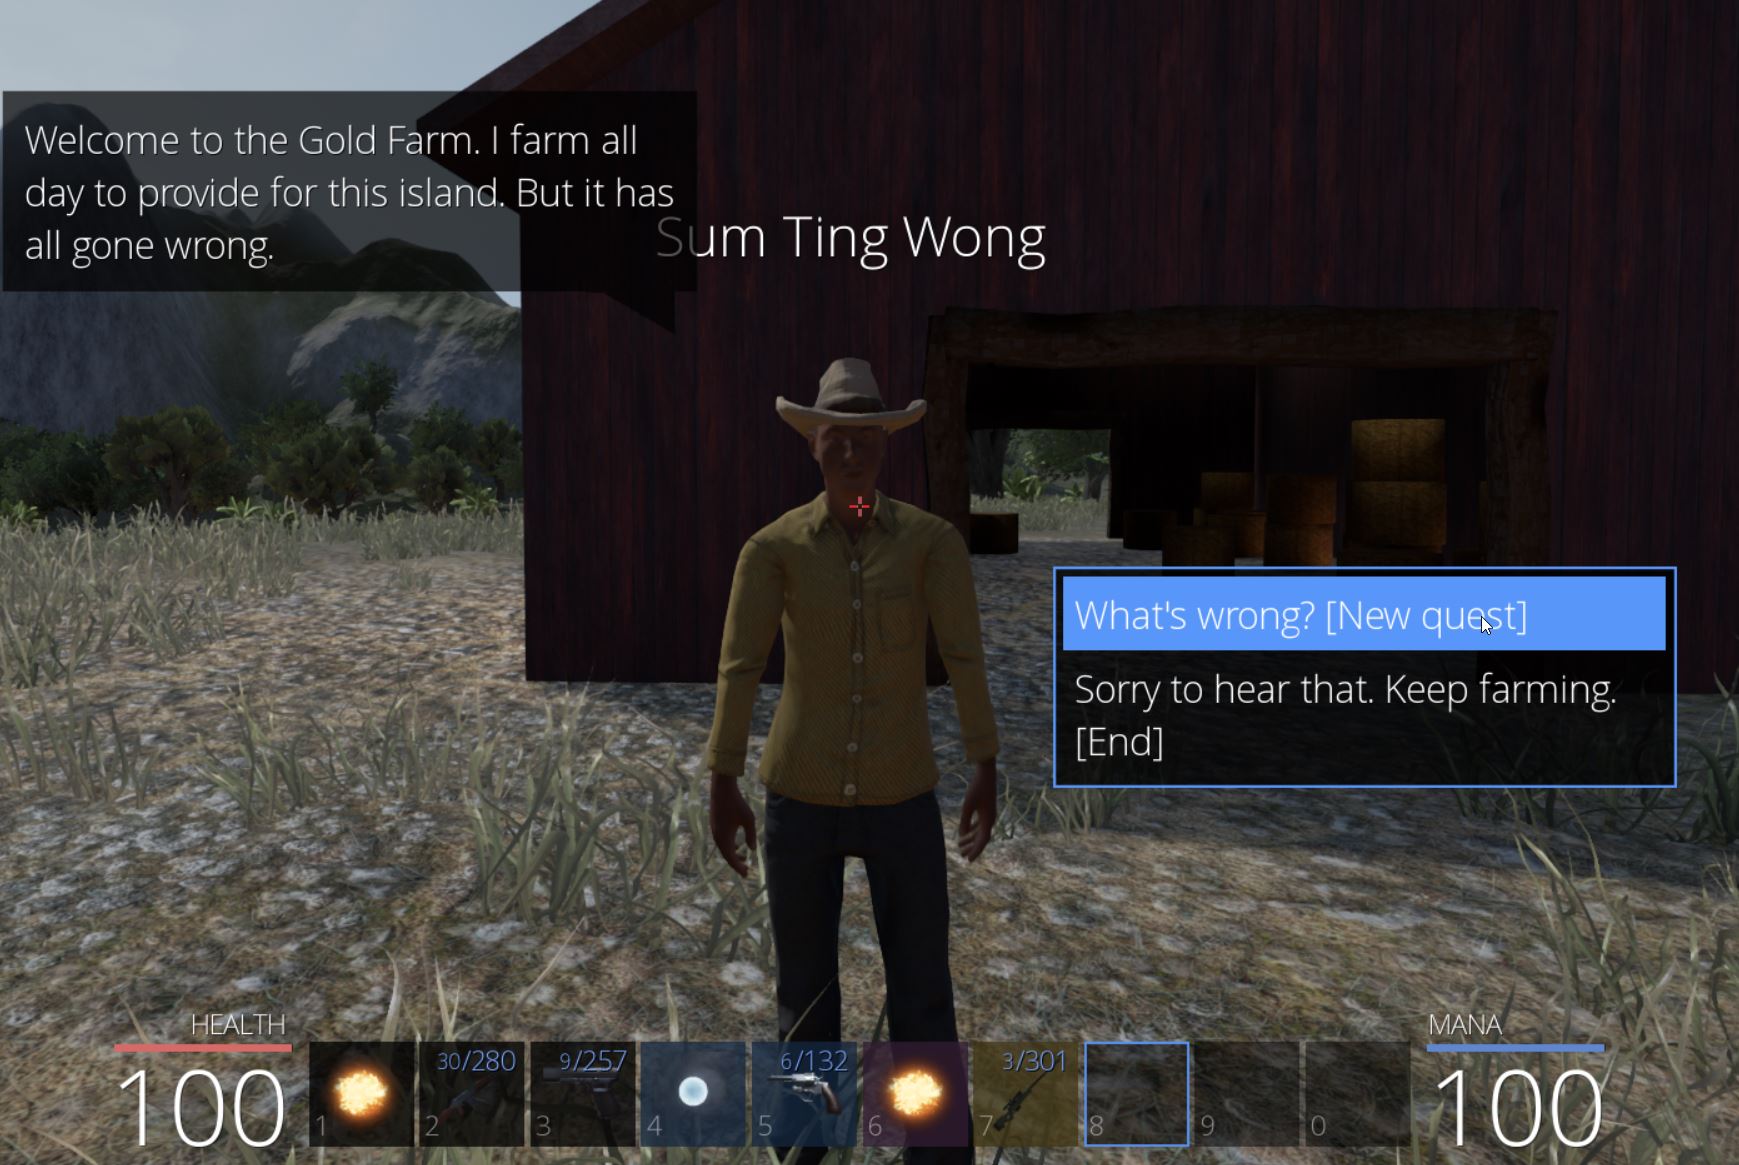
This begins the quest ‘Until the Cows Come Home’. Using this as a pivot, by searching the term ‘Cow’ in Ghidra, a number of hits come back which are of interest.
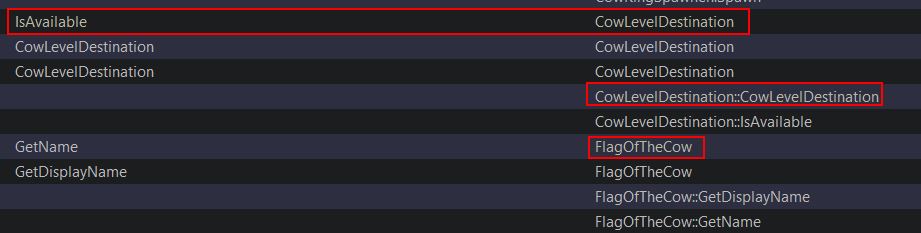
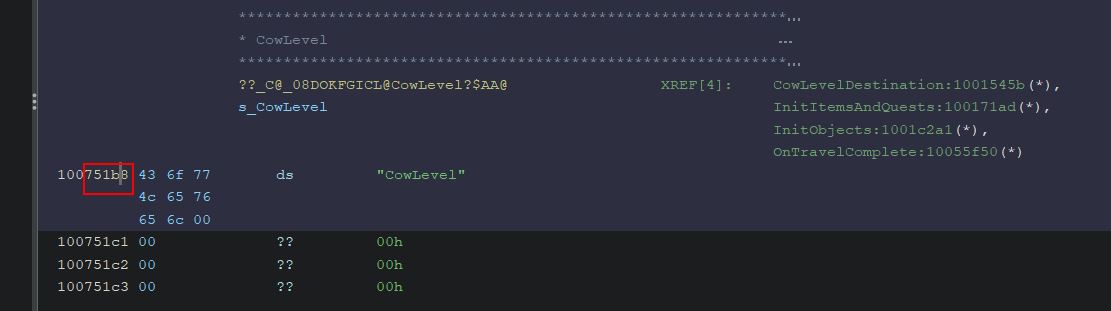
Examining the definition of ‘CowLevelDestination’ shows it is referencing a string ‘Cowabungalow’, and looking adjacent to this in our code also reveals a string ‘CowLevel’.
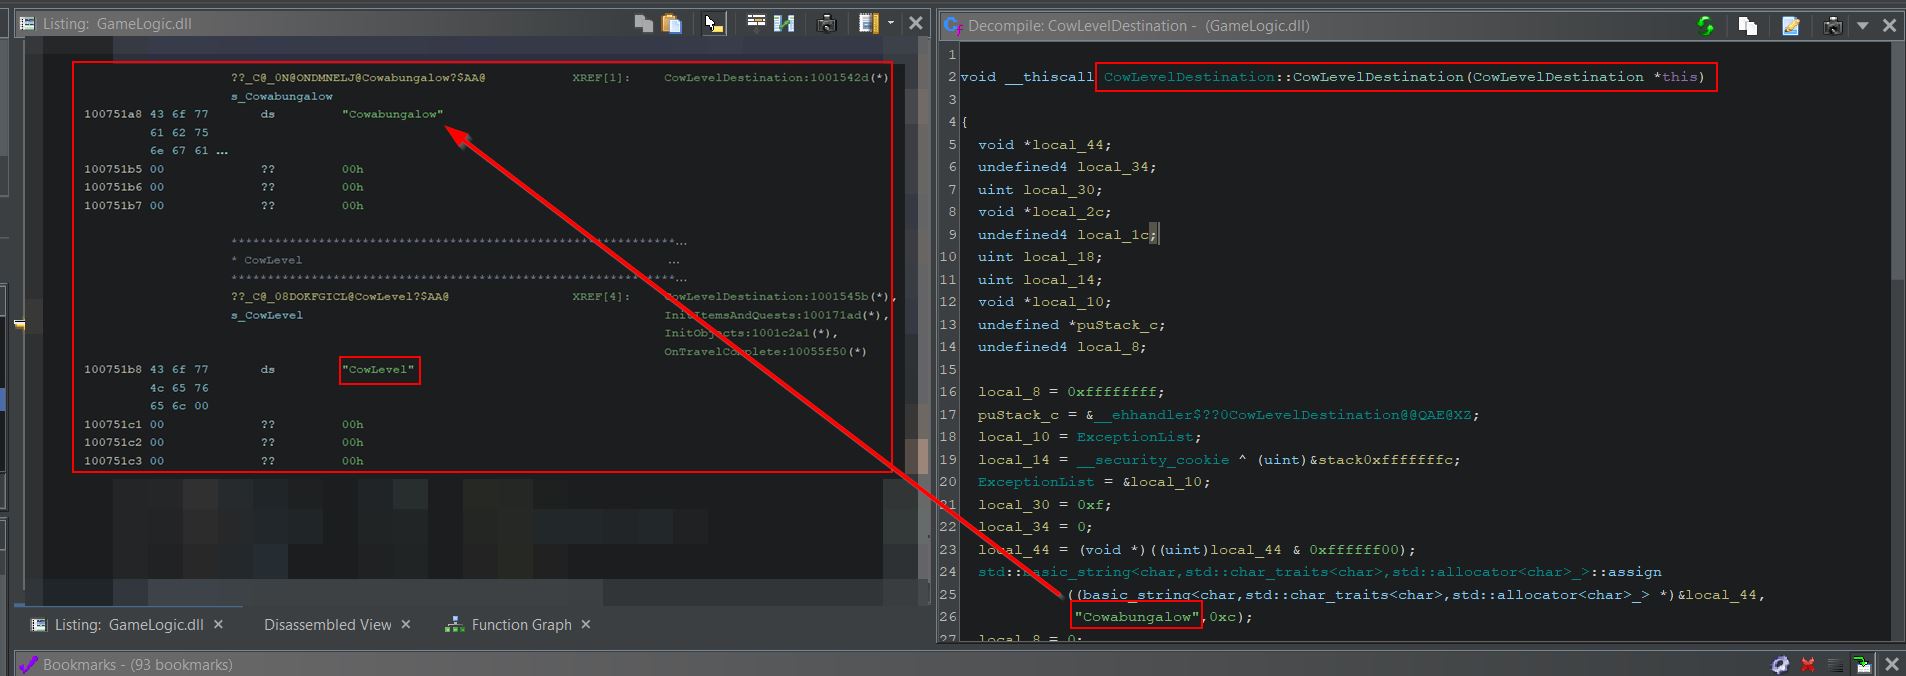
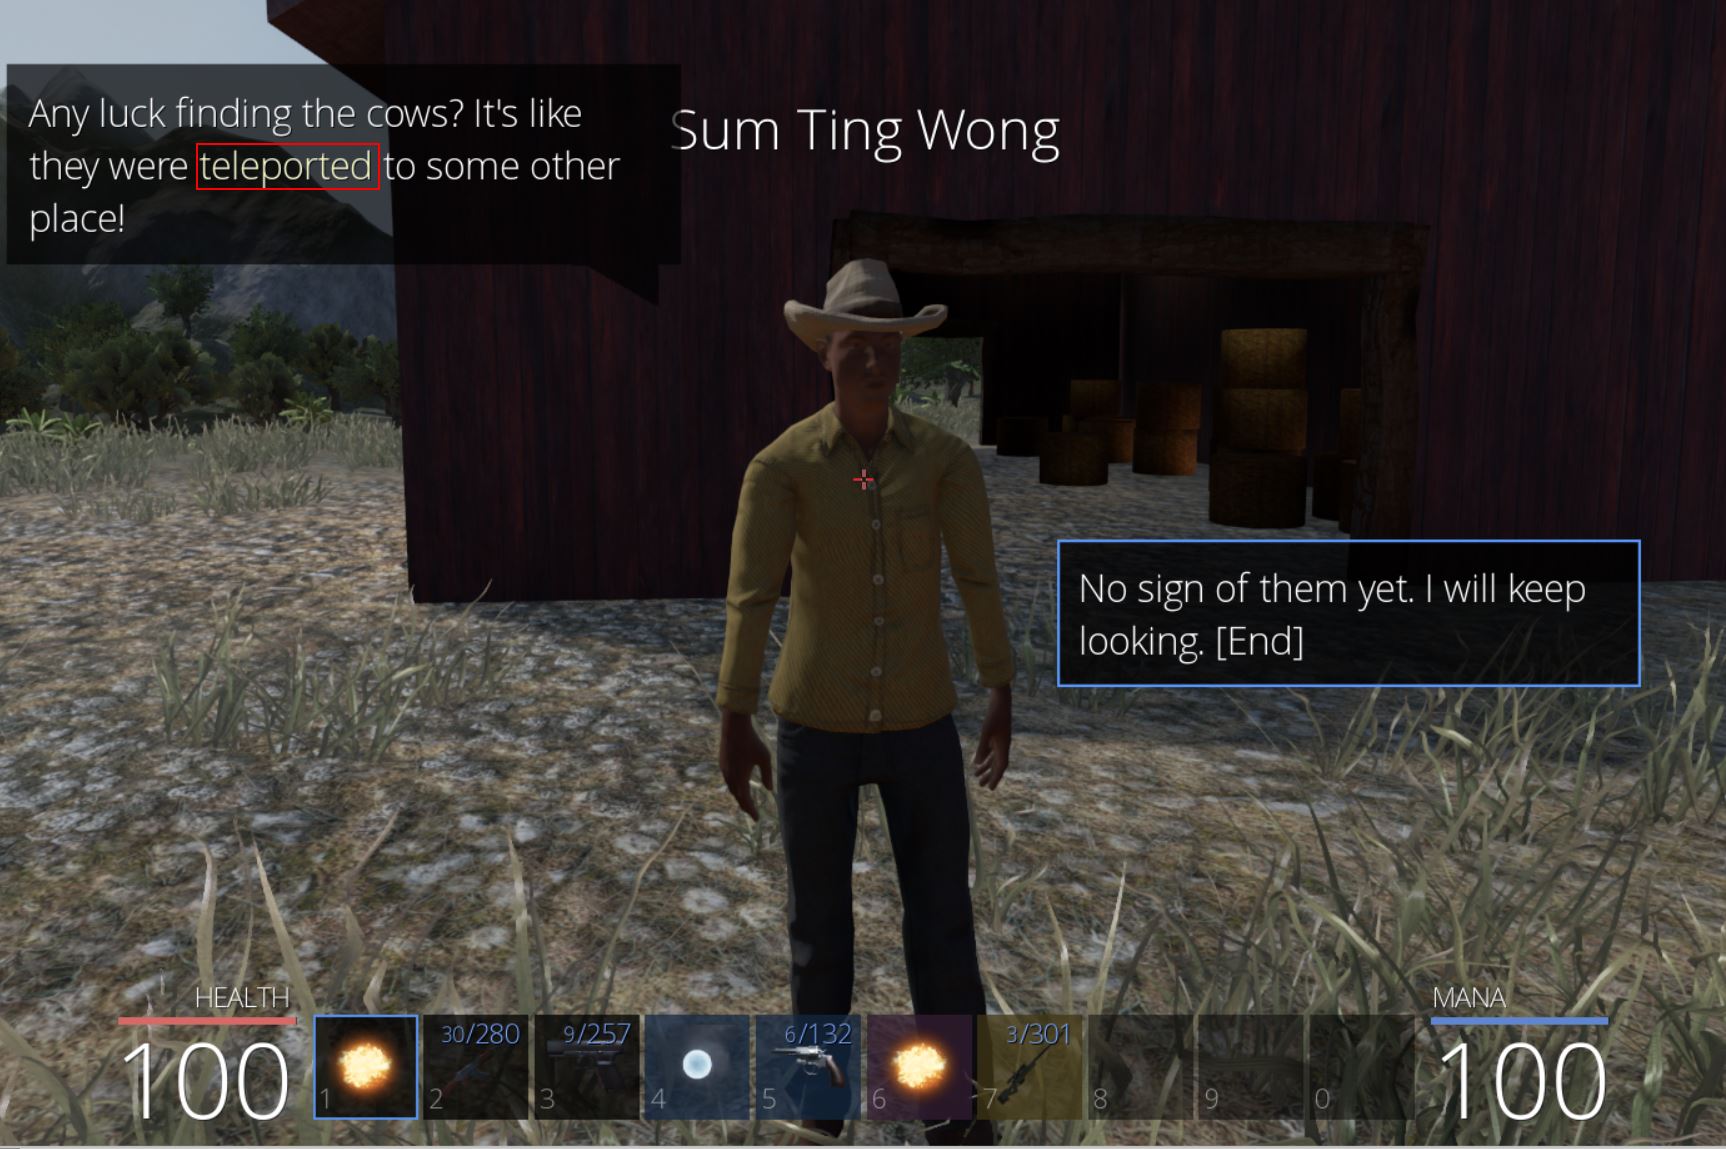
Based on how these are being referenced within Ghidra, it appears that they are identifiers for a location somewhere in the world and could possibly be used to teleport to this location. Talking to the farmer again helps to validate this assumption through the mention of cows teleporting somewhere else.
Knowing that the game has an in-built fast travel system, a search for ‘FastTravel’ in Ghidra shows a number of interesting labels. Of note is because we’re playing online and a lot of the logic is being controlled by the server, filtering based on the term ‘Player’ means we can focus on aspects that may be tied directly to our character and which we are likely able to control.

Replacing ‘UnbearableWoods’ Fast Travel With ‘Cowabungalow’
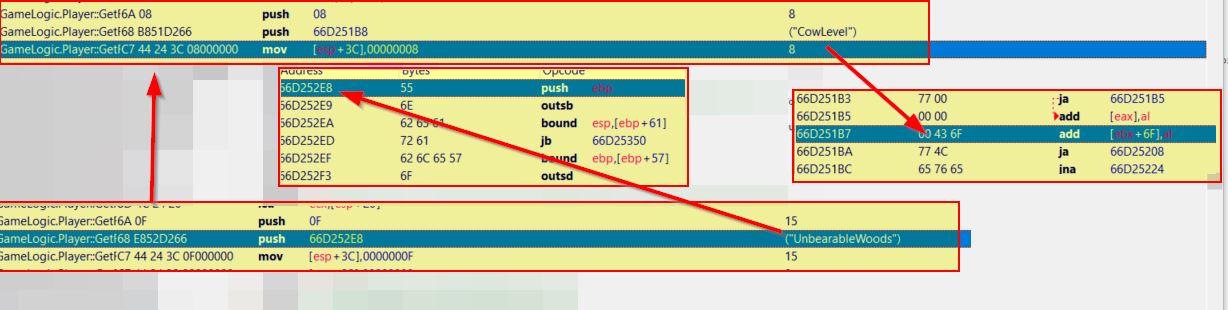
Looking more in-depth at ‘GetFastTravelDestinations’ shows there’s reference to ‘UnbearableWoods’ which appears to be inserted as an option to fast travel to at offset 0x55849
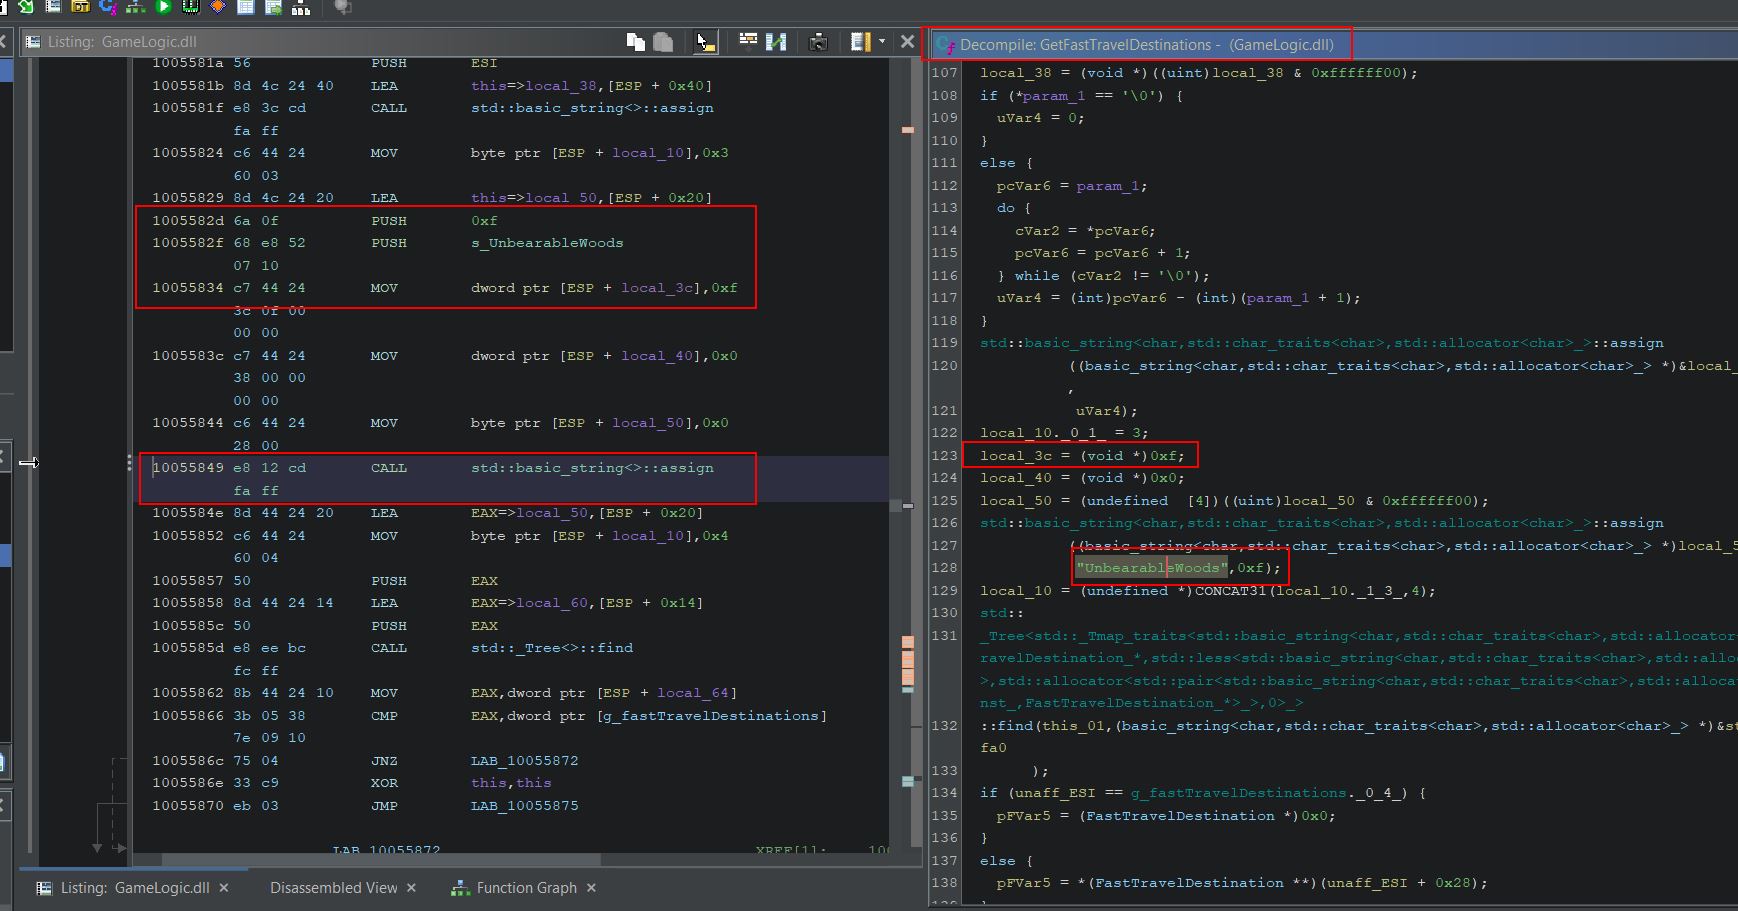
Of note is that this is passing in a particular value ‘0xf’ and there’s a variable also storing this value which is used further down in a function called ‘AddToListIfValid’. Based solely on the value and its usage, ‘0xf’ is equivalent to the decimal value ‘15’ and is being set as the number of characters in each fast travel entry name (UnbearableWoods has 15 letters in it). Using Cheat Engine we can try to substitute the values ‘0xf’ for ‘0x8’ (‘CowLevel’ has 8 characters in it), and the address for our ‘UnbearableWoods’ string to the address at offset 0x751b8 of GameLogic.dll (our ‘CowLevel’ string). Although Cheat Engine renders these strings as code, they will still be interpreted as the strings they represent upon replacing this address.
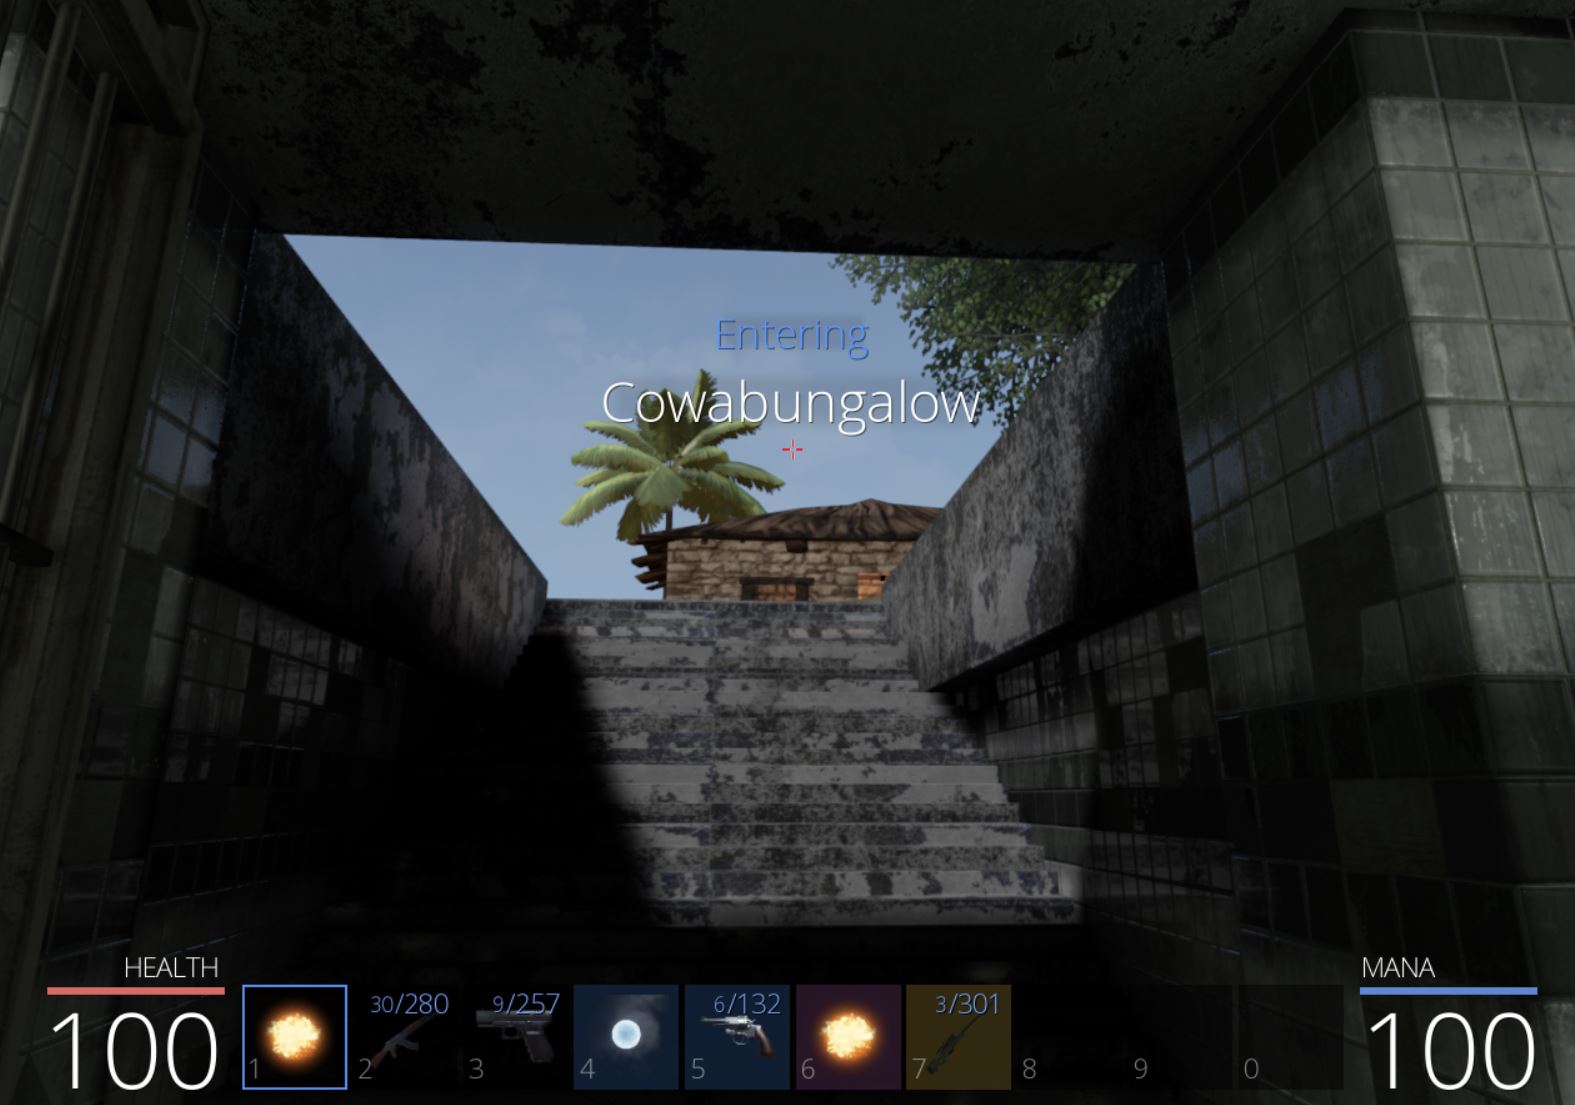
The end result is that our fast travel selection for ‘UnbearableWoods’ is now replaced with the location ‘Cowabungalow’.

By selecting this entry we successfully transport to the remote island of ‘Cowabungalow’.
🏆 Flag of The Cow (Until the Cows Come Home) via Fast Travel Hacking (100 points)
Implementing the same logic as was used in Cheat Engine, we can develop this into our internal game hack by simply binding another hotkey (in this case F5) to enable or disable. Once the key is pushed we need to locate the relevant address offsets below which are pointers to the static strings ‘UnbearableWoods’ and ‘CowLevel’.
- GameLogic.dll+0x752e8 = UnbearableWoods
- GameLogic.dll+0x751b8 = CowLevel
From here we just need to write the byte proceeding and after the address to memory, and then patch the obtained unbearable woods and cow address depending on if the hack is enabled or not.
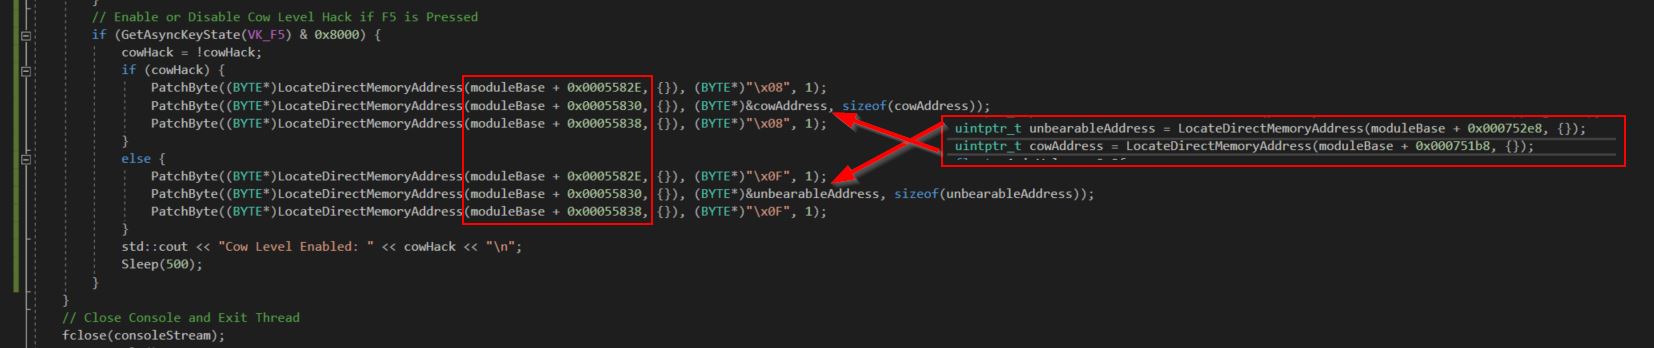
Of note we need to ensure we’re patching the pointer to these addresses as denoted through the use of ‘&’, rather than the value they contain which would crash the game.
At this point we can toggle it on, travel to Cowabungalow, and then toggle it off. Within Cowabungalow there’s an NPC on the island called ‘Michael Angelo’ who tells us of mad cows showing up out of nowhere.


Soon Michael asks if we know any magic and tells us of a rubicks cube he has that may be able to steal the thunder power of the Cow King.


By accepting the quest we get a Rubick’s Cube and can use it against the Cow King around the corner to steal its ‘Static Link’ ability.

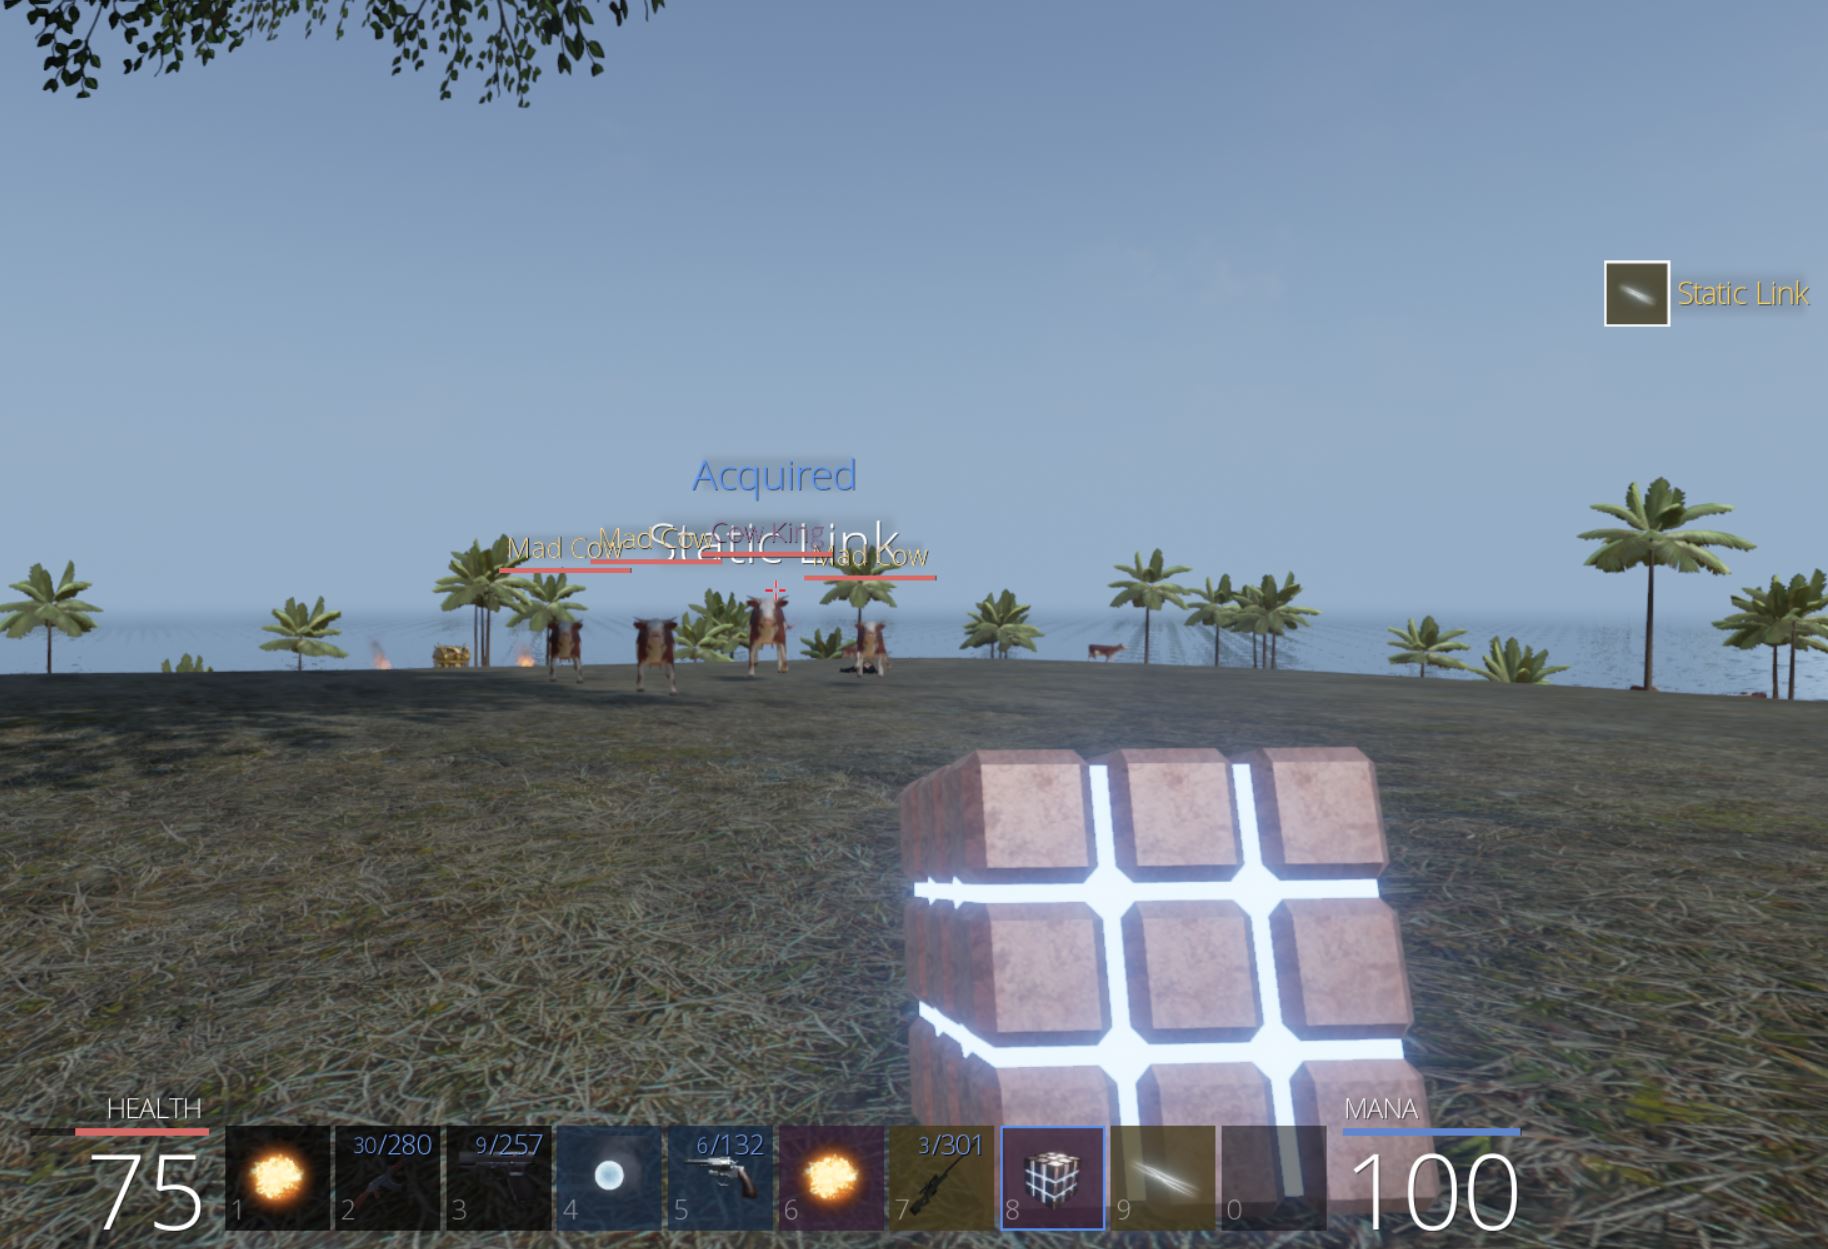
Using the Static Link ability we can kill the Cow King and complete the quest.
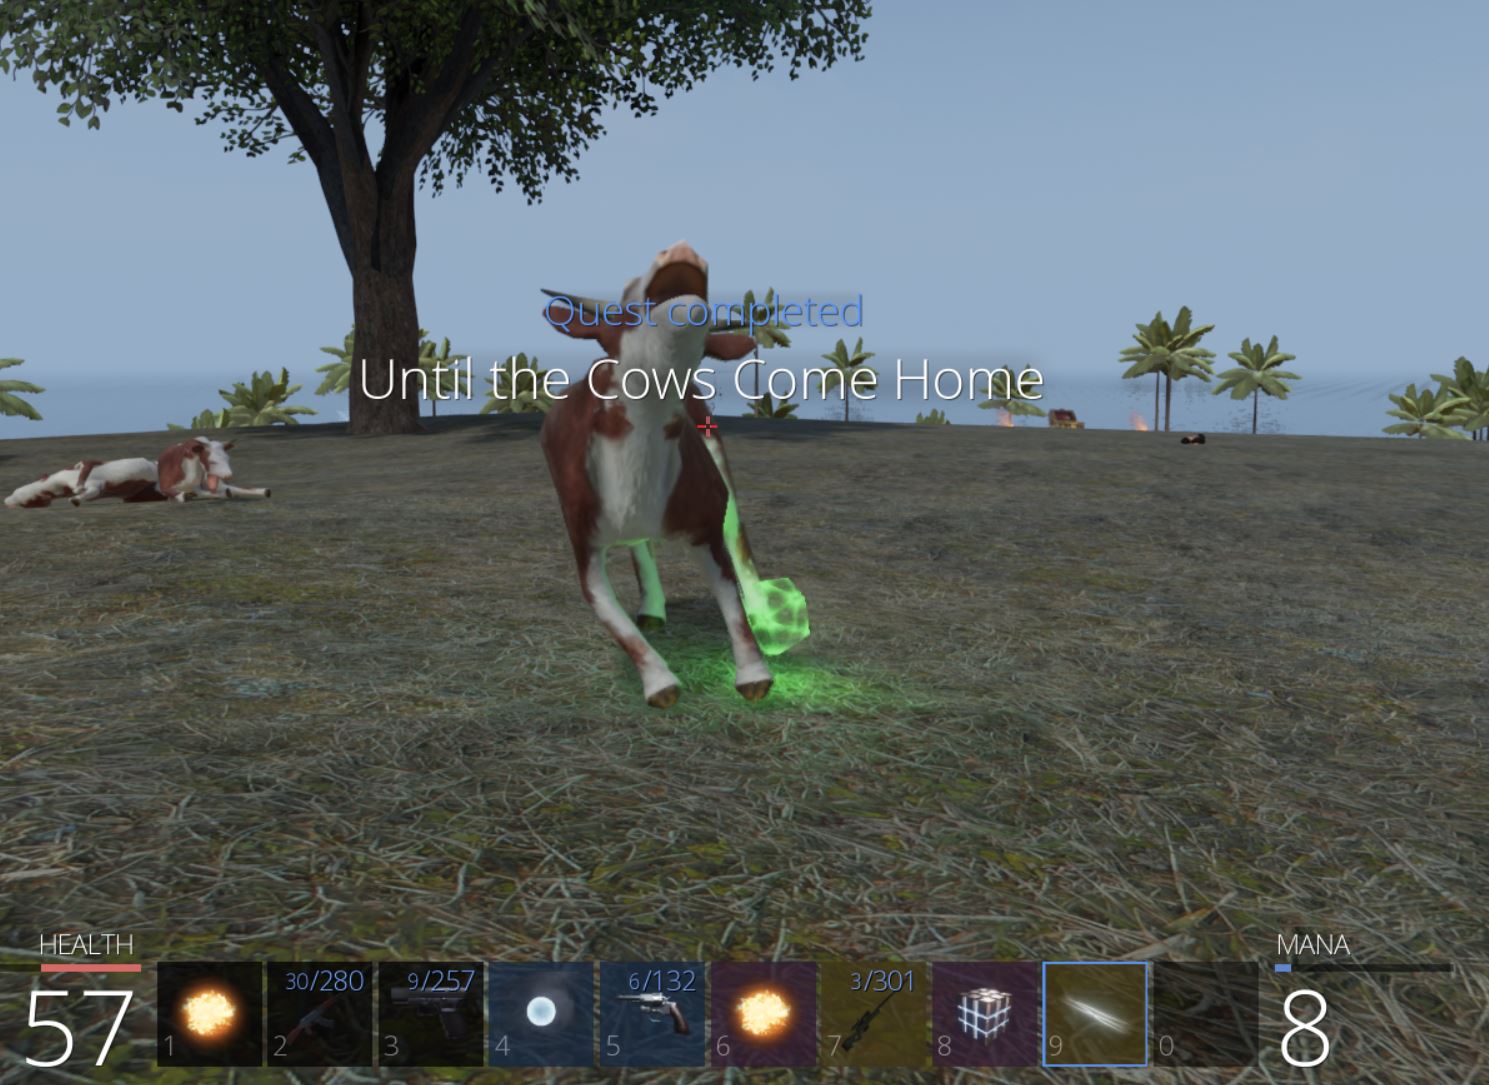
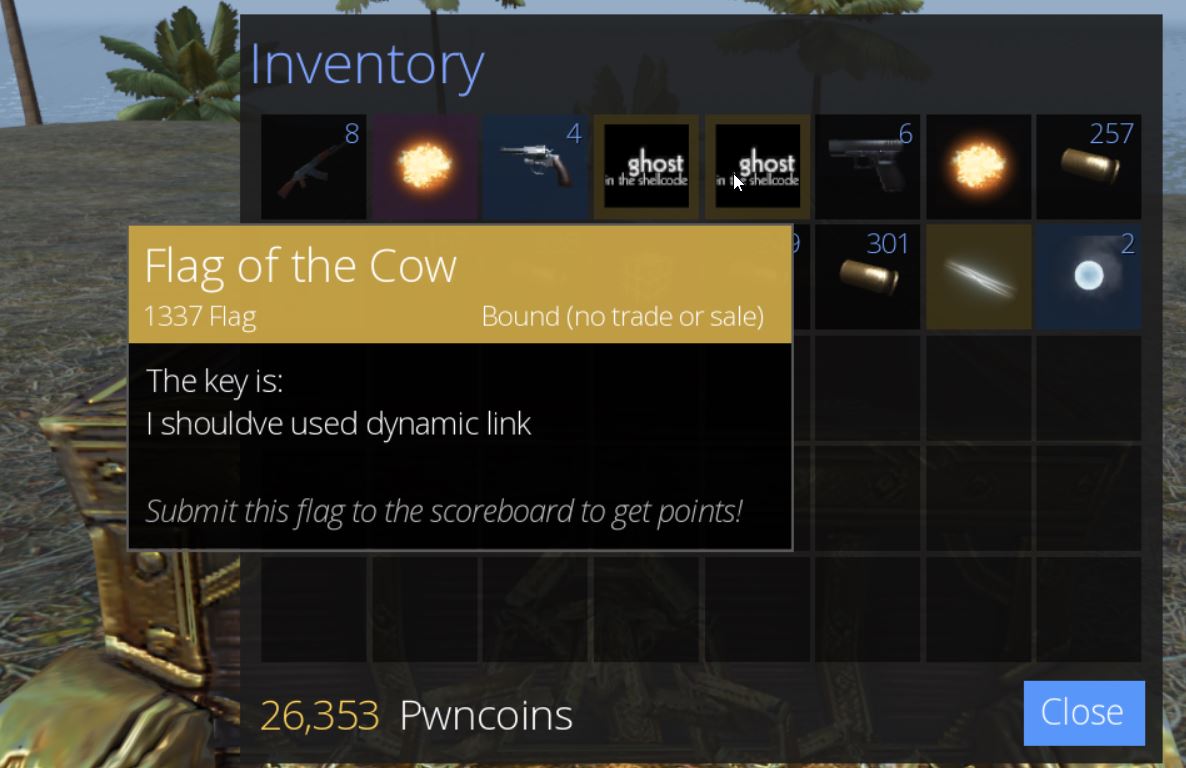
From here we can loot the chest nearby to retrieve ‘Flag of the Cow’ which has the key ‘I shouldve used dynamic link’, and we have our second flag of the game worth 100 points.

Part 6: 🐛🐜🐉 Finding Integer Overflow, Underflow, and Race Condition Bugs Using Ghidra
Locating Magmarok
Heading to the other side of the island, a the ‘Molten Cave’ can be found near the beach across from the farm where ‘Sum Ting Wong’ was standing.
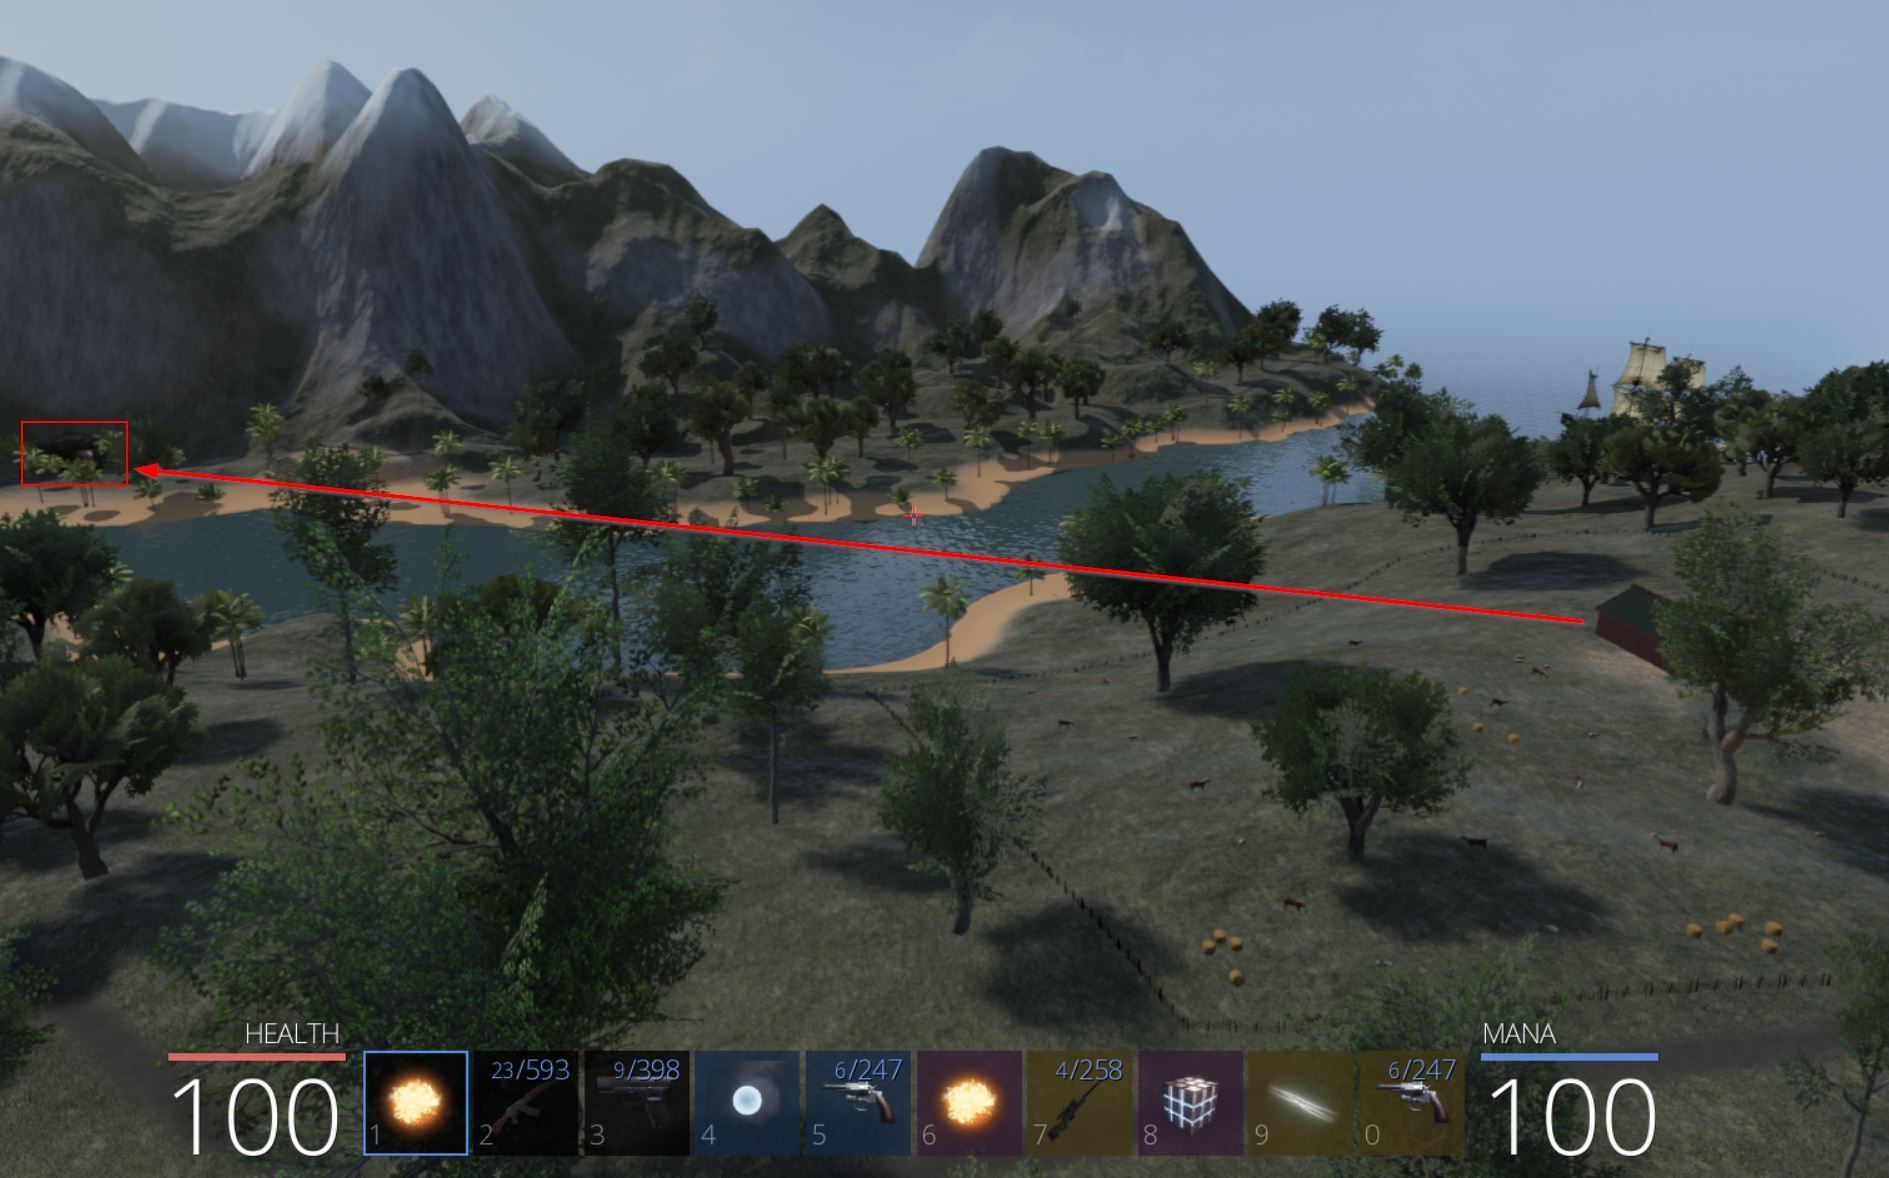
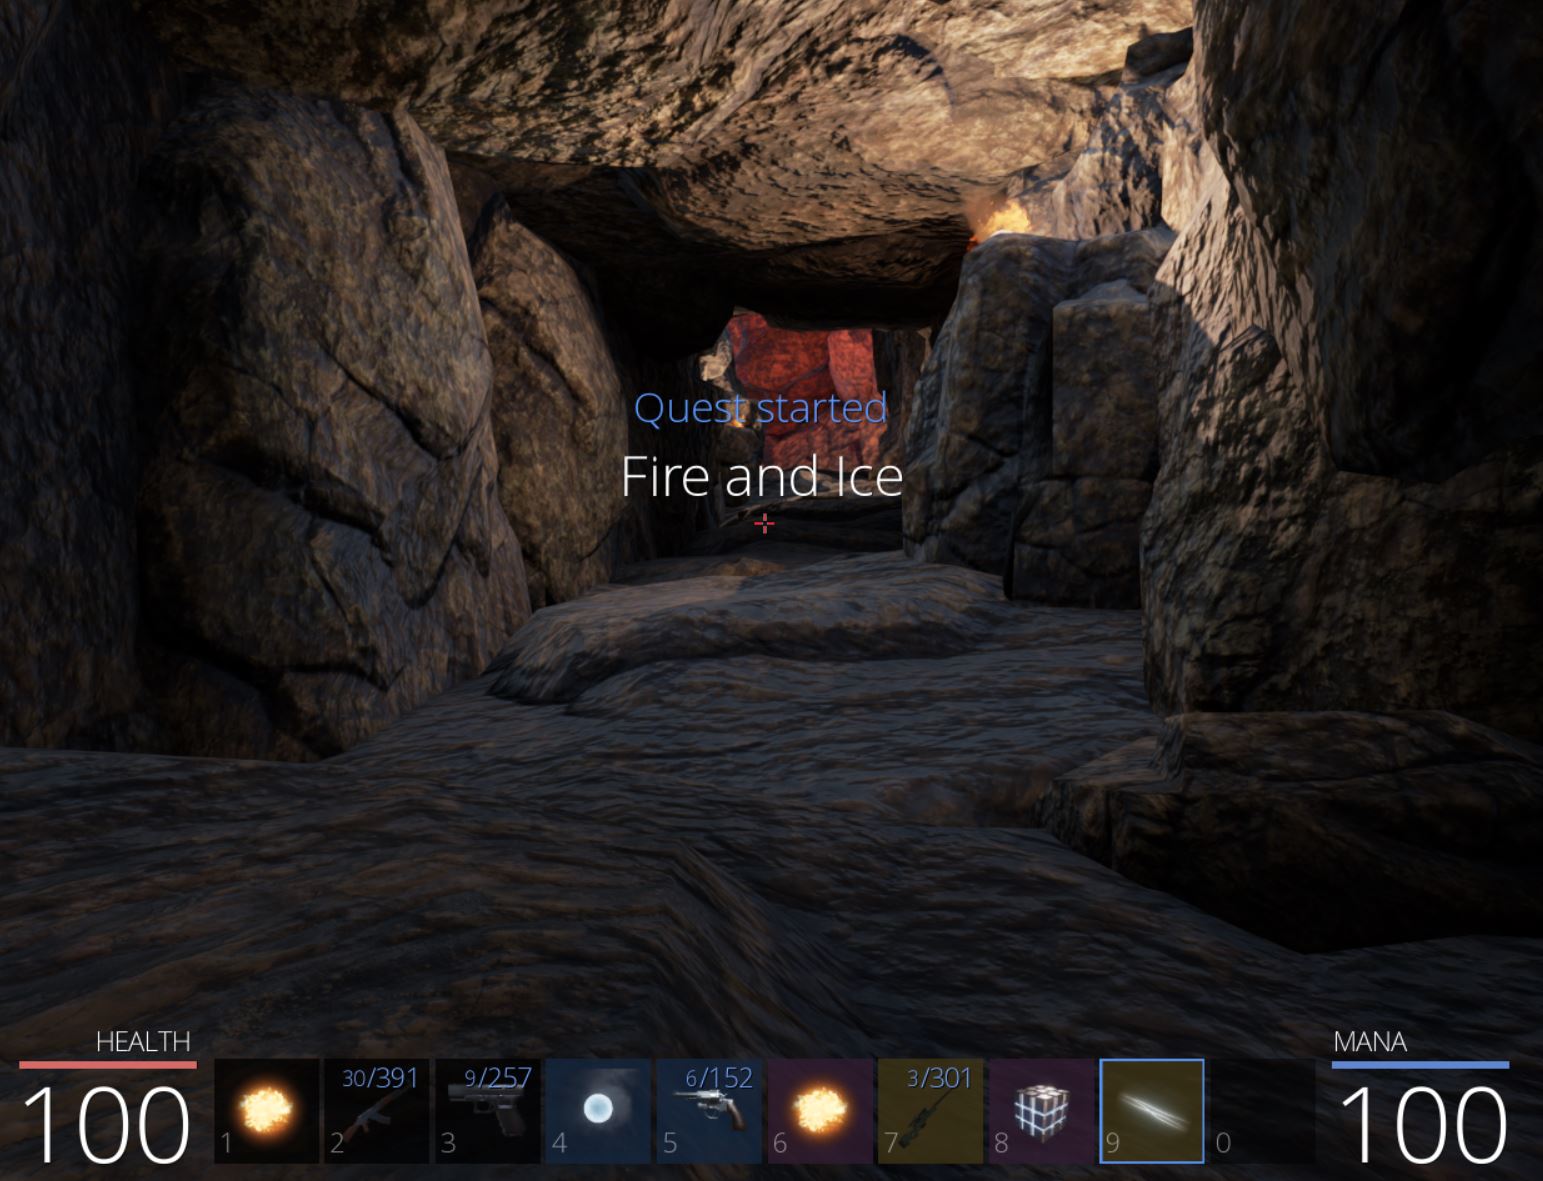
By entering the cave a new mission begins ‘Fire and Ice’.
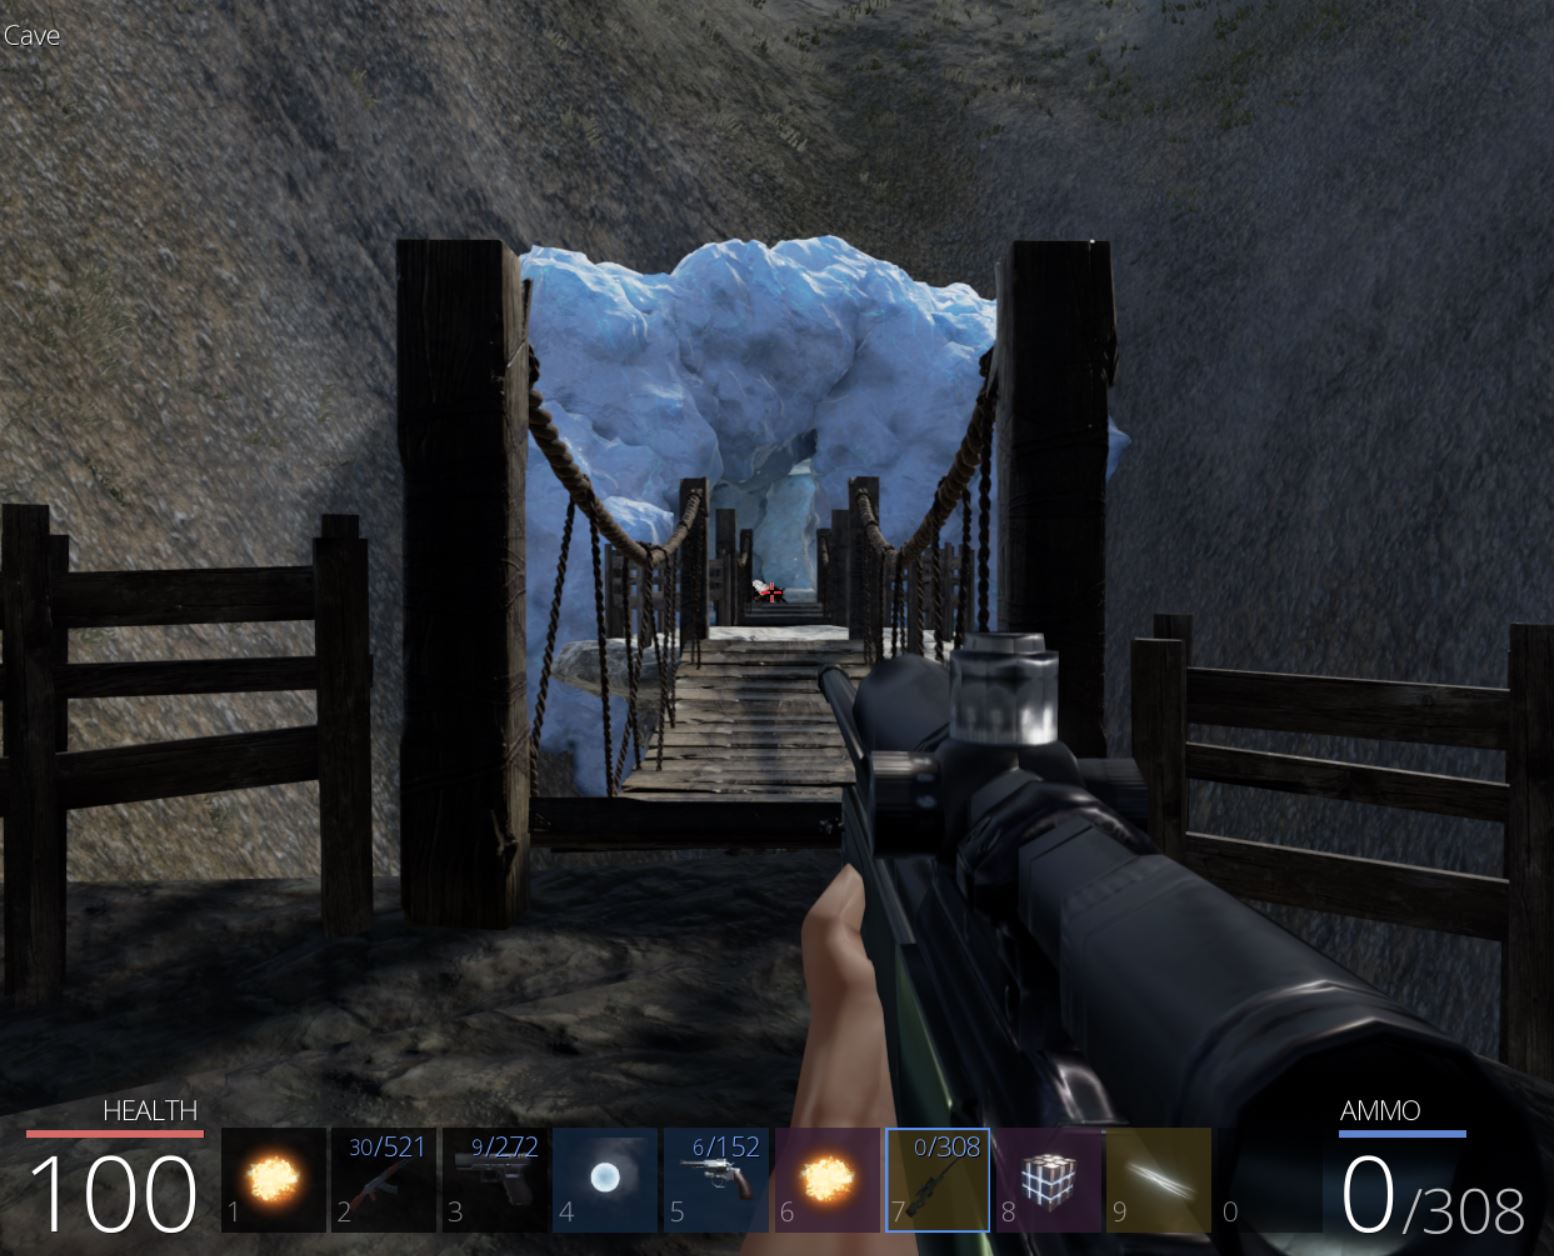
Travelling through the cave and the spiders it entails leads to a fork in the road. By traversing right we eventually reach an ice cavern.
Within this cavern is the ‘Ice Spider Queen’ which despite her menacing persona is easily defeated by using the strong weapons and spells we’ve unlocked and attacking from afar.
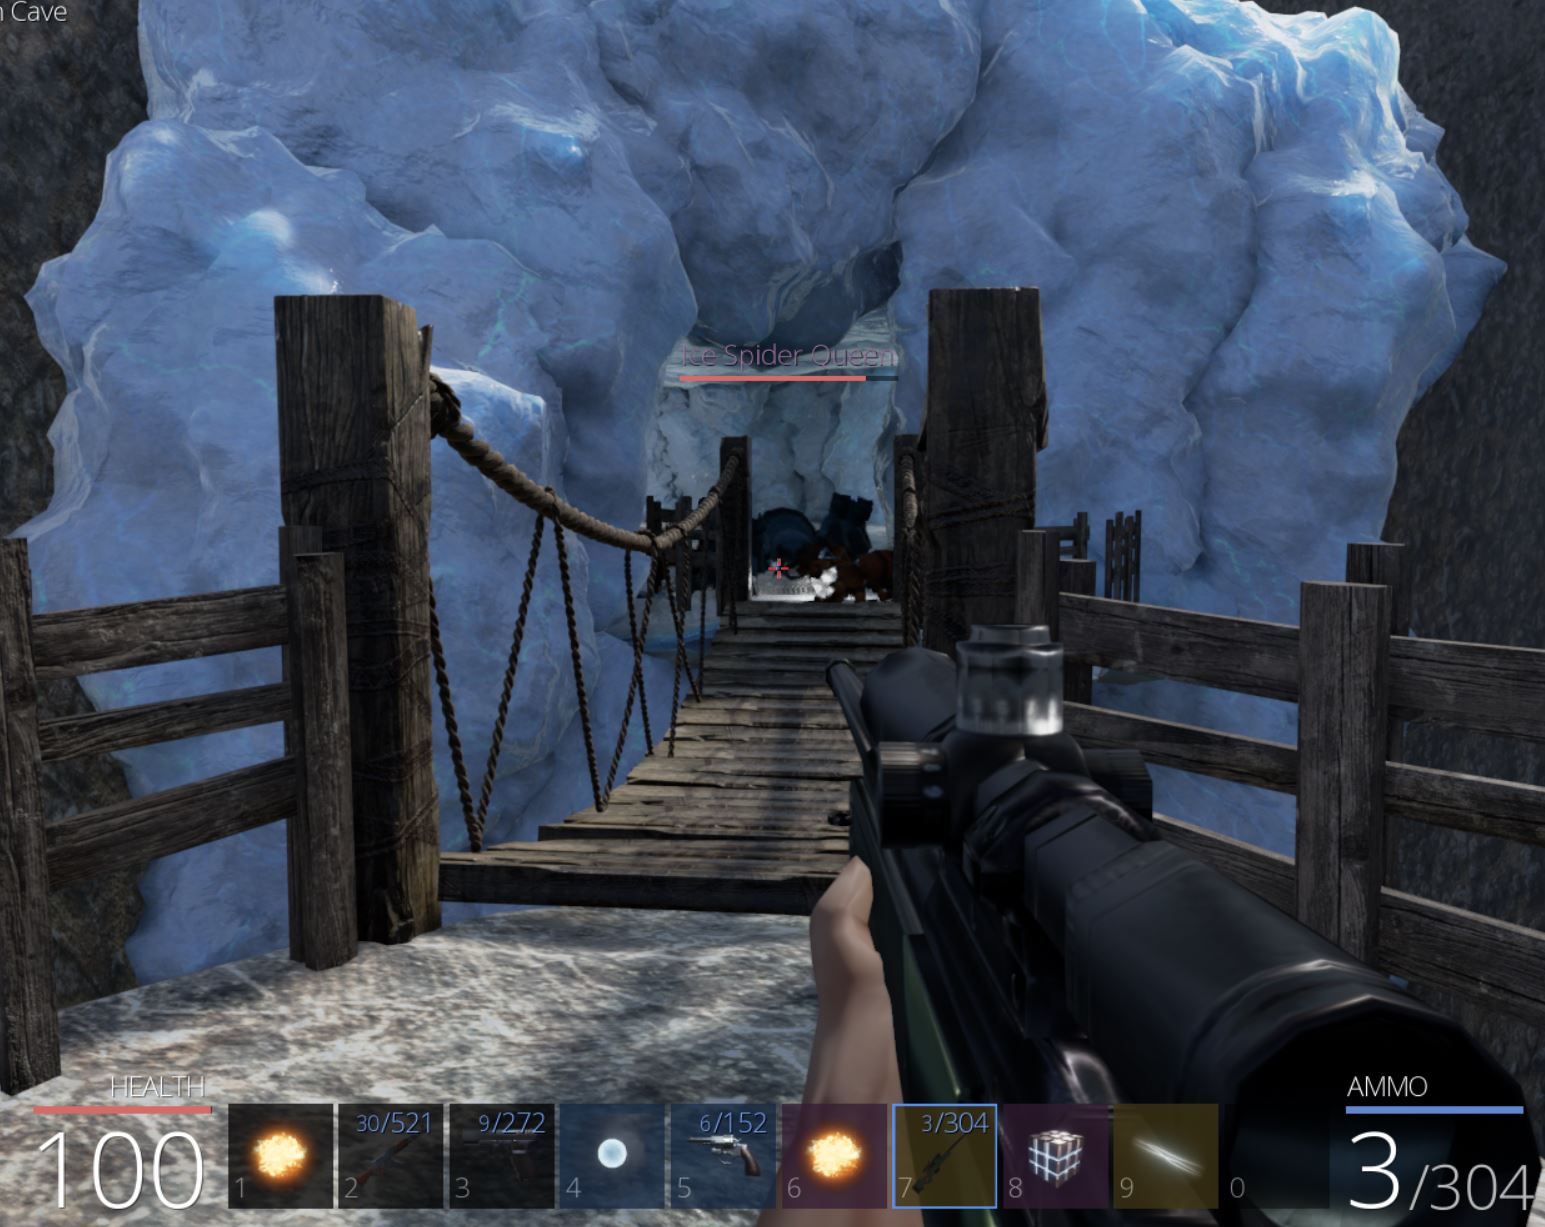
This creature drops the ‘ZeroCool’ spell which we’ve previously already obtained from an angry bear. Heading back to the other fork in the road and traversing left instead reveals a fire cavern.
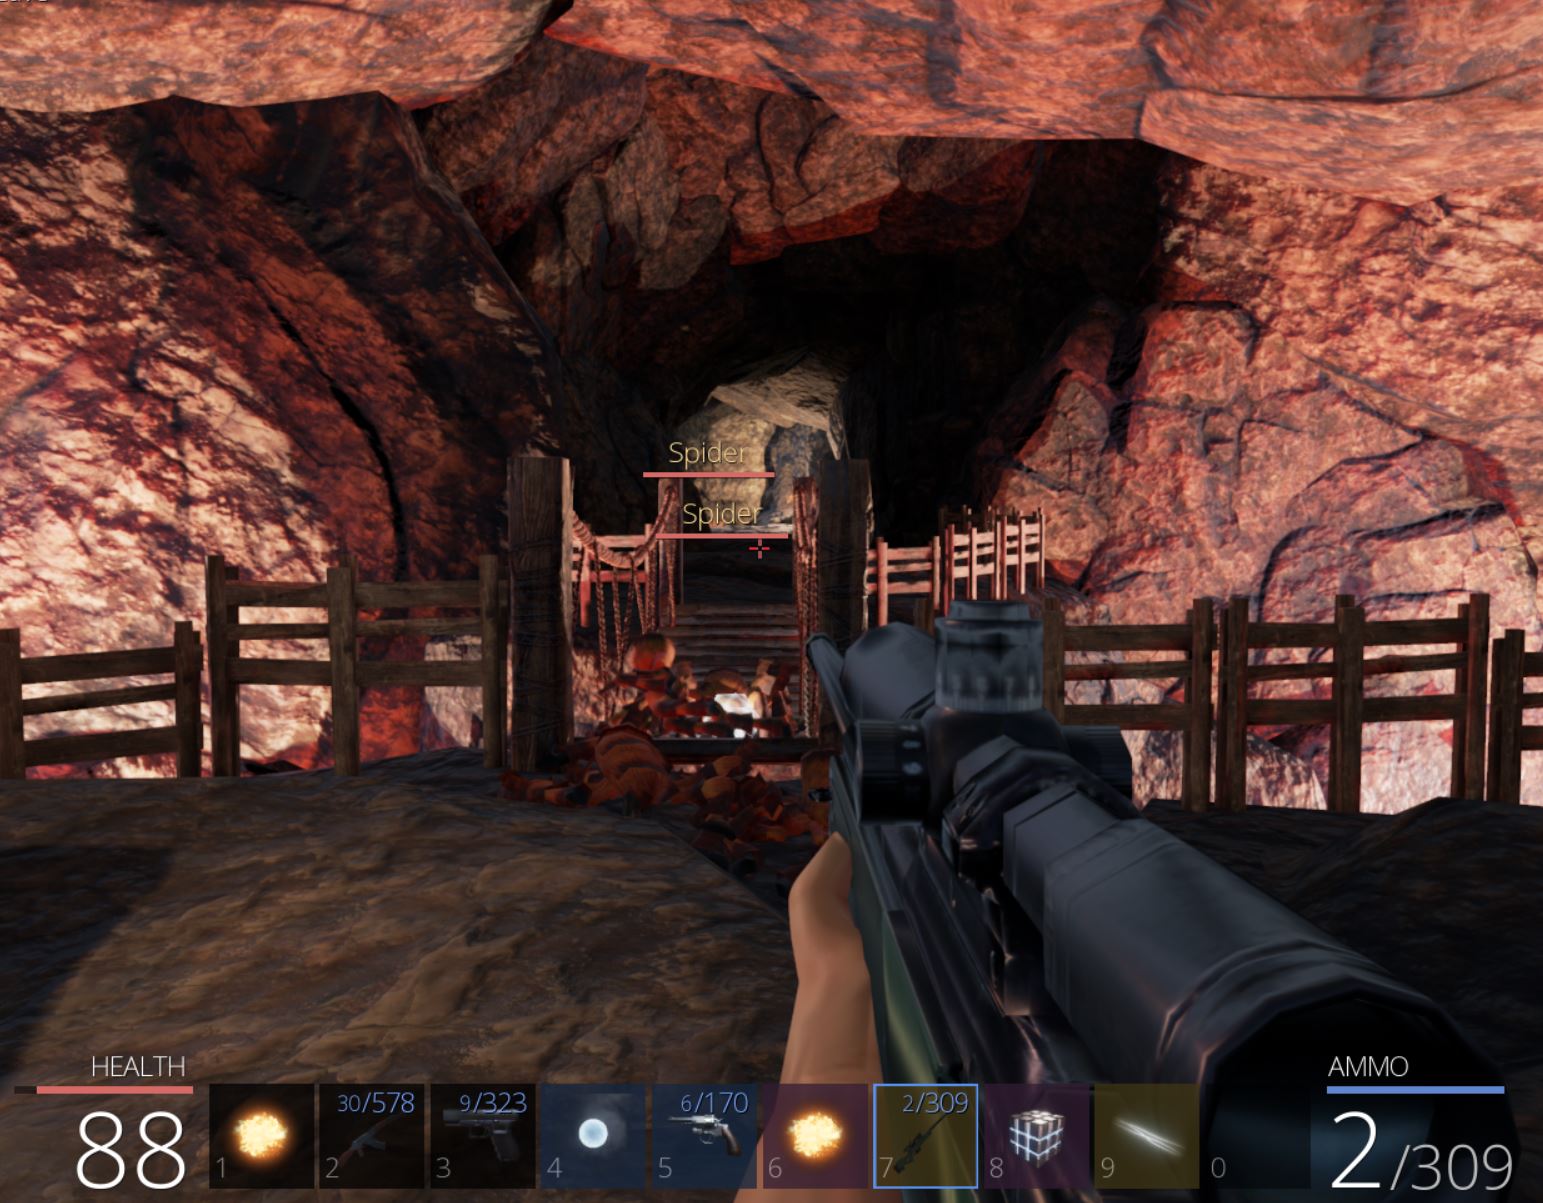
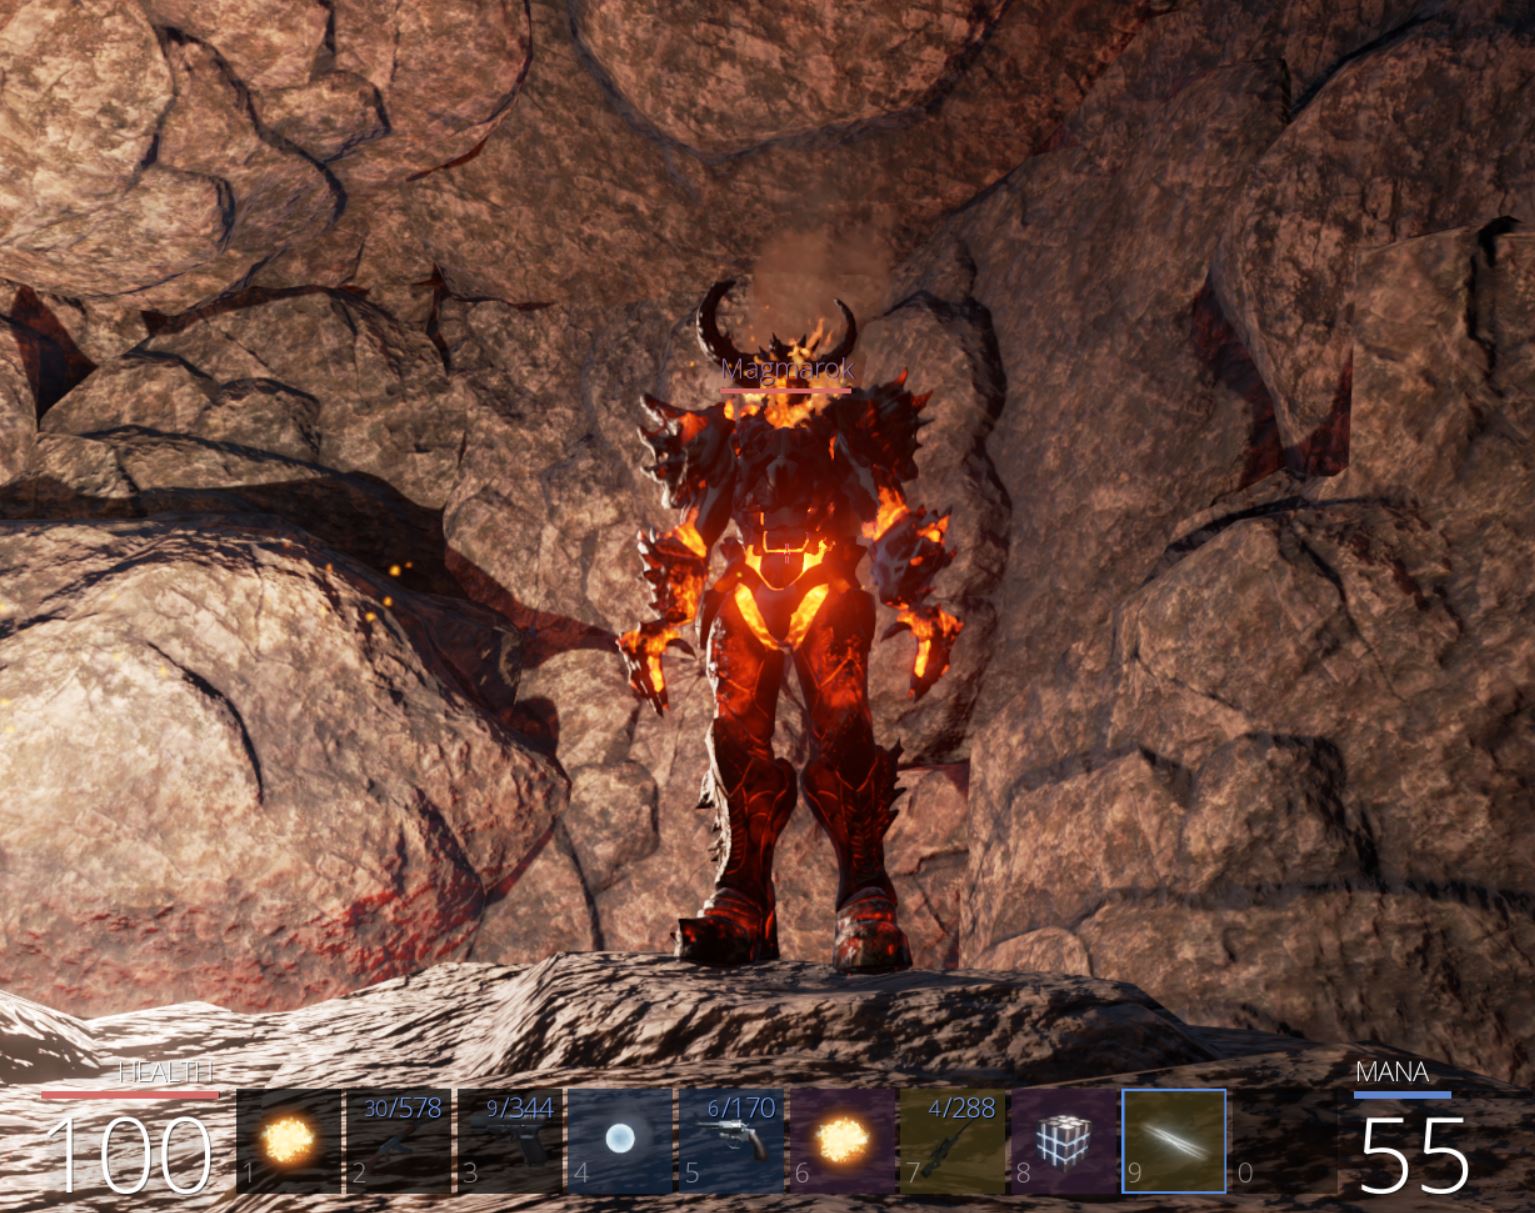
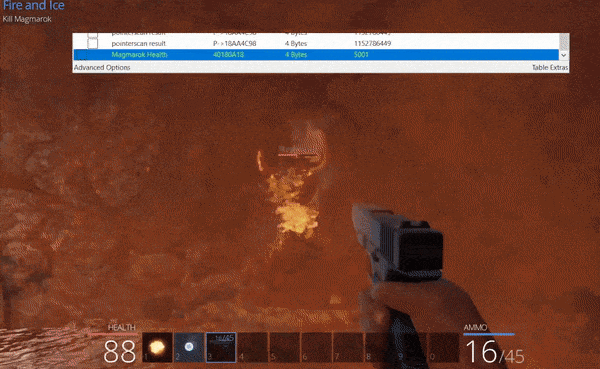
Entering the fire cavern leads to the boss ‘Magmarok’ who continuously strikes at us with fire balls.
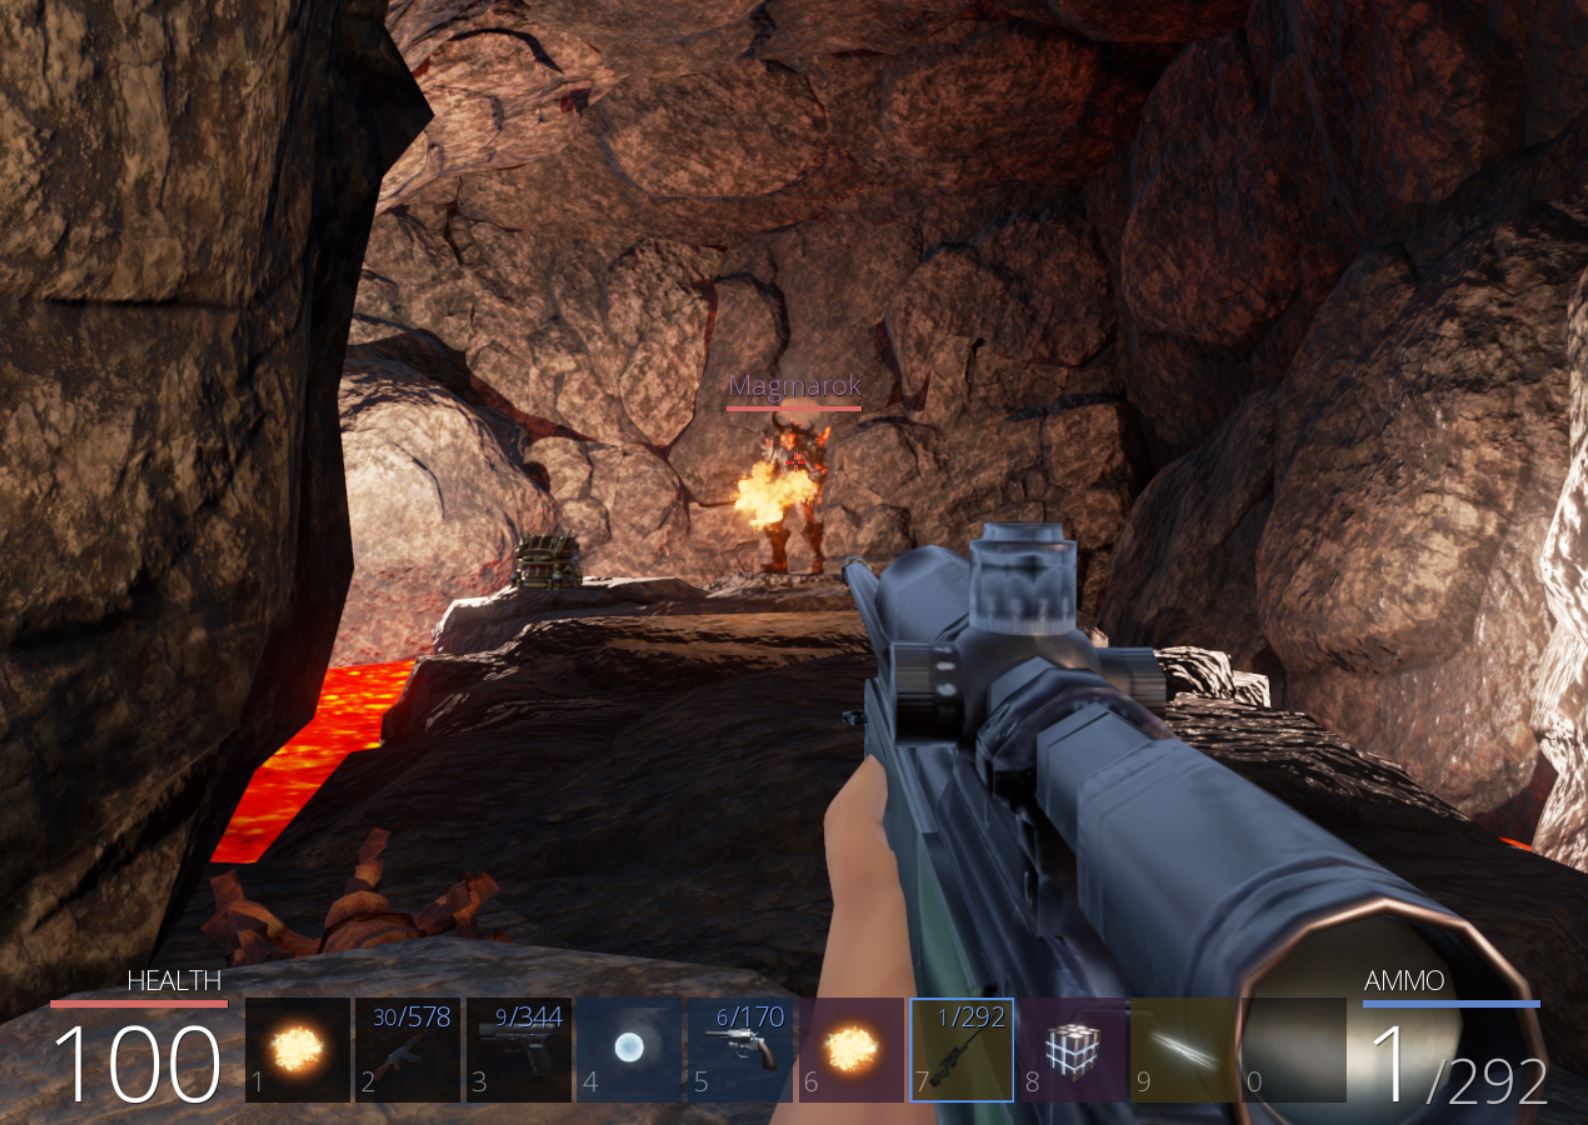
Magmarok has a lot of health, and despite being able to get up close and hide behind the nearby chest to attack, once Magmarok hits half health he transitions to a healing technique and recovers back to max health.
Disassembling and Decompiling Magmarok’s Defenses
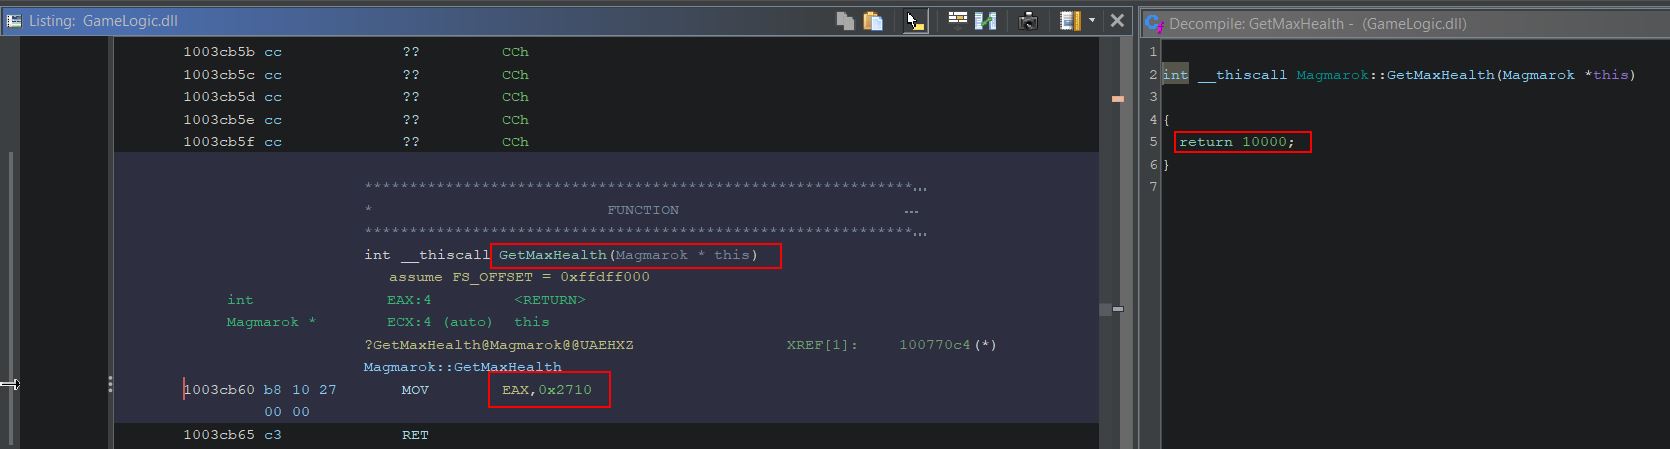
Looking for Magmarok in Ghidra shows a class which has a function called ‘GetMaxHealth’. This simply returns the value 10,000 (0x2710 in hex), indicating Magmarok has 10,000 health.
By examining the method ‘Damage’ within Magmarok, we can see that this is receiving a type of damage, and depending on what element it is, Magmarok will take a different amount of damage.
- FireDamage: Heal Magmarok
- ColdDamage: Deal double damage to Magmarok
- OtherElementalDamage: Deal half damage to Magmarok
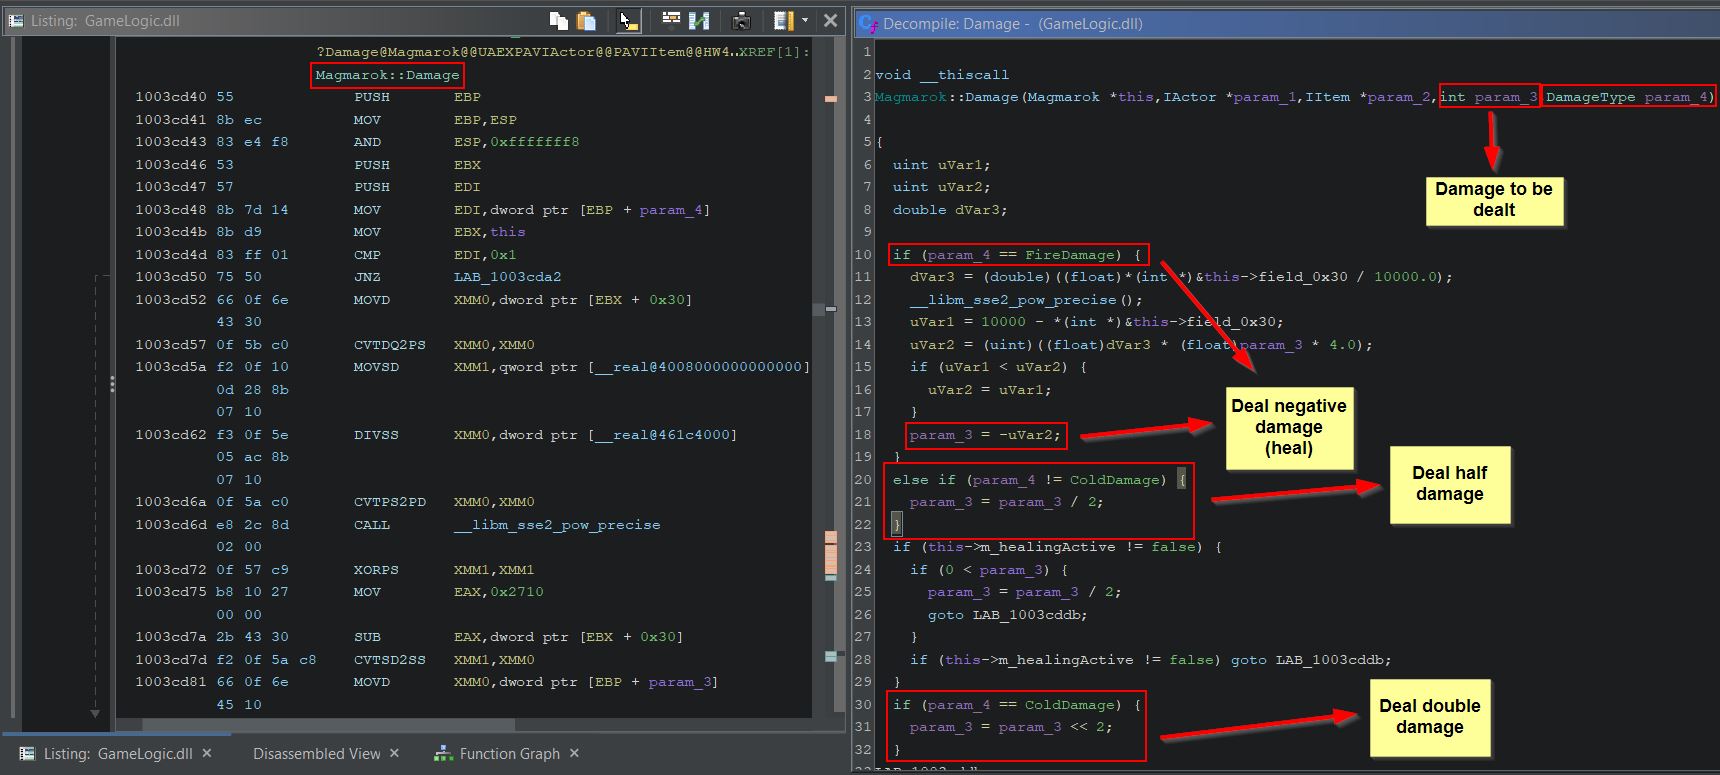
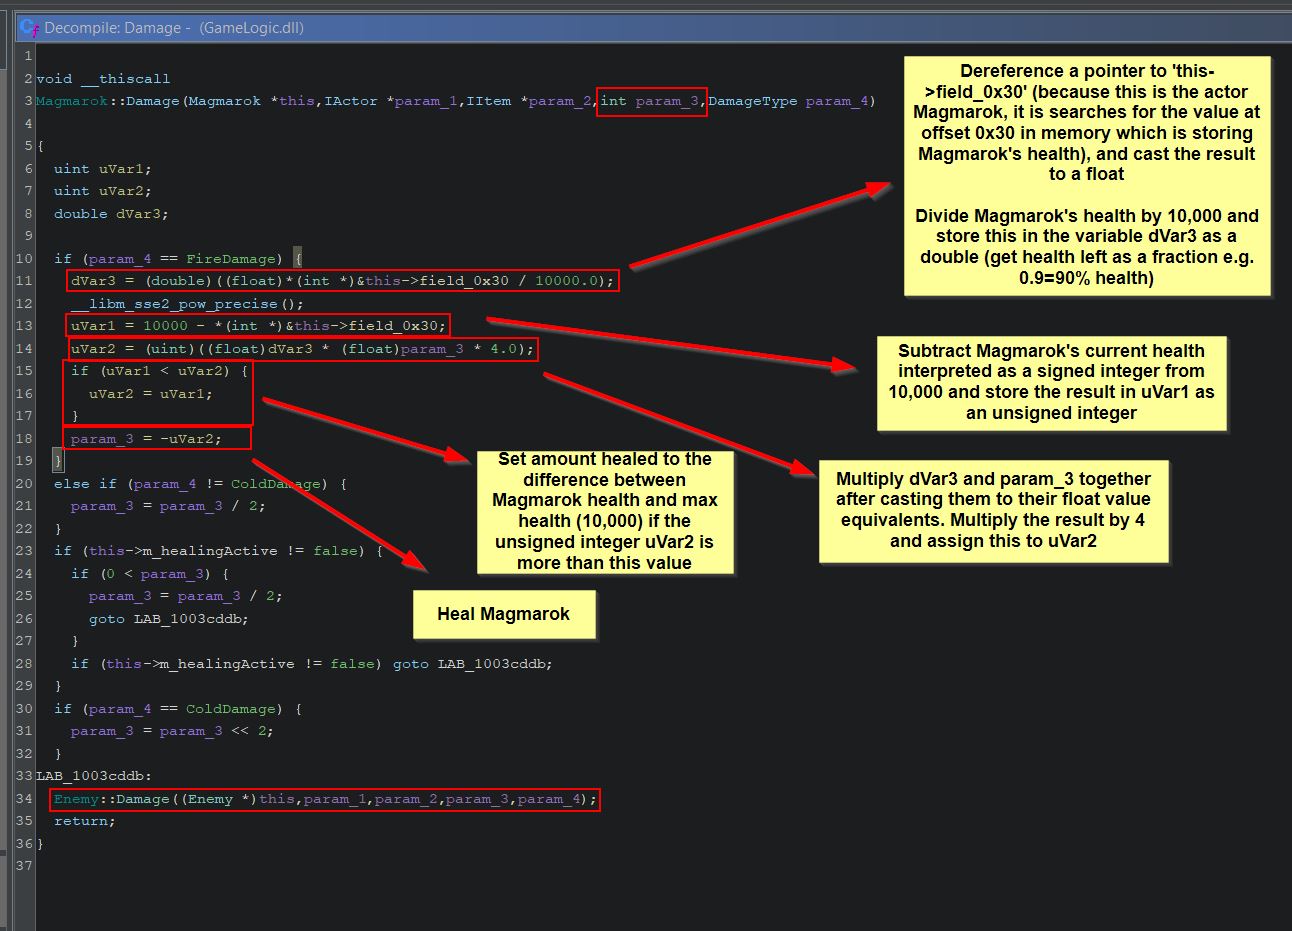
Of note is that more calculations are being performed when FireDamage is received than just simply healing Magmarok, and we can dig further into the logic behind this. Ghidra aptly names unknown variables based on their data type, which we know from the ‘Background Knowledge’ section of this write-up can include a ‘double’ type and an unsigned integer type ‘uint’. Looking at the logic for fire damage under a fine tooth comb we find the following:
- ‘dVar3’ is being used to determine what fraction of health Magmarok has left, where 0 is no health and 1 is full health.
- ‘uVar1’ is being used to calculate the difference in Magmarok’s current health, and 10,000 (presumed to be his max health).
- ‘uVar2’ is being used to calculate the amount of health to heal Magmarok by. Be default this is ‘dVar3’ multiplied by the spell damage multiplied by 4 (e.g. If hit with Great Balls of Fire which does 64 damage, and Magmarok has 90% of his health, Magmarok would be healed for 0.9 * 63 * 4 = 226, noting that casting to an integer loses any fraction values).
- If Magmarok had taken less damage than 226, instead of healing this amount Magmarok would simply be healed back to 10,000 by healing by ‘uVar1’ instead.
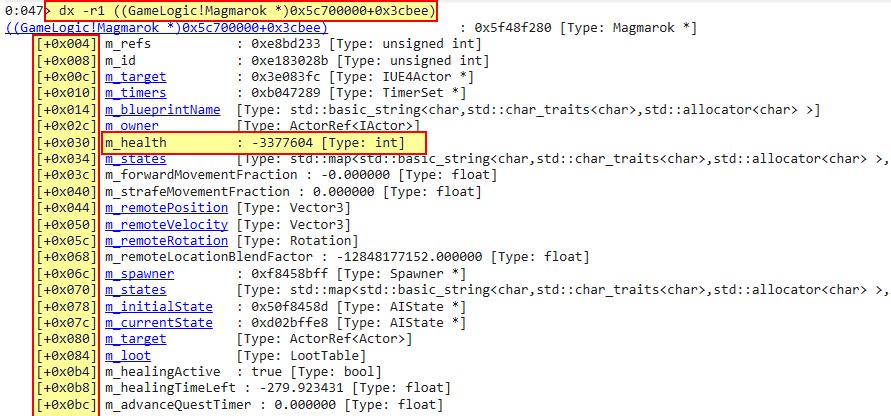
We can confirm that field_0x30 relates to Magmarok’s health in memory by examining the function which creates Magmarok. During creation the offset 0x30 within Magmarok’s virtual function table is set to be 10,000.
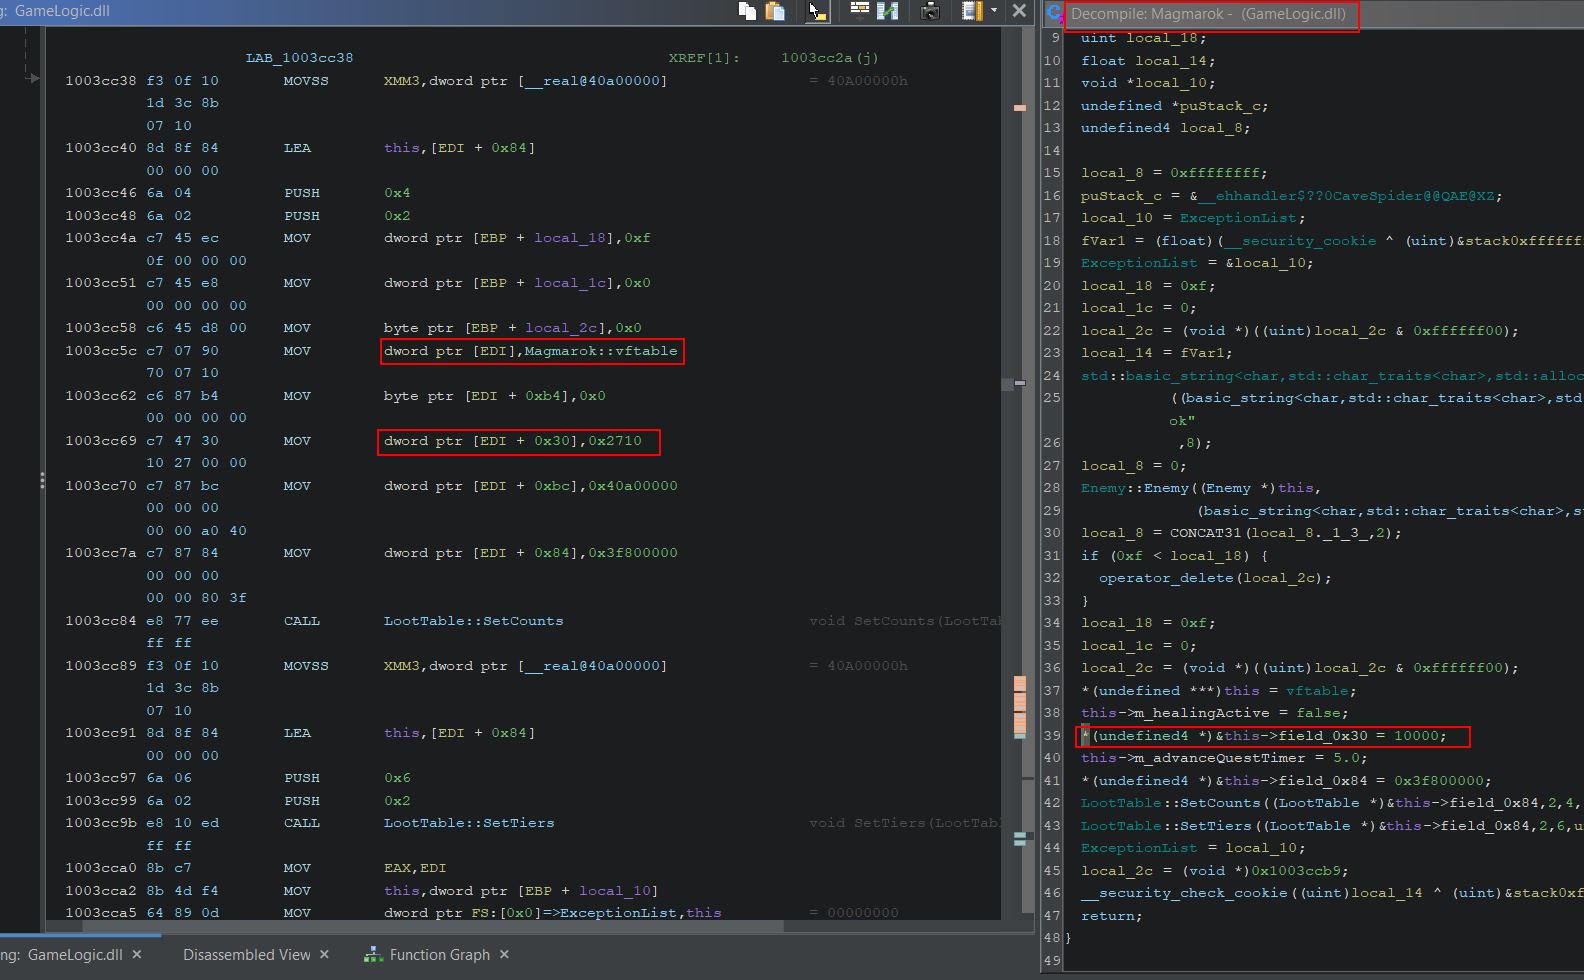
Magmarok also inherets a number of classes and has its own object type called ‘Magmarok’. Using Windbg, by casting any random memory segment to the type Magmarok, we can confirm that offset 0x30 is indeed Magmarok’s ‘m_health’ variable (note: this coincides with our player’s ‘m_health’ offset and all other enemies thanks to it inheriting the ‘actor’ class).
dx -r1 ((GameLogic!Magmarok *)0x5c700000+0x3cbee)
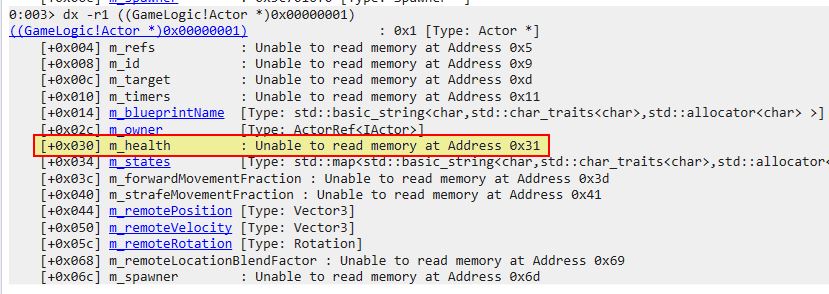
This same logic can be replicated by casting memory to the actor class.
dx -r1 ((GameLogic!Actor *)0x00000001)
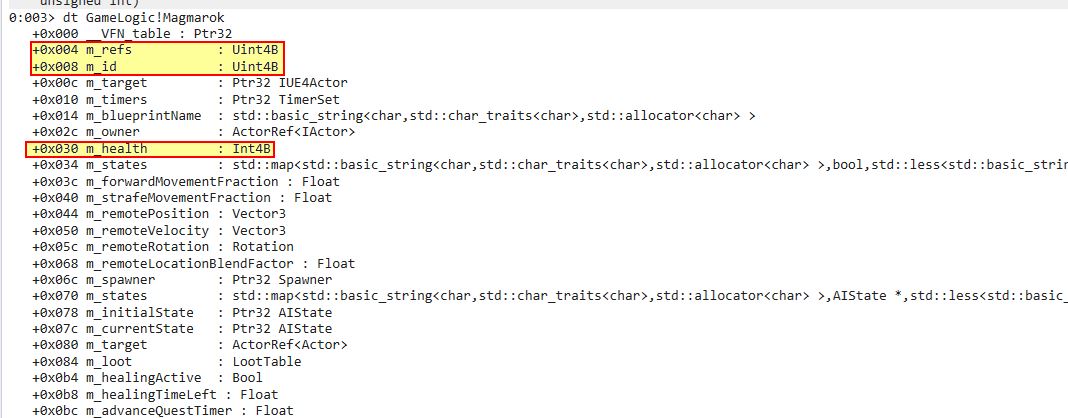
More specifically we can also use ‘dt’ to display data types for any given class. By using the ‘-v’ we can also get verbose output of functions and their parameters. For example:
dt GameLogic!Actor
dt GameLogic!Magmarok
dt -v GameLogic!Magmarok
Of most importance is that ‘dt’ clearly defines what type each offset is, so for m_health this is a signed integer of 4 bytes, whereas something like m_id or m_ref is an unsigned integer of 4 bytes.
Even though the previously mentioned link on data structures is useful, what’s more useful is the table provided within the .NET Visual Basic Data Type summary that helps us infer what value range we can have for a signed integer of 4 bytes.

🏆 Flag of The Lava via Integer Overflow, Integer Underflow, and Race Condition Vulnerabilities (300 points)
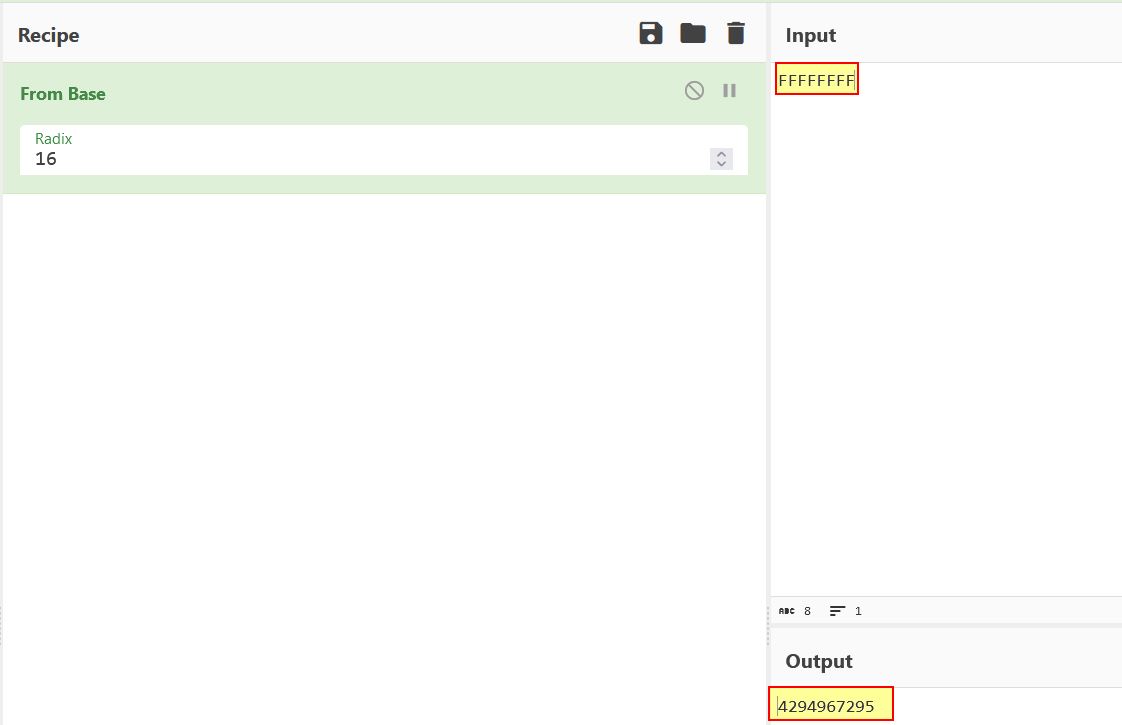
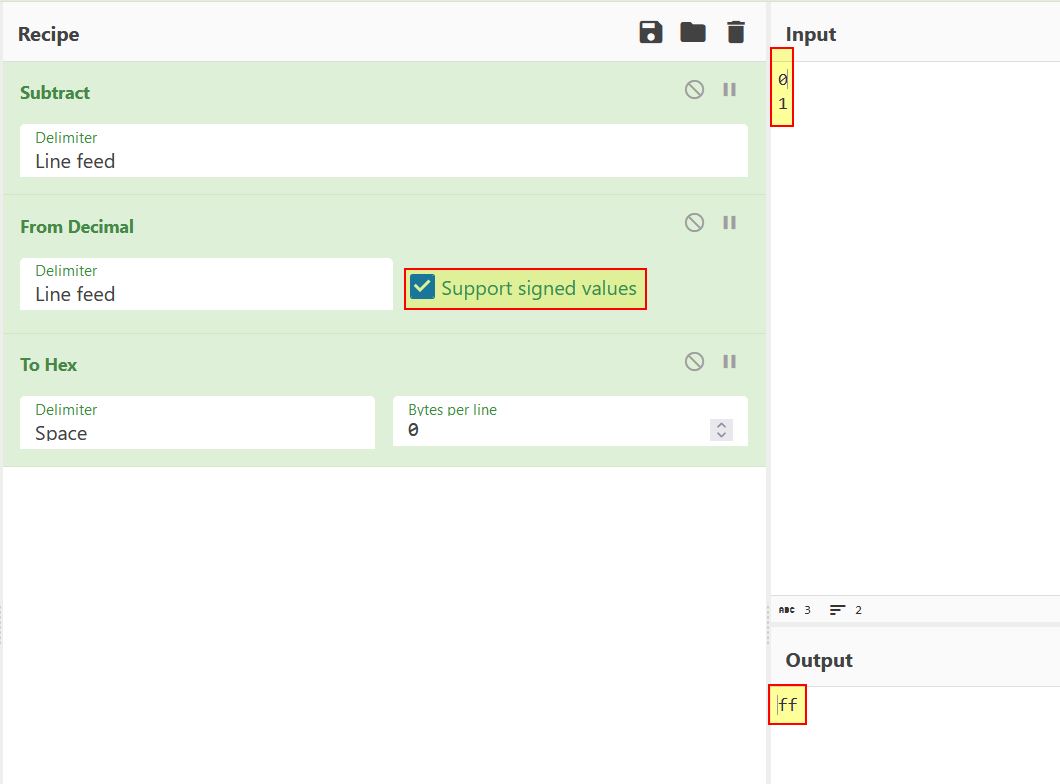
What’s interesting is that because Magmarok’s health is a signed integer as opposed to an unsigned integer, it can store anything in the range of -2,147,483,648 and 2,147,483,647. If this was an unsigned integer it could store anything in the range of 0 and 4,294,967,295 (This takes the form of 0xFFFFFFFF in memory if displayed as hexadecimal). This presents an interesting situation whereby because Magmarok’s health can exist in negative values, if we were to get it above 2,147,483,647, it would immediately wrap around in memory, overflow, and become -2,147,483,648 if it was to increase by 1, thus killing Magmarok.
At present although there’s a possible way of killing Magmarok, Magmarok has a healing check in place when hit with fire magic that ensures he only heals the difference between 10,000 and his current hp, so we’re unable to continuously heal Magmarok past 10,000 health.
Despite this, if we were to get Magmarok’s health past 10,000, because uVar1 (an unsigned integer) is used in calculating the difference in Magmarok’s health and his full health, a negative value cannot exist and so a value of ‘-1’ for example would wrap around the other way, causing an underflow vulnerability which results in a value of 4,294,967,295 (an example of this can be seen by taking the value 0, subtracting 1 from it as a signed value, and converting to hex which shows a value of -1 as FF in hex). This in itself means that if we’re able to surpass 10,000 health, the difference between 10,000 and 10,001 ends up being -1 (4,294,967,295) and thus the game thinks that Magmarok still has 4,294,967,295 health to gain before he is at max health, and thus allows Magmarok to be continuously healed past the 10,000 mark because there’s no check to see if Magmarok’s health is above 10,000.
At this point we can use our experience of fighting Magmarok to know that once he gets down to half health he will heal. Examining Magmarok’s tick method within Ghidra reveals the healing operations which take place.
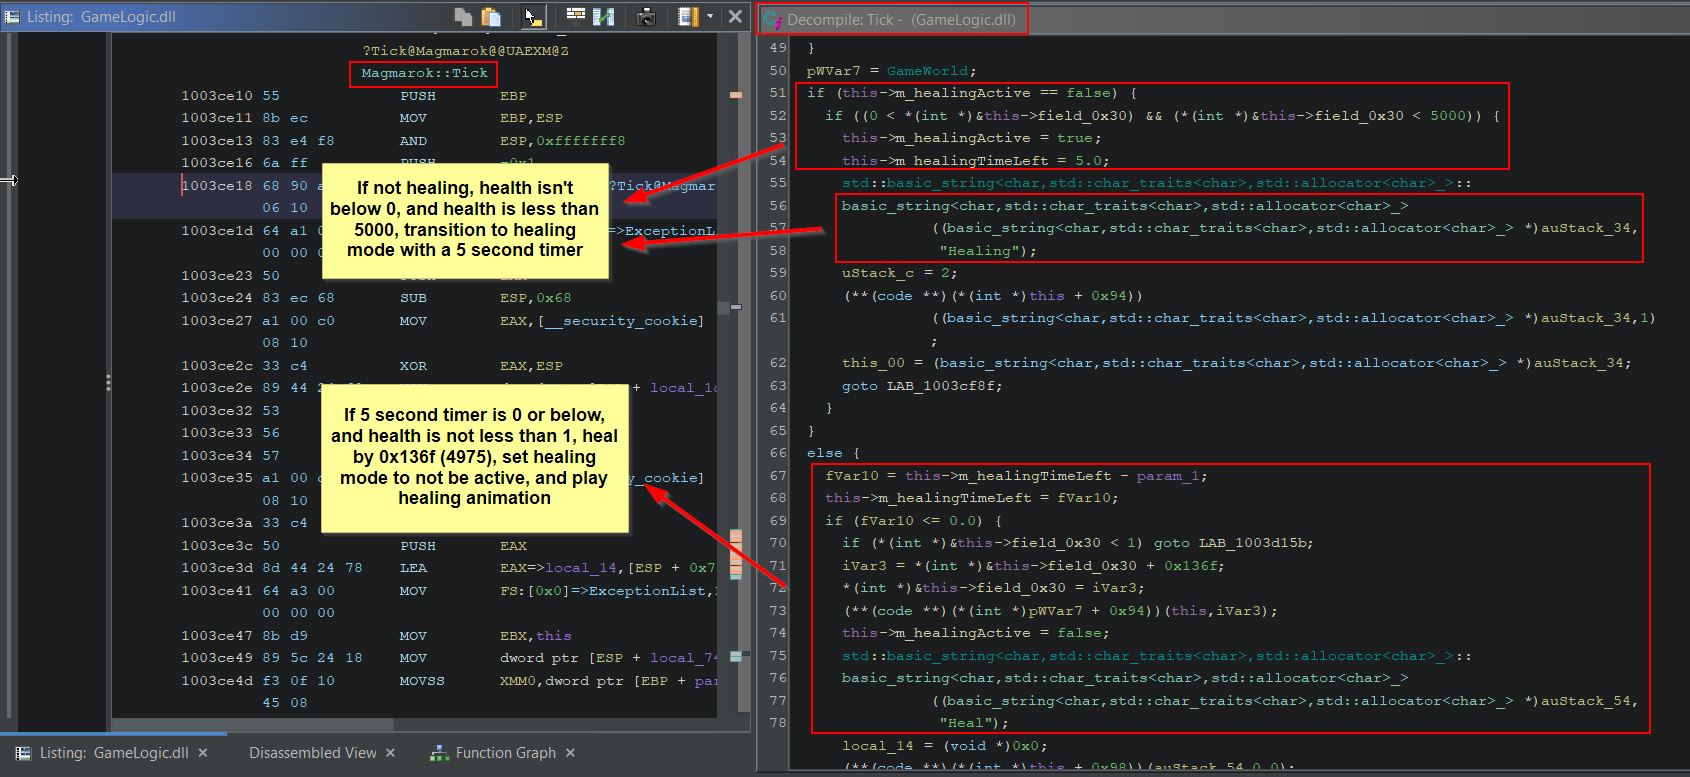
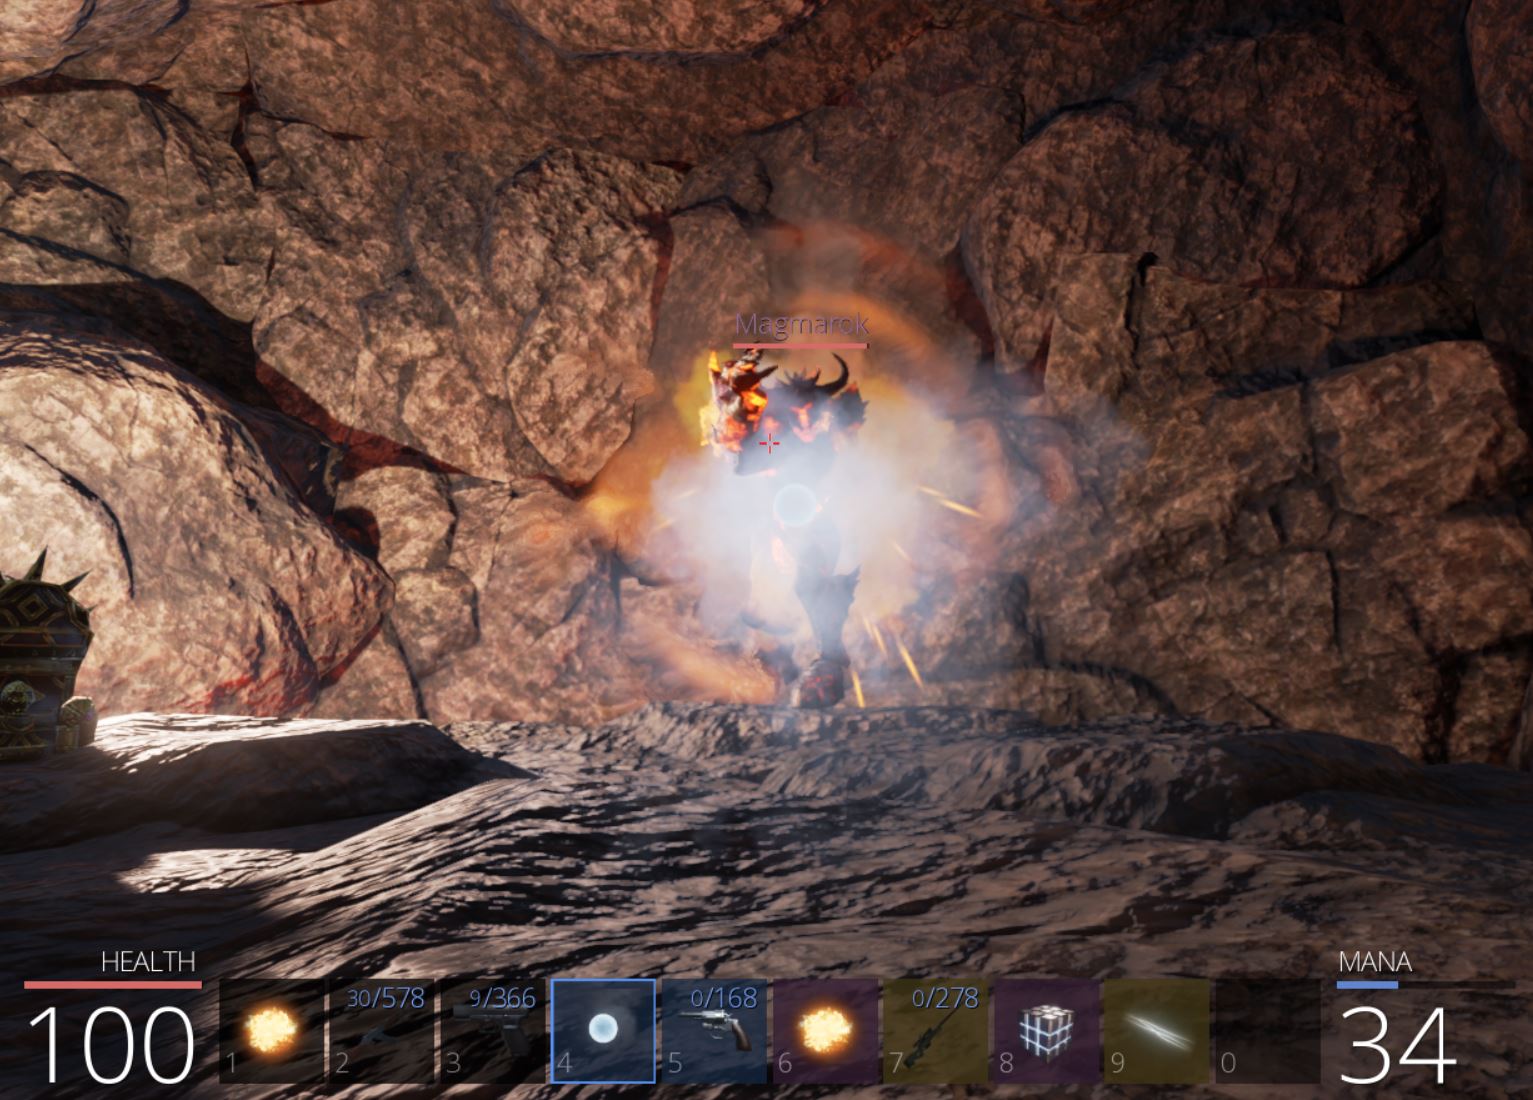
Specifically if Magmarok falls below 5000 health, he will transition to a healing state where there’s a 5 second delay between his animation and being healed by 4975 health. This 5 second delay gives us a window of opportunity, whereby we could heal Magmarok with fire spells past 5025 health, and then upon healing Magmarok will have surpassed the 10,000 health barrier.
Exploiting these vulnerabilities is fairly trivial and requires no other knowledge. The following steps can be taken to exploit Magmarok’s defenses.
- Attack with ‘ZeroCool’ or another weapon to reduce Magmarok’s health near half.
- Attack with a weaker pistol to drop Magmarok’s health to half or a minimal amount below ensuring you have mana to cast ‘Great Balls of Fire’.
- Begin hitting him with ‘Great Balls of Fire’ during his healing animation so that he surpasses 5025 health.
- His heal will take him past the 10,000 mark.
Although attacks at this stage appear to not impact his health bar, it is still impacting his health in memory. We now have an opportunity to keep healing Magmarok with ‘Great Balls of Fire’ until he inevitably falls over and dies. Note: Although this is shown offline in the gif below with locked health and mana, this was originally completed online.
If viewing Magmarok’s health using something like Cheat Engine, the value can either be expressed as a signed or unsigned integer, with a signed integer showing Magmarok’s true health value of -2,139,385,782 once he heals past 2,147,483,647.

With Magmarok dead we complete ‘Fire and Ice’.
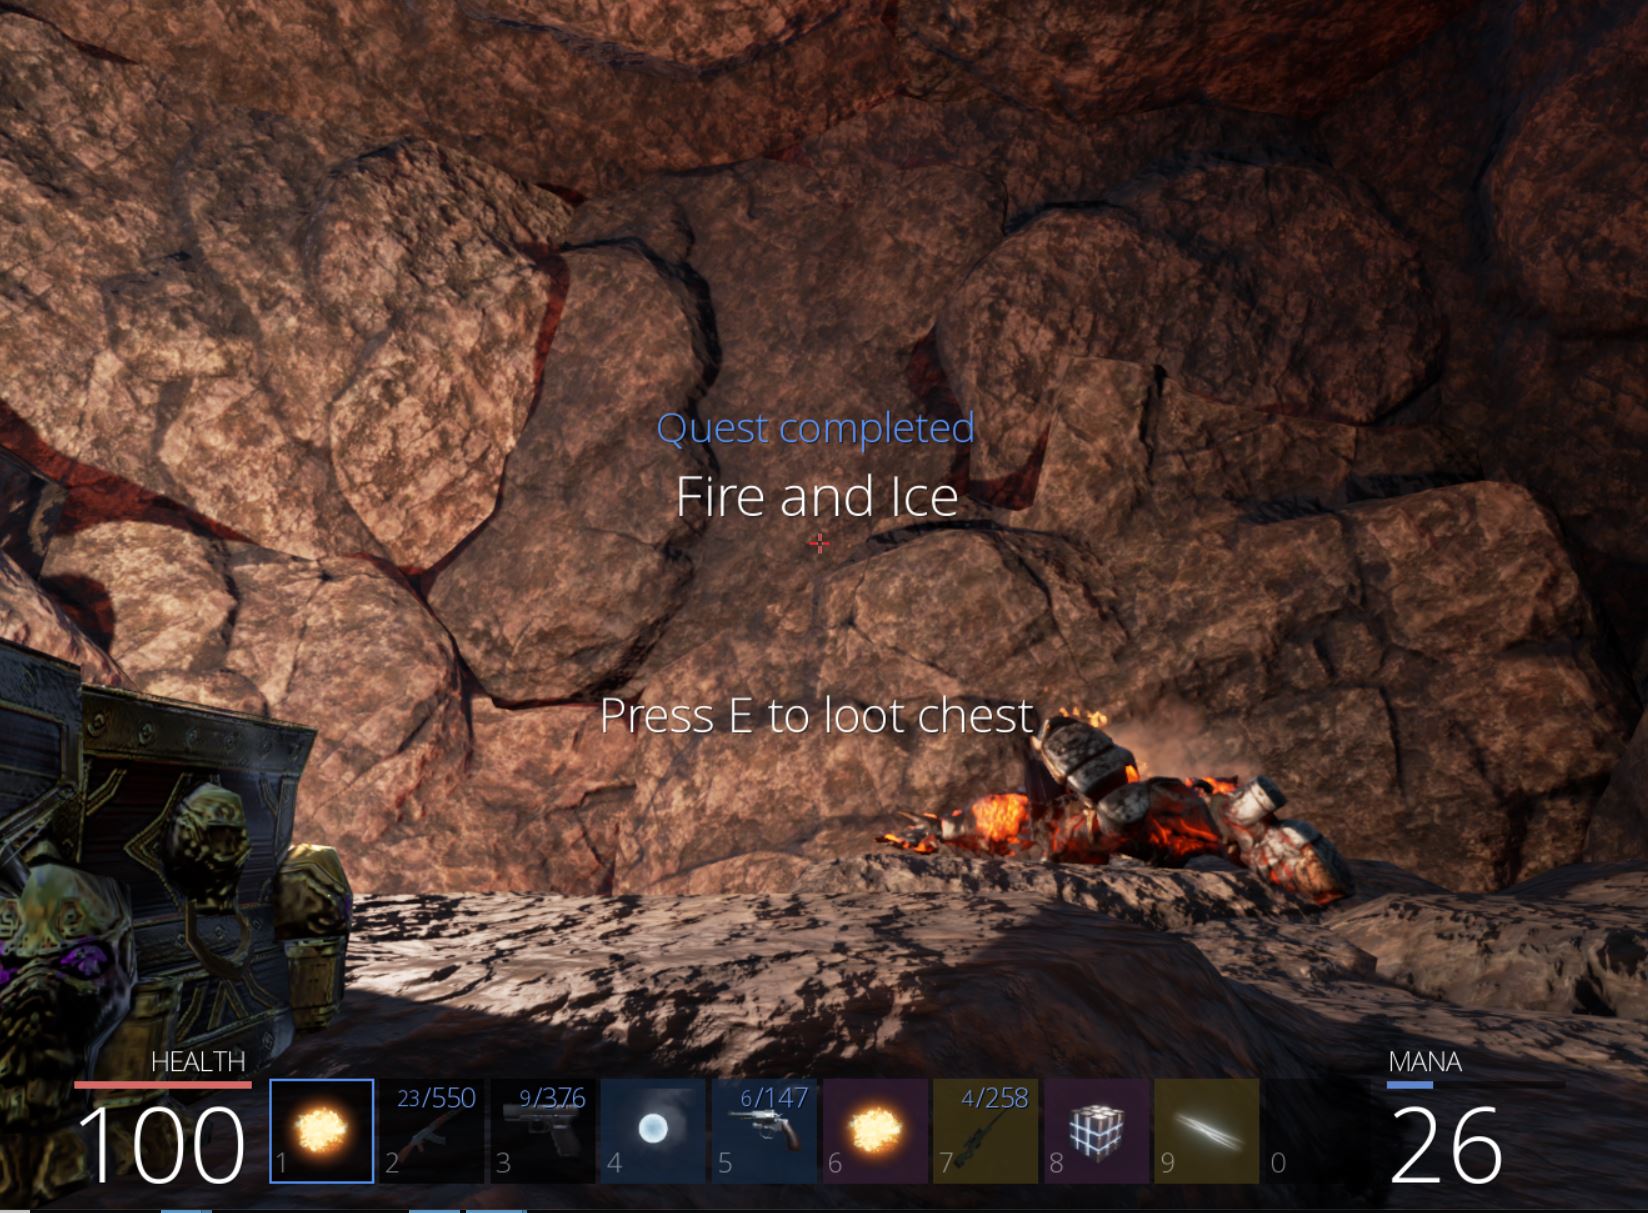
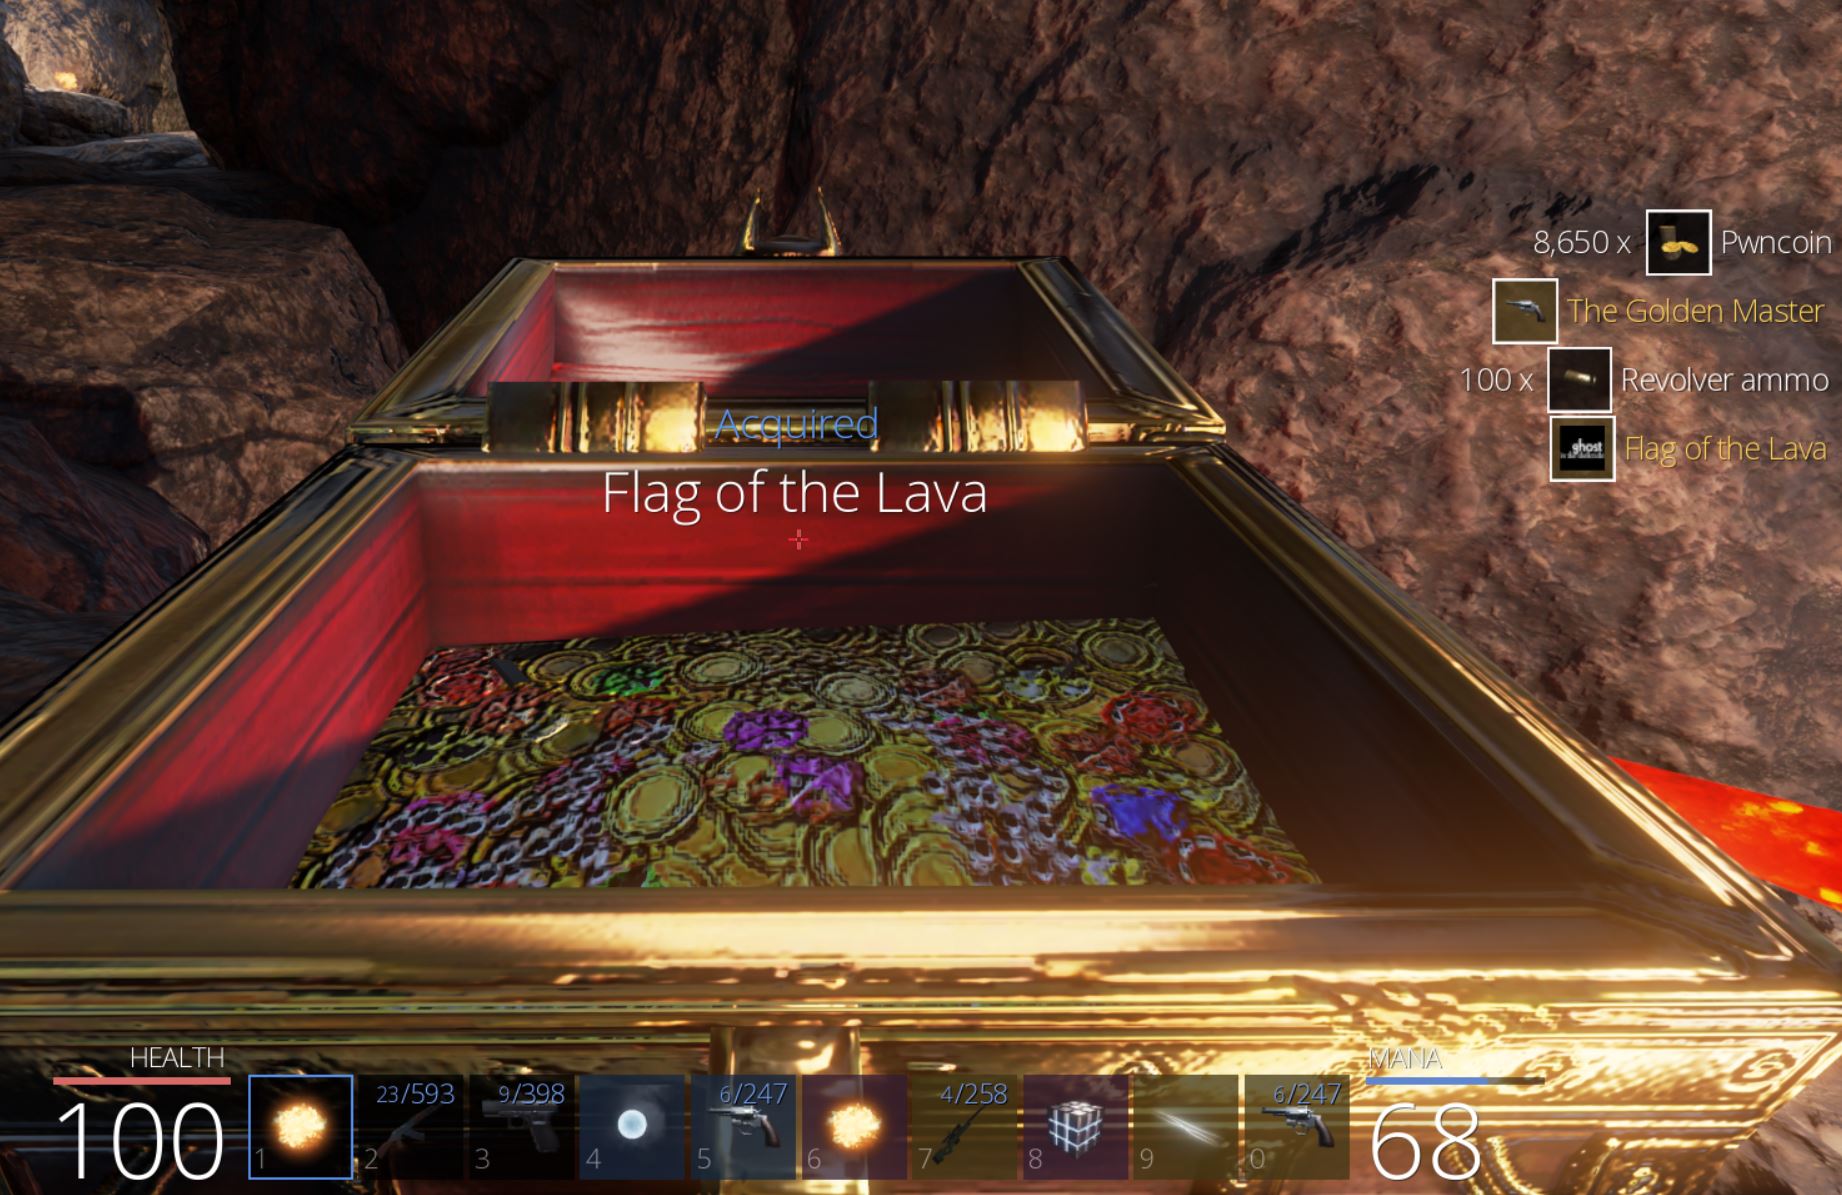
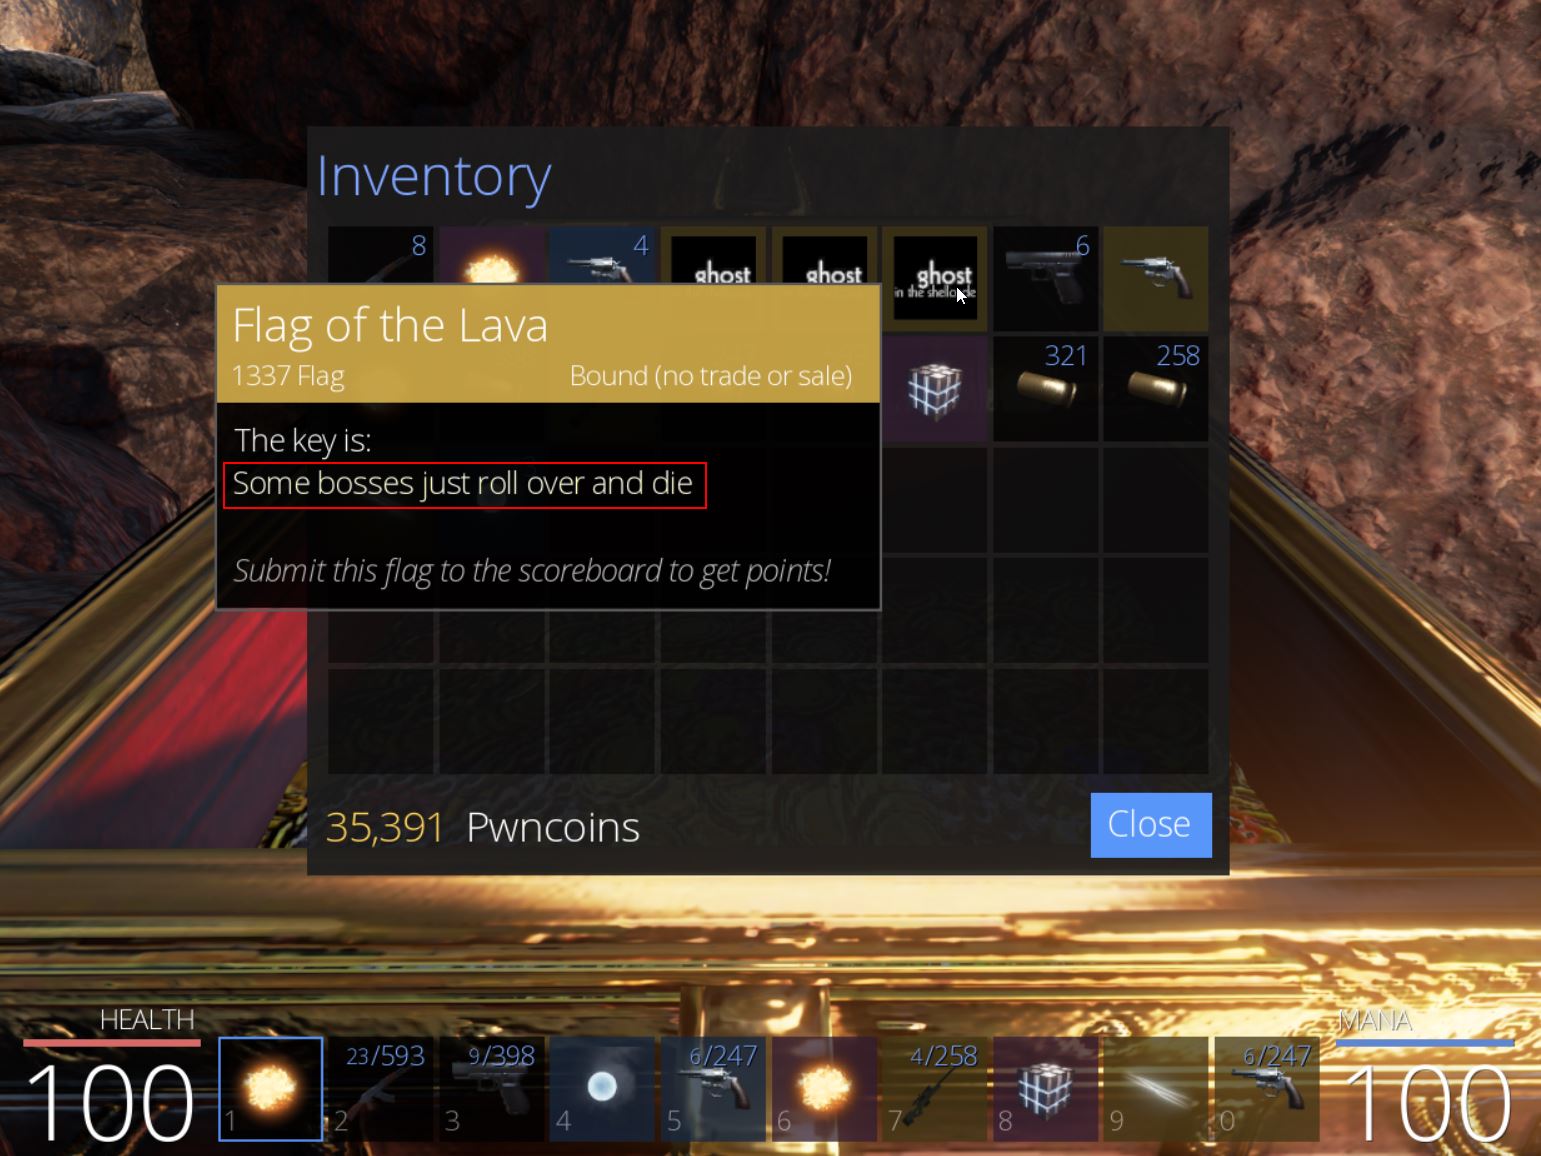
At this point the chest can be looted to acquire ‘Flag of the Lava’ which has the key ‘Some bosses just roll over and die’, and we have our third flag of the game worth 300 points.
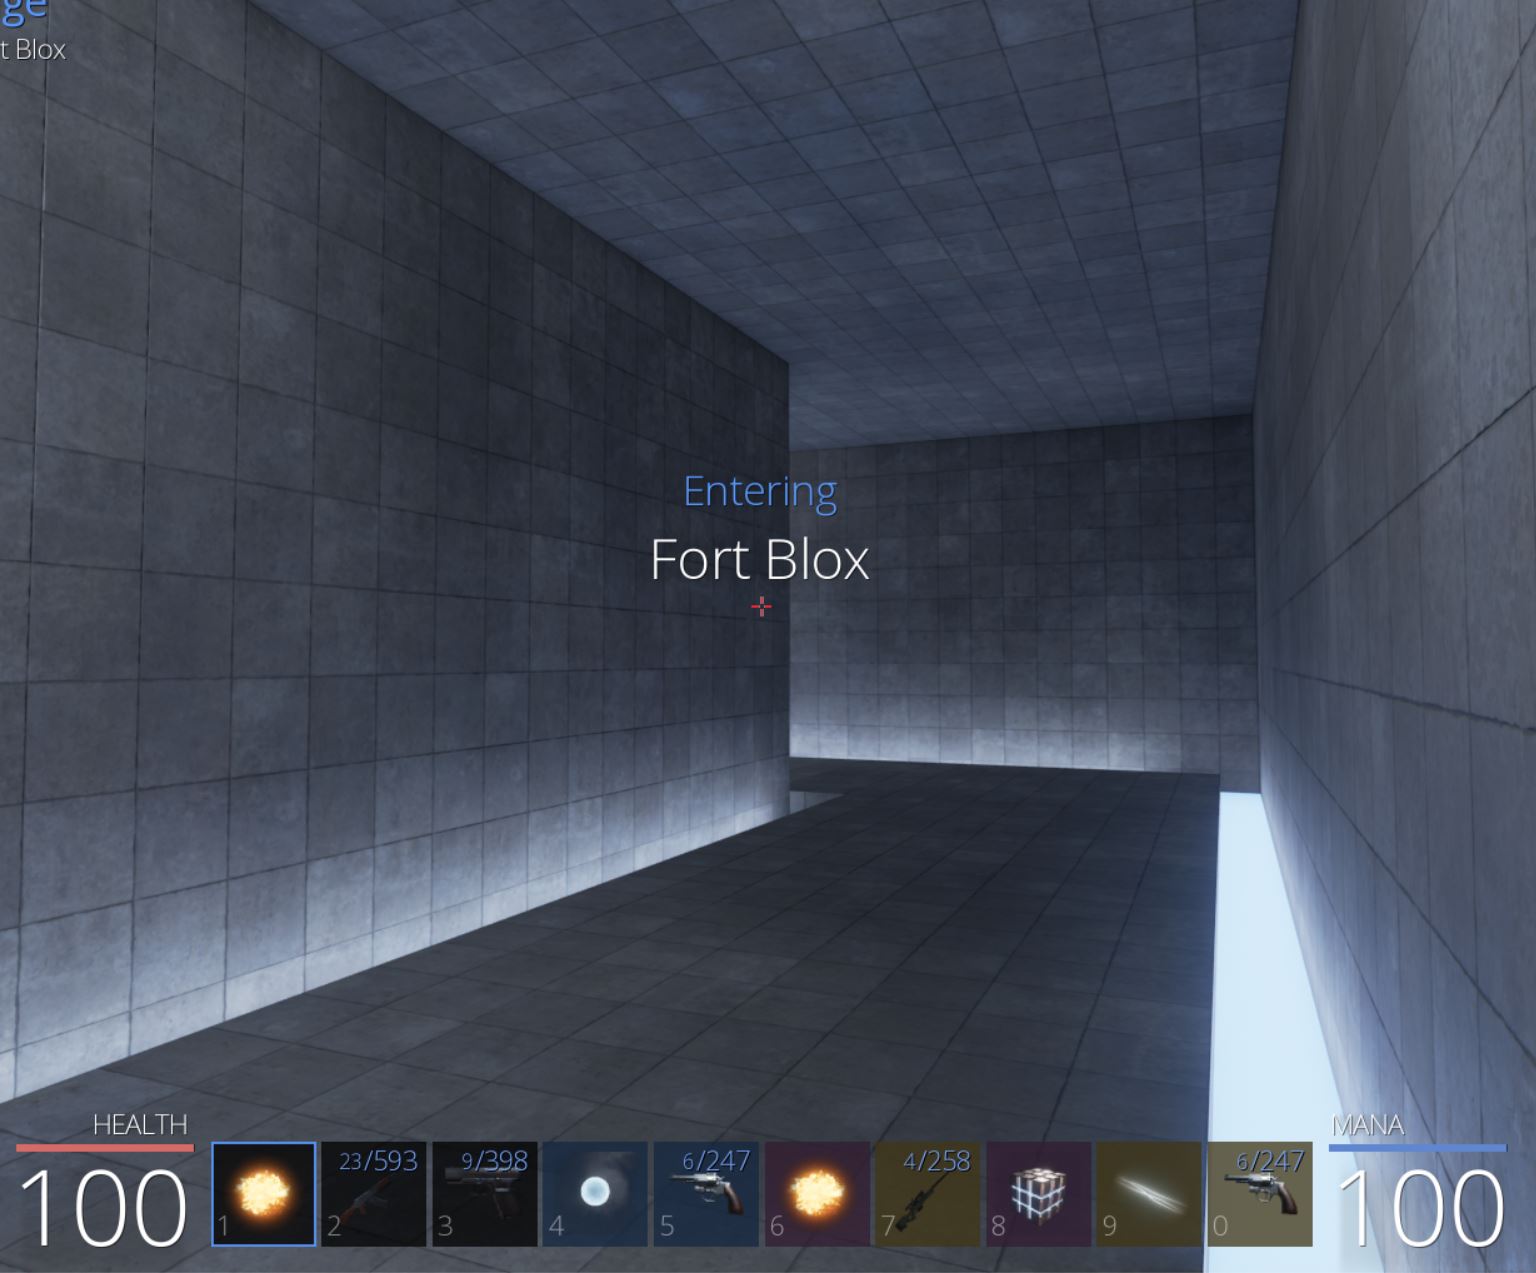
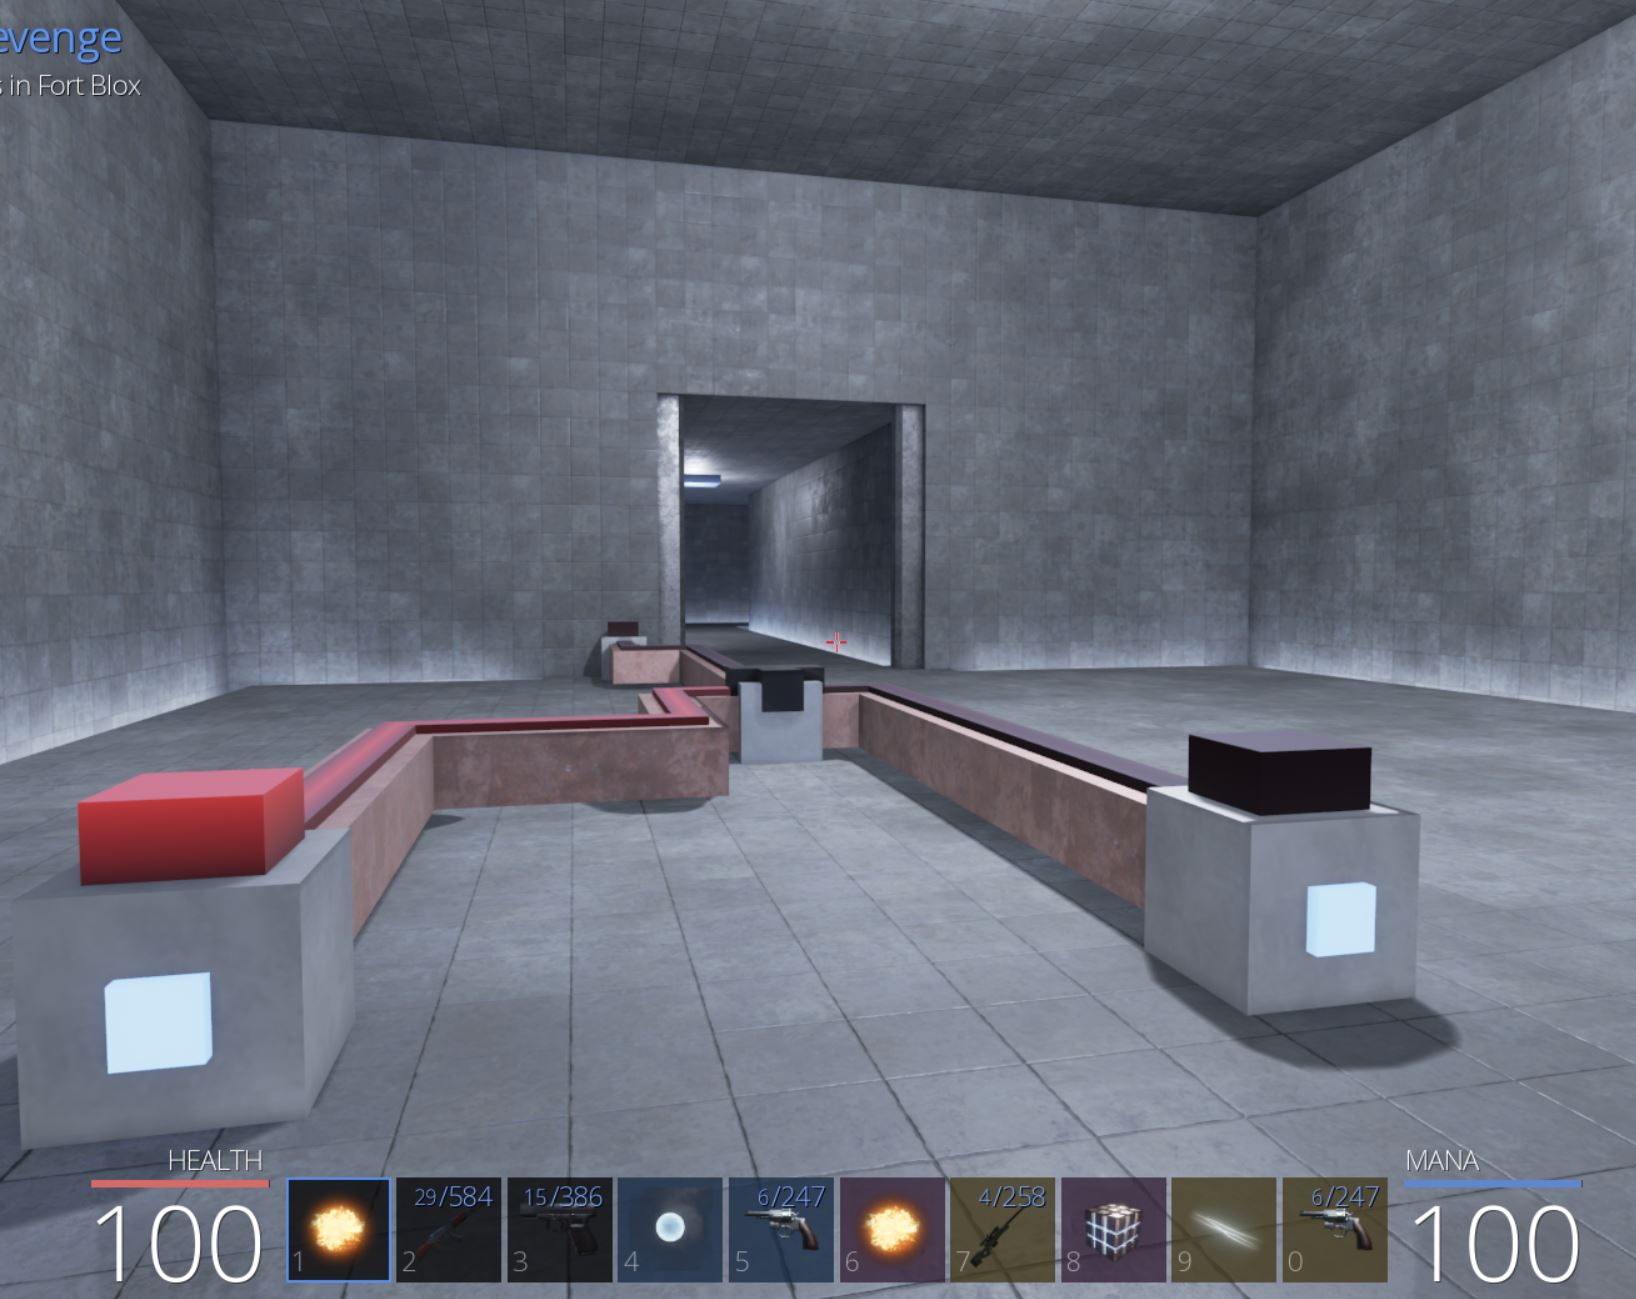
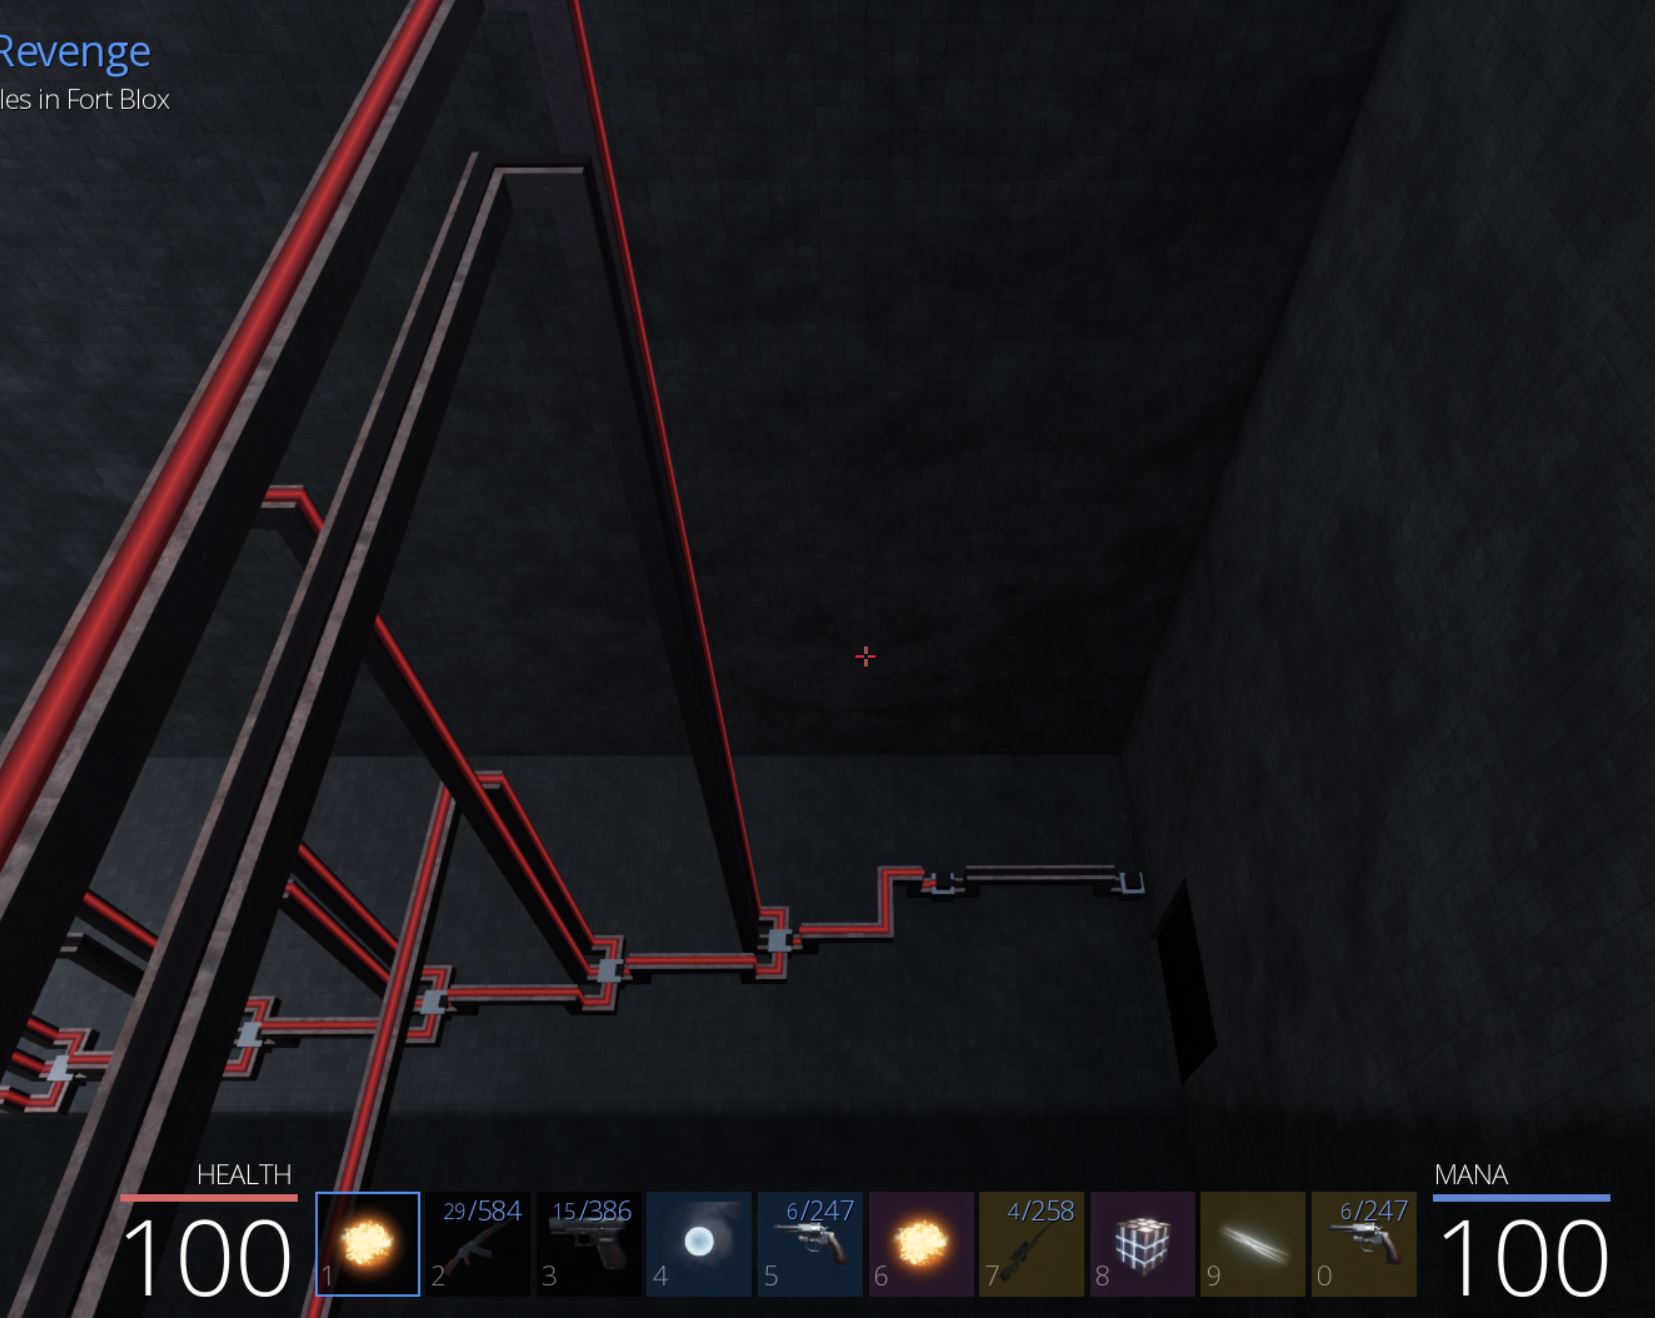
From here we can travel to ‘Fort Blox’ between the Town of Pwnie and Unbearable Woods to start the Blocky’s Revenge challenge.
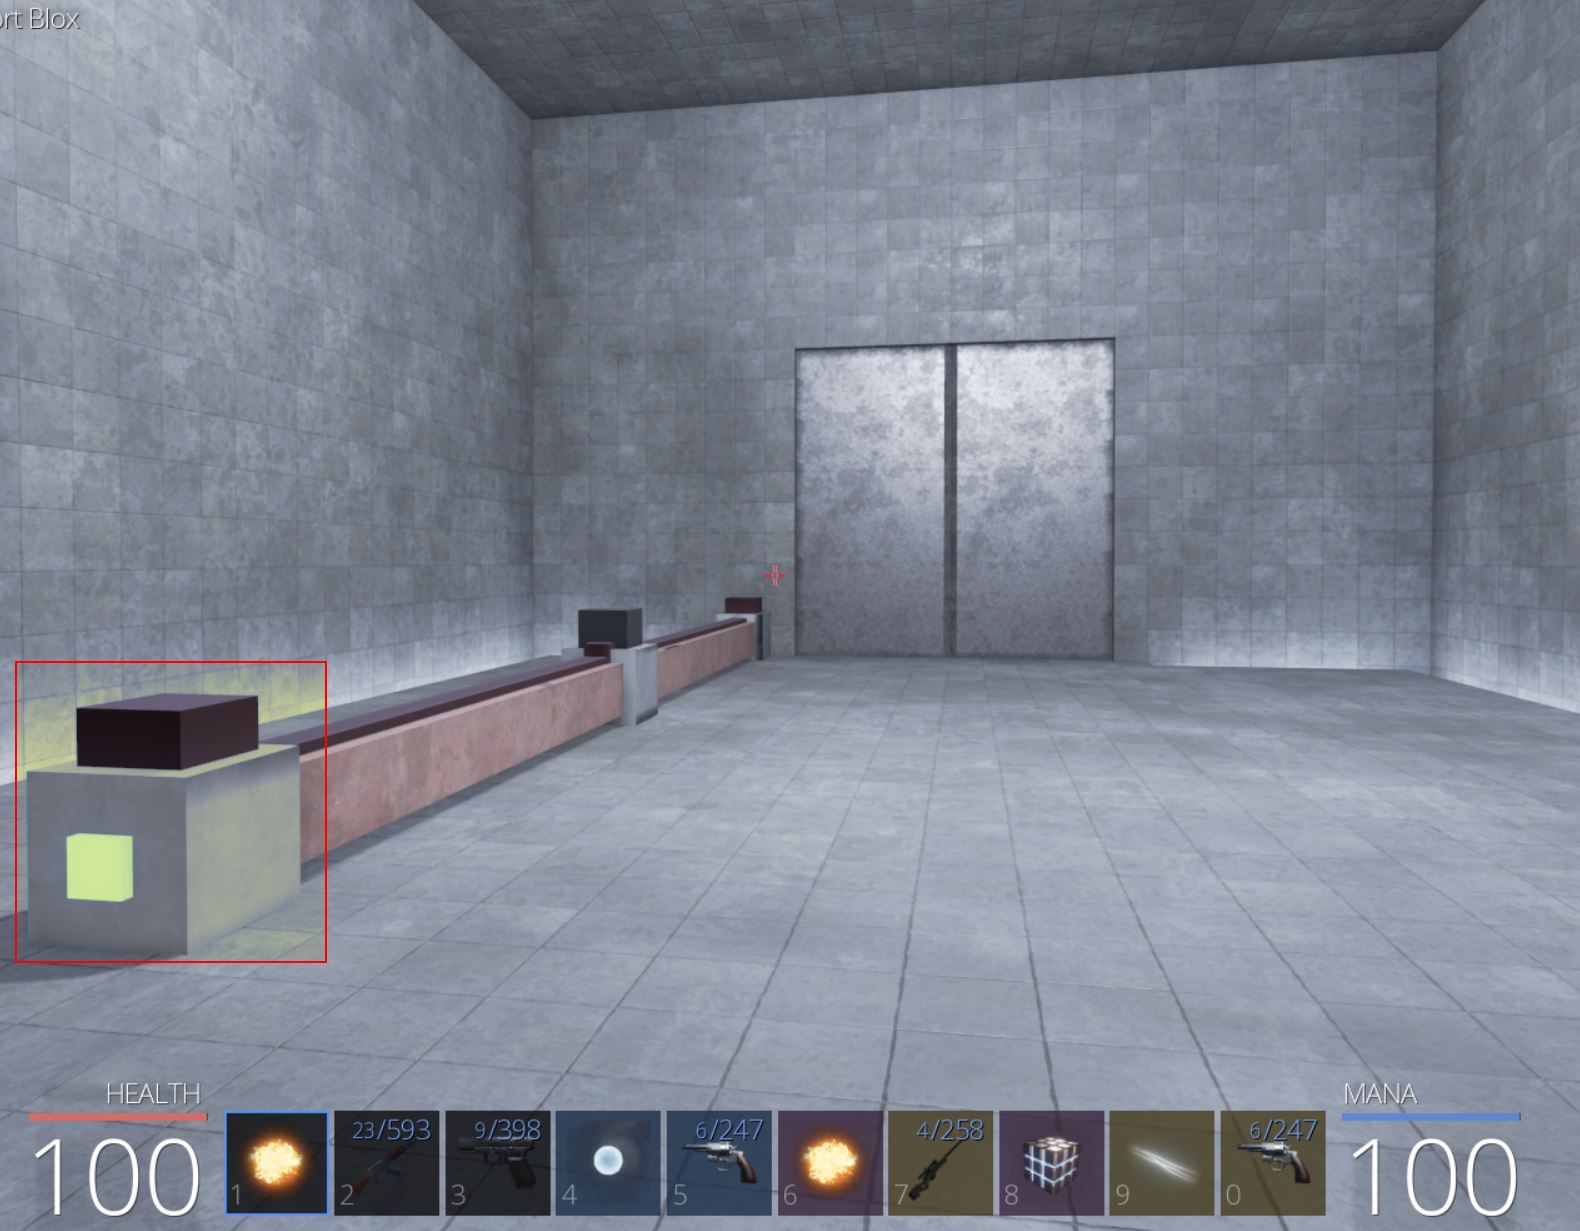
The challenge involves turning logic gates on or off to open doors and has multiple easy challenges to begin with. In the first room there’s only one input and so turning it on opens the door.
In the second room the logic gates function as an ‘AND’ logic gate where both inputs need to be turned on for the door to open.

In the third room the logic gates function as a ‘NOR’ logic gate where all 3 inputs need to be turned off so that a 4th ‘NOT’ logic gate can open the door.
In the fourth room there’s 3 inputs including an ‘OR’ logic gate which needs to be toggled correctly to open the door. This results in the achievement ‘It is Quite Logical’.
The final room presents a true challenge with seemingly endless amounts of inputs and logic gates which need to be used in the correct way to open the final door and claim our prize.
Part 7: 📡 Manipulating Game Network Traffic
Understanding Game Traffic
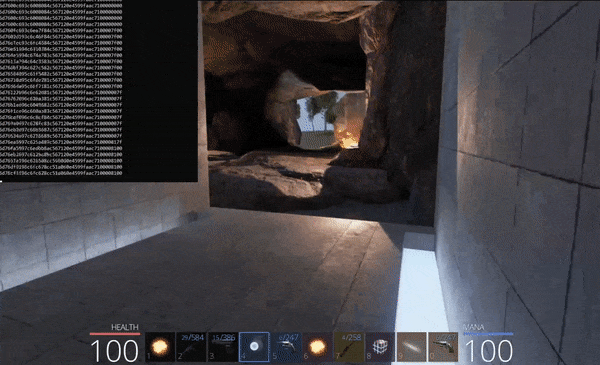
To properly understand what is happening we need to know a bit about how the server is receiving updates on what we’re doing. By examining traffic to and from the game server for our client, we can get an idea of what happens when we do nothing, and in essence what a standard tick in the game is sending back to the server. Examining a TCP flow in Wireshark shows a distinct value being sent to the server and a response from the server which remains the same.
- Client Request: 6d76fd6085c6571886c567120e458efc430000000000
- Server Response: 0000
By holding the up key for a brief period of time without changing camera angle or jumping, the requests change, but a few components remain static which can be seen in the samples extracted below:
6d76c6b78fc6ae0f85c567120e451afe7ffc00007f00
6d76aa698ec6cd8285c567120e451afe7ffc00007f00
6d76c7868bc6468186c567120e451afe7ffc00007f00
6d769bc08ac67ac586c567120e451afe7ffc00000000
From this the following appears to be true:
- First 2 bytes are static: 6d76
- Next 3 bytes appear to change
- Next byte appears to stay static
- Next 3 bytes appear to change
- Next 9 bytes appear to stay static
- Last 4 bytes change based on if up was pressed: 00000000 > 00007f00
Running another test but only changing our camera angle without moving shows the following traffic:
6d76d8be8ac619c686c567120e451afe7ffc00000000
6d76d8be8ac619c686c567120e451afe690100000000
6d76d8be8ac619c686c567120e45b217b8a200000000
6d76d8be8ac619c686c567120e45ff31670b00000000
From this the following appears to be true:
- The first 14 bytes appear to remain static
- The next 4 bytes appear to control our view angle.
- The last 4 bytes appear to stay static
Running yet another test but only jumping without changing our camera angle or moving shows the following traffic:
6d76d8be8ac619c686c5aa92104588059c5300000000
6d76d8be8ac619c686c55b5f124588059c5300000000
6d76d8be8ac619c686c516b8184588059c5300000000
6d76d8be8ac619c686c5a507184588059c5300000000
From this the following appears to be true:
- The first 10 bytes appear to remain static
- The next 3 bytes appear to change
- The next 9 bytes appear to remain static
Based on this the following are known:
6d76		|d8be8ac619c686c5	|a50718			|45		|88059c53	|00000000
Static ID	|Change when moving	|Change when jumping	|Unknown	|Camera angle	|Change when key pushed
What’s interesting is that the changes that occur when moving appears to be 8 bytes, whereas jumping only appears to change 3 bytes with an unknown byte left over; however, this isn’t something that’s standard for 3D games. Within 3D games an X, Y, and Z coordinate governs where your character is in relation to the overall world, and more often than not this takes the form of float values which are 4 bytes each.
Knowing this we can effectively assume that the following is an accurate breakdown of this network communication and thus what is happening on any given tick to the server.
6d76		|d8be8ac6	|19c686c5	|a5071845	|88059c53	|00000000
Static ID	|X-Axis		|Y-Axis 	|Z-Axis		|Camera angle	|Change when key pushed
Implementing a passive TCP proxy
To intercept game traffic sent to and from the server, we can use Python to setup a passive TCP proxy, and redirect the game.pwn hostname in /etc/hosts file (Linux) or %SystemRoot%\Windows\System32\drivers\etc\hosts (Windows) to point to the loopback (localhost) address 127.0.0.1.
hosts file:
192.168.56.106 	master.pwn3
127.0.0.1 	game.pwn3
A Python3.5+ basic TCP proxy can be created similarly to the below.
By running this we can then connect to the game and see all traffic being relayed to the server from our local game client. The end result is a continuous stream of values which update depending on our player movement, and new values which momentarily appear if we attack or jump.
Understanding Blocky’s Revenge Network Logic
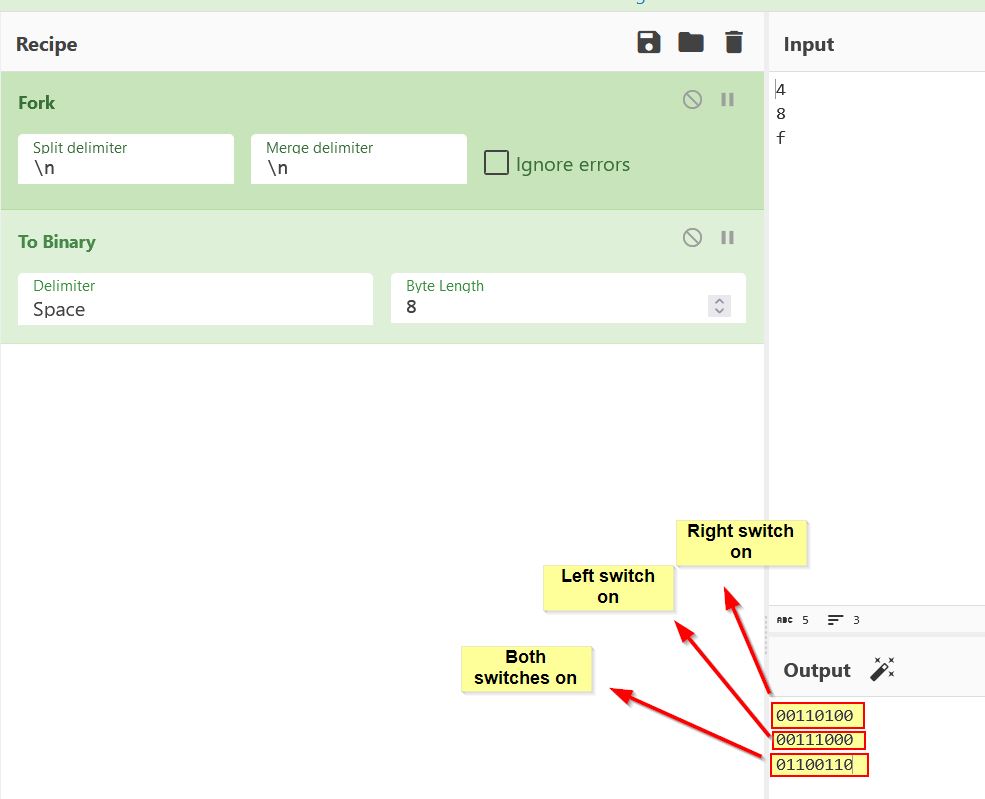
By toggling on a few of inputs within the Blocky’s Revenge final challenge room, using this TCP proxy we can now passively see what is being sent to the server for each individual switch.
30310a0046696e616c5374616765000000c06d76adcd3844f20411c5d7f20d452be48a4900000000
30310a0046696e616c5374616765000000e06d76cc349b43cf5d10c5d7f20d45e0e9244000000000
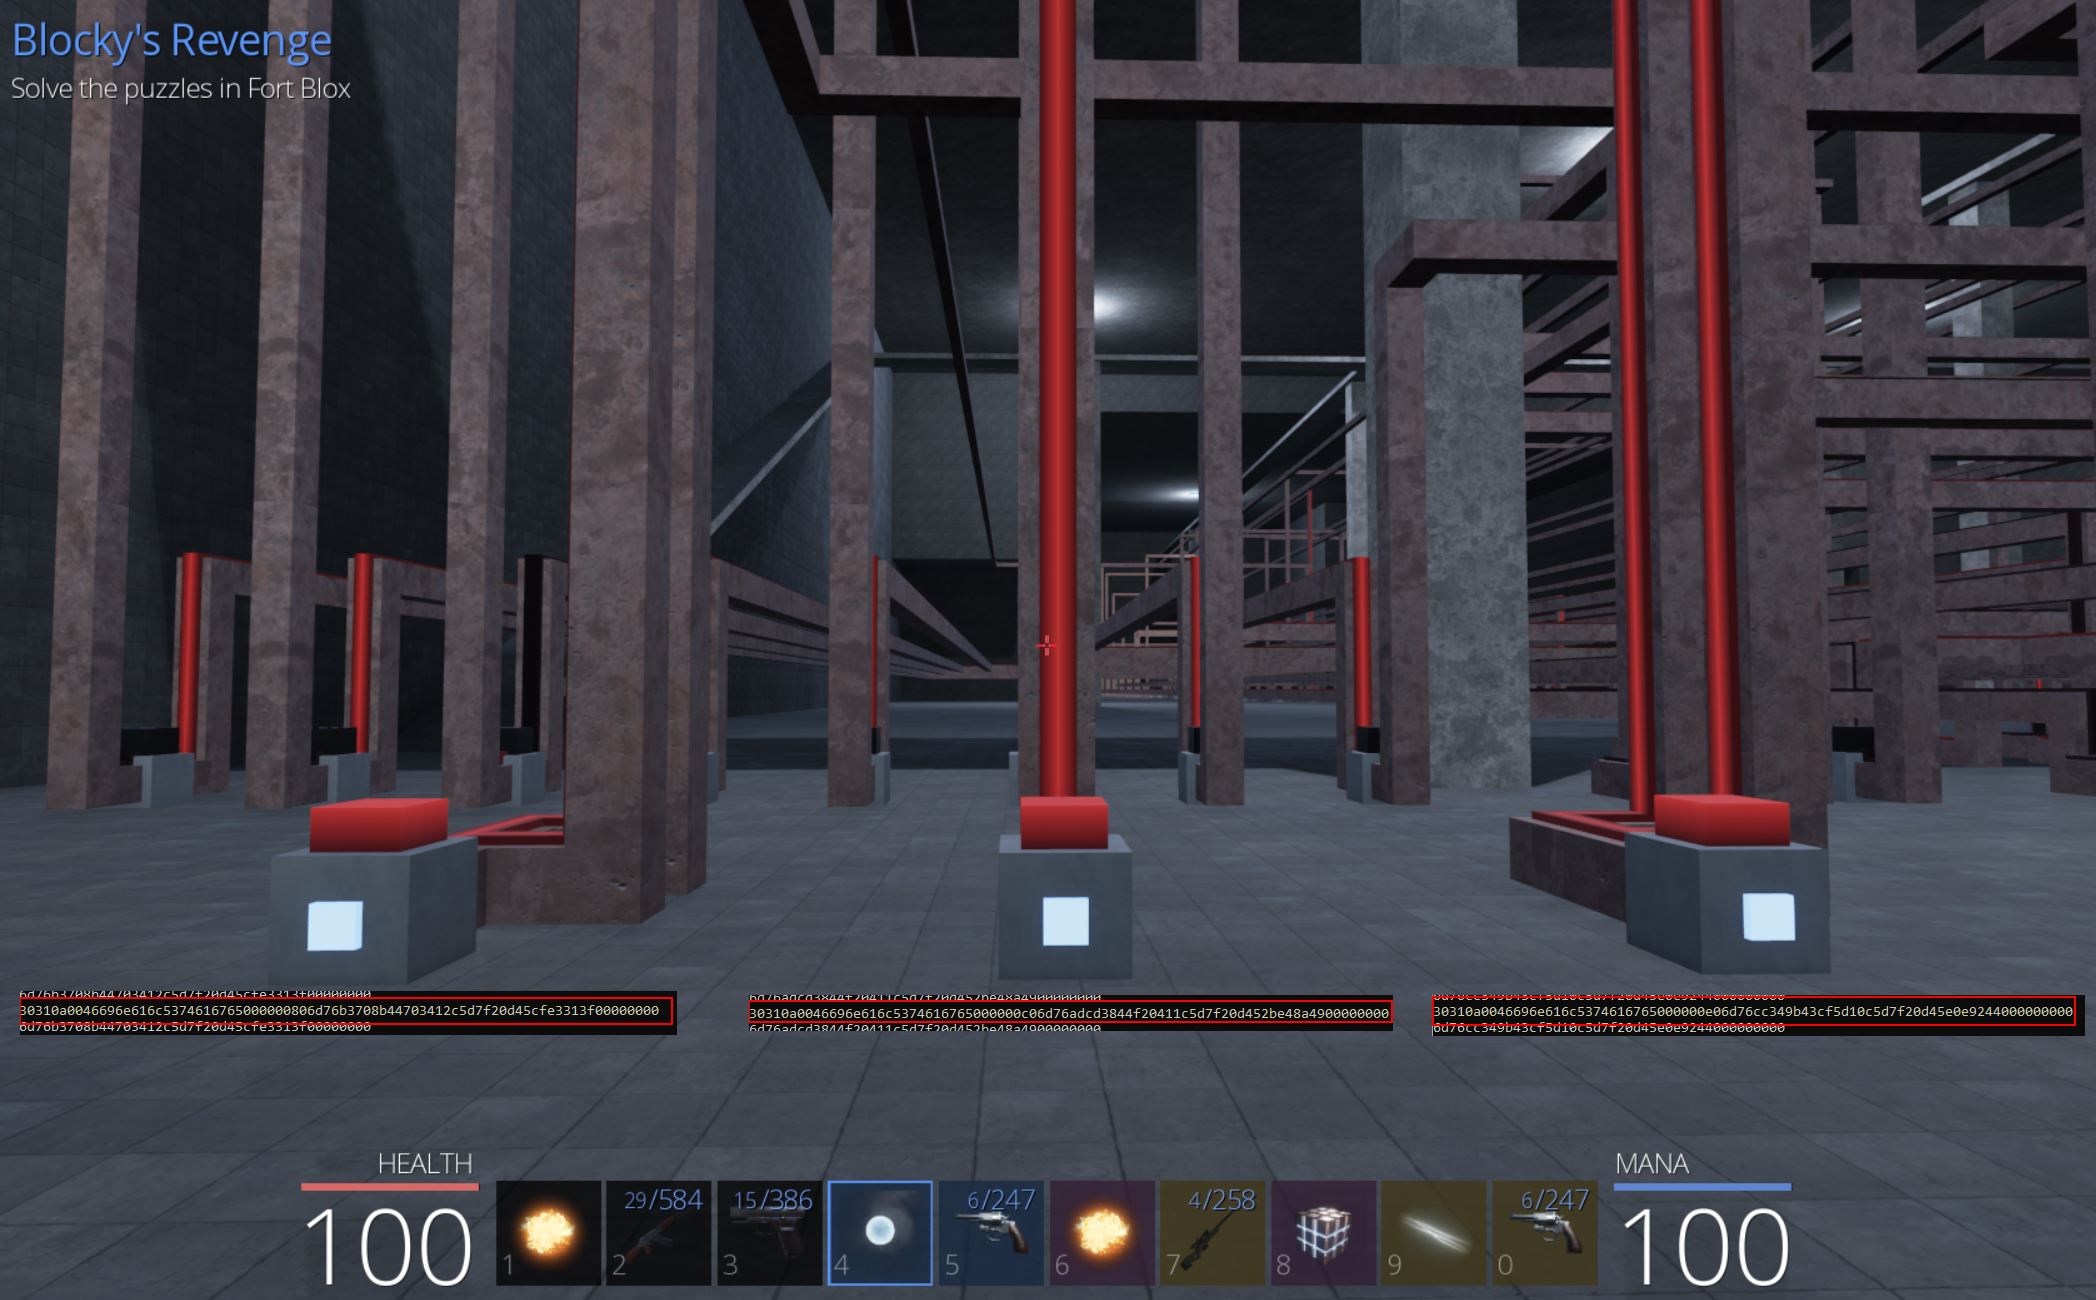
Taking a sample from the far right of the room also shows a similar pattern, and to properly understand this network traffic we can also get a sample of turning off the input.
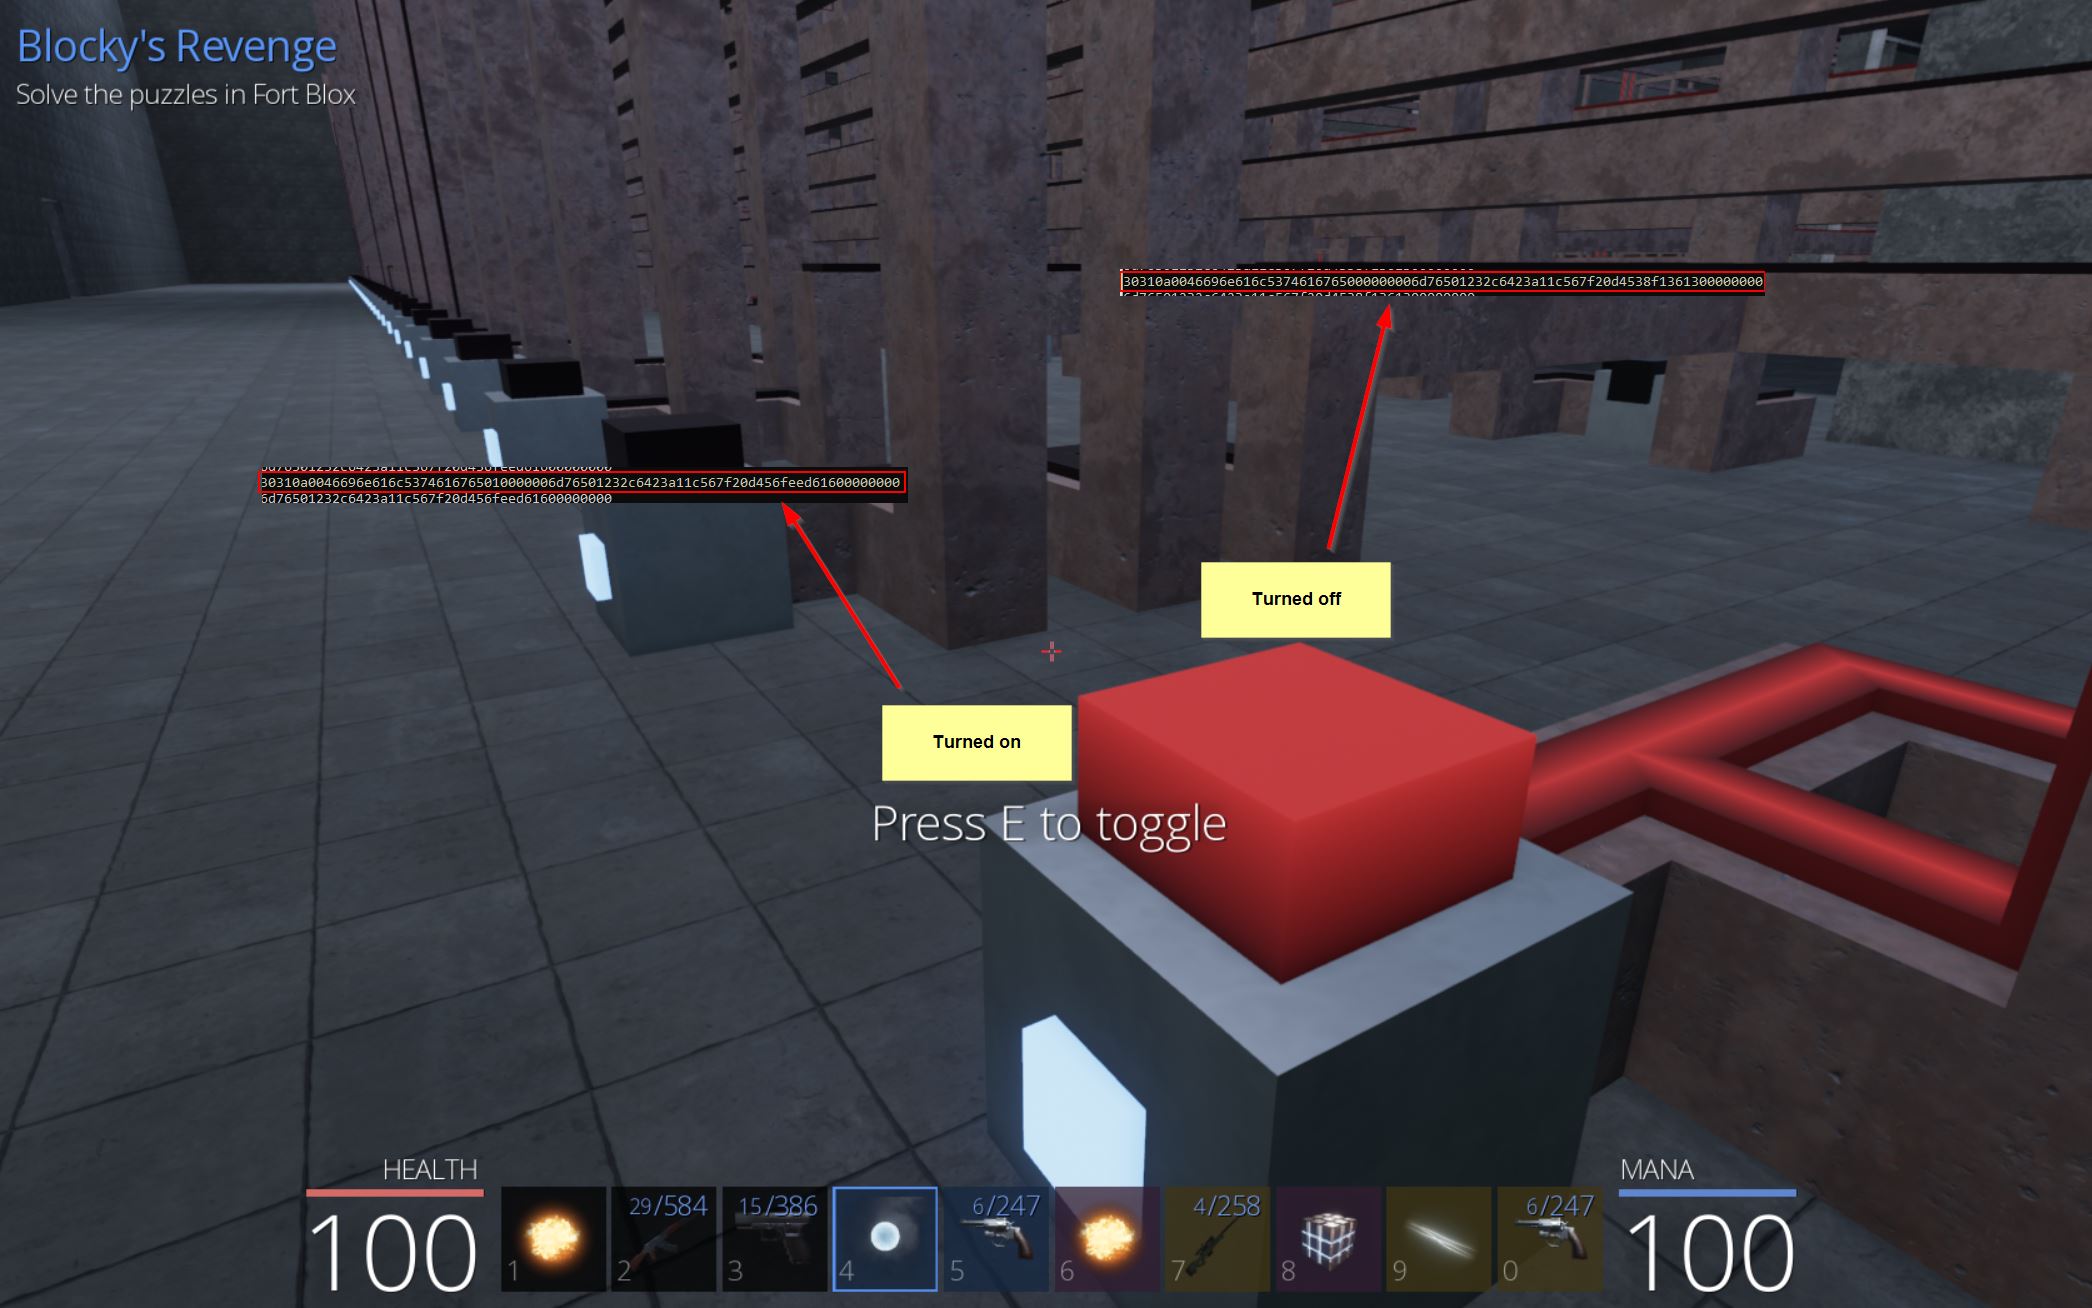
On:  30310a0046696e616c5374616765010000006d76501232c6423a11c567f20d456feed61600000000
Off: 30310a0046696e616c5374616765000000006d76501232c6423a11c567f20d4538f1361300000000
Considering there’s nothing inherently obvious in the way of consistency here, we can convert these from hex to see a bit of what is being sent to the server in ascii.
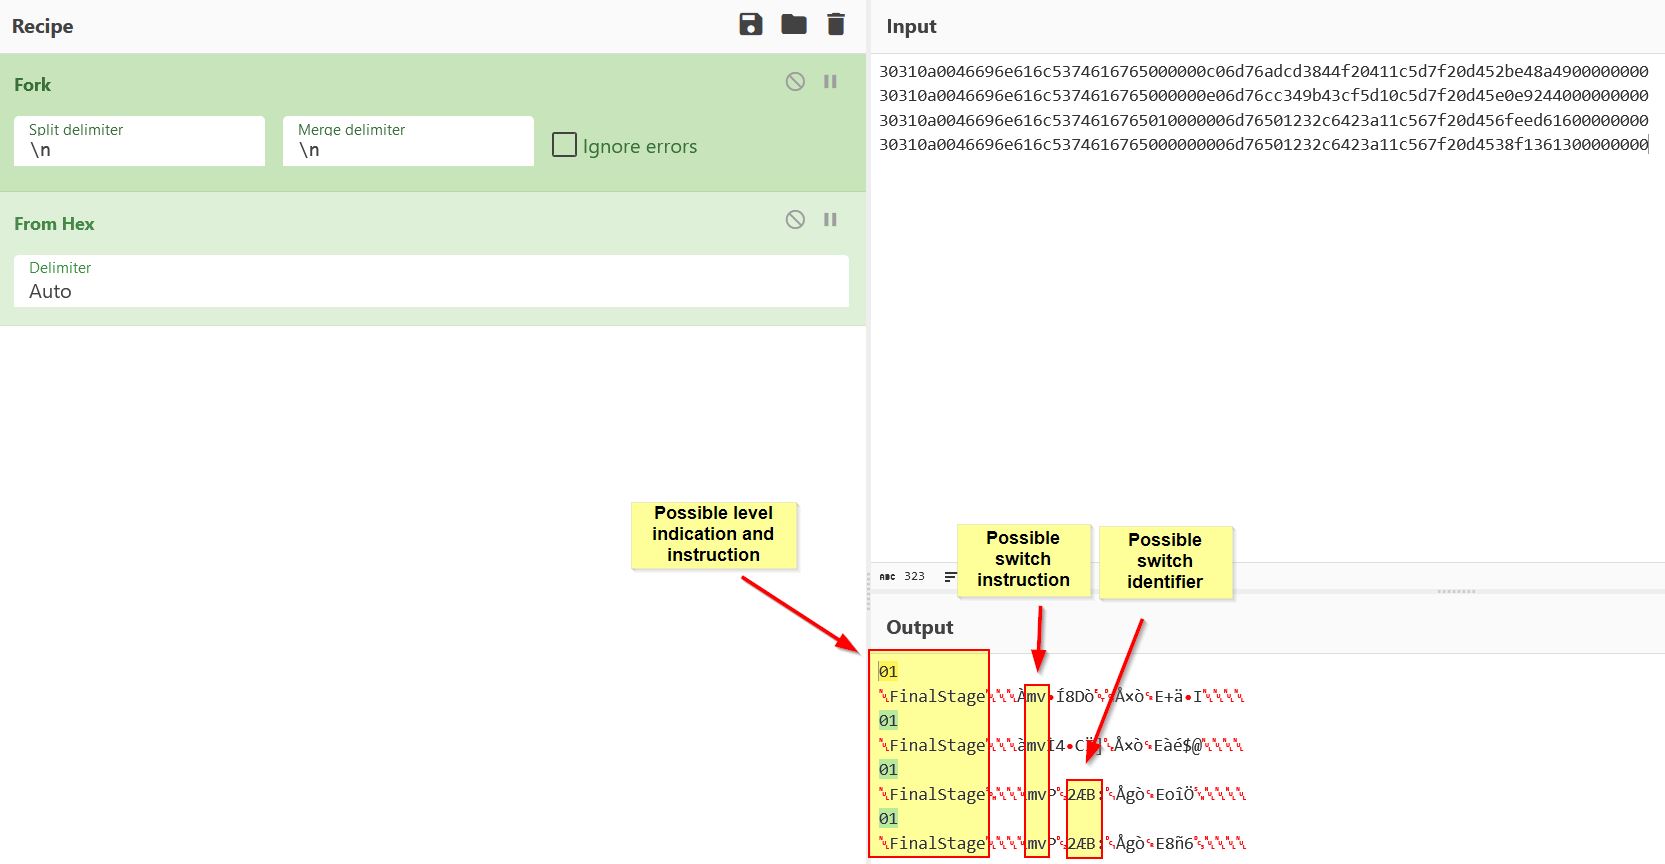
To gather more context, we can log out and log back in so that the earlier Blocky’s Revenge challenge rooms can be completed as a method of understanding the underlying puzzle protocol. Of note is that every instruction began with 0x3031 in hex (01) in ascii, so we can modify our proxy to only print out data if it starts with 3031 to reduce the amount of noise. With this we should also intercept the response from the server to see if anything is being missed.
# Relay received server data to game client and print
serv_socket.sendall(client_data)
if (client_data.hex().startswith("3031")):
    print(f"Server: {client_data.hex()}")

# Receive response from client
remote_data = serv_socket.recv(4096)
if (remote_data.hex().startswith("3031")):
    print(f"Client: {remote_data.hex()}")
This results in the following client/server interactions in the first room depending on if the switch is turned on or off.
Server Receives: 30310600537461676531000000006d765cc950c608aacfc567120e45f5e6680700000000
Client Receives: 30310600537461676531000000000300030000

Server Receives: 30310600537461676531010000006d765cc950c608aacfc567120e45dfe6680700000000
Client Receives: 30310600537461676531010000000300040000
From this the following can begin to be ascertained:
- The first 2 bytes are the instruction that we’ve hit a Blocky input switch (0x3031).
- The next byte is the length of bytes which make-up our level name (06 = 6 bytes = “Stage1”, 0a = 10 bytes = “FinalStage”).
- The next byte is a null byte.
- The following x amount of bytes as indicated by byte 3 spell out the level we’re on.
- The next byte indictates if a switch is turned on or off (01 = on, 00 = off).
Walking into stage 2 we find the following communication depending on which switch is turned on.
Right Switch
Server Receives: 30310600537461676532020000006d765d990ec6e96404c665120e45beea97d100000000
Client Receives: 30310600537461676532020000000400080000

Left Switch:
Server Receives: 30310600537461676532030000006d76797b08c6240704c665120e4564e98dce00000000
Client Receives: 303106005374616765320300000004000f0000
Injecting Packets Through TCP Proxy
If we only focus on what we don’t know about the data, it looks more like the below, noting that the byte which was either ‘01’ or ‘00’ depending on if it was on or off now shows as ‘02’, and ‘03’ so must be re-evaluated.
Right Switch
Server Receives: 020000006d765d990ec6e96404c665120e45beea97d100000000
Client Receives: 020000000400080000

Left Switch:
Server Receives: 030000006d76797b08c6240704c665120e4564e98dce00000000
Client Receives: 0300000004000f0000
Given this byte has increased by 1, it’s possible that it indicates the switch being hit; however, examining the middle switch being on in the third room shuts this theory down.
Server Receives: 070000006d765d50a6c5f3ff44c6e90e0e452ceb40ff00000000
Client Receives: 0700000006003c0000
Despite this, if we convert it to binary, another trend begins to show.
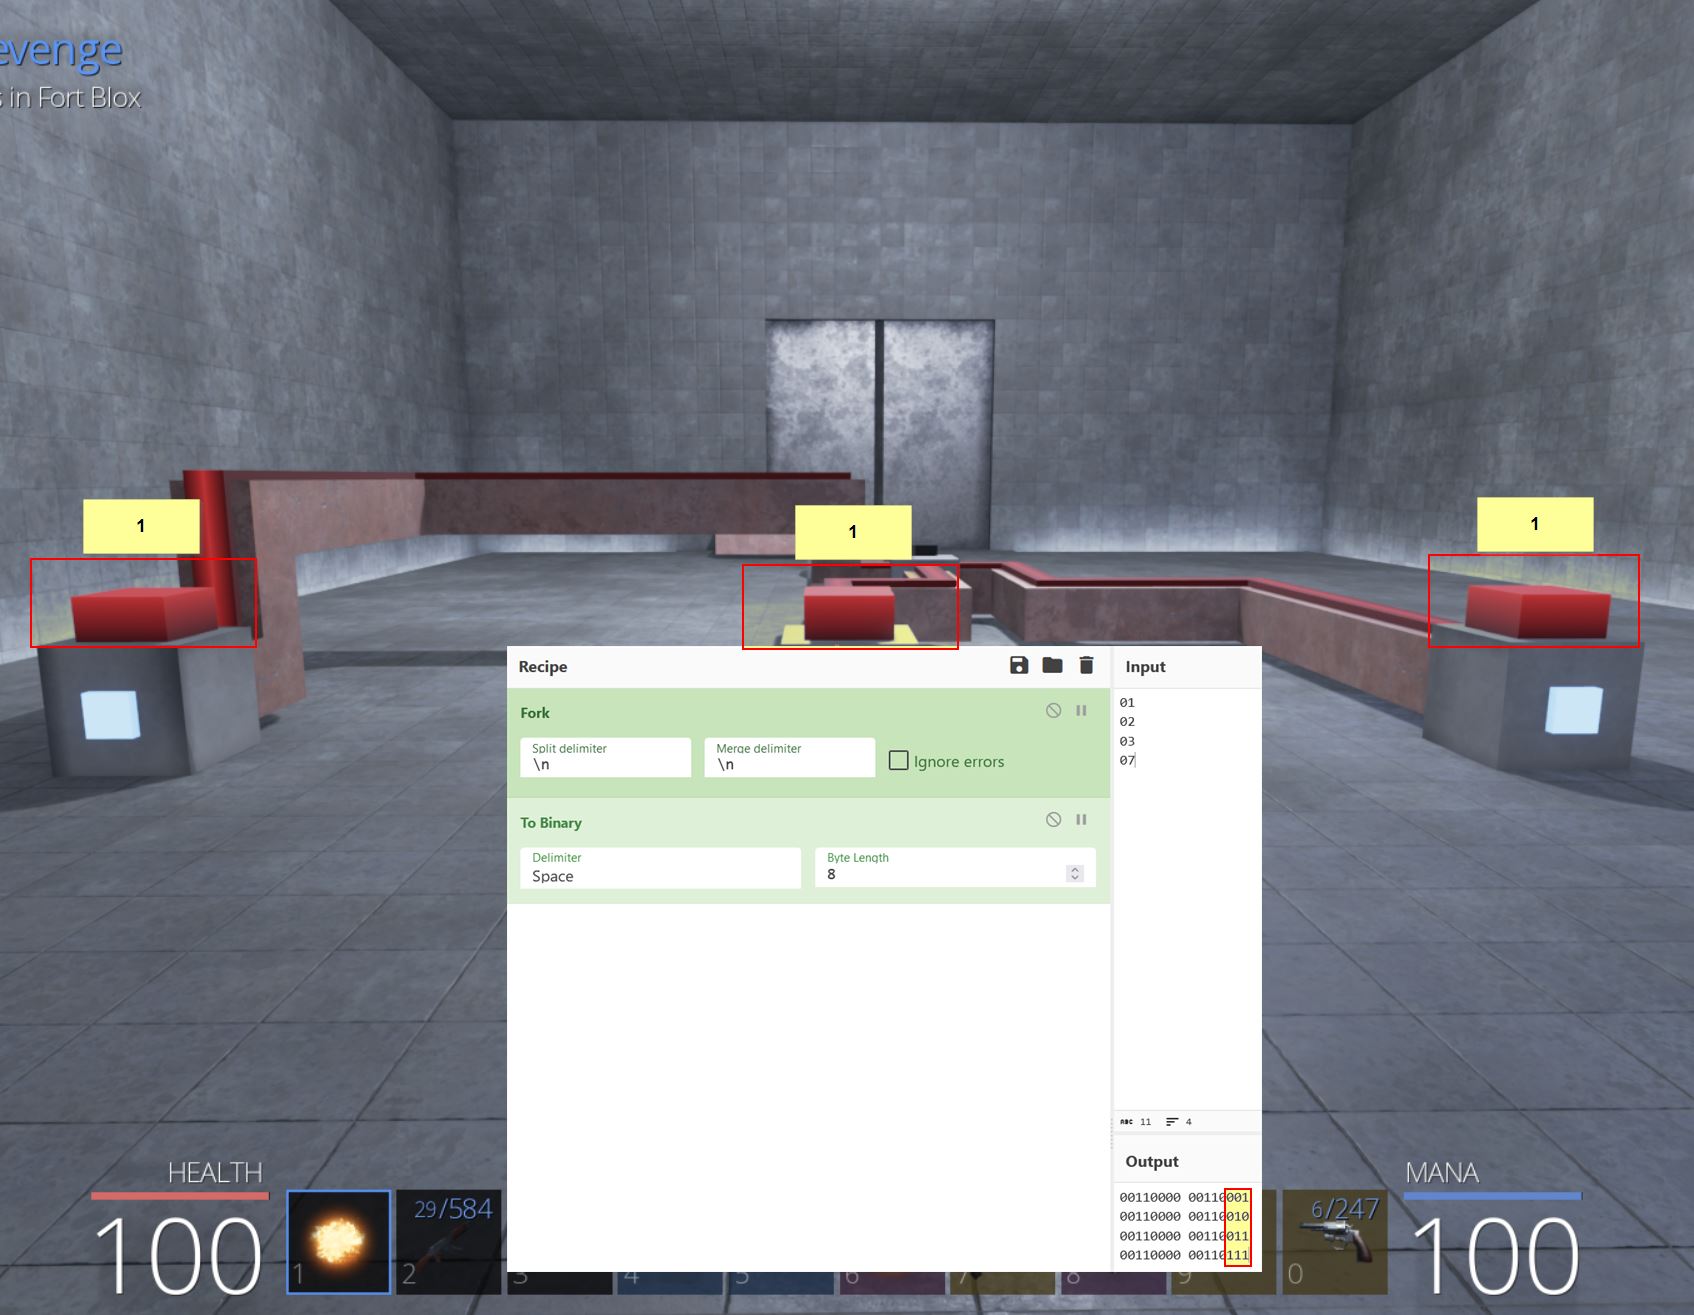
Rather than the value indicating what switch is turned on, it instead appears to be showing the state of all switch inputs in the current room. To test this theory, we can modify our proxy to include another function running in a new thread, this time serving to listen for the command ‘inj’ to be sent so that a packet we’ve seen in level 2 can be replayed.
In particular this is sending what we saw on the right switch in stage 2, so in theory if we turn on the left switch and send the packet this should open the door with all lights lit up; however, this happens instead.
What this indicates is that the client must also be receiving the presumed current state of switches to the server and whether they are turned on or off, and this is being used to update the switches visually. Another key aspect to note is that the server was responding with content containing ‘6d76’, and this appears to be just a move instruction for the player so can also be discarded. THe new unknowns are as follows:
Server Receives: 03000000
Client Receives: 0300000004000f0000
If we consider that ‘03’ signals the state of the switches in the room, and break the other core components down to their binary equivalent, it appears that the following bits are present when interacting with the switches in the second room to solve the puzzle.
- 0x4: 00110000 (This is a static value which never changes in this room, in room 1 it is 3, room 2 it is 4, room 3 it is 6 and room 4 it is 8)
- 0xf: 01100110 (Both switches on / Door open - This is 0x8 when only the left switch is on, and 0x4 when only the right switch is on)
- 0x8: 00111000 (Left switch on)
- 0x4: 00110100 (Right switch on)
From this it’s apparent that 04 is indicating the number of nodes (grey square blocks) in each room, but more information is still required to determine the significance of 0xf. In the third room this value changes as follows.
- 0x3: 00110011 (No switches on / Door open)
- 0x24: 00110010 00110100 (Left switch on)
- 0x14: 00110001 00110100 (Middle switch on)
- 0xc: 01100011 (Right switch on)
In the fourth room the solution sent is 0x77.
- 0x77: 00110111 00110111 (Only middle switch on / Door open)
Comparing all of the first 4 solutions, the bytes at this point are as follows.
- 00110011 (0x3 - room 1, 3 nodes)
- 01100110 (0xf - room 2, 4 nodes)
- 00110011 (0x3 - room 3, 6 nodes)
- 00110111 00110111 (0x77 - room 4, 8 nodes)
Turning on the first switch in the final room results in the following:
Client Receives: 30310a0046696e616c537461676500000080ae00fc5b0001970b74b95c2e0074c0805348b5cde6bbfd2e0000
Breaking this down as we have before, it appears that the following is true.
3031		|0a				|46696e616c5374616765	|80				|ae			|fc5b0001970b74b95c2e0074c0805348b5cde6bbfd2e
Static ID	|Length of bytes for level name	|Level name 		|State of current switch inputs	|Number of nodes	|State of current switches output
Examining the end state it appears that a number of inputs need to result in a negative to cause a NOT logic gate to convert this to an input at the end and solve the challenge:
Creating An Asynchronous TCP Proxy
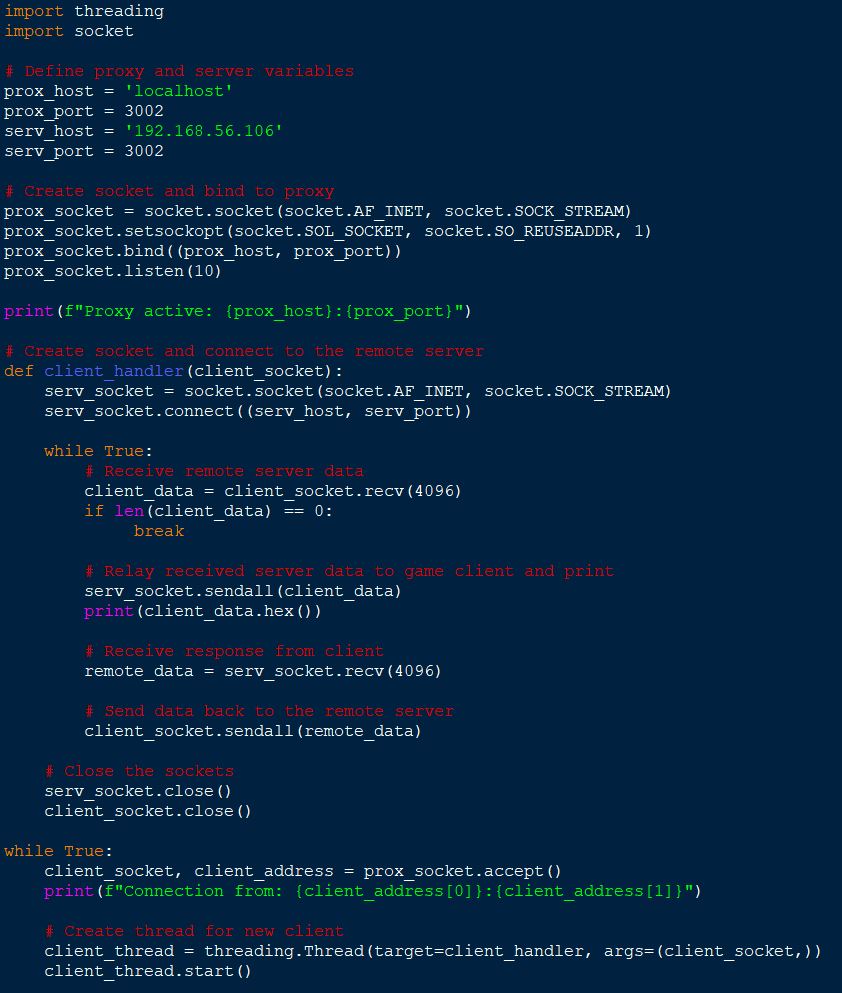
As painstaking as it is, at this point it’s clear that our proxy whilst functional, won’t suffice as it doesn’t allow us to send a large number of packets without breaking the current synchronous communication we have going between the game client and server. Instead we can create an asynchronous proxy by using 3 different threads:
- One that starts to establish the initial connection before awaiting use input
- One that handles the queuing for packets from the client to the server
- One that handles the queuing for packets from the server to the client.
This has been implemented as the following:
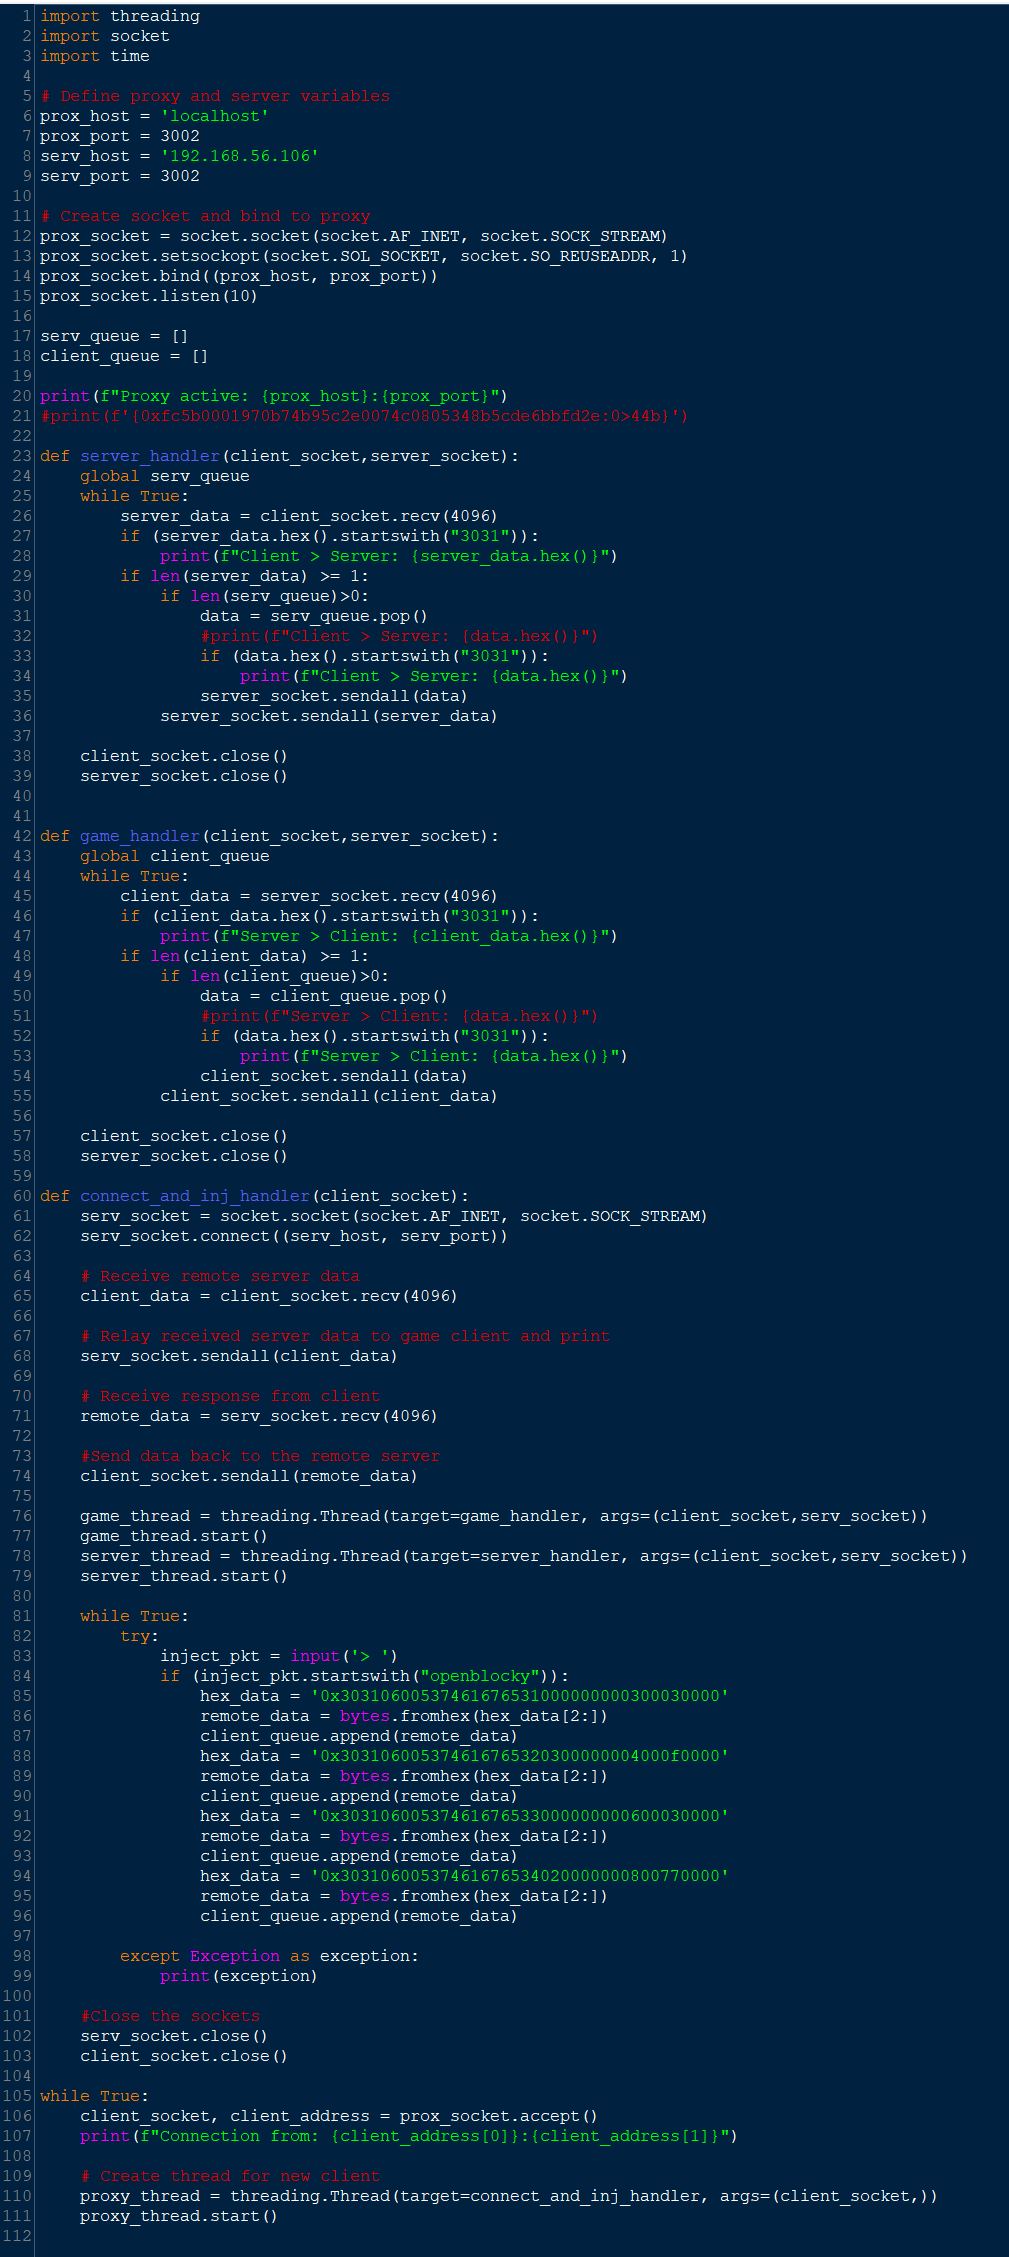
import threading
import socket
import time
# Define proxy and server variables
prox_host = 'localhost'
prox_port = 3002
serv_host = '192.168.56.106'
serv_port = 3002
# Create socket and bind to proxy
prox_socket = socket.socket(socket.AF_INET, socket.SOCK_STREAM)
prox_socket.setsockopt(socket.SOL_SOCKET, socket.SO_REUSEADDR, 1)
prox_socket.bind((prox_host, prox_port))
prox_socket.listen(10)
serv_queue = []
client_queue = []
print(f"Proxy active: {prox_host}:{prox_port}")
#print(f'{0xfc5b0001970b74b95c2e0074c0805348b5cde6bbfd2e:0>44b}')
def server_handler(client_socket,server_socket):
global serv_queue
while True:
server_data = client_socket.recv(4096)
if (server_data.hex().startswith("3031")):
print(f"Client > Server: {server_data.hex()}")
if len(server_data) >= 1:
if len(serv_queue)>0:
data = serv_queue.pop()
#print(f"Client > Server: {data.hex()}")
if (data.hex().startswith("3031")):
print(f"Client > Server: {data.hex()}")
server_socket.sendall(data)
server_socket.sendall(server_data)
client_socket.close()
server_socket.close()
def game_handler(client_socket,server_socket):
global client_queue
while True:
client_data = server_socket.recv(4096)
if (client_data.hex().startswith("3031")):
print(f"Server > Client: {client_data.hex()}")
if len(client_data) >= 1:
if len(client_queue)>0:
data = client_queue.pop()
#print(f"Server > Client: {data.hex()}")
if (data.hex().startswith("3031")):
print(f"Server > Client: {data.hex()}")
client_socket.sendall(data)
client_socket.sendall(client_data)
client_socket.close()
server_socket.close()
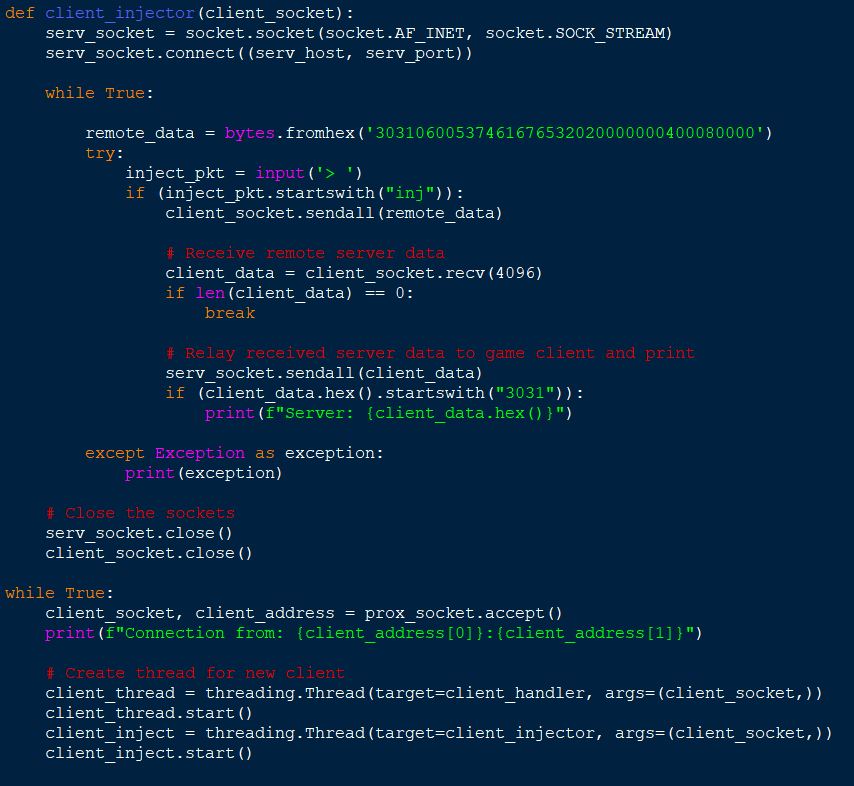
def connect_and_inj_handler(client_socket):
serv_socket = socket.socket(socket.AF_INET, socket.SOCK_STREAM)
serv_socket.connect((serv_host, serv_port))
# Receive remote server data
client_data = client_socket.recv(4096)
# Relay received server data to game client and print
serv_socket.sendall(client_data)
# Receive response from client
remote_data = serv_socket.recv(4096)
#Send data back to the remote server
client_socket.sendall(remote_data)
game_thread = threading.Thread(target=game_handler, args=(client_socket,serv_socket))
game_thread.start()
server_thread = threading.Thread(target=server_handler, args=(client_socket,serv_socket))
server_thread.start()
while True:
try:
inject_pkt = input('> ')
if (inject_pkt.startswith("openblocky")):
hex_data = '0x30310600537461676531000000000300030000'
remote_data = bytes.fromhex(hex_data[2:])
client_queue.append(remote_data)
hex_data = '0x303106005374616765320300000004000f0000'
remote_data = bytes.fromhex(hex_data[2:])
client_queue.append(remote_data)
hex_data = '0x30310600537461676533000000000600030000'
remote_data = bytes.fromhex(hex_data[2:])
client_queue.append(remote_data)
hex_data = '0x30310600537461676534020000000800770000'
remote_data = bytes.fromhex(hex_data[2:])
client_queue.append(remote_data)
except Exception as exception:
print(exception)
#Close the sockets
serv_socket.close()
client_socket.close()
while True:
client_socket, client_address = prox_socket.accept()
print(f"Connection from: {client_address[0]}:{client_address[1]}")
# Create thread for new client
proxy_thread = threading.Thread(target=connect_and_inj_handler, args=(client_socket,))
proxy_thread.start()
A new function implementation in this proxy is the ability to run ‘openblocky’ from the python shell to cause the first 4 level doors to be opened based on a known solution retrieved from solving each of these rooms. What we’re doing is queuing these to be processed by our game client by making it think we’ve solved the challenges and the server is notifying us of a success.
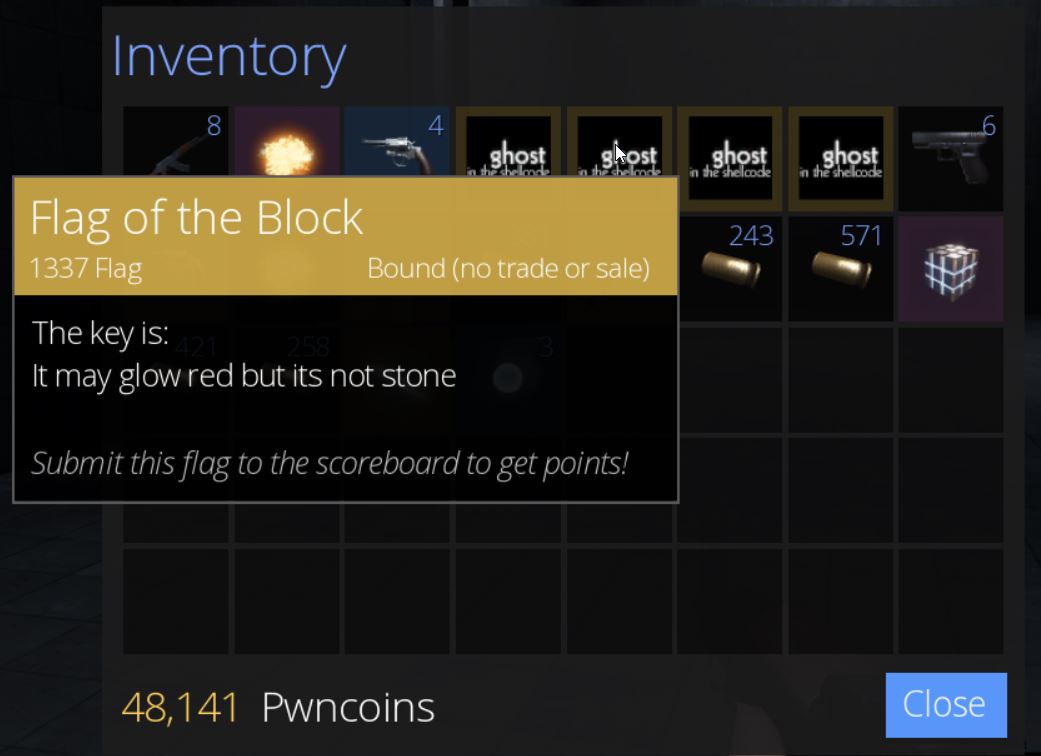
🏆 Flag of The Block (Blocky’s Revenge) via Packet Spoof Brute Force and Ghosting / NoClipping (400 points)
One key aspect of game hacking to consider is that we now have a way of injecting packets to try and unlock the final puzzle; however, rather than just spoofing packets from the server to our game client, we can instead spoof the packets sent to the server and brute force the state of the input switches (in this case it was previously shown by the value ‘80’ - included again below) until all possible combinations have been sent or we get the correct combination.
3031		|0a				|46696e616c5374616765	|80				|ae			|fc5b0001970b74b95c2e0074c0805348b5cde6bbfd2e
Static ID	|Length of bytes for level name	|Level name 		|State of current switch inputs	|Number of nodes	|State of current switches output
This can be implemented as follows:
if (inject_pkt.startswith("blockyfinal")):
	for x in range(0x10, 0xff):
		brute_hex = hex(x)
        hex_data = '0x30310a0046696e616c5374616765000000'+f"{brute_hex[2:]}"
        remote_data = bytes.fromhex(hex_data[2:])
        print(f"Queue: {remote_data.hex()}")
        serv_queue.append(remote_data)
Despite this showing great promise, it falls short of solving the challenge because now there’s 32 switches in this room which means we need 32 bits (4 bytes) to brute force instead (this needs to include all of the preceeding 0’s). In addition the range given is out by 1 due to ‘0xFF’ not being covered within the range. Although it looks messy, the following is a perfectly acceptable method of nesting these possible combinations and brute forcing the final blocky challenge.
if (inject_pkt.startswith("blockyfinal")):
    for x1 in range(0x10, 0xff+1):
        for x2 in range(0x10, 0xff+1):
            for x3 in range(0x10, 0xff+1):
                for x4 in range(0x10, 0xff+1):
                    brute_hex1 = hex(x1)
                    brute_hex2 = hex(x2)
                    brute_hex3 = hex(x3)
                    brute_hex4 = hex(x4)
                    hex_data = '0x30310a0046696e616c5374616765'+f"{brute_hex4[2:]}"+f"{brute_hex3[2:]}"+f"{brute_hex2[2:]}"+f"{brute_hex1[2:]}"
                    remote_data = bytes.fromhex(hex_data[2:])
                    print(f"Queue: {remote_data.hex()}")
                    serv_queue.append(remote_data)
This does have a few edge cases given it only goes in the range 0x10 to 0xff (because anything below 0x10 causes it to resolve to 0x9 rather than 0x09 and this breaks the script); however we’re lucky that the solution is in fact within this range. The issue is that this takes a very long time to complete, but given enough time it will work. In my case reducing the sample size by around half (reducing the minimum range to be 0x60 as opposed to 0x00) significantly reduced the number of possible combinations, and luckily allowed the challenge to be solved in approximately one hour of brute forcing.
if (inject_pkt.startswith("blockyfinal")):
    for x1 in range(0x60, 0xff+1):
        for x2 in range(0x60, 0xff+1):
            for x3 in range(0x60, 0xff+1):
                for x4 in range(0x60, 0xff+1):
                    brute_hex1 = hex(x1)
                    brute_hex2 = hex(x2)
                    brute_hex3 = hex(x3)
                    brute_hex4 = hex(x4)
                    hex_data = '0x30310a0046696e616c5374616765'+f"{brute_hex4[2:]}"+f"{brute_hex3[2:]}"+f"{brute_hex2[2:]}"+f"{brute_hex1[2:]}"
                    remote_data = bytes.fromhex(hex_data[2:])
                    print(f"Queue: {remote_data.hex()}")
                    serv_queue.append(remote_data)
Despite this, because we have no checks in place, after getting the correct answer, another request will then be sent and close the Blocky door. This isn’t a major issue because we have already developed a Ghosting/Noclipping hack that can be used to enter the end room and acquire ‘Flag of the Block’ which has the key ‘It may glow red but its not stone’, and we have our fourth flag of the game worth 400 points.
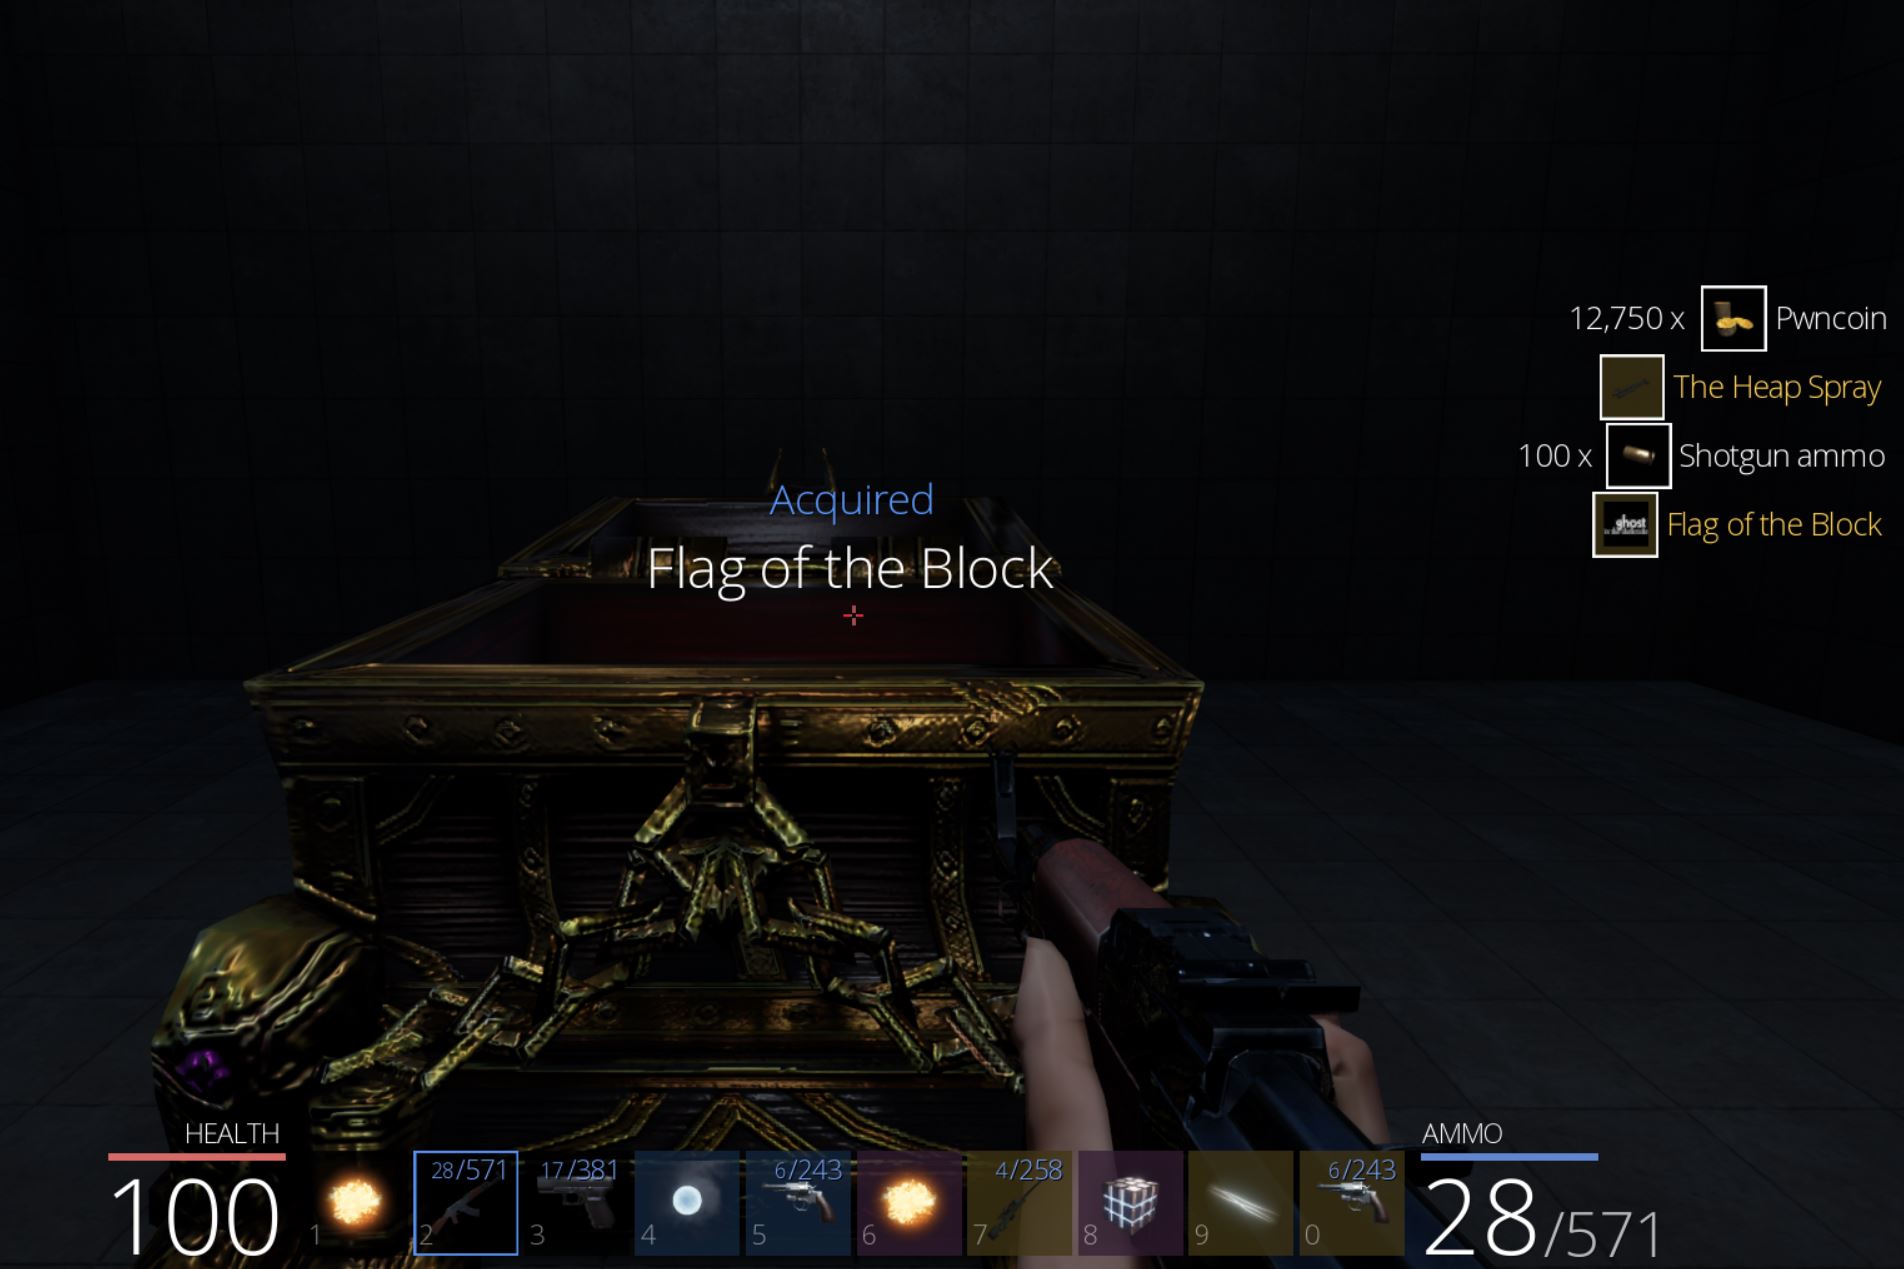
By recording the brute force, logging each packet sent, and playing it back, the end result wound up being the packet ‘0x30310a0046696e616c5374616765faab8f69’ which opened the door.
Locating Eggs in Ghidra, Windbg, and via TCP Proxy
Looking For eggs in Ghidra
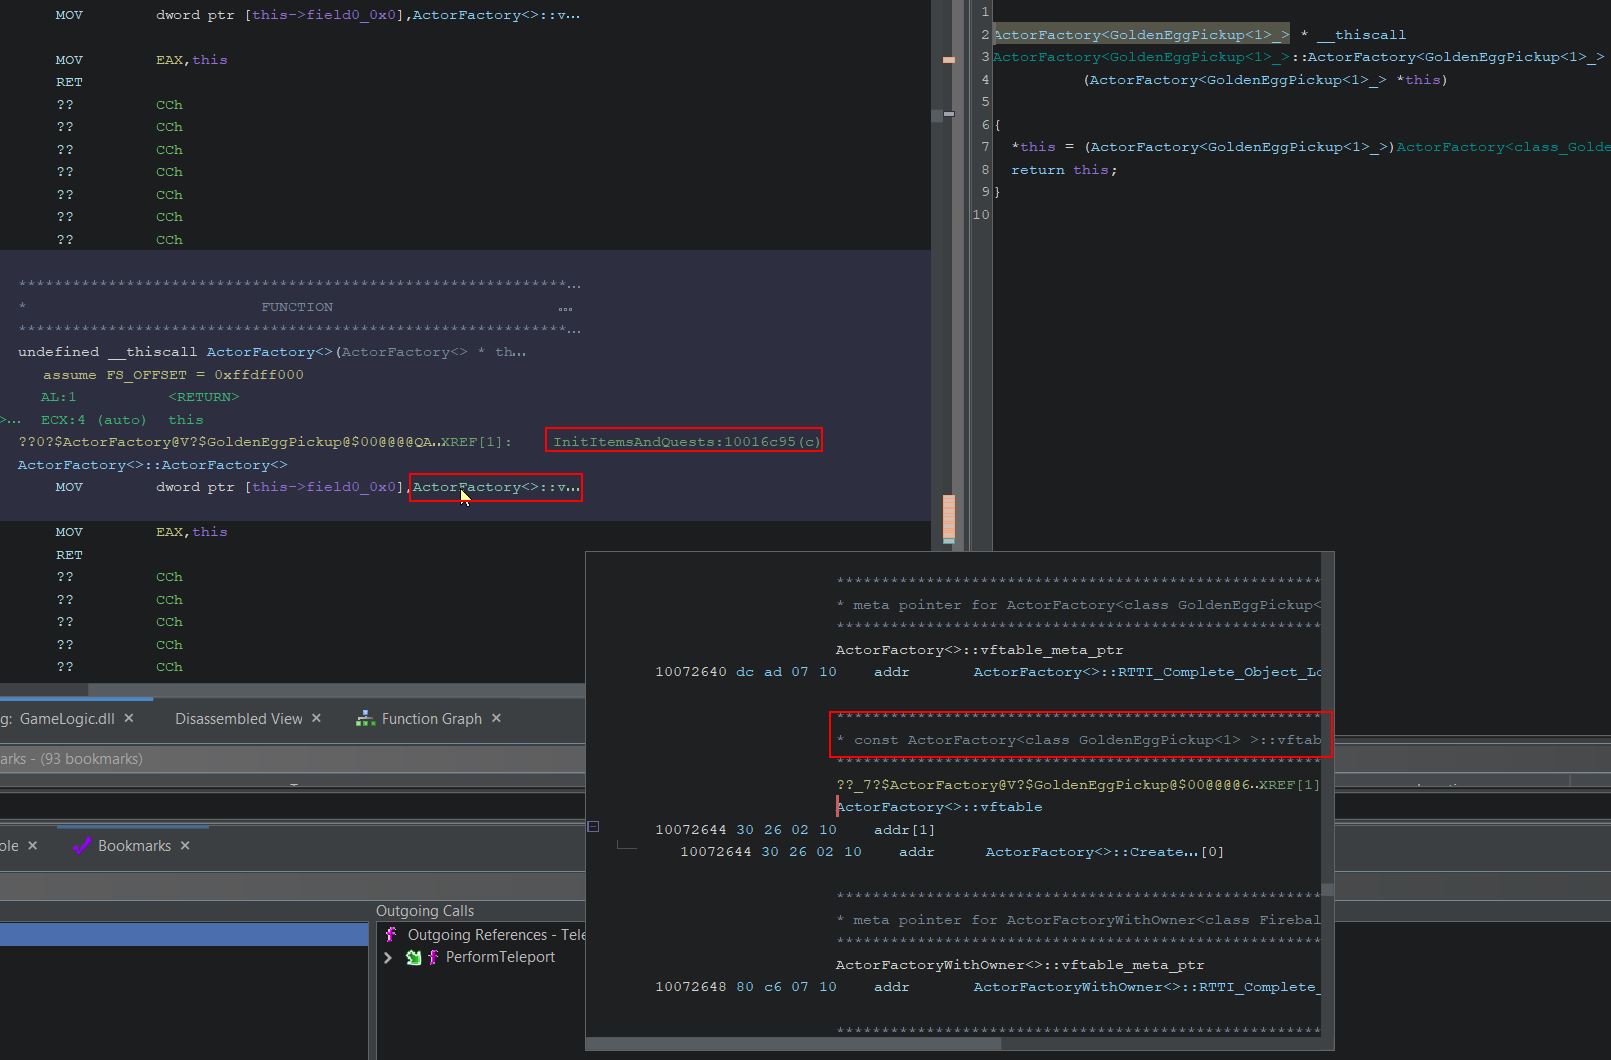
Searching in Ghidra for the term ‘egg’ shows that there’s a number of likely Golden Eggs which can be found in the game.
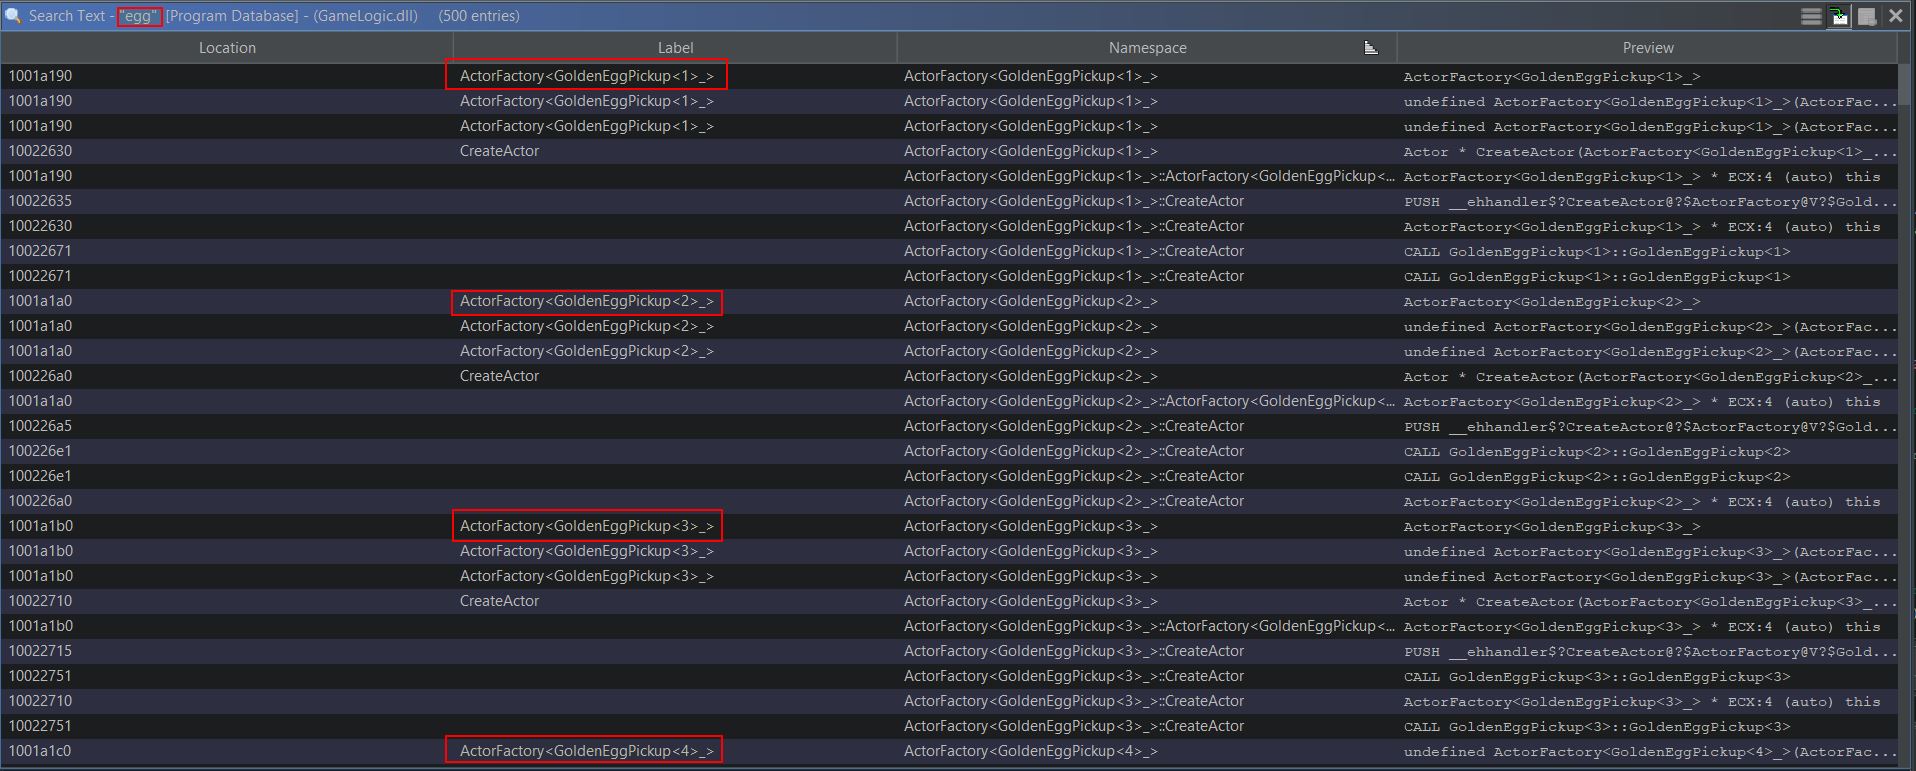
By examining where this is initialised, it appears there’s a call within InitItemsAndQuests which places the eggs in game as part of a derived Actor class.
Looking For Eggs in Windbg
Using Windbg we can examine what actors are present in the GameWorld object to find that entry 0x4 has the first Golden Egg. Note: To avoid issues being disconnected from the server this can also be checked in offline mode.
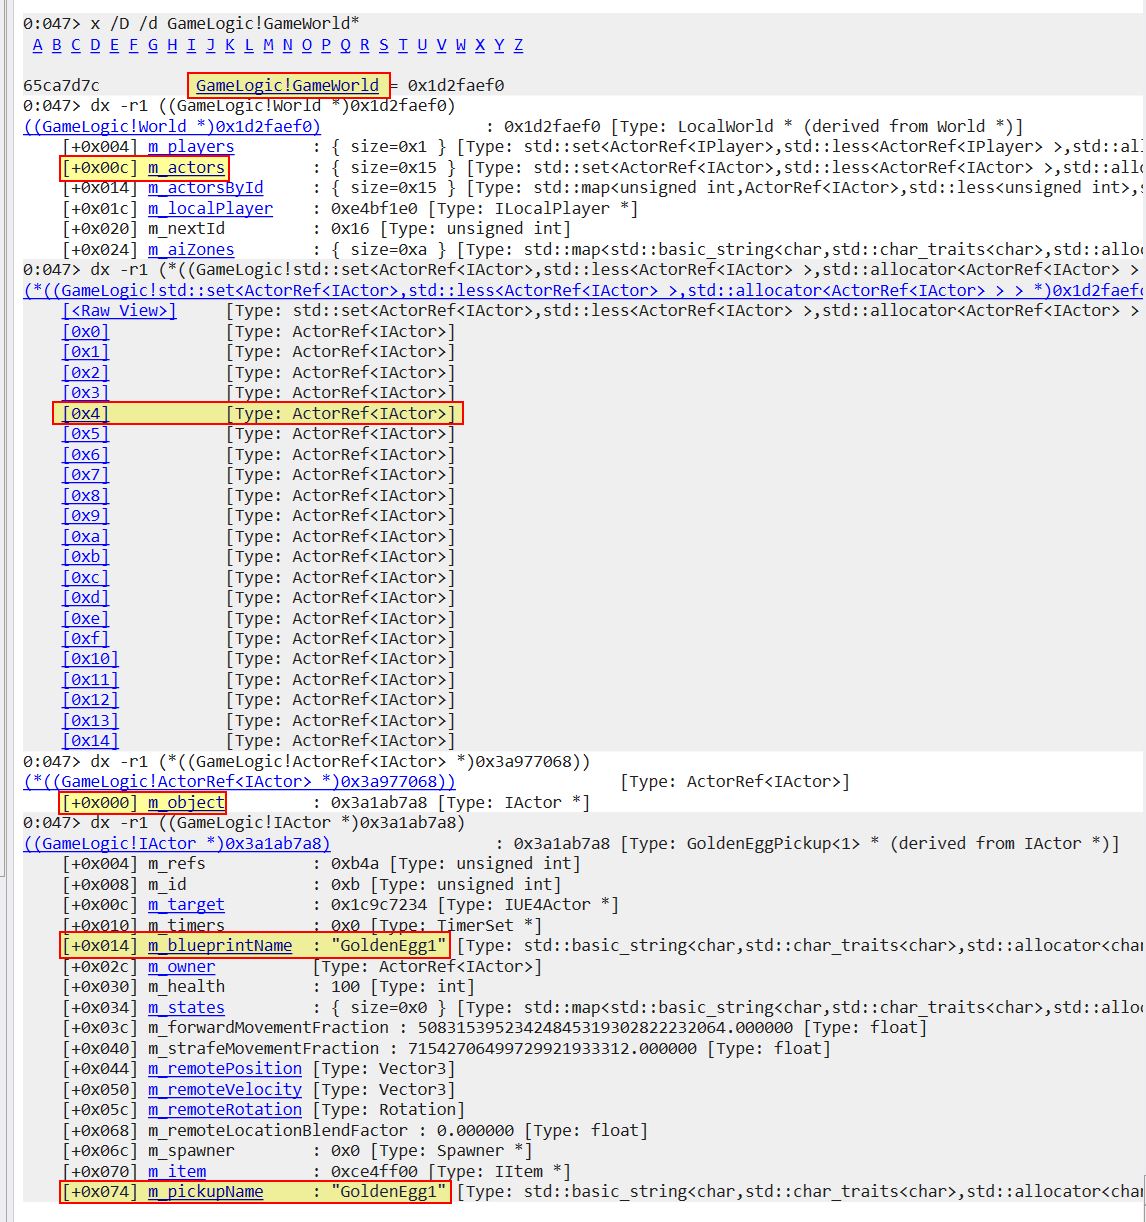
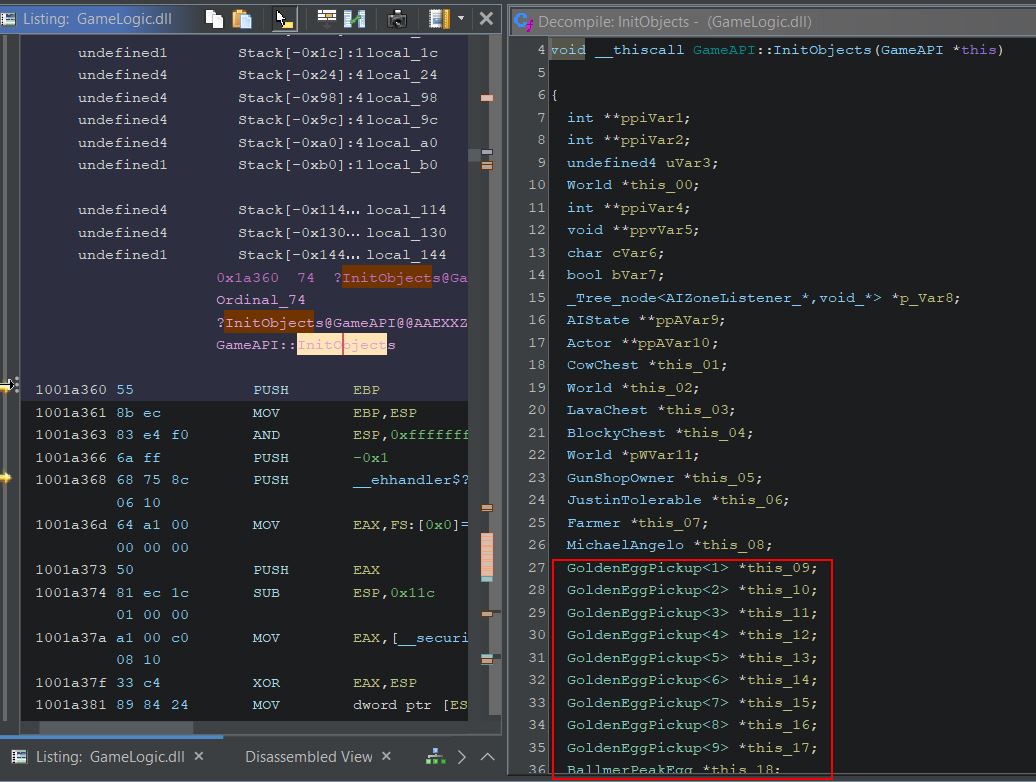
One issue is that m_remotePosition is completely empty and any position needs to be retrieved using a method ‘GetPosition’ which exists within the actor class and as such is derived by the Golden Egg subclass. Looking back into Ghidra we can see a call is made to GameAPI::InitObjects which seems to have a number of defined variables of interest in our decompiler.
Looking For Eggs in TCP Proxy
Despite this it’s not inherently obvious where these objects are being created in the world due to C++ complexities and the way the game has been programmed. Of interest though is that all of this information needs to be sent to the server upon starting the game, so by modifying our python script to print out anything regardless of what it begins with, upon connection it receives a very long packet.
6d6b0100000000000000001000477265617442616c6c734f664669726500872ac7000c5ac70000a143000000800000640000006d6b0200000000000000000c004c6f73744361766542757368002351c700d62cc70000b343000000000000640000006d6b030000000000000000090042656172436865737400b0f6c500e27b470070264523fde67f8100640000006d6b0400000000000000000800436f77436865737400fe764800a16fc80040924422fe088fc5fd640000006d6b05000000000000000009004c617661436865737400bc464700d8a3c50060be440000e3380000640000006d6b0600000000000000000b00426c6f636b79436865737400f03ec500bab34600300e45000000c00000640000006d6b0700000000000000000c0047756e53686f704f776e6572005712c700048dc6000017450000ff7f0000640000006d6b0800000000000000000f004a757374696e546f6c657261626c65007c20c700007ec600e00d450000aa6a0000640000006d6b09000000000000000006004661726d65720062a84600102147005005450000e3380000640000006d6b0a00000000000000000d004d69636861656c416e67656c6fc0277e48c0ba72c800e0b0440000c7510000640000006d6b0b00000000000000000a00476f6c64656e4567673100aac3c6004a8d4600008243000000000000640000006d6b0c00000000000000000a00476f6c64656e45676732007249c7001f6fc700e09c45000000000000640000006d6b0d00000000000000000a00476f6c64656e456767330080bf460019884700302645000000000000640000006d6b0e00000000000000000a00476f6c64656e4567673400256c47000288c600b03745000000000000640000006d6b0f00000000000000000a00476f6c64656e456767350040be4400d869460070db45000000000000640000006d6b1000000000000000000a00476f6c64656e4567673600503546002c4dc60080cd43000000000000640000006d6b1100000000000000000a00476f6c64656e4567673780ed8dc7003f51c700a0cd44000000000000640000006d6b1200000000000000000a00476f6c64656e4567673800143d4700aadb4600003044000000000000640000006d6b1300000000000000000a00476f6c64656e4567673900c97e470060b3c500009a45000000000000640000006d6b1400000000000000000e0042616c6c6d65725065616b45676700a02dc5006c2cc600202446000000000000640000006d6b150000000000000000110042616c6c6d65725065616b506f7374657200a8bec500302bc6003026460000000000006400000030310600537461676531010000000300043031060053746167653200000000040000303106005374616765330500000006002c303106005374616765340700000008009830310a0046696e616c537461676500000000ae00fc5b0001974b7ab95c2e4074c0805348b5cde6f77d2e0000
Converting this from hex we can see the same order of names as was seen by the ‘GameAPI::InitObjects’ function. This seems to follow a ‘mk’ (6d6b) identifier/command, potentially indicating a ‘make’ instruction for each object/actor in the game.
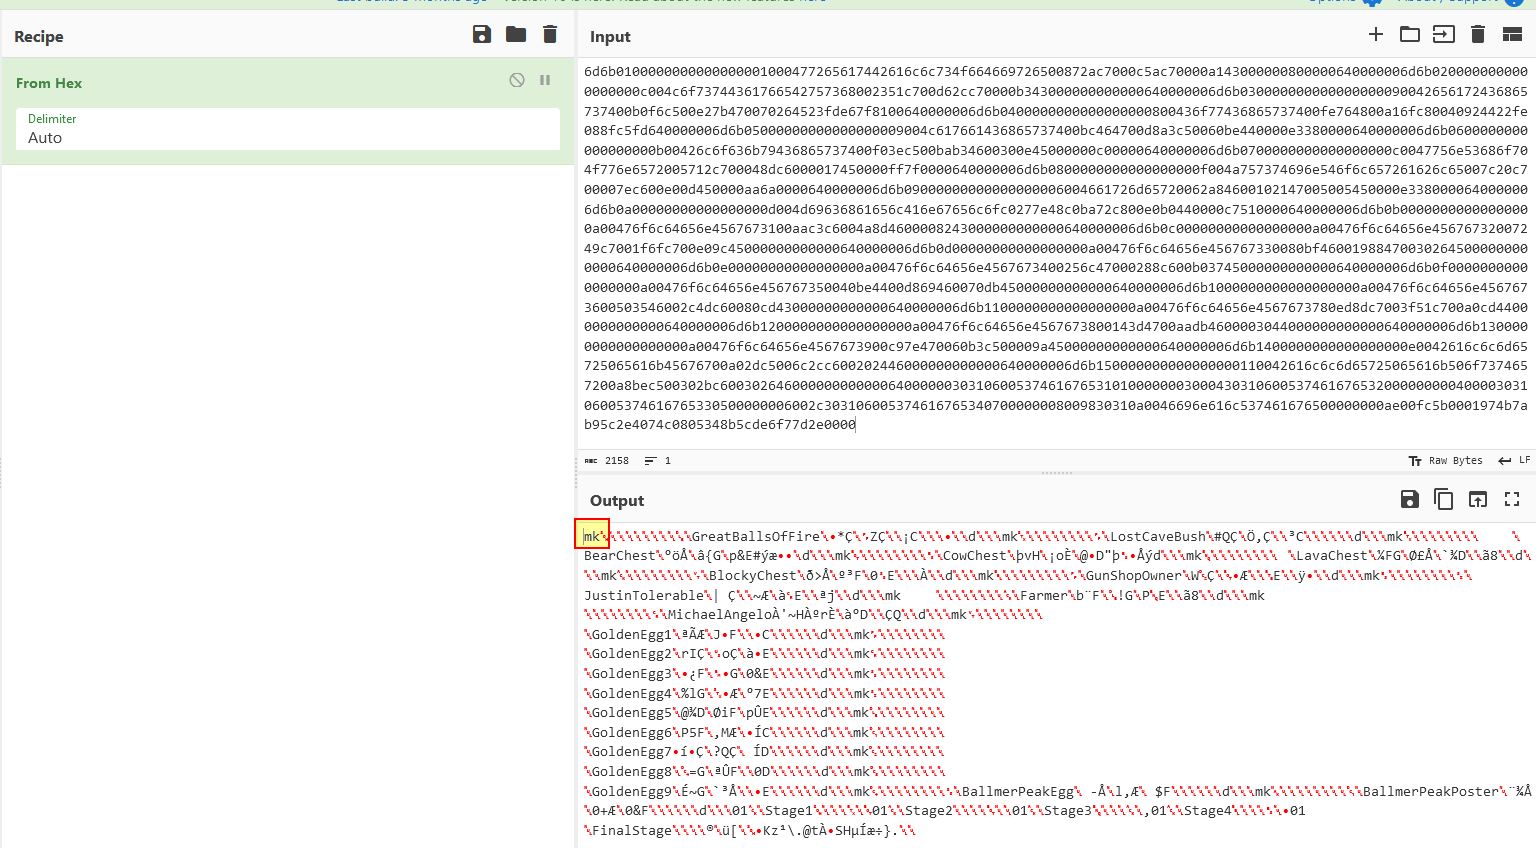
By splitting these out by value ‘6d6b’, the following sets of instructions can be found.
0100000000000000001000477265617442616c6c734f664669726500872ac7000c5ac70000a14300000080000064000000
0200000000000000000c004c6f73744361766542757368002351c700d62cc70000b34300000000000064000000
030000000000000000090042656172436865737400b0f6c500e27b470070264523fde67f810064000000
0400000000000000000800436f77436865737400fe764800a16fc80040924422fe088fc5fd64000000
05000000000000000009004c617661436865737400bc464700d8a3c50060be440000e338000064000000
0600000000000000000b00426c6f636b79436865737400f03ec500bab34600300e45000000c0000064000000
0700000000000000000c0047756e53686f704f776e6572005712c700048dc6000017450000ff7f000064000000
0800000000000000000f004a757374696e546f6c657261626c65007c20c700007ec600e00d450000aa6a000064000000
09000000000000000006004661726d65720062a84600102147005005450000e338000064000000
0a00000000000000000d004d69636861656c416e67656c6fc0277e48c0ba72c800e0b0440000c751000064000000
0b00000000000000000a00476f6c64656e4567673100aac3c6004a8d460000824300000000000064000000
0c00000000000000000a00476f6c64656e45676732007249c7001f6fc700e09c4500000000000064000000
0d00000000000000000a00476f6c64656e456767330080bf46001988470030264500000000000064000000
0e00000000000000000a00476f6c64656e4567673400256c47000288c600b0374500000000000064000000
0f00000000000000000a00476f6c64656e456767350040be4400d869460070db4500000000000064000000
1000000000000000000a00476f6c64656e4567673600503546002c4dc60080cd4300000000000064000000
1100000000000000000a00476f6c64656e4567673780ed8dc7003f51c700a0cd4400000000000064000000
1200000000000000000a00476f6c64656e4567673800143d4700aadb460000304400000000000064000000
1300000000000000000a00476f6c64656e4567673900c97e470060b3c500009a4500000000000064000000
1400000000000000000e0042616c6c6d65725065616b45676700a02dc5006c2cc60020244600000000000064000000
150000000000000000110042616c6c6d65725065616b506f7374657200a8bec500302bc60030264600000000000064000000
Hunting For Eggs
Breaking Down The Initialisation Packets
Assuming the protocol is similar to that of our player movement or the blocky challenge, it can begin to be broken down as follows:
6d6b		|01			|10				|477265617442616c6c734f6646697265	|872ac700		|0c5ac700		|00a14300		|00008000	|64000000
Static ID	|Actor/Item Number	|Length of Actor/Item Name	|Actor/Item Name			|Possible X-Axis	|Possible Y-Axis	|Possible Z-Axis	|Unknown	|Unknown
With this assumption GoldenEgg1 which is identified as actor/item number ‘0x0b’ would be at:
X-Axis: 0x00aac3c6
Y-Axis: 0x004a8d46
Z-Axis: 0x00008243
Because this is a 32-bit game and we’re dealing with coordinates which are likely floats, we need to swap the endianness of these values to how they’d be read by the server receiving the bytes.
X-Axis: 0xc6c3aa00
Y-Axis: 0x468d4a00
Z-Axis: 0x43820000
Teleporting With Cheat Engine
Using a IEEE-754 Floating Point Converter, we’re now able to translate the hexadecimal representation to a float value:
X-Axis: -25045
Y-Axis: 18085
Z-Axis: 260
With these coordinates we can now teleport using Cheat Engine by setting our X,Y,and Z coordinates to match this value. By doing this we are teleported on top of our first egg.
Of note is that we need to press ‘E’ to pick up this egg, so it seems we can’t just teleport to all eggs and automatically get them. By picking up the egg we receive an achievement ‘Chamber of Secrets’.

More important to note though is the instruction sent to the server and response received when ‘E’ is pushed.
Client > Server: 65650b0000006d76a915c4c6086b8d4621aa90439ceb900d00000000
Server > Client: 63700900476f6c64656e456767010000006e710900476f6c64656e45676770751500416368696576656d656e745f476f6c64656e45676770750a00476f6c64656e456767317073c42800004e4f99c68fb2ec463295b64400009b20000057005a0000007073c7280000cc43b9c6fd657c460950174500008ec900001d0086ff00007073c528000030f19ac60336bd46c1d809450000cb09000079001e0000007073c8280000881a8fc65e7c9846234f0e45000051d80000460099ff00007073c92800005426bdc61b747d46e92f174500003b3300002700770000007073ca280000a056a2c6ab87cf45d23c3a450000040300000000000000007073cb280000b8c3b2c69541ba45c0d830450000a1aa000084ff0b0000007073d42800005d96b6c69c82a54602ad20450000ecf100007600d6ff00007073d5280000e245b5c6a5acb5467682234500006b1a00000000000000007073cc280000bd70b4c632c699467d711e450000a98a000087ffe0ff00007073cd280000658d93c6dd4dad4665ea17450000b92e00003300720000007073ce2800008fd19ec65d46a246c4e720450000bc1a000063004c0000007073d2280000d5c1cfc6368526467f9308450000913d000007007d0000007073d3280000d9b8a6c6afae834540a969450000d78900000000000000007073cf2800003603aec66494684644982c45000044c80000190086ff00007073d02800004d12bfc668bf47468f642b450000b19a00002d00a3ff00007073d12800008f0dc5c6b467a546399d02450000b72f00000000000000007073c6280000c093afc67a05ab4636302645000073c000000000000000007073d628000039f9a9c62395a746e22a26450000373d000009007d0000007073d72800009434a1c693509e46a0ae20450000474100000000000000007073d8280000cab3aac6787c78461a582a4500003a9300001000110000007073d9280000e9f6bfc63f414f46096029450000033200002a00760000007073da280000cf5f9fc6afef0a46baef444500003f3200002900760000007073db280000bb8dc4c6d4b1d445730a1d4500006f77000086ff1a0000000000
Replaying Packets For Profit
Breaking this down it appears that 5 different instructions may be taking place ‘ee’,’mv’,’cp’,’nq’,’pu’.
Without knowing what these are, just based on the known naming convention it appears that they may mean the following:
- ee: ‘e execute’ (Notify the server that ‘e’ has been pushed on an actor)
- mv: ‘move’ (Notify the server of our player coordinates/angle)
- cp: ‘character pickup’ (Notify the server an item has been picked up)
- nq: ‘next quest’ (Notify the server of our current player quest)
- pu: ‘player update’ (Notify the server of specific achievements being unlocked)
These assumptions could be completely wrong; however, given we know the packets, we now have a way to test any hypothesis.
Testing Packet Hypothesis’
Examining our inventory we now have 1 out of 10 eggs.
So by virtue of ‘cp’ indicating an item has been picked up, we should in theory be able to send the below (noting a rogue value of 01 at the end has been changed to 09) to pickup 9 golden eggs:
0x63700900476f6c64656e45676709000000
By adding a command to our proxy called ‘eggs’:
if (inject_pkt.startswith("eggs")):
    hex_data = '0x63700900476f6c64656e45676709000000'
    remote_data = bytes.fromhex(hex_data[2:])
    client_queue.append(remote_data)
we find this does add 9 eggs to our inventory. It should be noted that this is being relayed back from the server to the client, which means it’s not going to persist upon logging out as the server is unaware of these eggs being held.
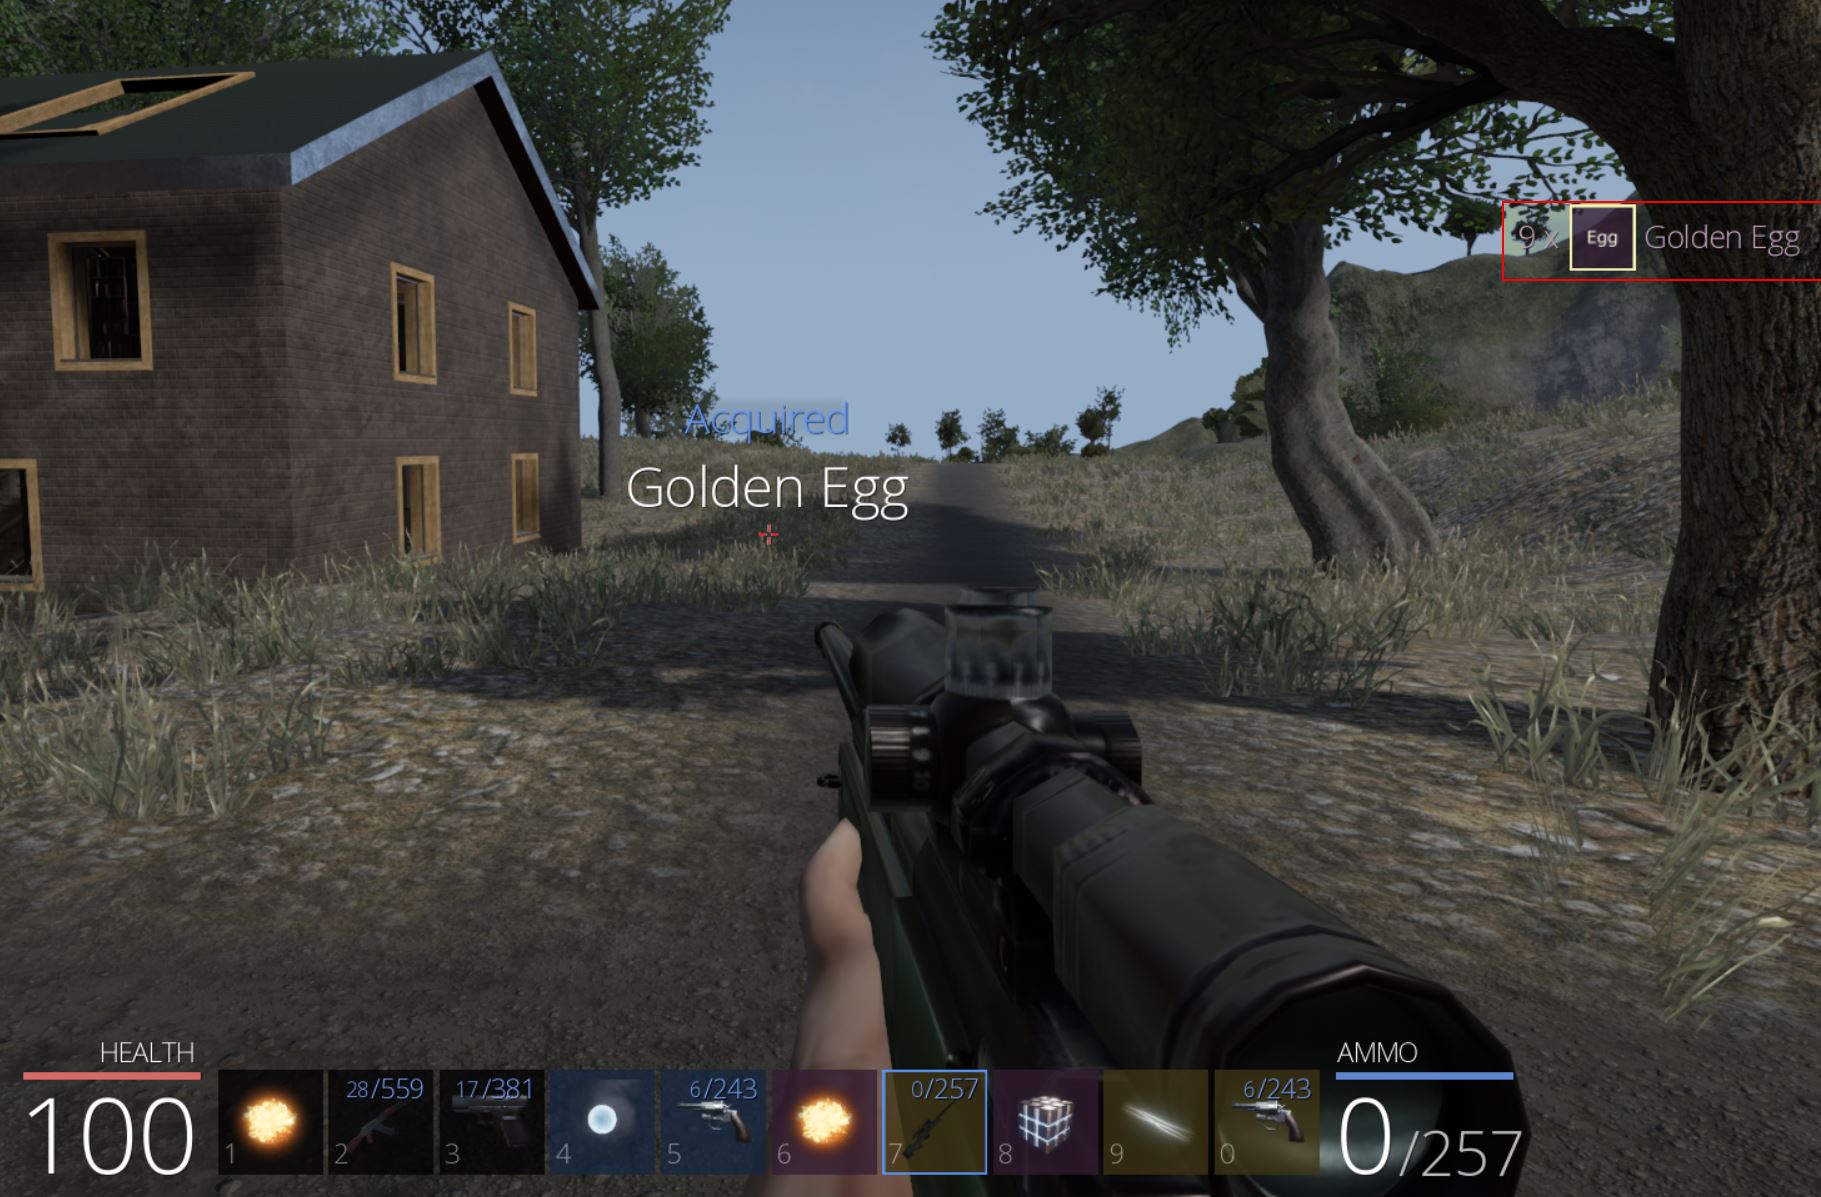
Despite now having 10 eggs, we haven’t received any flag. This indicates that the server must instead be tracking each individual egg being picked up prior to presenting us with the flag.
🏆 Flag of The Egg Hunter (Egg Hunter) via Packet Tampering, Replaying, Teleportation, and Ghidra (250 points)
Looking at our next hypothesis to confirm, if ‘ee’ indicates we have pressed ‘e’ on an object, then triggering this on all the different eggs may be a way to retrieve them all without having to teleport to them and press ‘e’. Not only this but the packet is incredibly small.
65650b000000
The only value provided here appears to be ‘0b’ which as we know from the game initialisation is the first egg. Because of this by replaying the packet but going all the way to 14, we should in theory be triggering an ‘e’ command on all of the eggs and picking them up.
if (inject_pkt.startswith("egghunter")):
    for x in range(0xb, 0x15):
        brute_hex1 = hex(x)
        if (x<16):
            hex_data = '0x65650'+f"{brute_hex1[2:]}"+'000000'
        else:
            hex_data = '0x6565'+f"{brute_hex1[2:]}"+'000000'
        remote_data = bytes.fromhex(hex_data[2:])
        serv_queue.append(remote_data)
The issue is that that this doesn’t appear to work, possibly due to the game knowing our player position isn’t in the correct spot to trigger the pickup. To rectify this we may be able to append this with a command to specify our player is at the egg in question. As a test, we know the second egg indicated by ‘0c’ is at the following:
0c00000000000000000a00476f6c64656e45676732007249c7001f6fc700e09c4500000000000064000000
x: 007249c7
y: 001f6fc7
z: 00e09c45
To spoof this position we’d need to send something to the server similar to the following (based on our understanding of the ‘mv’ command when analysing Blocky):
6d76 007249c7 001f6fc7 00e09c45 88059c5300000000
mv   x-path   y-path   z-path   camera
Therefore a full packet would be as follows:
6d76007249c7001f6fc700e09c4588059c530000000065650c000000
Replaying Tampered Packets
The egghunter command is now:
if (inject_pkt.startswith("egghunter")):
    hex_data='0x6d76007249c7001f6fc700e09c4588059c530000000065650c000000'
    remote_data = bytes.fromhex(hex_data[2:])
    serv_queue.append(remote_data)
Running the egghunter command we acquire a golden egg, indicating the spoofed packet is now successful. In hindsight we have successfully spoofed our position on the server, collected the egg, and profited without actually moving in our local game client.
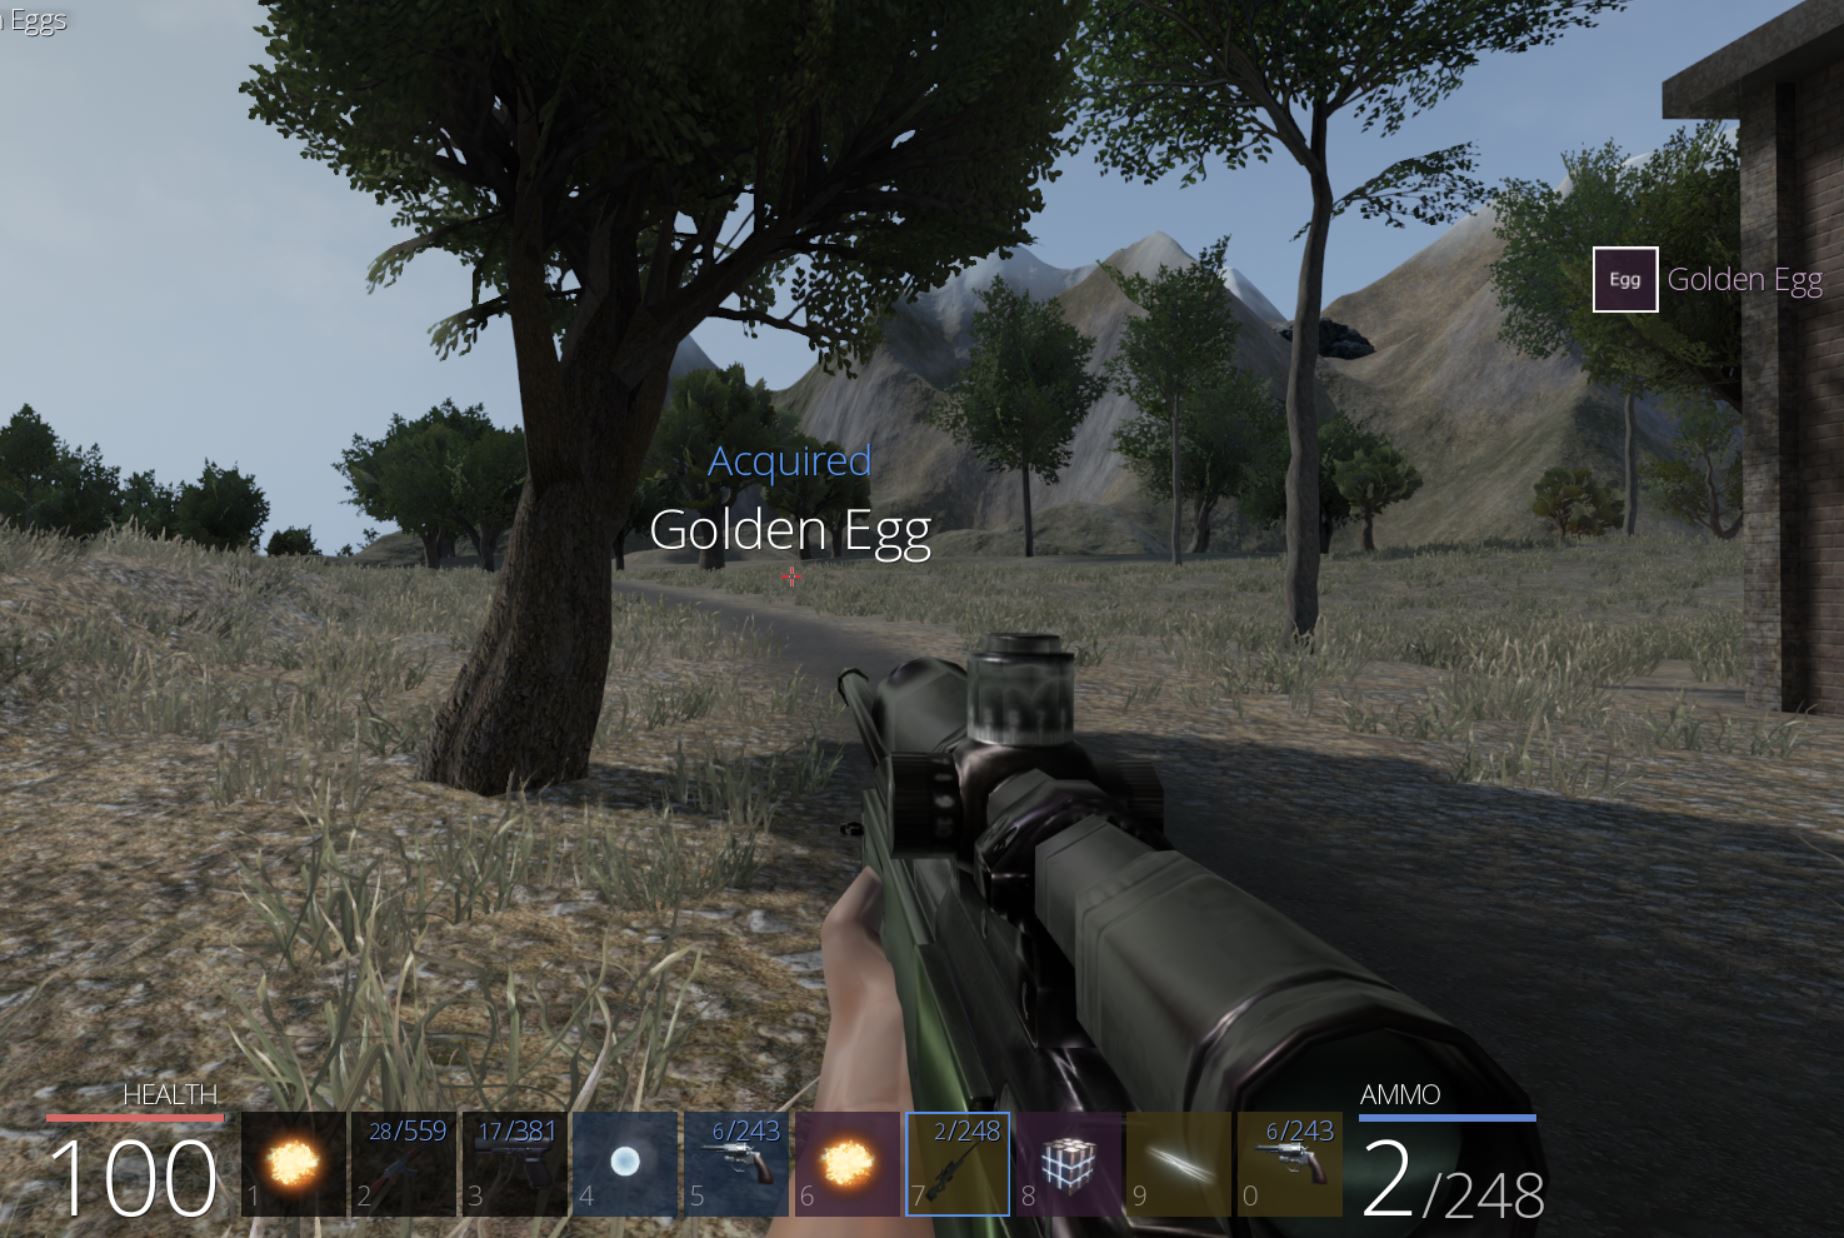
Working with this we can now take all of the egg addresses and add them into the script to be run.
if (inject_pkt.startswith("egghunter")):
    # egg 1
    hex_data='0x6d7600aac3c6004a8d460000824388059c530000000065650b000000'
    remote_data = bytes.fromhex(hex_data[2:])
    serv_queue.append(remote_data)
    # egg 2
    hex_data='0x6d76007249c7001f6fc700e09c4588059c530000000065650c000000'
    remote_data = bytes.fromhex(hex_data[2:])
    serv_queue.append(remote_data)
    # egg 3
    hex_data='0x6d760080bf46001988470030264588059c530000000065650d000000'
    remote_data = bytes.fromhex(hex_data[2:])
    serv_queue.append(remote_data)
    # egg 4
    hex_data='0x6d7600256c47000288c600b0374588059c530000000065650e000000'
    remote_data = bytes.fromhex(hex_data[2:])
    serv_queue.append(remote_data)
    # egg 5
    hex_data='0x6d760040be4400d869460070db4588059c530000000065650f000000'
    remote_data = bytes.fromhex(hex_data[2:])
    serv_queue.append(remote_data)
    # egg 6
    hex_data='0x6d7600503546002c4dc60080cd4388059c5300000000656510000000'
    remote_data = bytes.fromhex(hex_data[2:])
    serv_queue.append(remote_data)
    # egg 7
    hex_data='0x6d7680ed8dc7003f51c700a0cd4488059c5300000000656511000000'
    remote_data = bytes.fromhex(hex_data[2:])
    serv_queue.append(remote_data)
    # egg 8
    hex_data='0x6d7600143d4700aadb460000304488059c5300000000656512000000'
    remote_data = bytes.fromhex(hex_data[2:])
    serv_queue.append(remote_data)
    # egg 9
    hex_data='0x6d7600c97e470060b3c500009a4588059c5300000000656513000000'
    remote_data = bytes.fromhex(hex_data[2:])
    serv_queue.append(remote_data)
    # egg 10
    hex_data='0x6d7600a02dc5006c2cc60020244688059c5300000000656514000000'
    remote_data = bytes.fromhex(hex_data[2:])
    serv_queue.append(remote_data)
This appears to grab a few eggs but not all. Looking at our console output there are some connections to be reestablished which indicates there may be some problems running this too quickly to teleport around the server.
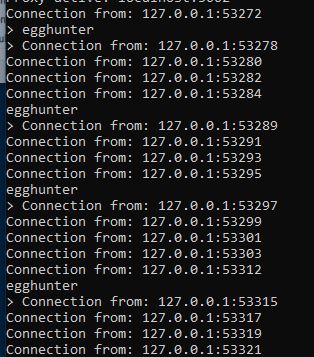
By adding some sleep statements between each queue to pause the program for a couple of seconds, this seems to be rectified and we’re able to grab 9/10 eggs (which persist upon logging out as all of this was sent to the server rather than game client).
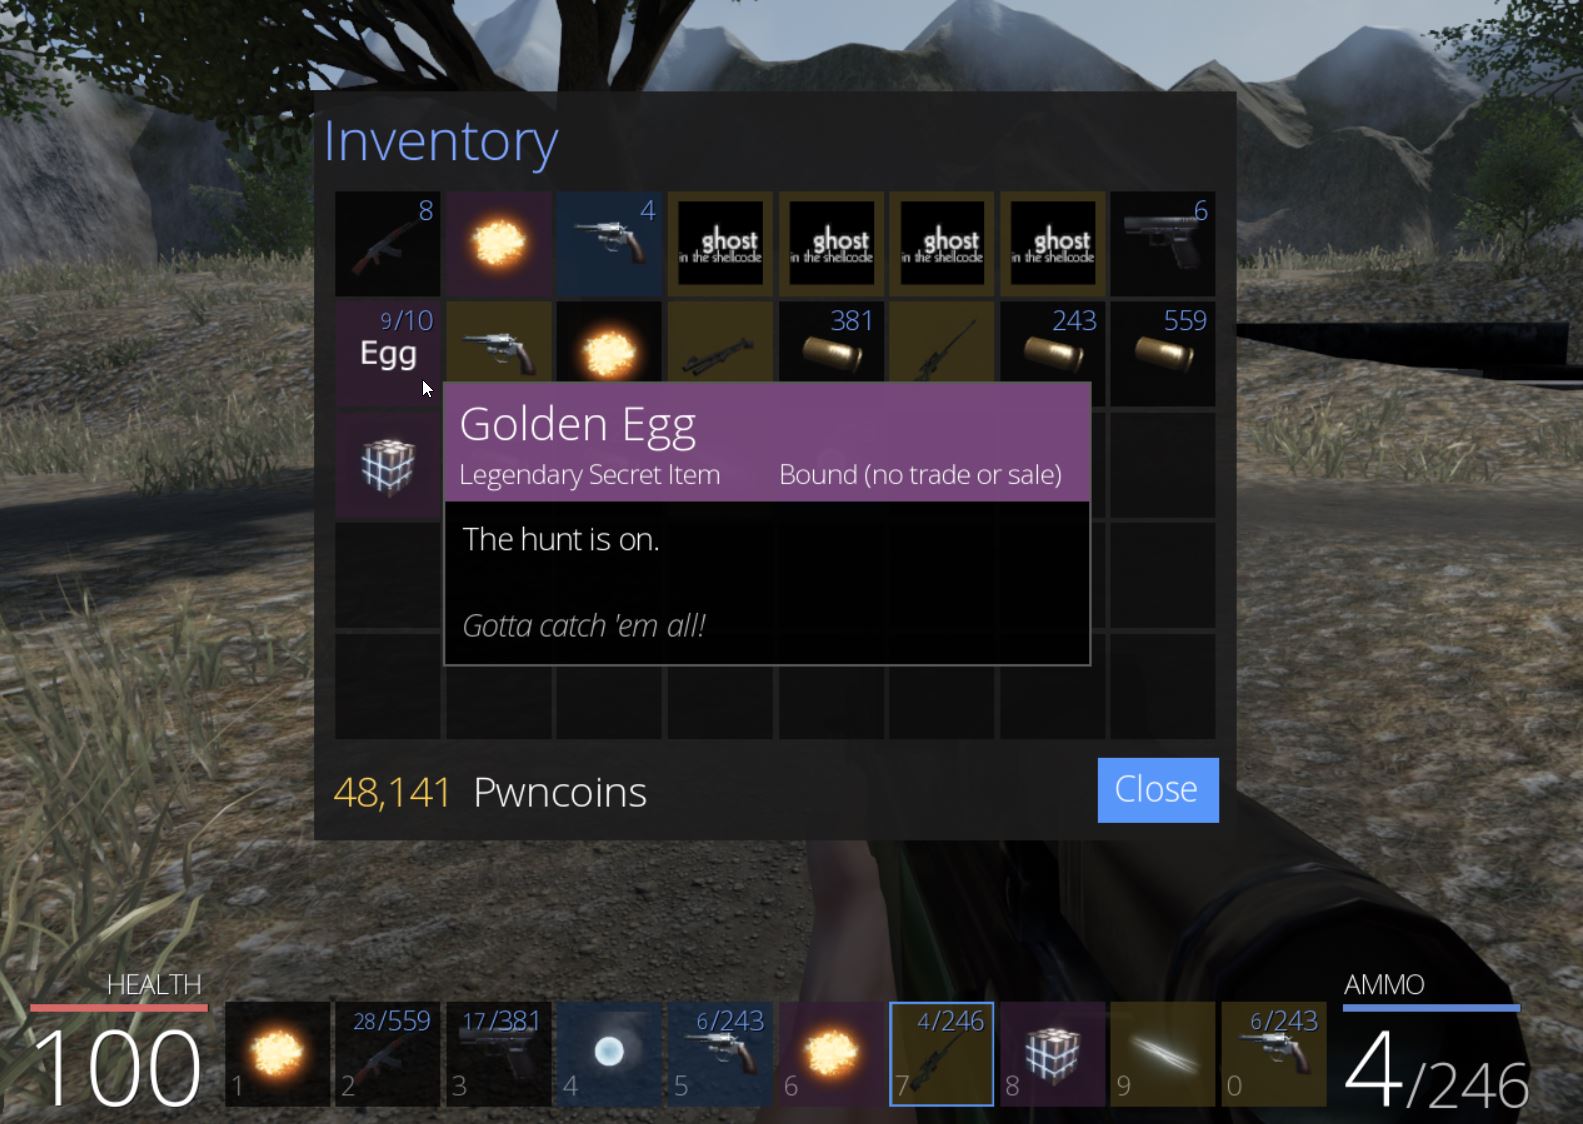
Finding Game Logic in Ghidra
Looking closer at egg 10, this actually has a different name ‘BallmerPeakEgg’. By converting these coordinates from hex as we did before, and then teleporting there using Cheat Engine, we find that there’s no egg to collect.
x: c52da000
y: c62c6c00
z: 46242000

x: -2778
y: -11035
z: 10504
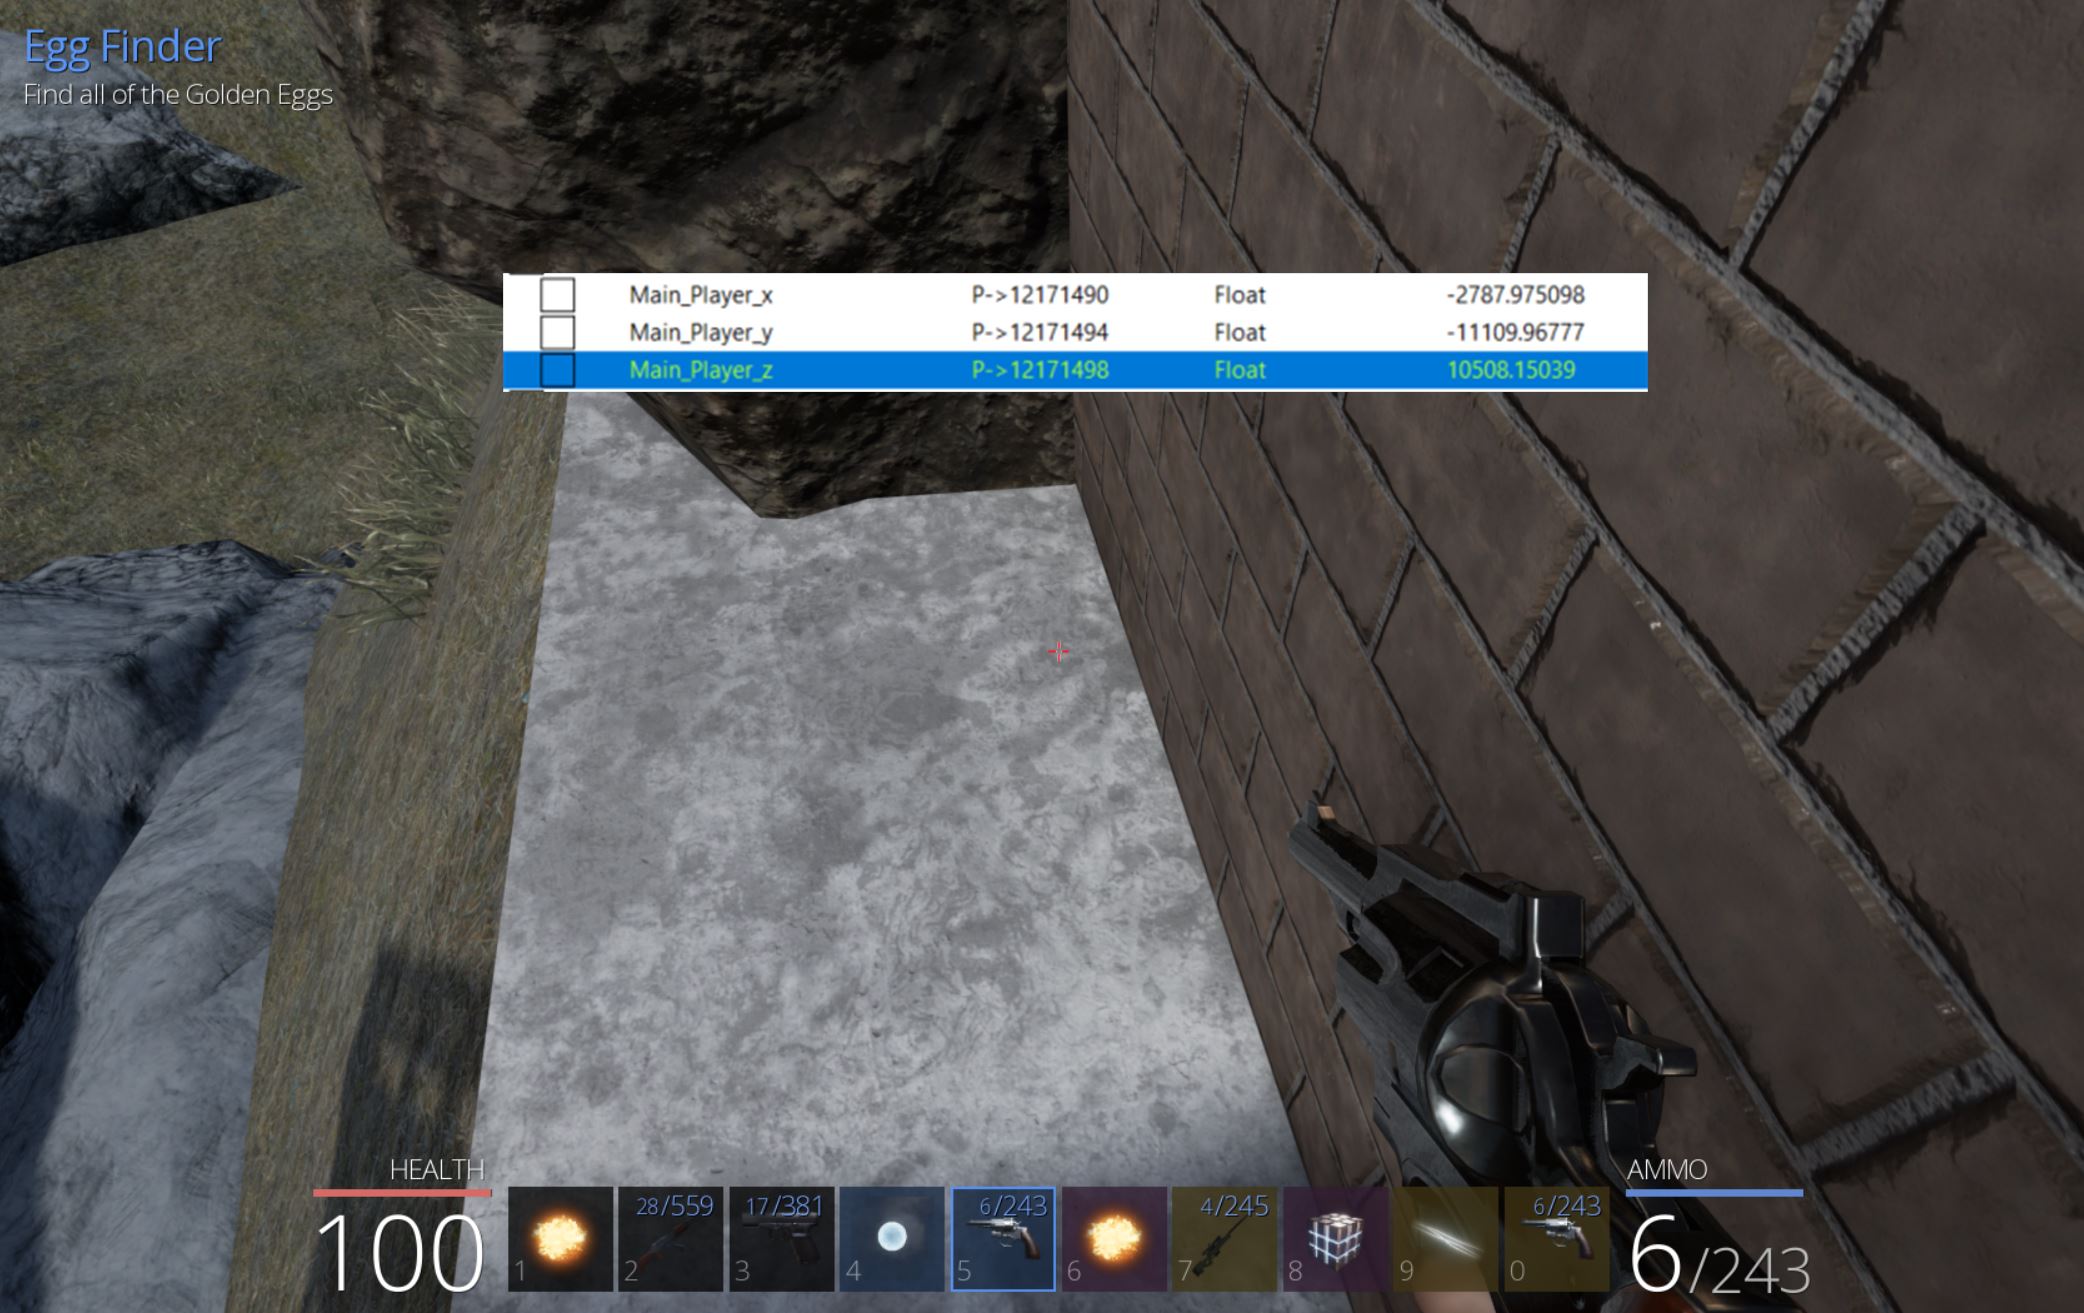
Taking a look in Ghidra for the word ‘BallmerPeakEgg’ shows a method called ‘CanUse’ which seems to have reference to something called ‘BallmerPeakSecret’.
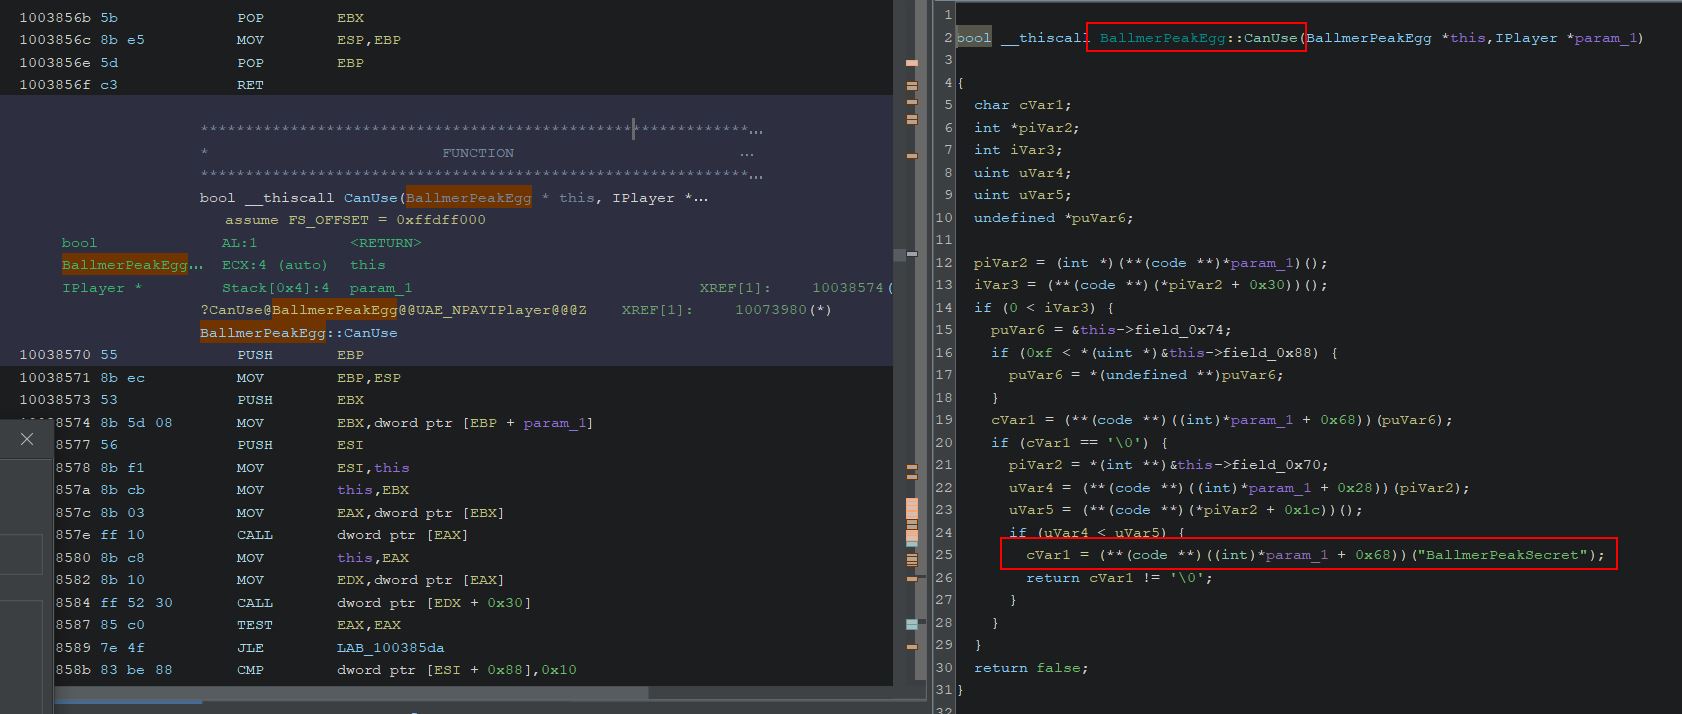
Running a search for ‘BallmerPeakSecret’ in Ghidra finds another namespace ‘BallmerPeakPoster’ with a method ‘Damage’.

Diving into the decompiled code there appears to be reference to ‘BallmerPeakSecret’ being executed, but only if the poster is damaged. Further analysis shows this is all wrapped within a conditional statement which appears to be making a comparison based on character traits at the time it is damaged.
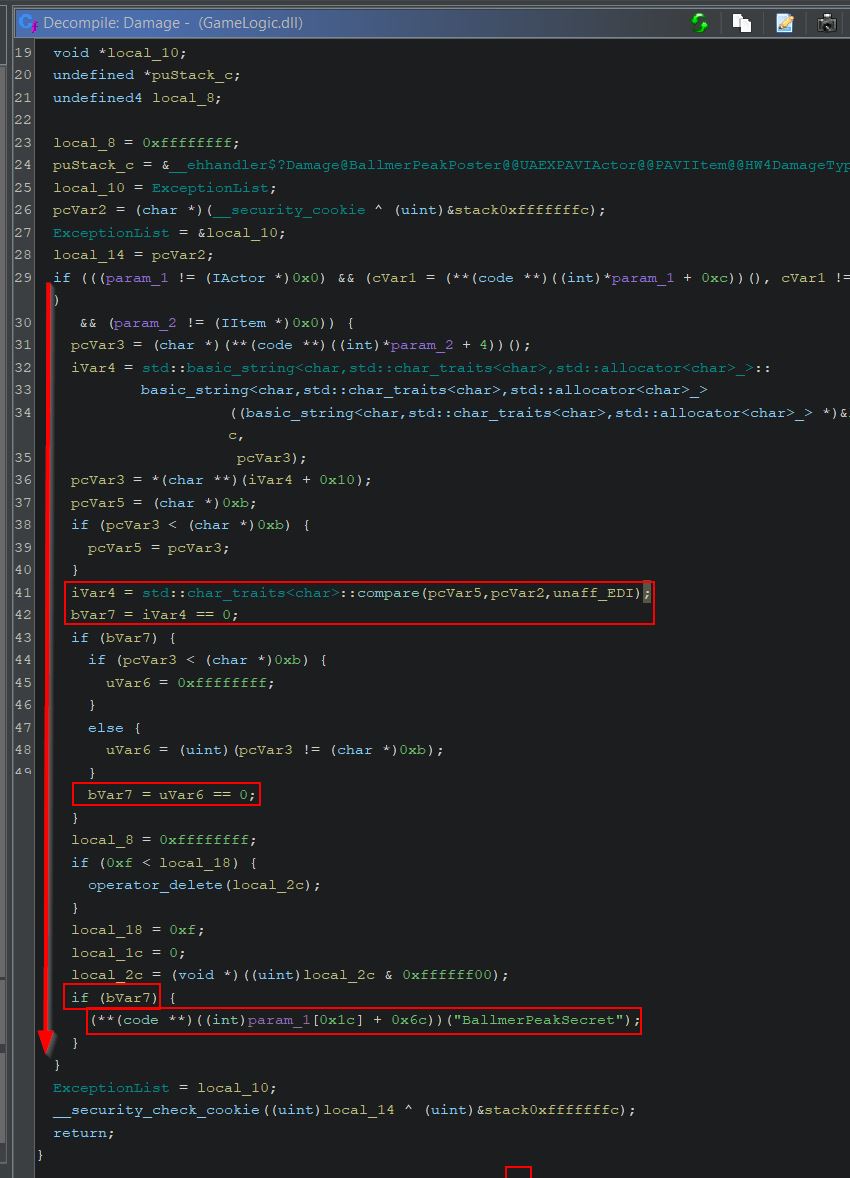
By stepping out and examining the high level assembly, it appears that the comparison is checking if the player has the ‘CowboyCoder’ equipped.

Based on this we can infer that damaging a poster at BallmerPeak may result in the egg being accessible. Moving back to the game, inside BallmerPeak there is a poster as expected.
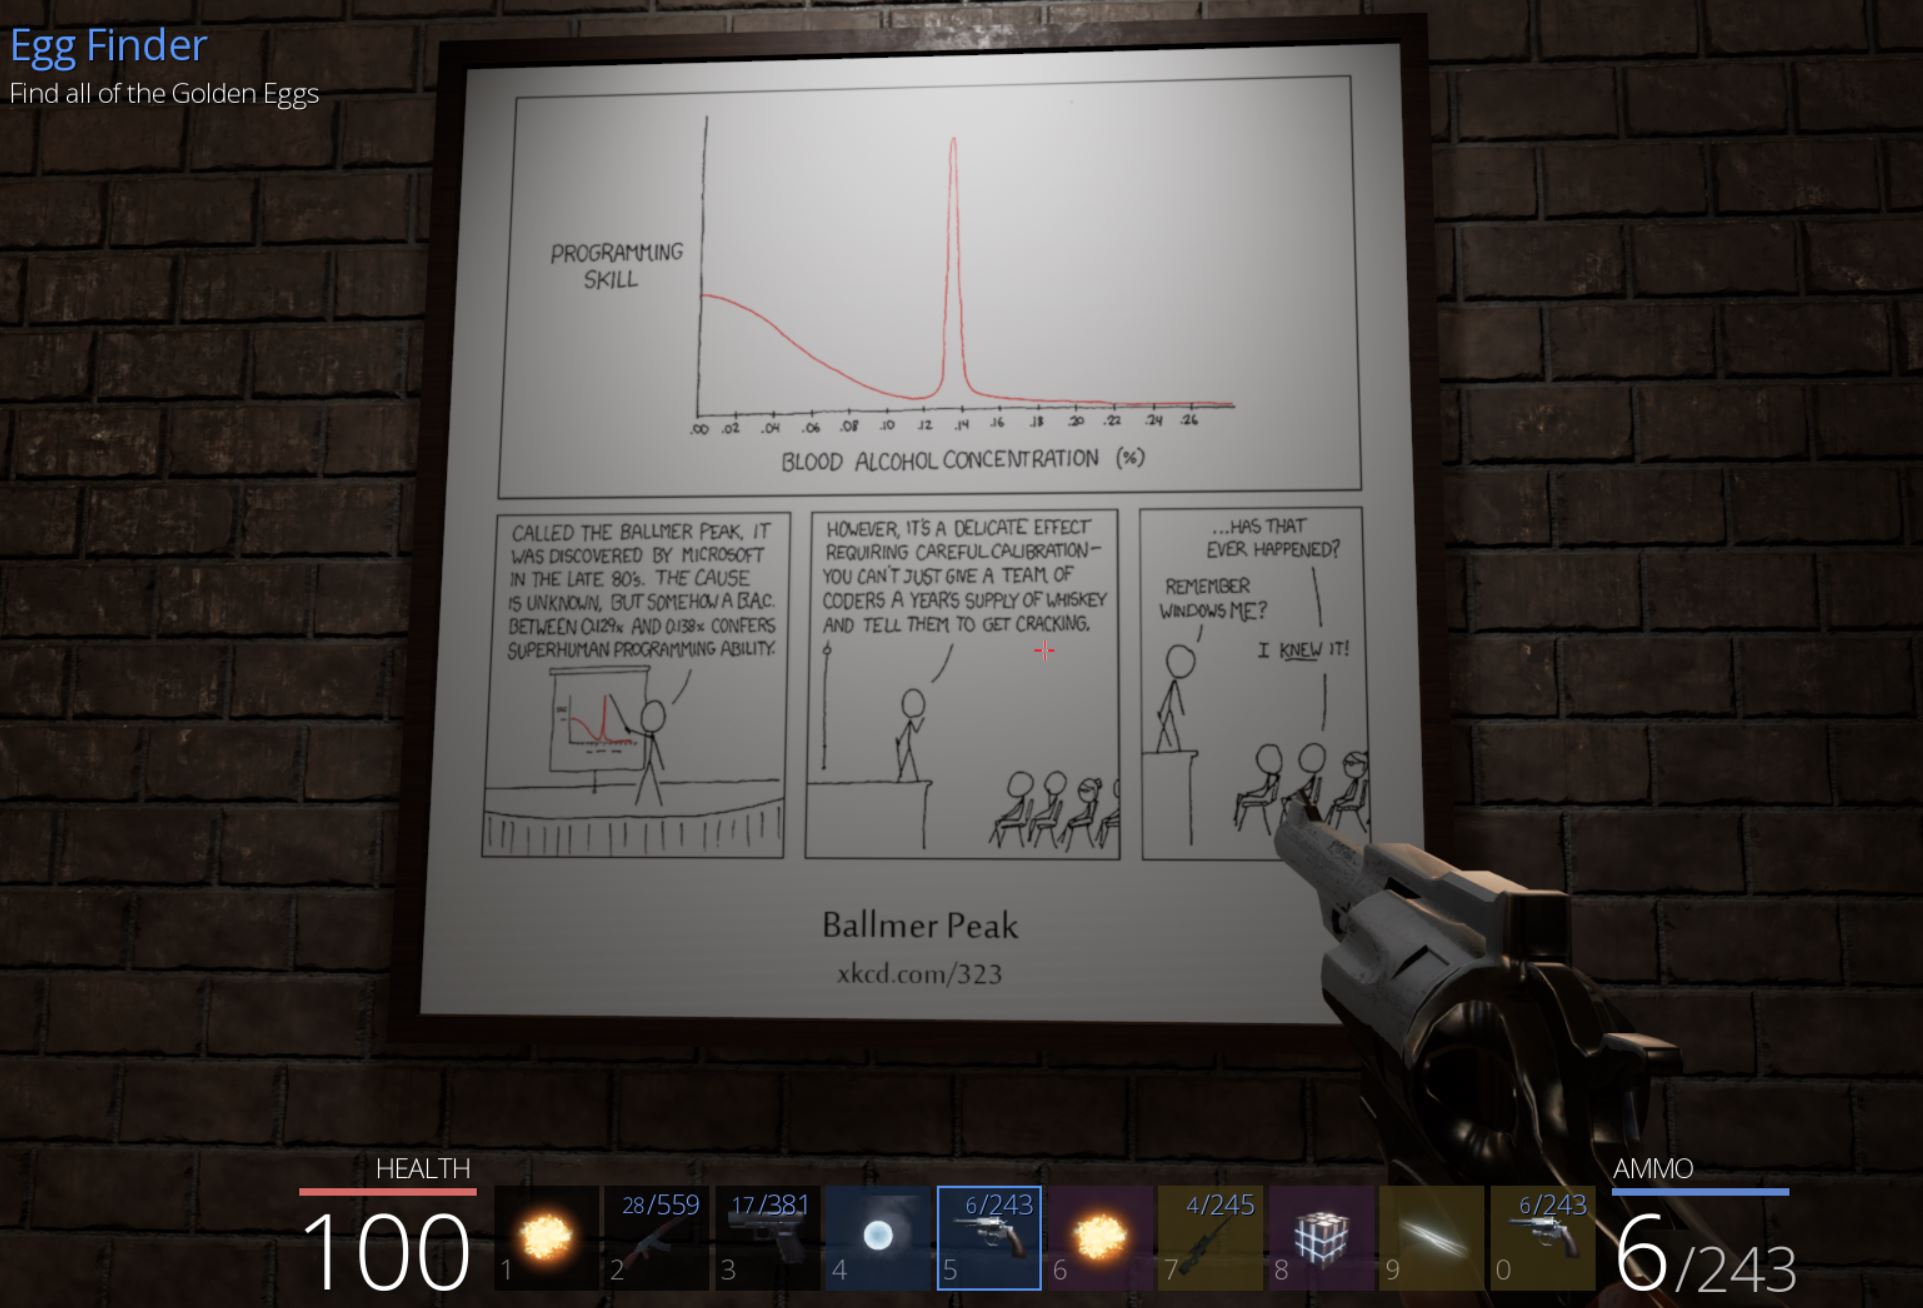
By shooting this with the CowboyCoder and heading outside we can see the egg as expected has now appeared.

Collecting this successfully completes the ‘Flag of the Egg Hunter’ which has the key ‘The Fortress of Anorak is all yours’, and we have our fifth flag of the game worth 250 points.
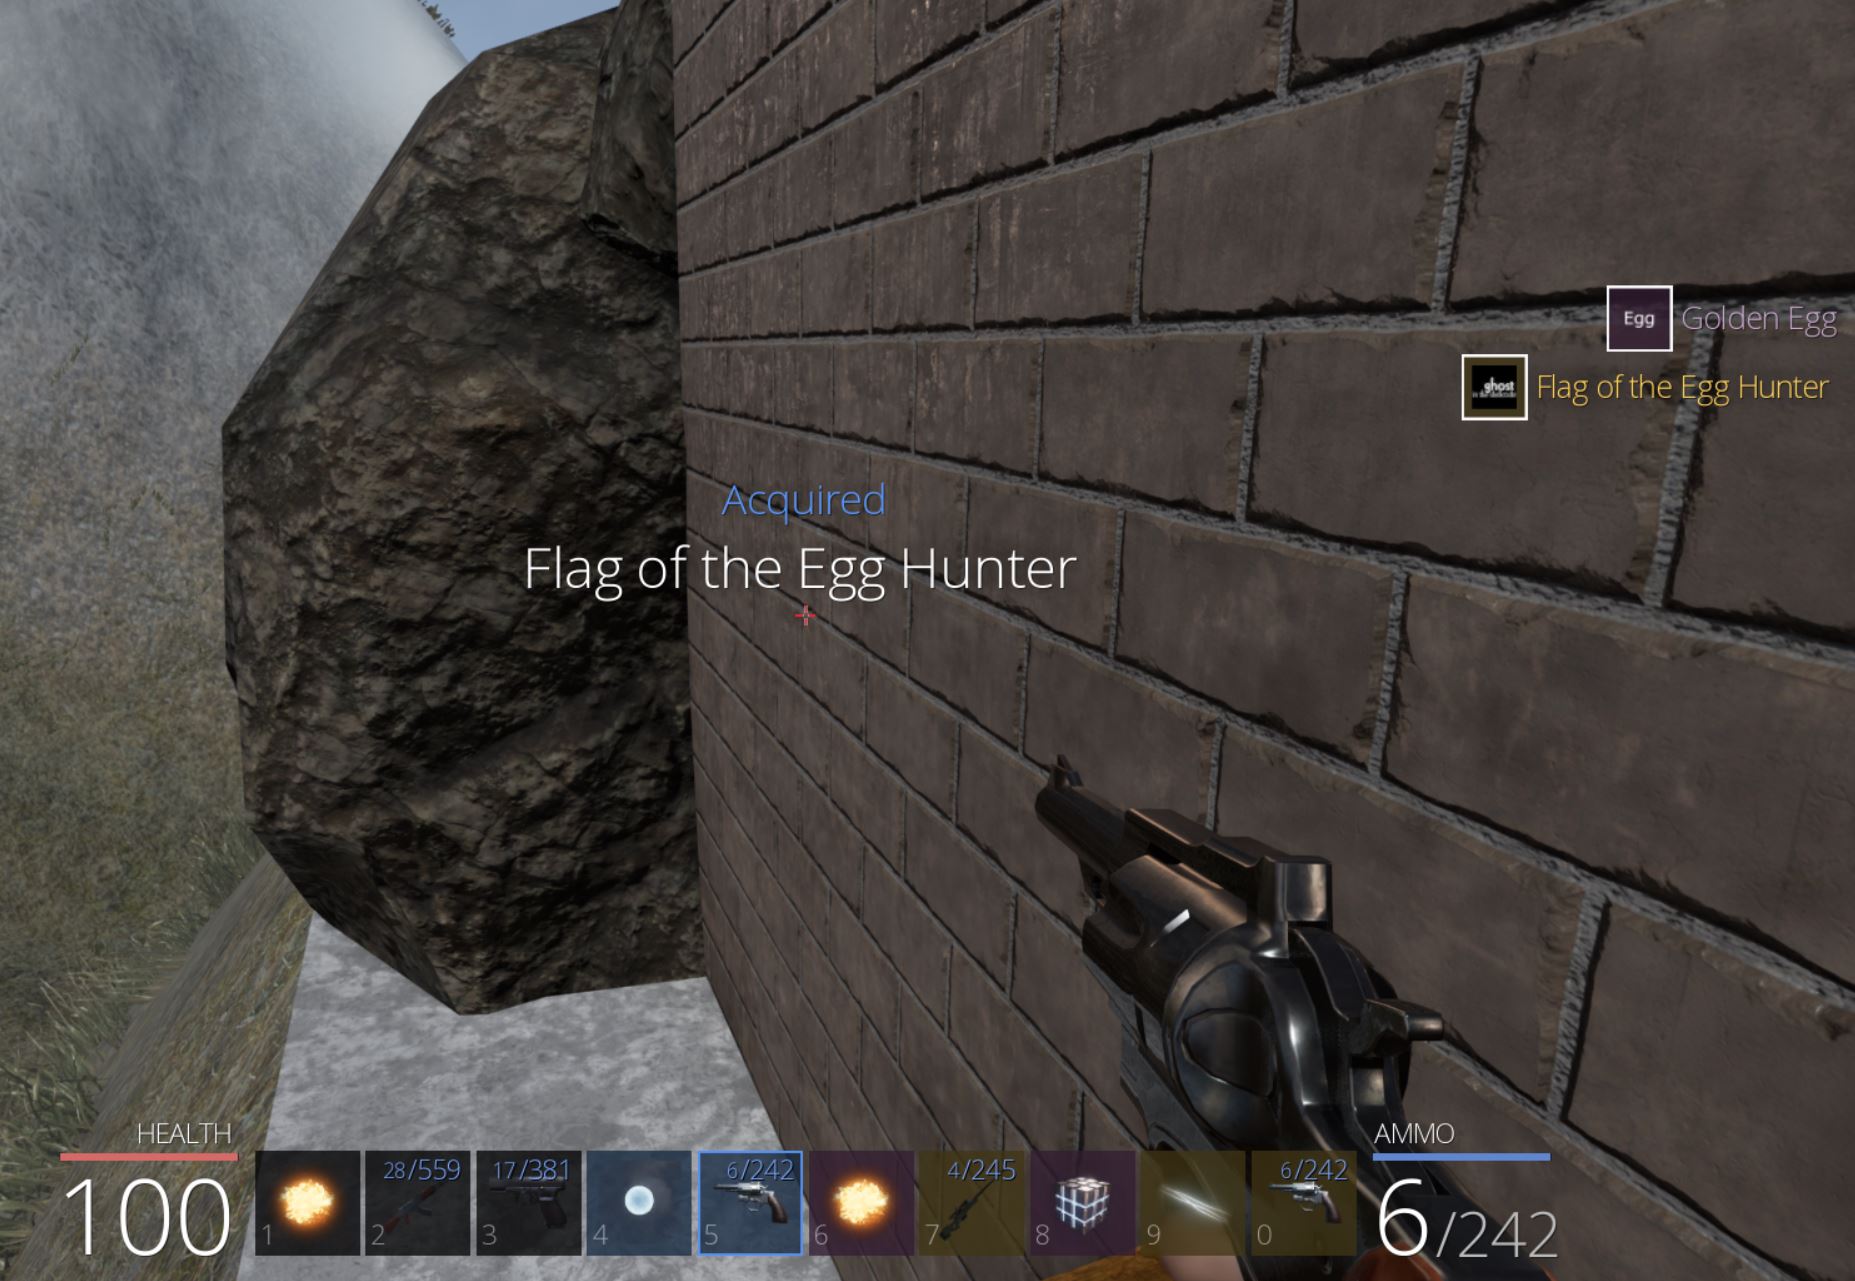
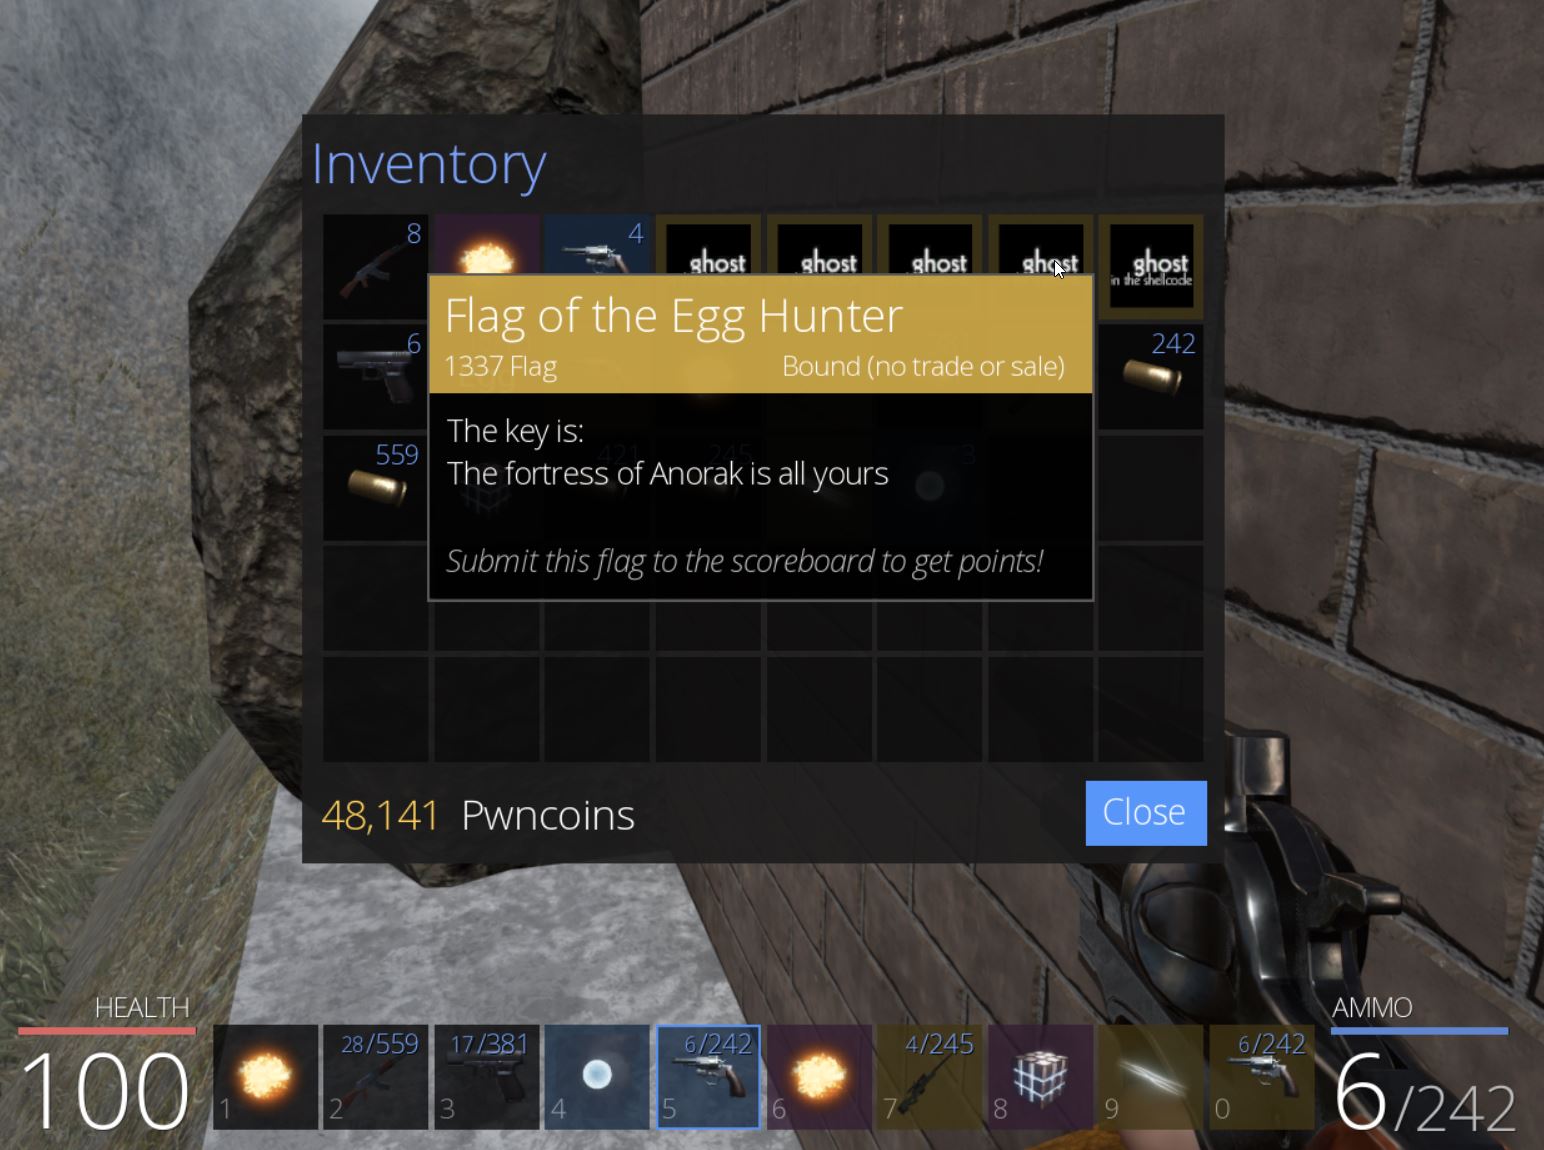
🏆 Flag of The Overachiever via Multiplayer Farming (200 points)
To get the Overachiever flag there’s only 2 more achievements we need at this point, both of which involve killing another player in PVP.
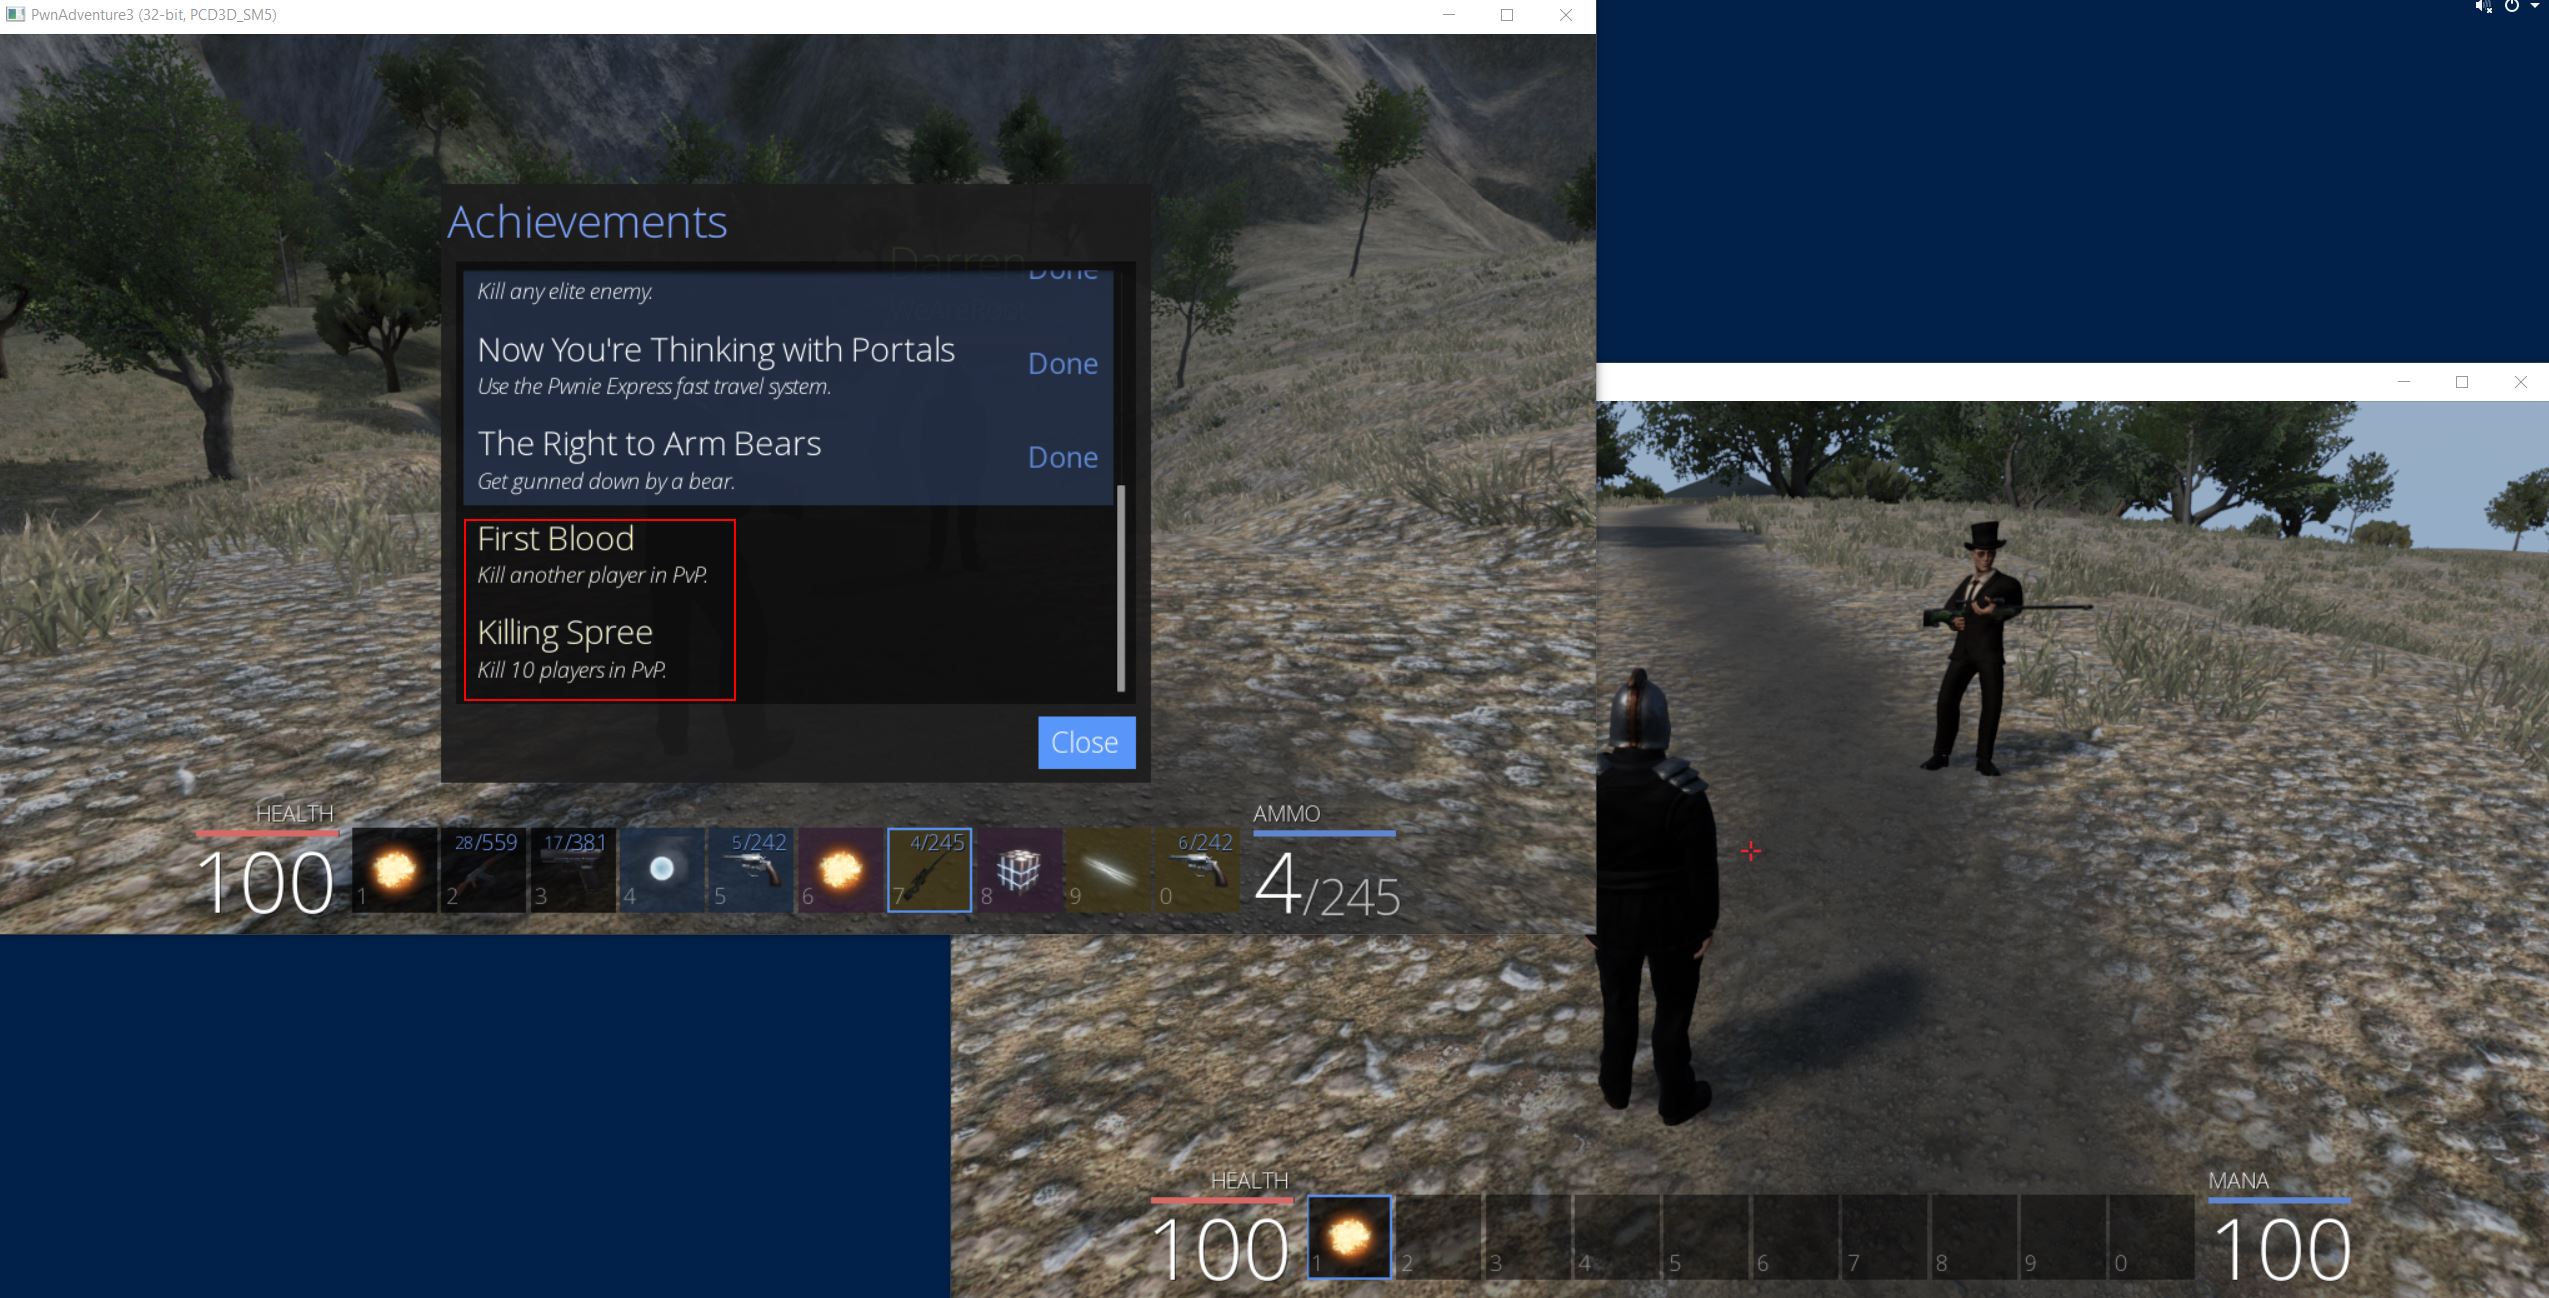
By creating another account, disabling the proxy, and modifying our hosts file to have the game server domain point directly back to the game server, we’re able to then go into PVP mode using both players.
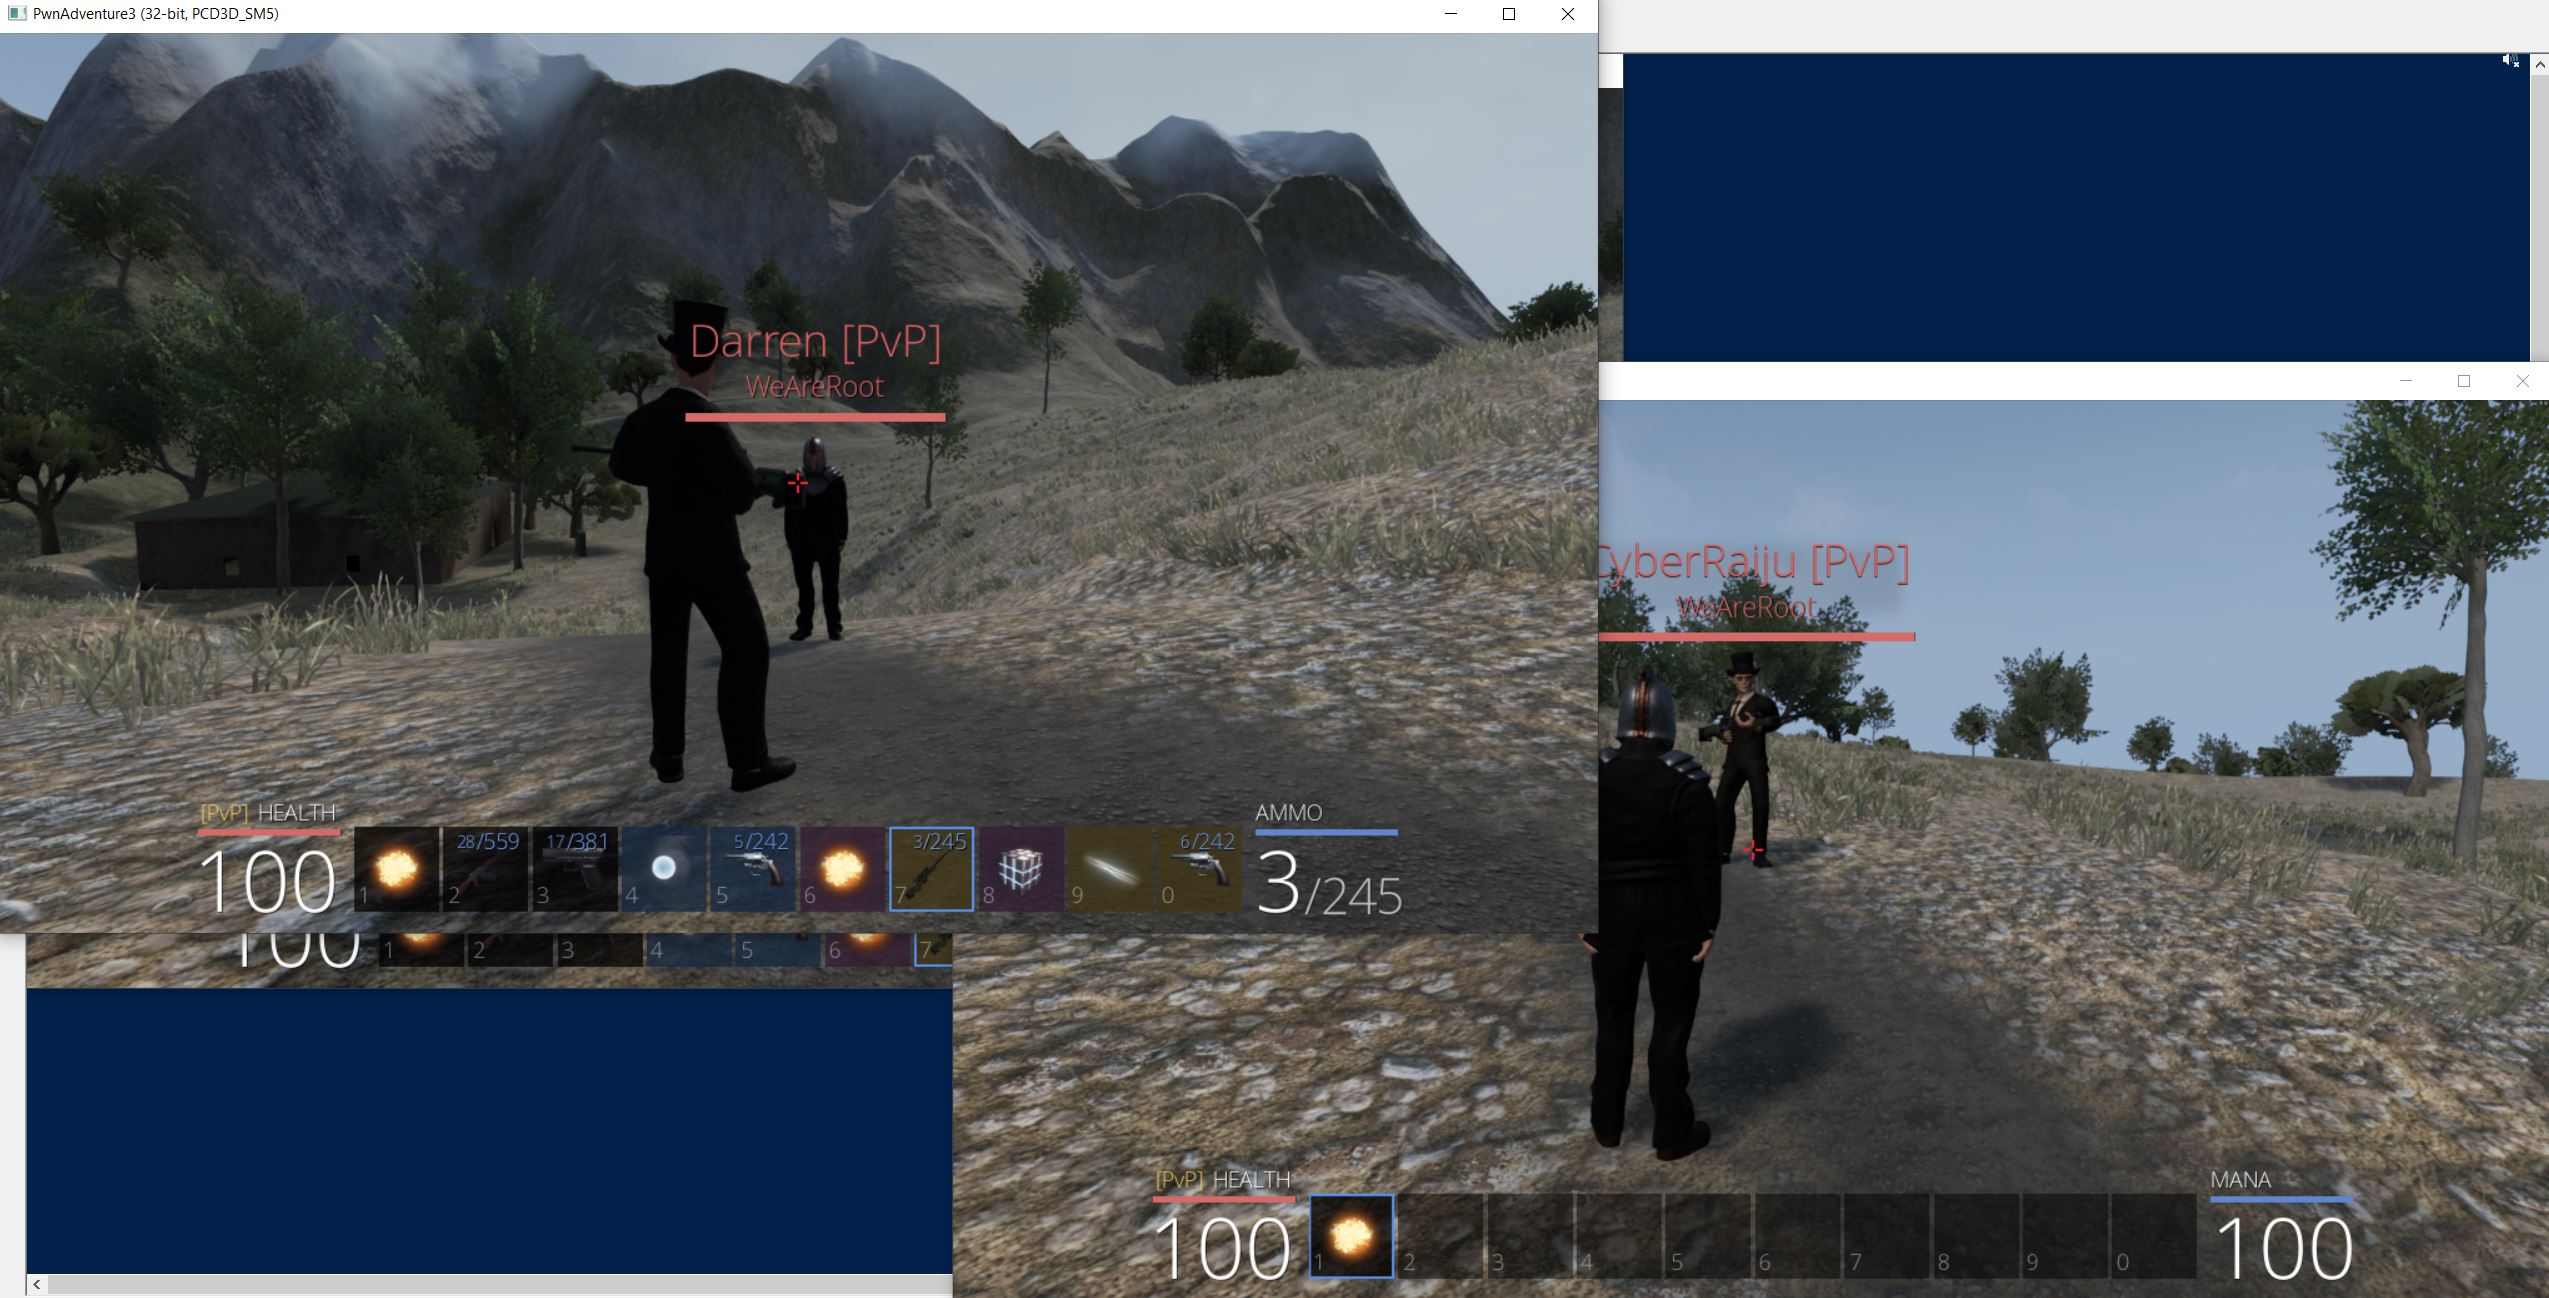
In this instance our friend Darren just loves taking an arrow (or bullet) to the knee.
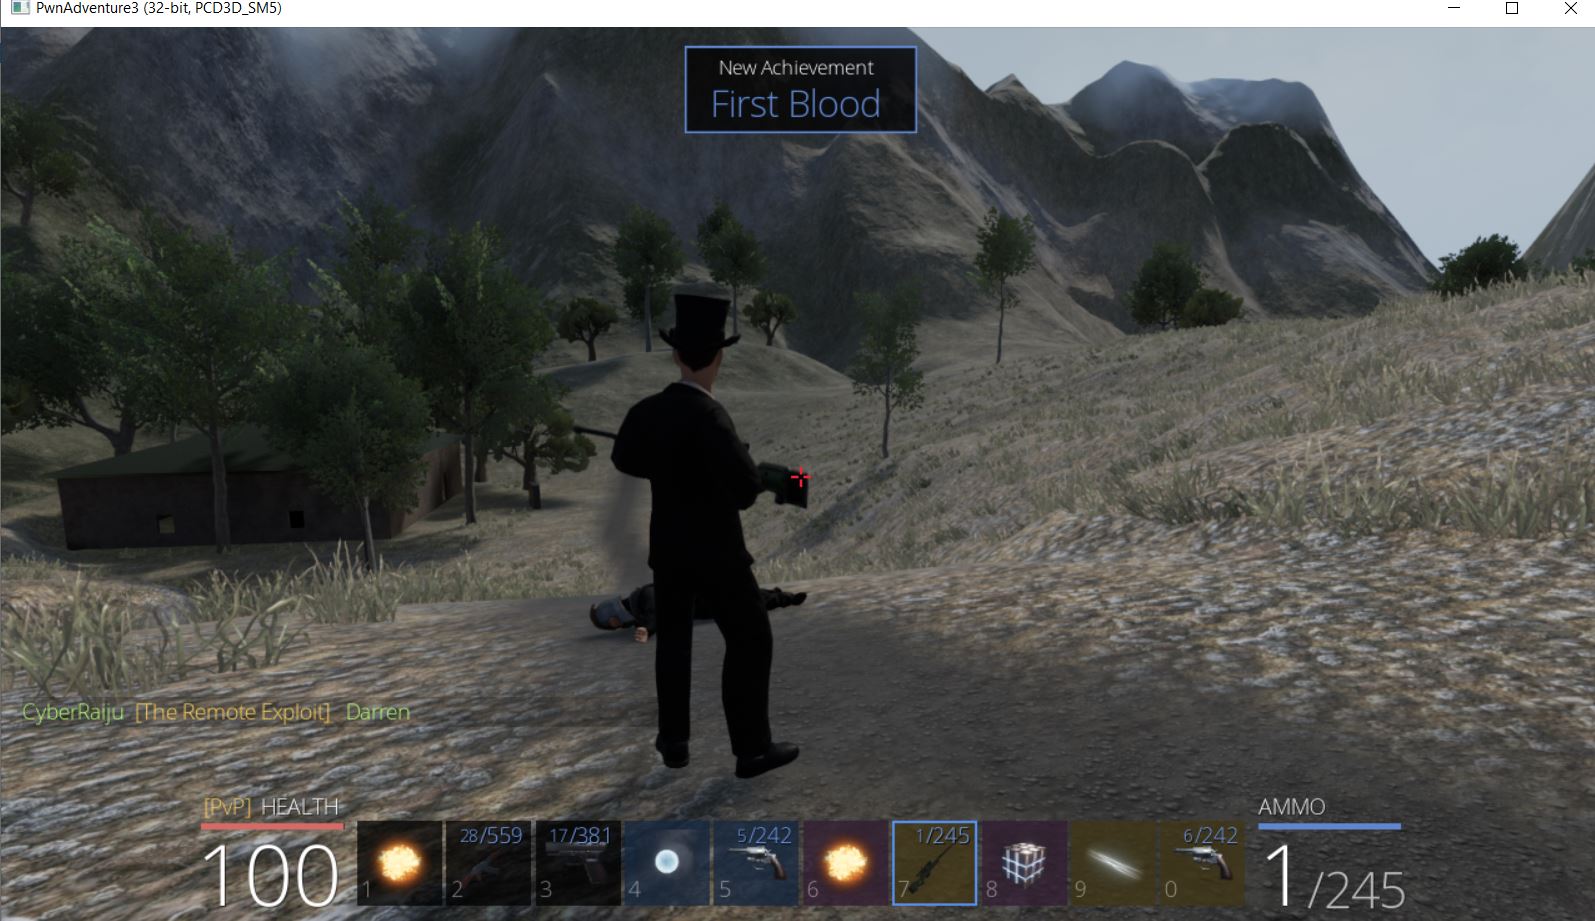
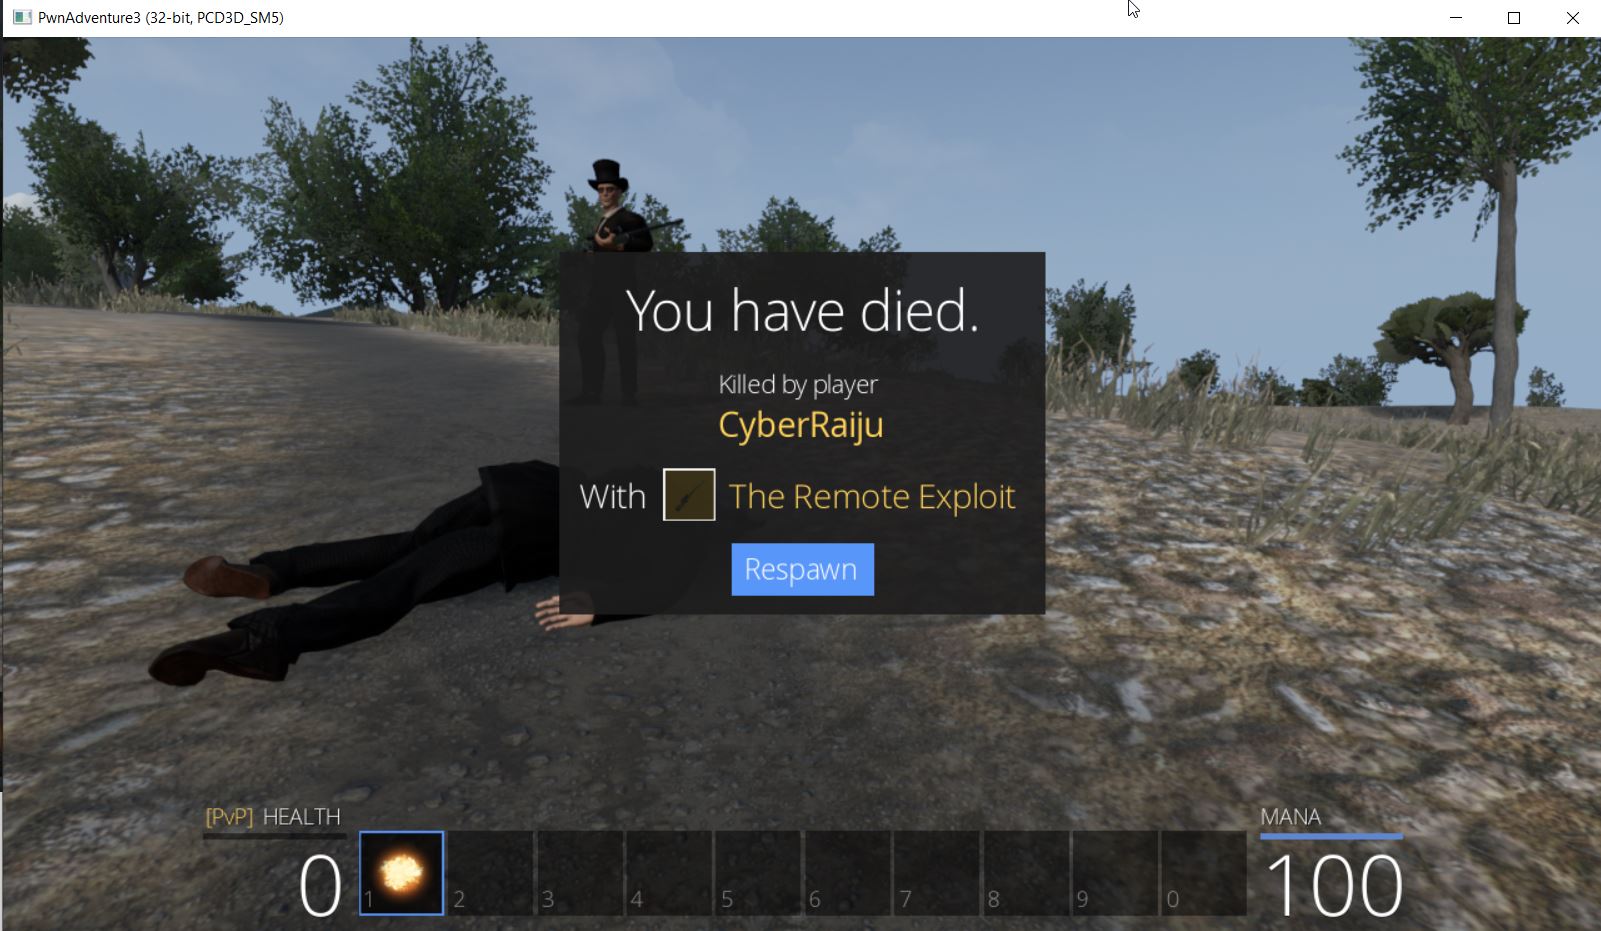
By staying near a spawn point we can ensure the Town of Pwnie runs red with the stench of achievement until the game rewards us with the ‘Flag of the Overachiever’.
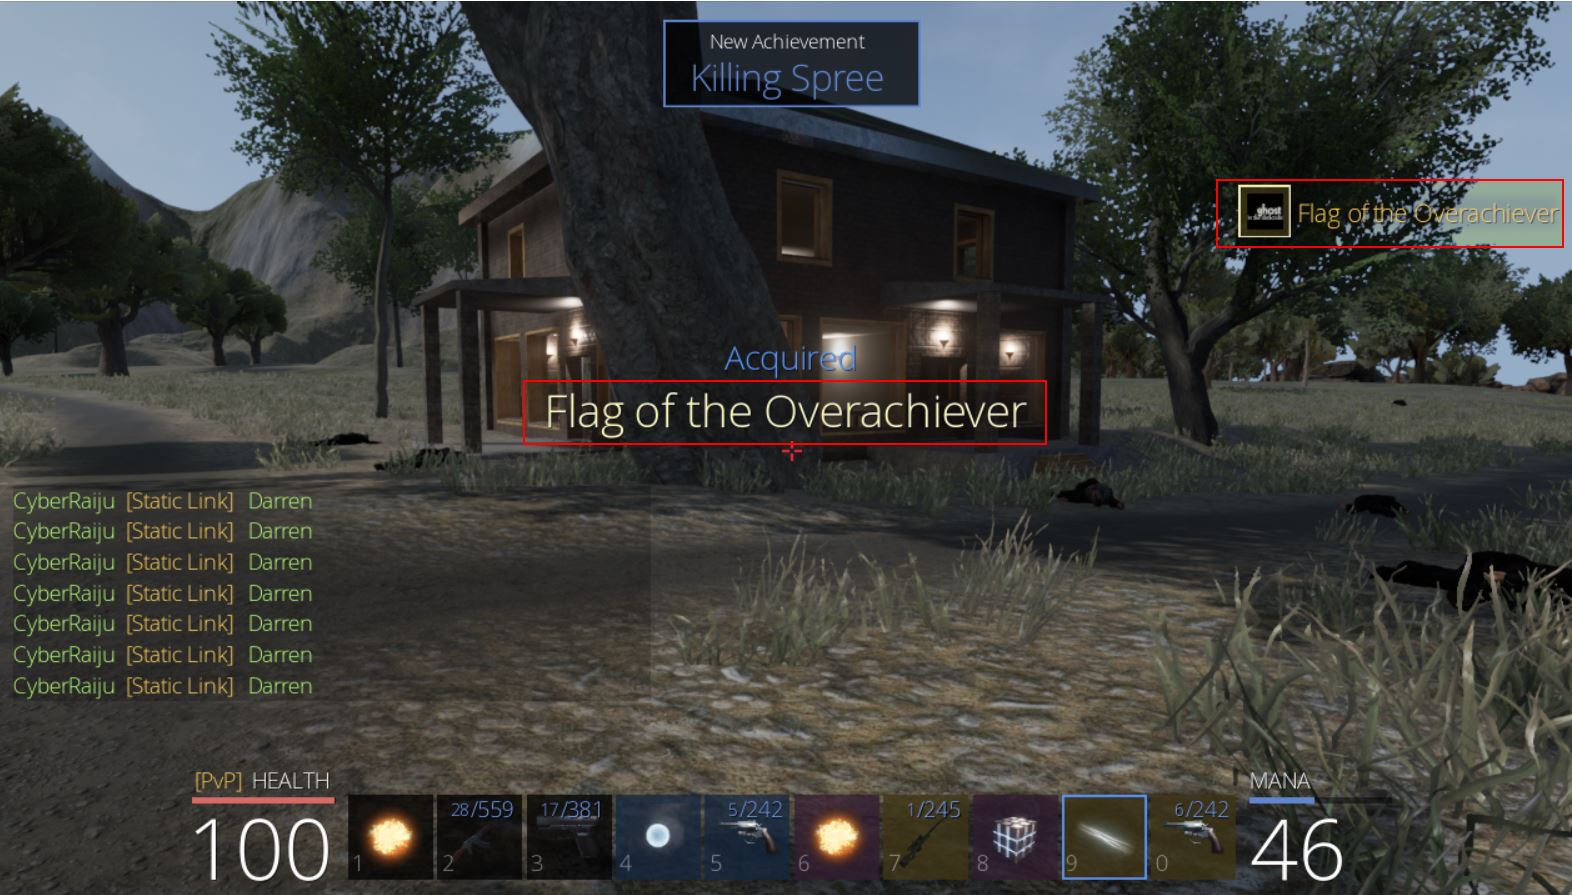
This flag has the key… hold on.
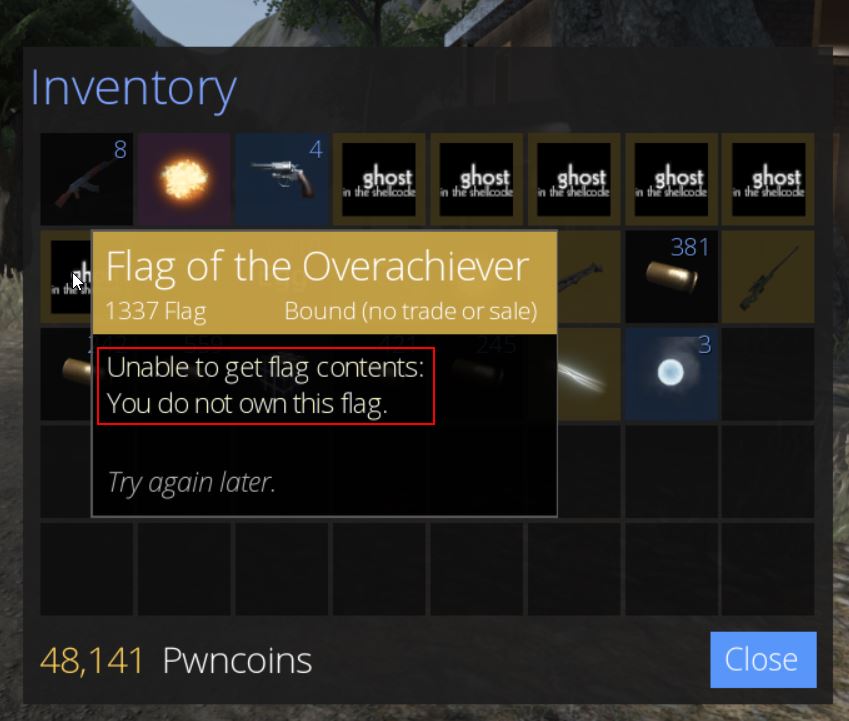
For some reason the game doesn’t recognise we have achieved this flag; however, by logging out and back in we see the flag has the key ‘Achievement Unlocked Red Ring of Death’, which is our sixth flag of the game worth 200 points.
From here we can redirect the game back to our own host to continue intercepting yummy packets.
Part 8: 🔑 Generating DLC Keys
Heading over to Pirate’s Cove we can find a large pirate ship.

On that ship is a chest to be unlocked.

Upon attempting to unlock it, it asks us for a DLC key.

Searching in Ghidra for the term ‘DLC’ finds a number of interesting results, including SubmitDLCKey and a string defined as DLC.
Looking into this further shows a namespace ‘KeyVerifier’ with the method ‘VerifyKey’ being called.

Diving into this a bit further it appears that a number of operations are occurring including what’s likely to be string concatenations.
However, this is all part of a much larger function with a lot of moving parts.
Based on this it’s likely there won’t be a simple answer and we’ll need to dive into potentially developing a keygen for this chest.
Investigating Methods with Ghidra Function Graph and x32dbg
From a high level we can begin to look at what the VerifyKey method is doing by using the Function Graph of Ghidra.
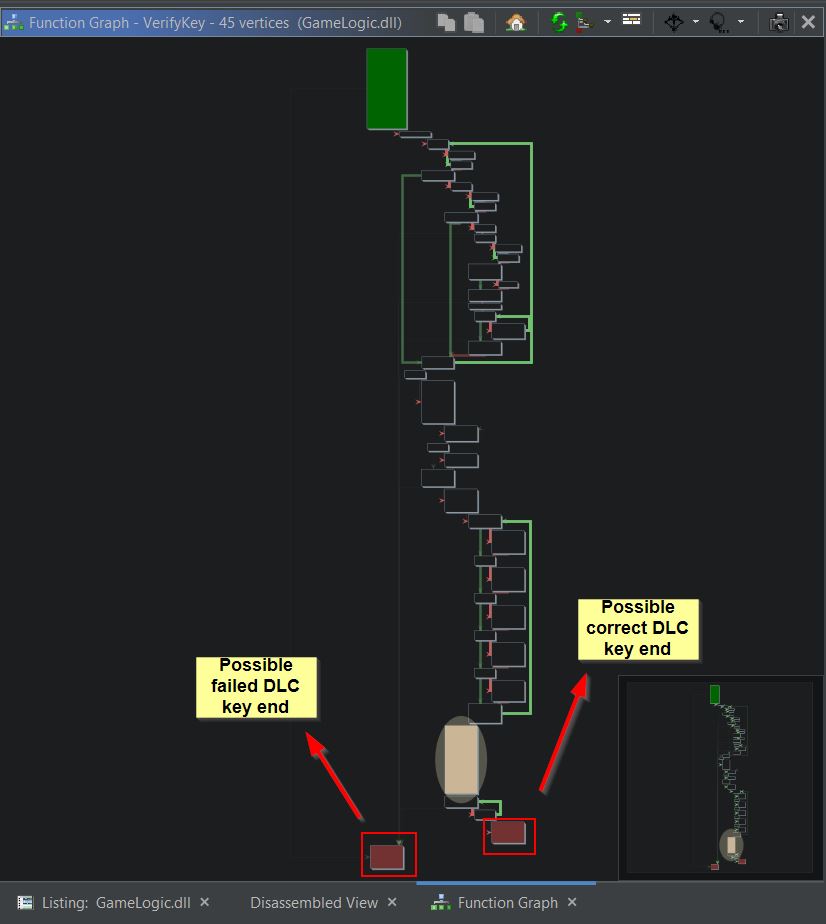
Specifically this has a number of loops and checks occurring with what appears to be 2 possible endpoints, one when an invalid key is given, and one when a correct key is given. The final jump that looks to be happening is at offset 0x3afb8 of GameLogic.dll.
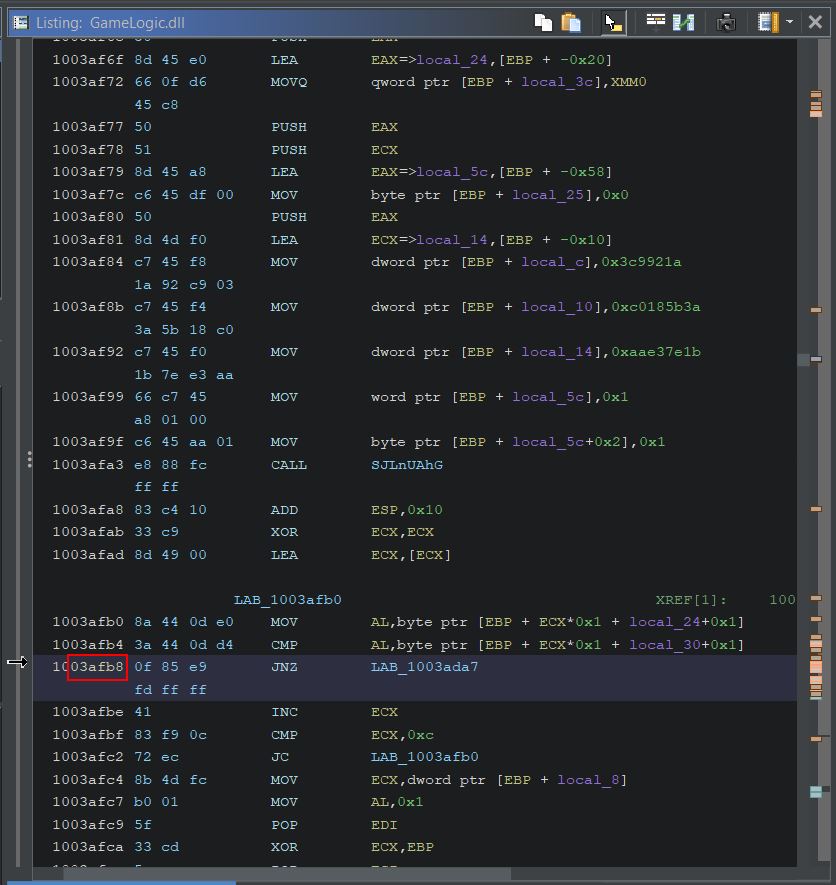
We can attach a debugger such as x32dbg to the game to see if we can tamper with the flow to get a successful key submitted.
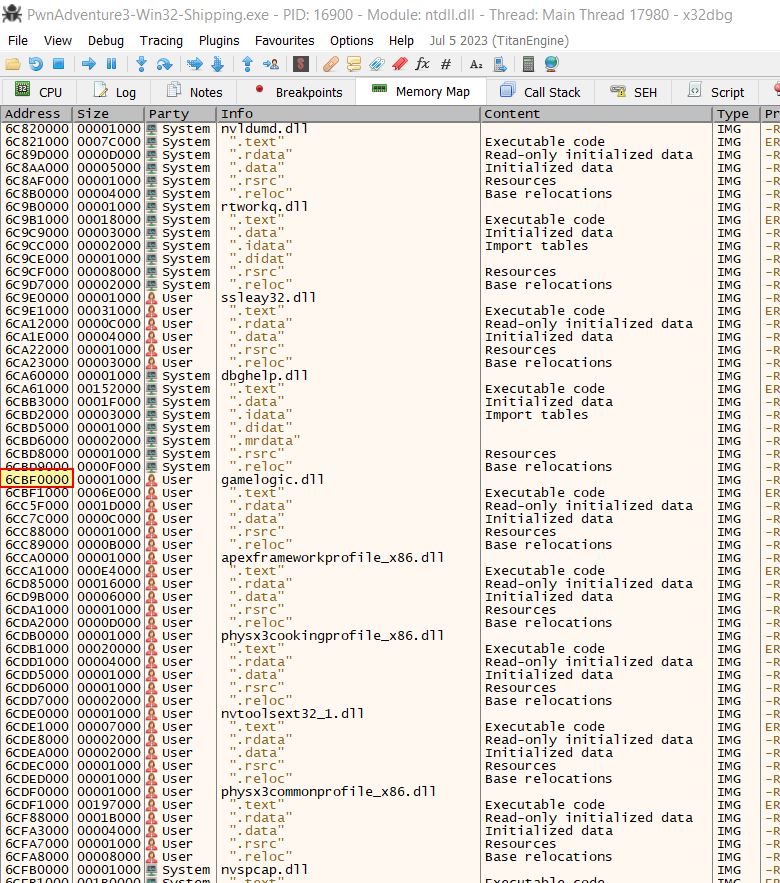
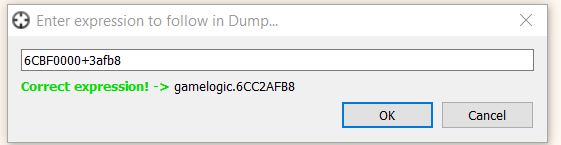
To do this we will create a breakpoint at the jump statement occurring.
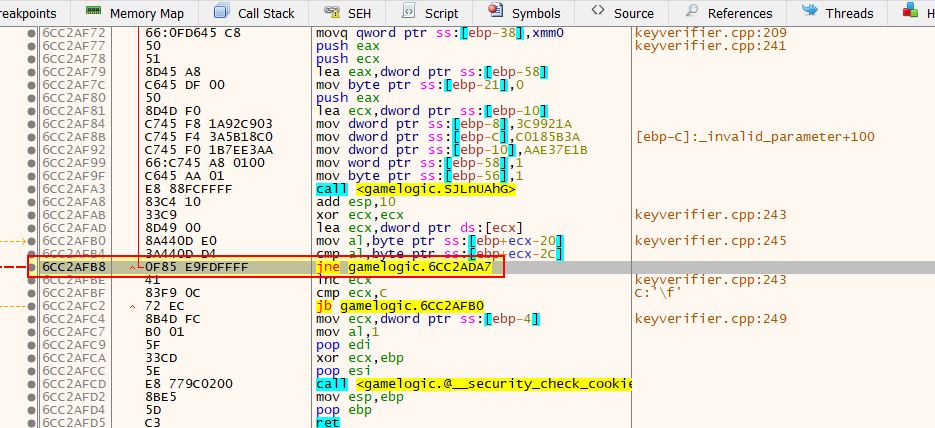
By playing the game and attempting to open the chest with a key it becomes obvious that there’s more checks in place occurring prior to this breakpoint because it is never triggered. Further to this no traffic is sent to the server which is a good sign that there’s more conditions which need to be met prior to any network traffic even being sent out. Looking at the specific conditions of VerifyKey’s pseudo-code, the first check seems to be whether the 5th element of an array called in_ECX (which appears to be whatever we submit as the key) is not ‘0’, if so the 6th element of this array is stored to a variable. From here if 15 (0xf) is less than the 6th element in the array, it appears to store in a new variable as a pointer to an unknown structure type which in_ECX is casted to. This is repeated a couple of times, but of note is that both resulting variables are added together and checked to see if they are equal to a ‘-‘ character. There is also a check shortly after this which if it fails returns 0 (false) for the verifykey method, and this seems to be a comparison on if uVar4 is less than 0x18 (24).
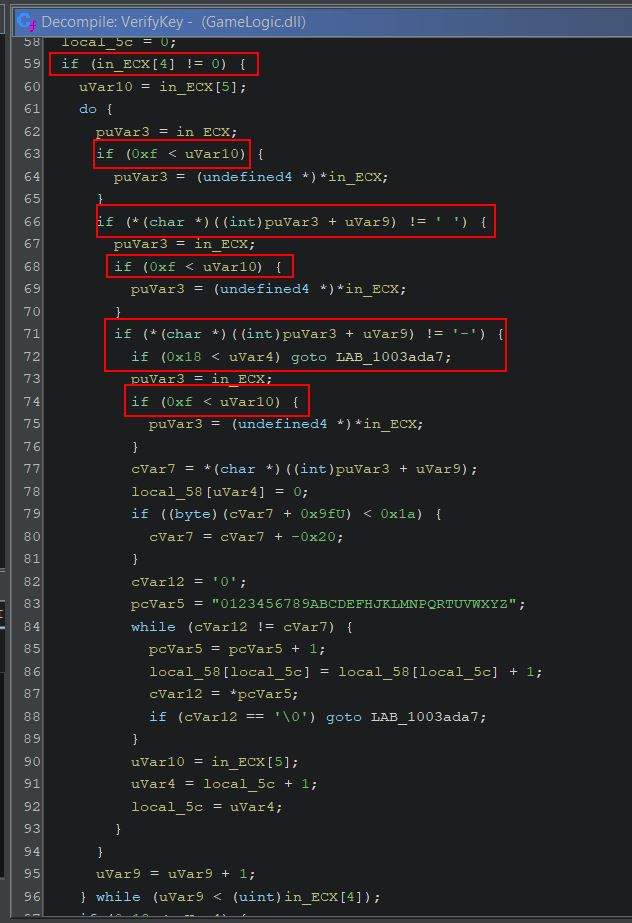
Based on this it appears that the key must be split by a ‘-‘ delimeter after 5 characters, and possibly that the array passed in must be greater than 24, which means 25 characters long or more. Submitting a key which matches this still results in not hitting the breakpoint.

Although some of the next checks aren’t inherently obvious, there is a reference to 0x20 being deducted from cVar7 which is casted to an ascii character. If we consult the relevant ascii codes, this appears to be converting any lowercase characters submitted to uppercase given the difference between these is exactly 0x20.
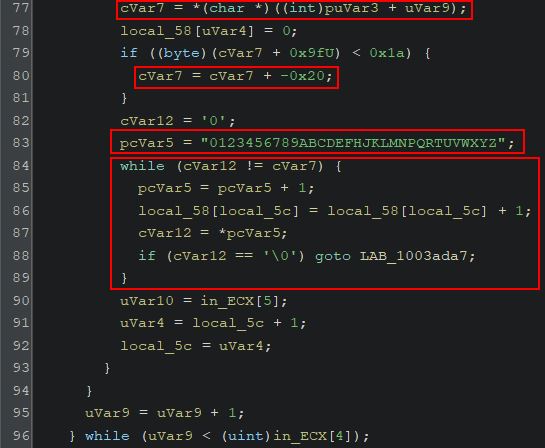
Looking at the assembly makes this more obvious as it performs a comparison using the vaue 0x61 which is a lowercase ‘A’ in ascii.
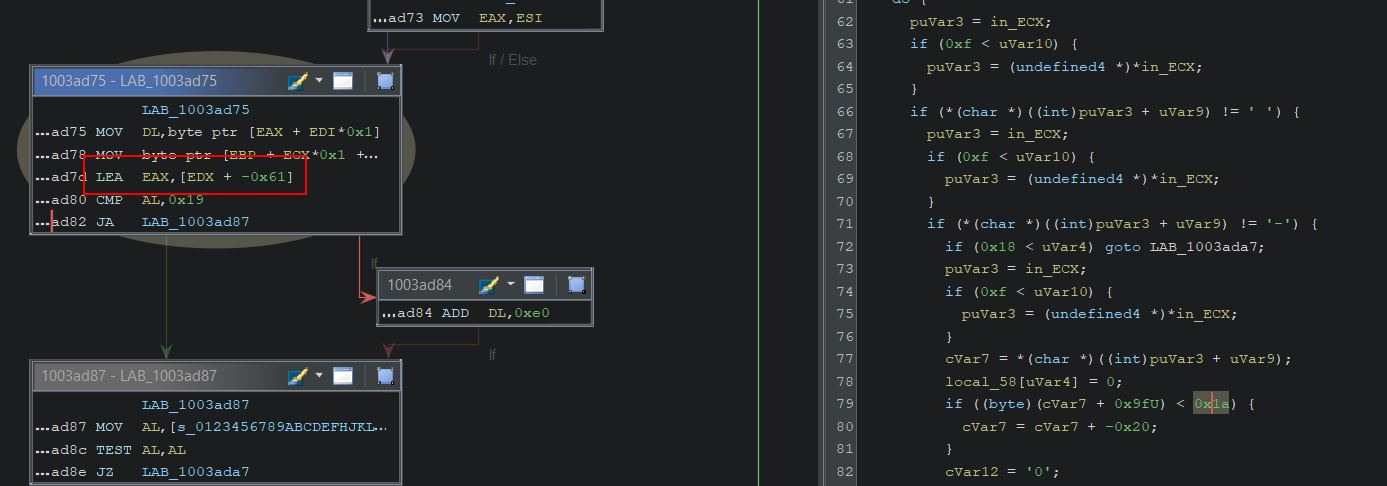
The next check appears to confirm if it contains one of the following characters.
0123456789ABCDEFHJKLMNPQRTUVWXYZ
and if it doesn’t it will fail. Of note is that this is actually missing the values ‘G’, ‘I’, ‘O’, and ‘S’, which tells us that it’s possible these characters cannot be used in the provided key. This also looks like a custom alphabet which would be used in an encoding operation such as Base64.
It’s worth mentioning that we can attempt to tamper with the binary in memory under the failed key check to instead return a value of ‘1’ by looking at the offset 0x3adb8 which has an instruction xor ‘al,al’ right before the return statement.
By making a simple modification to this to instead be an instruction of performing xor on al with the number 1, we can open the chest… sort of.

In offline mode this is all that’s required to solve the challenge.
In online mode though, the game logic is being processed by the server, so all this change does is prevent us from getting the wrong DLC key message, but it still fails to open the chest.
Moving back to the decompiled and disassembled ‘VerifyKey’ code, we can see what looks like it may be a memory operation occurring by the evident references to XMM registers, ‘cStack’ variables in Ghidra, and the use of ‘LEA’ assembly instructions to load what is at a particular address.
The next key part of the method is an operation that seems to be looping over other variables which have been concatenated, and then concatenating them on themselves.
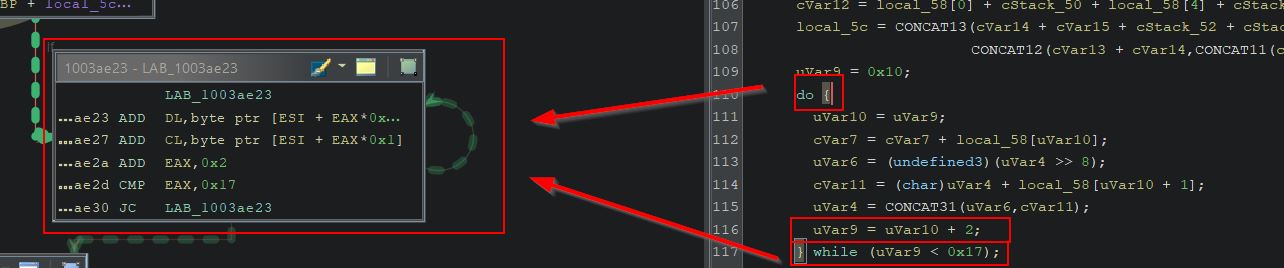
The key parts here is that this operation then seems to be used in a check to see if the char value of the concatenated (added) values after an ‘AND’ operation with the key 0x1f is equivalent to something on the stack, but it’s not entirely clear what.
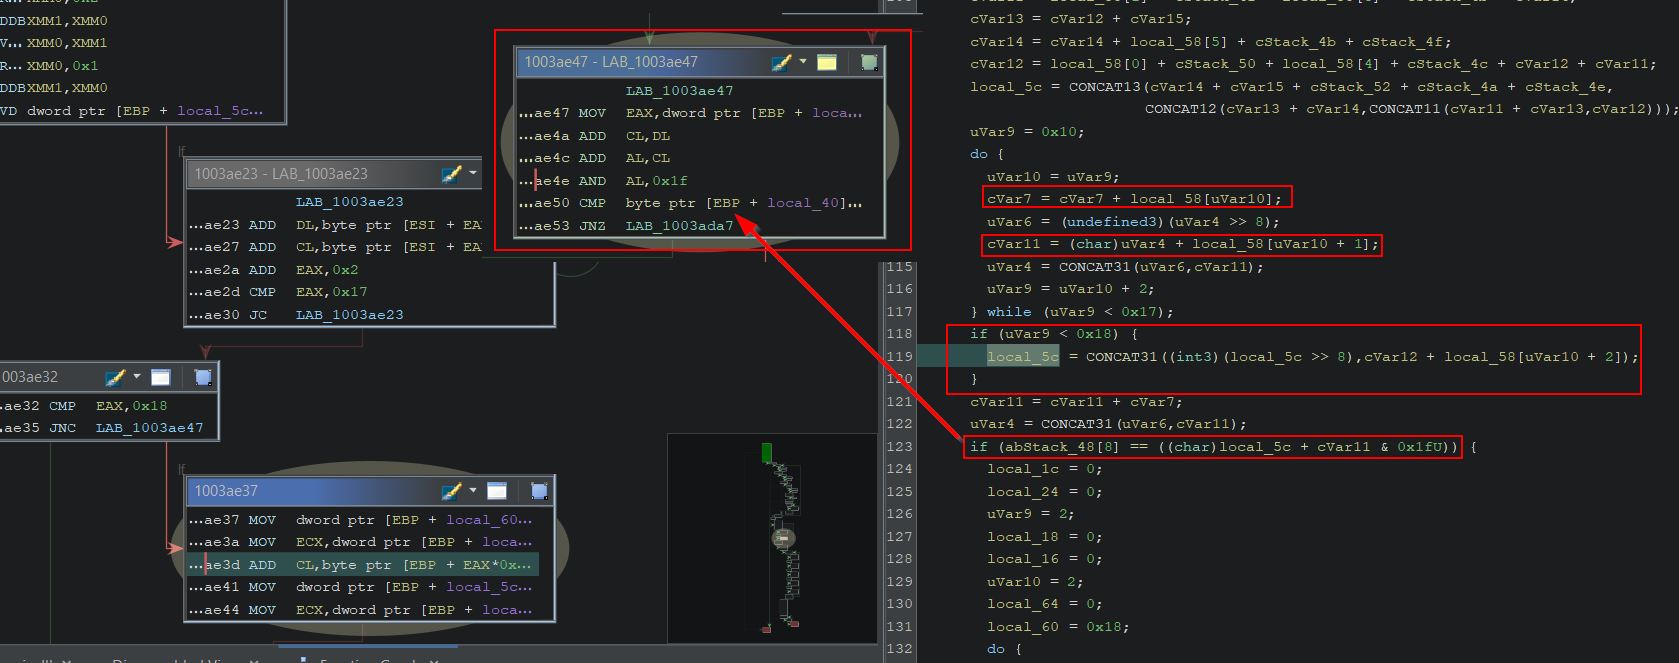
To locate what may be on the stack, we can create a breakpoint at offset 0x3ae50 (of gamelogic.dll) and run through this with our debugger. Looking at the breakpoint we find that ‘B’ which was our final submitted character is being compared to ‘10’. At this point to make sense of the below, it’s important to note that all values submitted appear to map directly to the custom alphabet that was seen in terms of their index. So the value 0 is at index ‘0’, and the value ‘A’ is at index ‘10’ etc. This assumption is made based on the custom alphabet which would closely resemble how Crockford’s Base32 alphabet works.
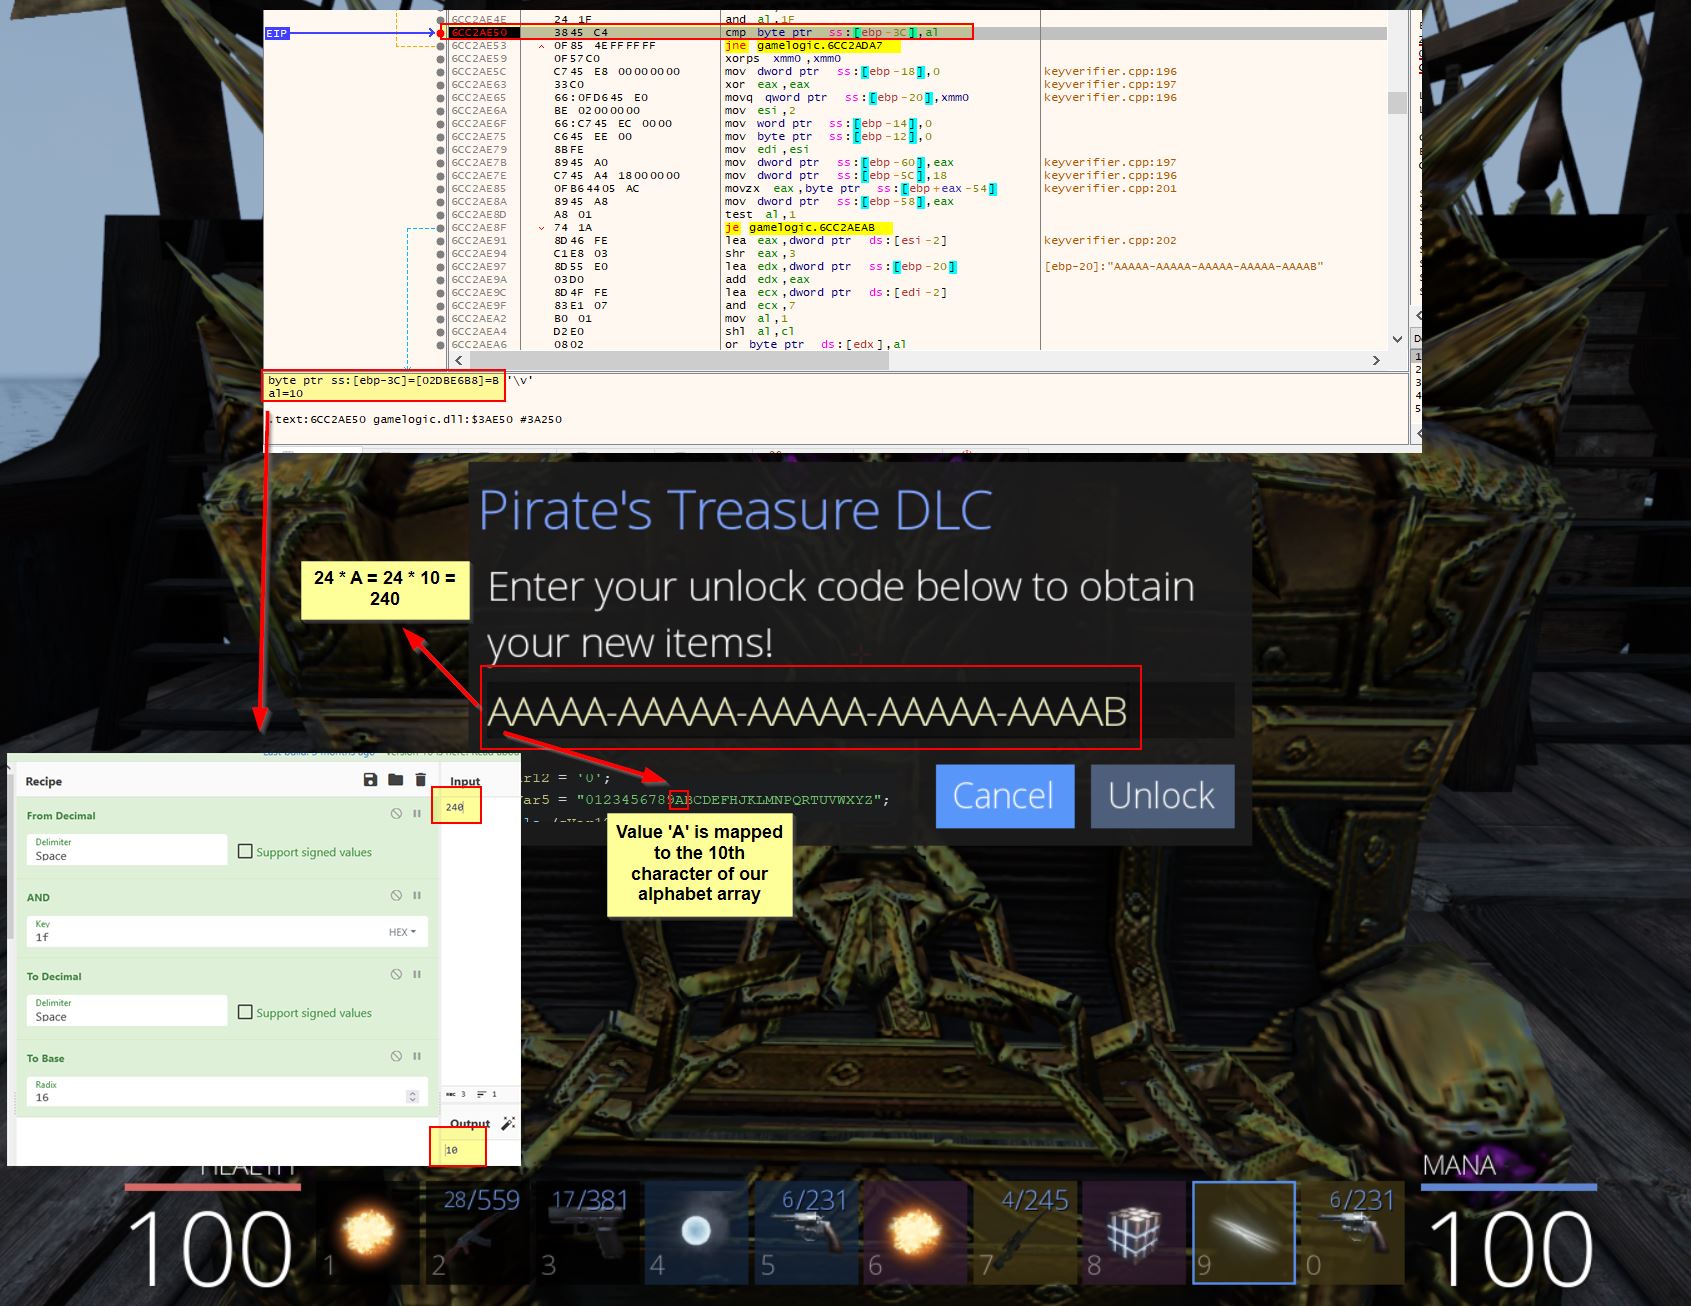
Because the sum of all values submitted (in decimal) has a bitwise AND operation occur on it with the key ‘1f’, the end result in hex here is ‘10’ being compared to ‘B’.
This looks like it may be a checksum occurring because the sum of all the input characters provided is being compared to the final character in our submitted key.
Recreating Custom Decoding Operations in Python
Looking at the next part of assembly, this has a number of conditions which are occurring that doesn’t resemble a typical Base64 or Base32 operation; however, it is performing bitwise left shift and bitwise right shift operations on values in memory as evident by ‘shl’ and ‘shr’ instructions or ‘«’ and ‘»’, so this does appear likely to be an encoding or decoding routine.
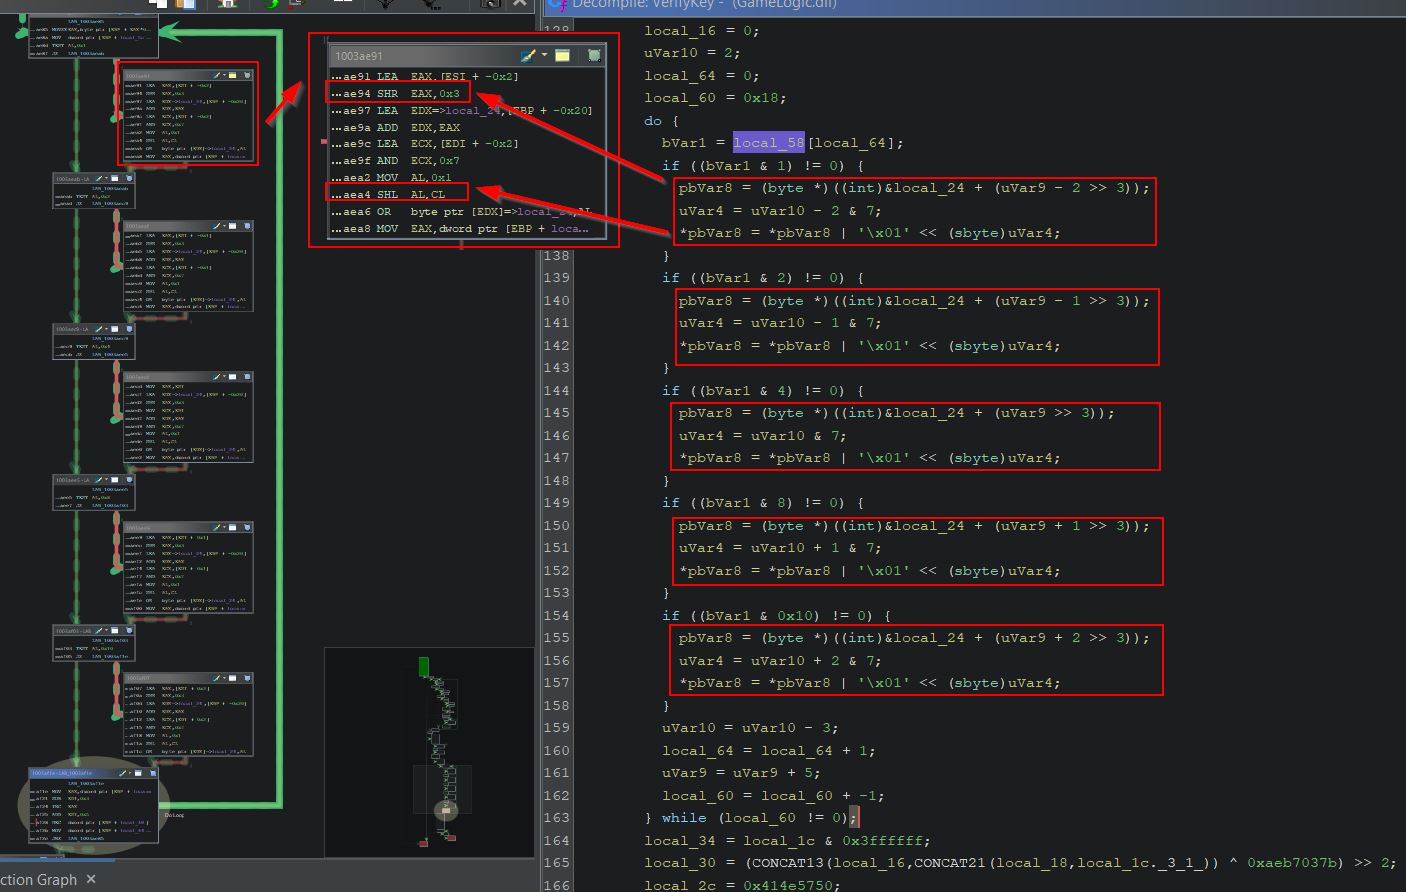
To recreate this in python we can begin transferring over the pseudo-code and begin making it syntactically correct. Of note is there’s still a number of type declarations and variables which will need to be cleaned up.
def decode():
	local_1c = 0
	local_24 = 0
	uVar9 = 2
	local_18 = 0
	local_16 = 0
	uVar10 = 2
	local_64 = 0
	local_60 = 24

	while (local_60 !=0):
		Var1 = local_58[local_64]
		if ((bVar1 & 1) != 0):
			pbVar8 = (byte *)((int)&local_24 + (uVar9 - 2 >> 3))
			uVar4 = uVar10 - 2 & 7
			*pbVar8 = *pbVar8 | '\x01' << (sbyte)uVar4
		if ((bVar1 & 2) != 0):
			pbVar8 = (byte *)((int)&local_24 + (uVar9 - 1 >> 3))
			uVar4 = uVar10 - 1 & 7
			*pbVar8 = *pbVar8 | '\x01' << (sbyte)uVar4
		if ((bVar1 & 4) != 0):
			pbVar8 = (byte *)((int)&local_24 + (uVar9 >> 3))
			uVar4 = uVar10 & 7
			*pbVar8 = *pbVar8 | '\x01' << (sbyte)uVar4
		if ((bVar1 & 8) != 0):
			pbVar8 = (byte *)((int)&local_24 + (uVar9 + 1 >> 3))
			uVar4 = uVar10 + 1 & 7
			*pbVar8 = *pbVar8 | '\x01' << (sbyte)uVar4
		if ((bVar1 & 0x10) != 0):
			pbVar8 = (byte *)((int)&local_24 + (uVar9 + 2 >> 3))
			uVar4 = uVar10 + 2 & 7
			*pbVar8 = *pbVar8 | '\x01' << (sbyte)uVar4
		uVar10 = uVar10 - 3;
		local_64 = local_64 + 1;
		uVar9 = uVar9 + 5;
    local_60 = local_60 + -1;
Specifically this is likely to be a decoding routine given how it is using the parameters passed to it. There’s a number of local variables here which never change e.g. ‘local_24’ but which are being casted to a type which makes it a bit easier to identify variables which would have been passed into the routine, or which are storing the output of something pushed to the routine. There’s also some strange pseudo-code such as ‘local_60’ starting at 0x18 (24) and reducing by 1 after every loop, which would indicate this is actually looping over every individual character submitted as the DLC key.
Also ‘uVar10’ after operations goes from the value 0 to 4 and has 5 if statements, which means it’d also be equivalent to a loop condition which occurs 5 times. The same can be said for ‘uVar9’ which has a similar pattern (except it has a uVar9 + 5 statement at the end of the loop which indicates it’s incrementing by 5 every time). Looking at the identifiers ‘pbVar8’ is likely a public (global) variable being used, and ‘local_64’ is increasing by 1 every loop which identifies a local variable is being passed to the method. In addition ‘uVar4’ isn’t being used so would also be referencing an index or passed in value. This code can be summised similar to the below:
def decode(mapped_alphabet):
	i = 0
	decoded = [0]*(int)(5/8*24)

	for ii in range(0,24):
		for iii in range(0,5):
			Var1 = mapped_alphabet[ii]
			if Var1 & (1 << iii) != 0:
				shift = i+iii & 7
				decoded[(i + iii) >> 3] = decoded[(i + iii) >> 3] | (1 << shift)
		i += 5;
It may not be clear how this code can be reduced so much; however, the below breakdown hopefully makes this clearer.
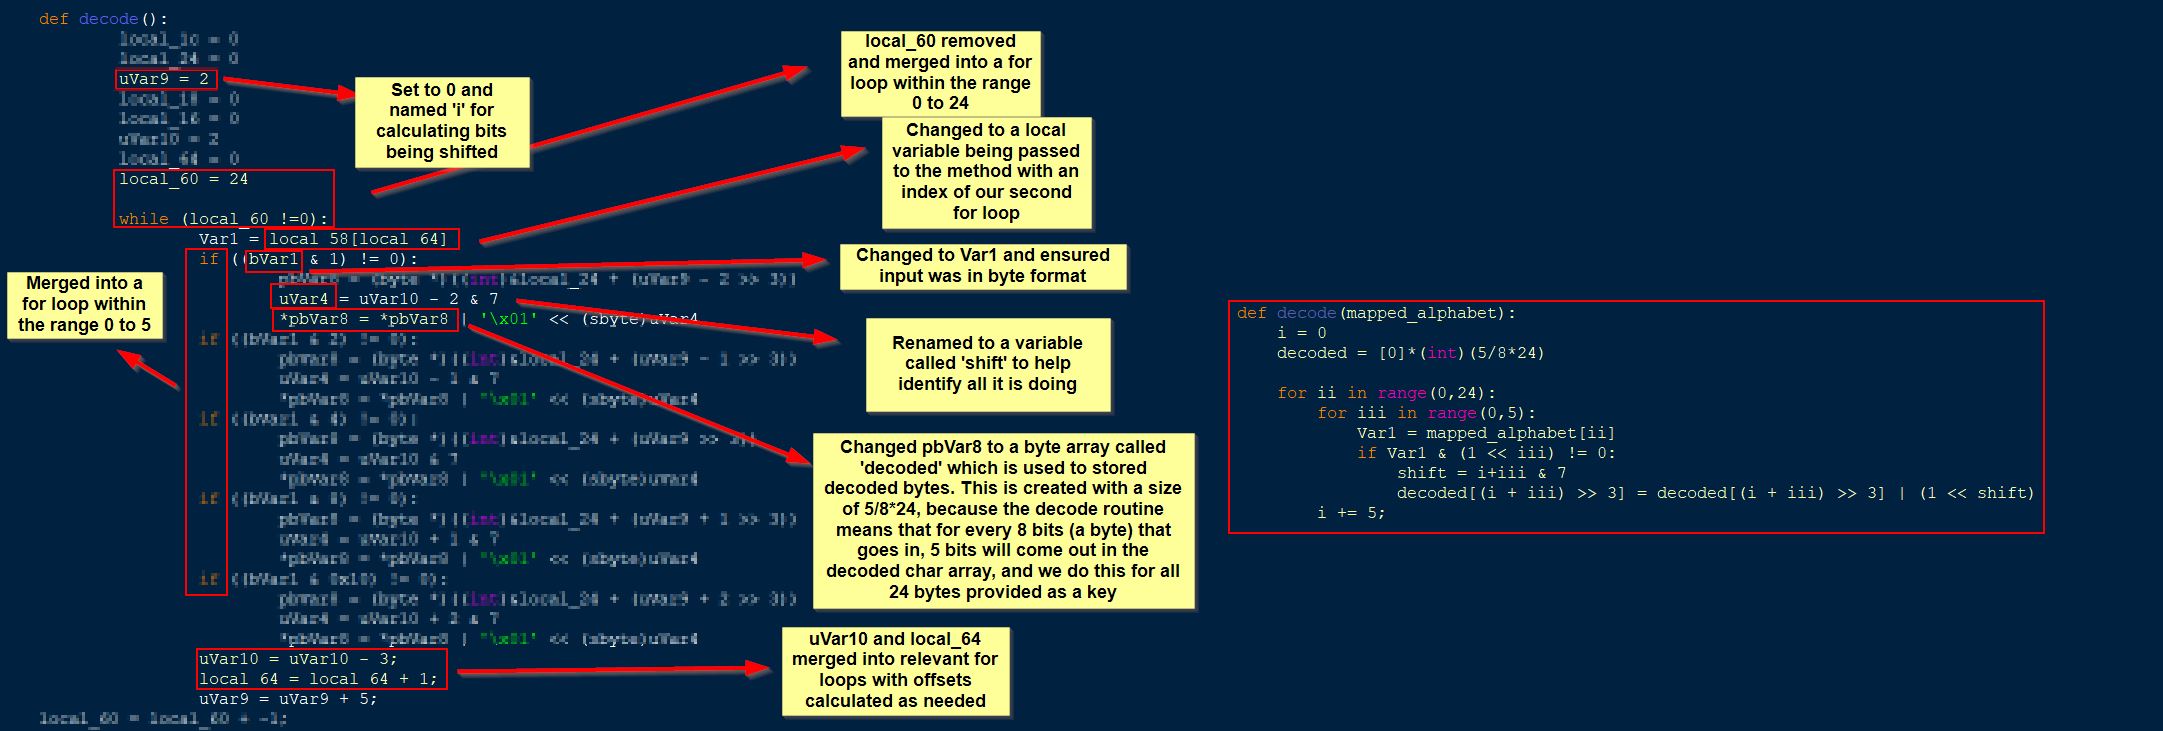
Because we are passing in the mapped_alphabet array (mapping the alphabet used in the decoding routine to a relevant index), this also needs to be created based on a given alphabet and buffer sent as a DLC key so our decoding and encoding operations can be tested. As such the end result we can work with is below:
alphabet = '0123456789ABCDEFHJKLMNPQRTUVWXYZ'
buf = 'AAAAAAAAAAAAAAAAAAAAAAAA'
mapped_alphabet = []
decoded = ''

def decode(mapped_alphabet):
	i = 0
	decoded = [0]*(int)(5/8*24)

	for ii in range(0,24):
		for iii in range(0,5):
			Var1 = mapped_alphabet[ii]
			if Var1 & (1 << iii) != 0:
				shift = i+iii & 7
				decoded[(i + iii) >> 3] = decoded[(i + iii) >> 3] | (1 << shift)
		i += 5;
	print(decoded)

def map_alphabet(alphabet,buf):
	global mapped_alphabet
	mapped_alphabet = []
	for i in buf:
		mapped_alphabet.append(alphabet.find(i))
	print(mapped_alphabet)

map_alphabet(alphabet,buf)
decode(mapped_alphabet)
At this point we have essentially the same pseudo-code seen in Ghidra which is now implemented in Python, and we can begin looking into more methods.
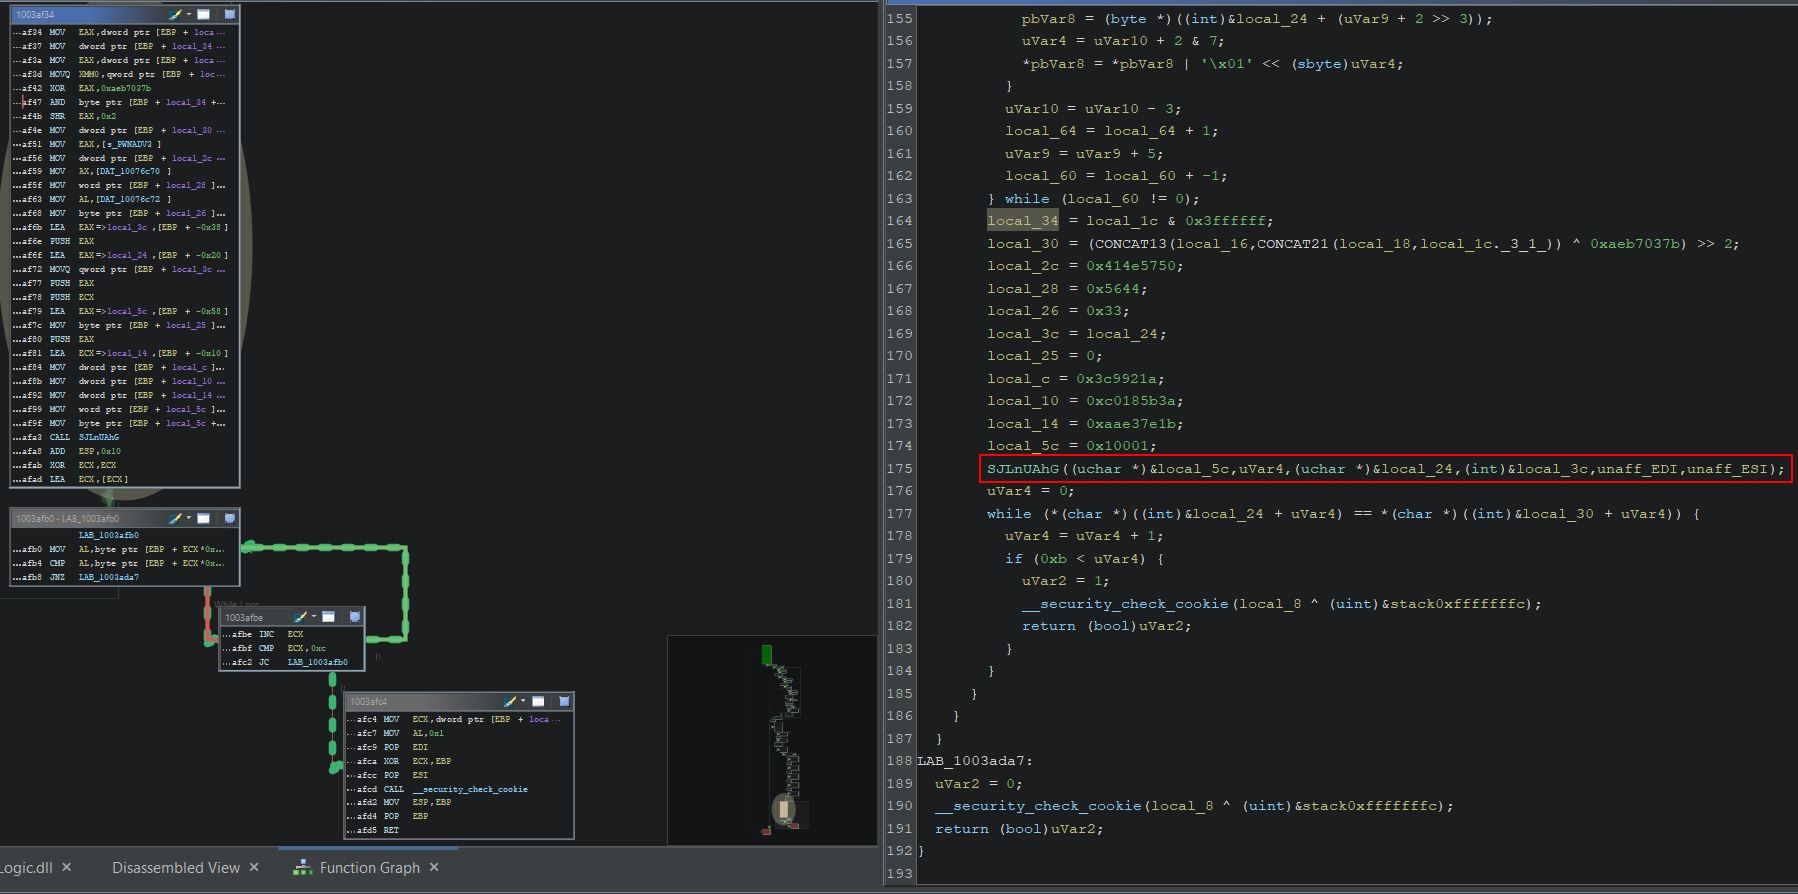
Recreating RSA Operations to Recover Private Keys in Pyhon
After this custom Base32-like decoding routine occurs, there’s a call to an obfuscated function ‘SJLnUAhg’ with a number of parameters being passed. In particular the parameter 0x10001 and our bits that were shifted in the decoding routine are being passed. There’s also a local variable ‘local_30’ which is then being checked against a string which has been XOR’d (using ‘^’) with the key ‘0xaeb7037b’ and having a bitwise shift right operation occur.
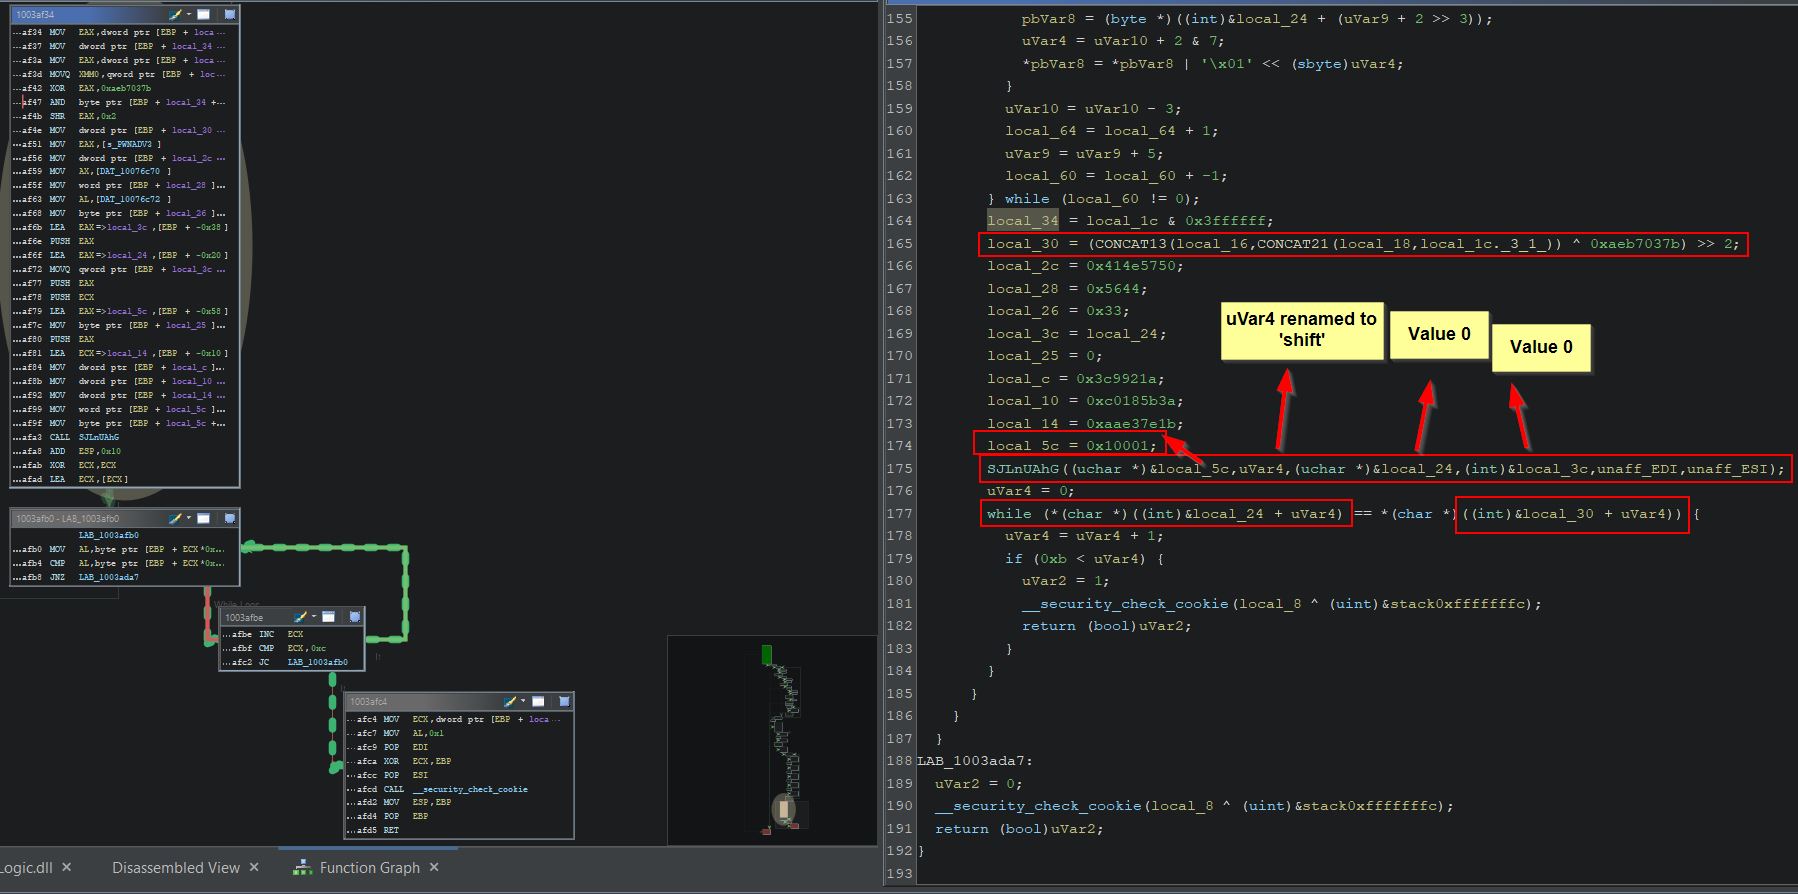
Also of interest is the string ‘PWNADV3’ which is being used somewhere.
The obfuscated function has another obfuscated function within it called ‘JftLXRHh’, which in turn has another 2 obfuscated functions within it ‘pCsLWByS’, and ‘pzsMuhFr’. The function graphs of these at a high level are as follows:
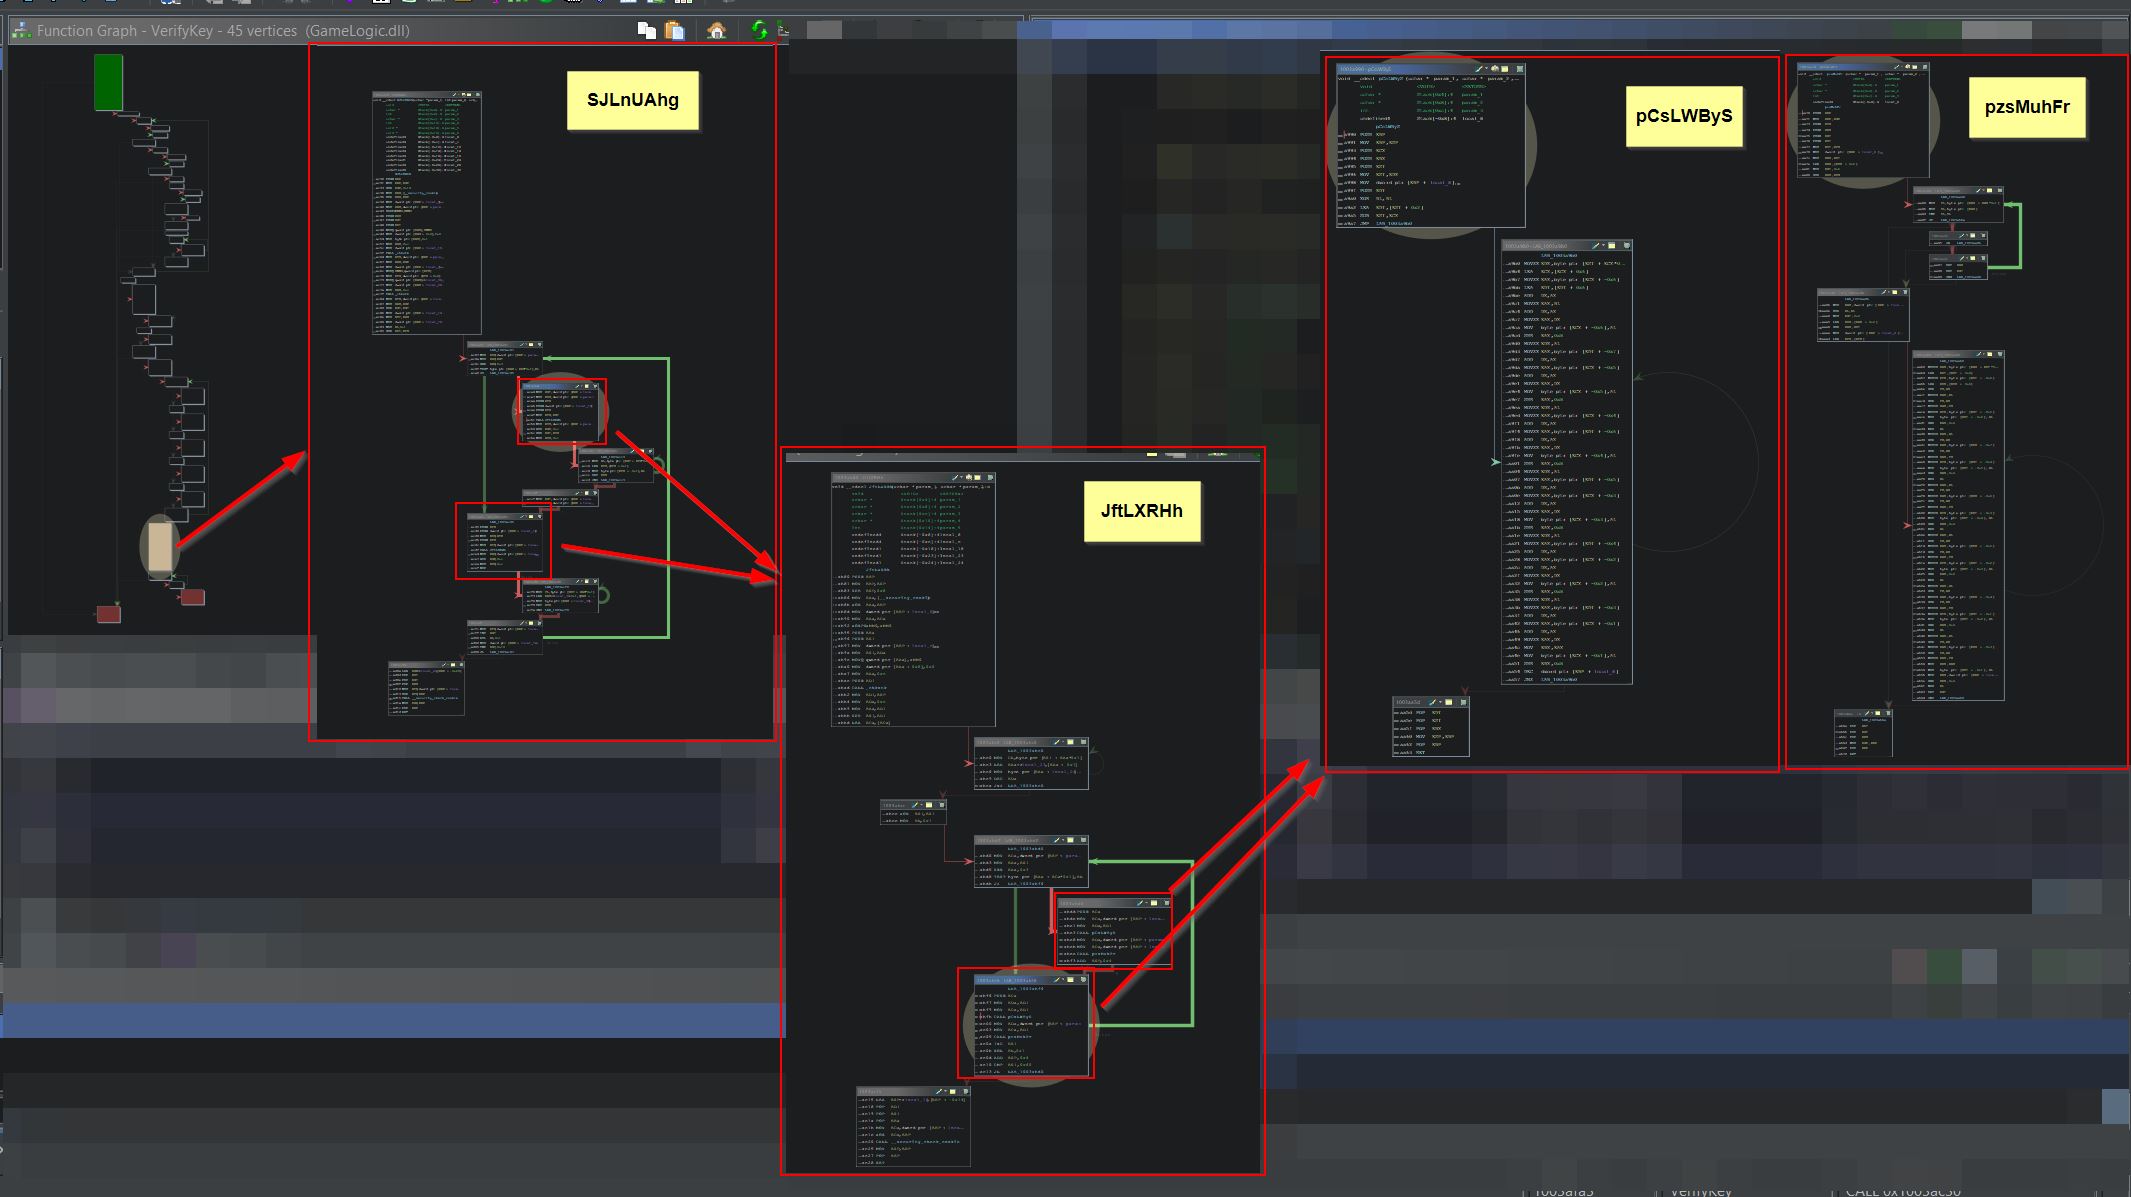
Rather than trying to understand every individual operation occurring within these functions, a quick search for ‘0x10001 parameter’ shows that this is a common value used in RSA encryption/decryption.
Based solely on this there’s a chance that this is performing RSA decryption.
To perform a quick check, the value ‘0x3C9921AC0185B3AAAE37E1B’ (found by combining variables local_c, local_10, and local_14) as an integer can be checked to see if any known factors exist for it using factordb. The reason this can be used as a starting point is that RSA encryption involves taking 2 large prime numbers (which are referenced as ‘p’ and ‘q’), multiplying them together to get a modulus (which is referenced as ‘n’), computing Carmichael’s totient function - λ on n, and then using this computed value in calculations with an exponent (which is referenced as ‘e’ and in this case is 0x10001 or 65537) to calculate a private key as ‘d’ which will then be used to reverse the encryption (a mouthful I know). In short the encryption and decryption functions can be expressed as:
- Encrypt: Ciphertext = Padded plaintext as an integer^public key (exponent modulus prime1*prime2)
- Decrypt: Plaintext = Ciphertext as an integer^private key (modular multiplicative inverse of exponent(modulus Carmichael’s totient function ‘λ’(prime1*prime2))
By first converting the value 0x3C9921AC0185B3AAAE37E1B to an integer.
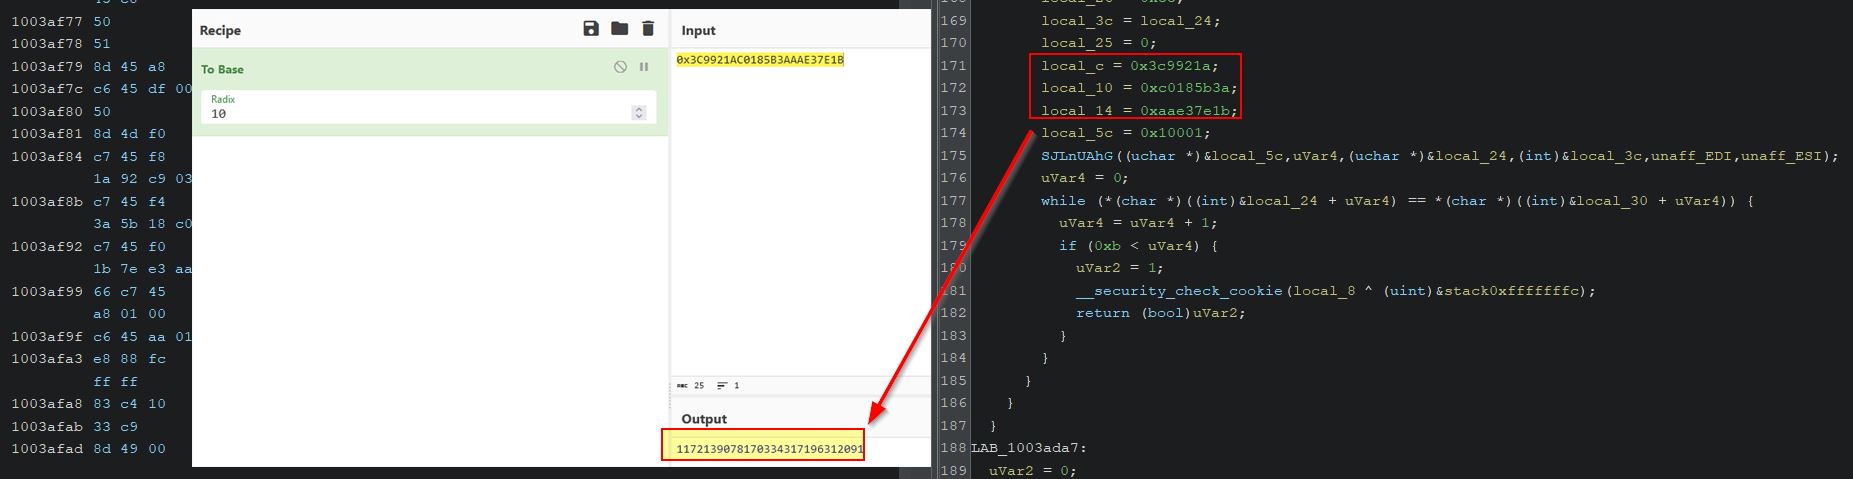
Using the python wrapper for factordb, we can then find 2 prime numbers (p and q) which when multiplied together give us this value (n) due to how small the key size is.
factordb 1172139078170334317196312091
33759901540733 34719860683127
Knowing ‘p’ (33759901540733), ‘q’ (34719860683127), ‘e’ (65537) and ‘n’ (1172139078170334317196312091), we can now calculate ‘d’ as the private key using the RSA algorithm. To do this we need to calculate Carmichael’s totient function (λ) of ‘n’, and can then use the python3.8 inbuilt function ‘pow’ to calculate the modular multiplicative inverse of e. The formula comes out to the following:
e^-1 modulo λ(n)
On the RSA wiki it explains how λ(n) = least common multiple (lcm) of (p − 1, q − 1). What this means is that we instead need to find out the lcm here which it mentions we can locate by using the euclidean algorithm. By defining a function to do this as shown in this StackOverflow answer we can then calculate the value required before passing it into the rest of our formula to uncover the private key.
def lcm(a, b):
return abs(a*b)

x = lcm(33759901540733-1,34719860683127-1)
print(x)

key = pow(0x10001, -1, x)
print(key)
The end result is a usable private key value ‘d’:
117398124862438392921820577 (0x611c0519e05065e8f38da1)
Filling In Game Logic Gaps Using Binary Ninja
At this point it’s important to get a more complete picture of what is happening which isn’t inherently obvious with Ghidra. Using Binary Ninja, we can examine the same operations in the lead-up to calling ‘SJLnUAhg’ as high level intermediate language.
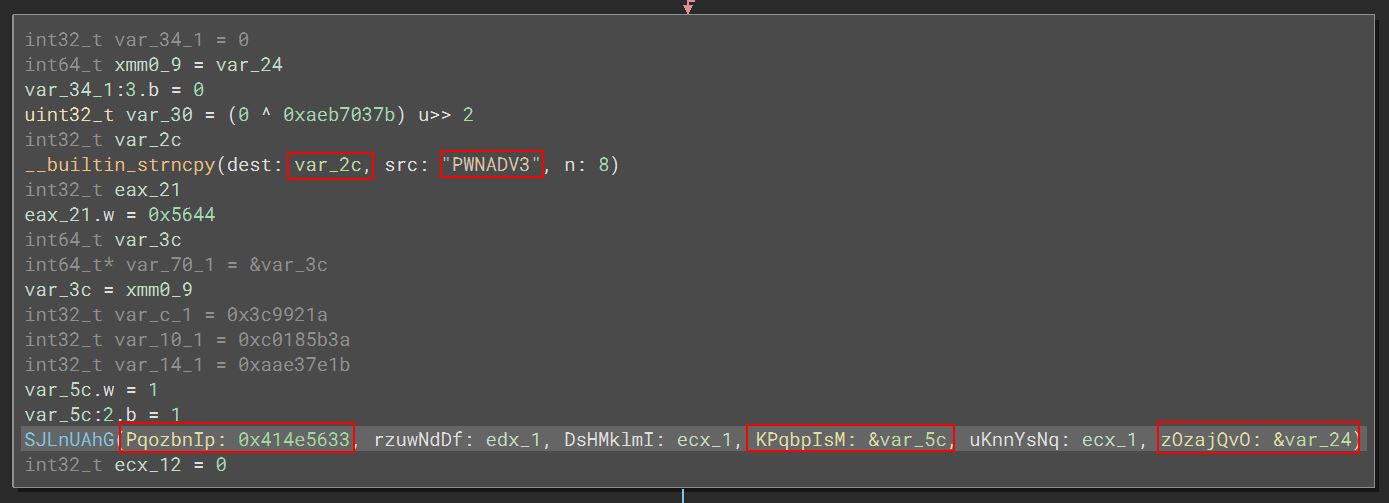
This already poses some more context in that this function seems to be passed 3 specific values (a hex string and a reference to values stored in var_5c and var_24), in addition to what is in registers edx and ecx. What’s most of interest is that the string PWNADV3 is seen to be copied into var_2c but this is never referenced; however, the hex string ‘0x414e5633’ comes out as ‘ANV3’. This appears as if it may actually be referencing ‘PWNADV3’ within ‘SJLnUAhg’; however, the IL interpreter hasn’t quite figured this out properly, nor the endianness of some of the data.
Although not a smoking gun, shortly within ‘SJLnUAhg’ there seems to be a check where a pointer to a value on the stack (after some operations) is checked to see if the value is not equal to 0. The operations are:
- It is first bit shifted right by 3
- The added to the passed in ‘ANV3’ value
- Finally has an ‘AND’ operation occur on it.
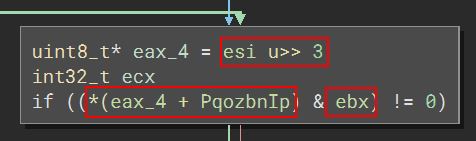
This seems to indicate that a check will occur to determine if a value being decrypted winds up being ‘PWNADV3’. At this point it is more of a hypothesis, but definitely something that can be confirmed.
Looking back on the operations occurring in Ghidra, it was seen that a variable ‘local_30’ was being set, but up until the end of ‘SJLnUAhg’ hasn’t been used. Of interest is that there appears to be a check to determine whether the decrypted values of the provided key are equivalent to local_30.
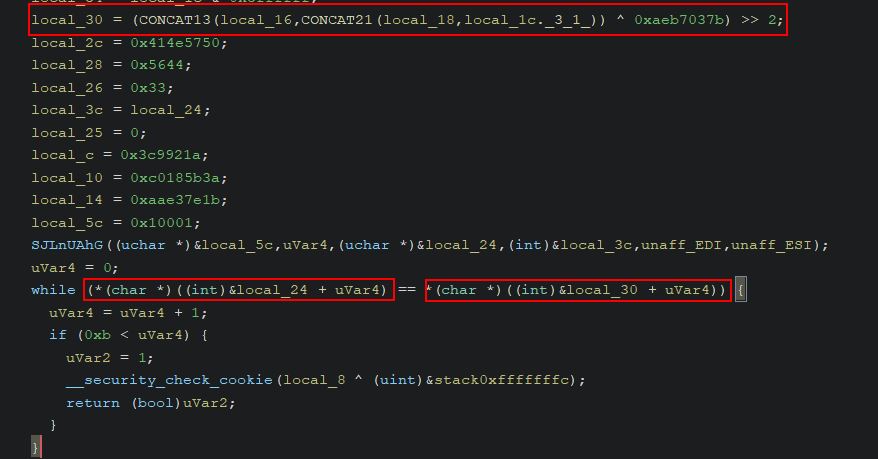
Based on all of this we roughly know that the algorithm performs the following:
- With a provided DLC key of 25 characters or more, using a custom alphabet, confirm the last byte is equal to the sum of the submitted bytes mapped to this alphabet after performing an AND operation with the key ‘1f’
- Perform a custom Base32 decoding operation on these bytes
- Decrypt the Base32 decoded bytes using RSA decryption with the e value 65537, p value 33759901540733 and q value 34719860683127
- Check the decrypted bytes for the value ‘PWNADV3’
- Perform an XOR operation on the remaining bytes with the value 0xAEB7037B and bitwise-shift the output 2 places to the right
- Compare the output of the XOR operation to 8 characters (4 bytes) and see if they are equal to that of the returned decrypted value (without PWNADV3)
🏆 Flag of The Pirate via Creating a Keygen (500 points)
Converting Our Decoding Routine to an Encoding Routine
Starting out with our existing Python script we can convert the decoding routine to an encoding routine by first changing ‘&’ and bitshift operations to their mathematical equivalents (‘» 3’ is equivalent to ‘/ 8’, and ‘& 7’ is equivalent to ‘% 8’) for ease of understanding:
def decode(mapped_alphabet):
	i = 0
	decoded = [0]*(int)(5/8*24)

	for ii in range(0,24):
		for iii in range(0,5):
			Var1 = mapped_alphabet[ii]
			if Var1 & (1 << iii) != 0:
				shift = (i+iii) % 8
				decoded[(int)((i + iii) / 8)] = decoded[(int)((i + iii) / 8)] | (1 << shift)
		i += 5;
	return decoded
From here, because the custom Base32 decoding operation is taking 8 bits and decoding these to 5 bits, we can essentially take these numbers and reverse them for encoding. An encoding routine would look like the following:
def encode(decoded):
	i = 0
	encoded = [0]*24

	for ii in range(0,(int)(5/8*24)):
		for iii in range(0,8):
			Var1 = decoded[ii]
			if Var1 & (1 << iii) != 0:
				shift = (i+iii) % 5
				encoded[(int)((i + iii) / 5)] = encoded[(int)((i + iii) / 5)] | (1 << shift)
		i += 8;
	return(encoded)
Shortening this further our custom Base32 encode and decode routines when combined with the RSA calculations can be seen below:
alphabet = '0123456789ABCDEFHJKLMNPQRTUVWXYZ'
buf = 'AAAAAAAAAAAAAAAAAAAAAAAA'
mapped_alphabet = []
decoded = ''

def decode(mapped_alphabet):
	i = 0
	decoded = [0]*(int)(5/8*24)

	for ii in range(0,24):
		for iii in range(0,5):
			Var1 = mapped_alphabet[ii]
			if Var1 & (1 << iii) != 0:
				shift = (i+iii) % 8
				decoded[(int)((i + iii) / 8)] |= (1 << shift)
		i += 5;
	return decoded

def encode(decoded):
	i = 0
	encoded = [0]*24

	for ii in range(0,(int)(5/8*24)):
		for iii in range(0,8):
			Var1 = decoded[ii]
			if Var1 & (1 << iii) != 0:
				shift = (i+iii) % 5
				encoded[(int)((i + iii) / 5)] |= (1 << shift)
		i += 8;
	return(encoded)

def map_alphabet(alphabet,buf):
	global mapped_alphabet
	mapped_alphabet = []
	for i in buf:
		mapped_alphabet.append(alphabet.find(i))
	return(mapped_alphabet)

mapped_alphabet = map_alphabet(alphabet,buf)
print(mapped_alphabet)
decodeval = decode(mapped_alphabet)
print(decodeval)
encodeval = encode(decodeval)
print(encodeval)

def lcm(a, b):
	return abs(a*b)

x = lcm(33759901540733-1,34719860683127-1)

key = pow(0x10001, -1, x)
print(key)
print(hex(key))
Running this with python3.8 or higher would result in the following, note the decoded bytes being encoded and then decoded successfully:
[10, 10, 10, 10, 10, 10, 10, 10, 10, 10, 10, 10, 10, 10, 10, 10, 10, 10, 10, 10, 10, 10, 10, 10]
[74, 41, 165, 148, 82, 74, 41, 165, 148, 82, 74, 41, 165, 148, 82]
[10, 10, 10, 10, 10, 10, 10, 10, 10, 10, 10, 10, 10, 10, 10, 10, 10, 10, 10, 10, 10, 10, 10, 10]
117398124862438392921820577
0x611c0519e05065e8f38da1
Now that we have an idea of what needs to be performed and the underlying functions required, a keygen can be built by working backwards on the keyverifier instructions below:
- With a provided DLC key of size 25 or more, using a custom alphabet, confirm the last byte is equal to the sum of the submitted bytes mapped to this alphabet after performing an AND operation with the key ‘1f’
- Perform a custom Base32 decoding operation on these bytes
- Decrypt the Base32 decoded bytes using RSA decryption with the e value 65537, p value 33759901540733 and q value 34719860683127
- Check the decrypted bytes for the value ‘PWNADV3’
- Perform an XOR operation on the remaining bytes with the value 0xAEB7037B and bitwise-shift the output 2 places to the right
- Compare the output of the XOR operation to 8 characters (4 bytes) and see if they are equal to that of the returned decrypted value (without PWNADV3)
Creating Base Key From Random and Static Bytes
First off we’re going to need 15 characters which once we encode them will come out to a nice 24 characters in size. Of this the first 7 characters are going to be the word ‘PWNADV3’, with the other 8 characters being randomly generated, XORd with the value ‘0xAEB7037B’ and bitwise-shifted 2 places to the right.
#Perform an XOR operation on 8 characters with the value 0xAEB7037B and bitwise-shift the output 2 places to the right
rand_bytes = random.randint(0,0xFFFFFFFF)
hex_rand_bytes = hex((rand_bytes ^ 0xAEB7037B) >> 2)[2:]
print("XORED Bytes:")
print(hex_rand_bytes)

# Have 7 characters be the value 'PWNADV3' Note: This needs to be backwards due to endianness
static_bytes="3VDANWP".encode("utf-8").hex()
print(static_bytes)
print("Bytes For Keygen:")
int_bytes=int(static_bytes+hex_rand_bytes,16)
print(int_bytes)
Encrypting Base Key Using RSA
Next we’re going to need to merge in some script to encrypt these bytes using RSA with the e value 65537, p value 33759901540733 and q value 34719860683127. Because the key is already calculated in our previous step this can be used in a new method that puts the rest of the RSA encryption routine into play. To confirm it works we can create an encryption and associated decryption routine as follows:
# p = 33759901540733
# q = 34719860683127
# e = 65537
# n = 1172139078170334317196312091
# d = 117398124862438392921820577

def RSA_encrypt(message,key):
	encrypted_text = pow(message,key,1172139078170334317196312091)
	return(encrypted_text)

def RSA_decrypt(message,key):
	decrypted_text = pow(message,65537,1172139078170334317196312091)
	return(decrypted_text)

def lcm(a, b):
	return abs(a*b)

x = lcm(33759901540733-1,34719860683127-1)

key = pow(0x10001, -1, x)
print("RSA Key:")
print(key)
print("RSA Key Hex:")
print(hex(key))

# Perform an XOR operation on 8 characters with the value 0xAEB7037B and bitwise-shift the output 2 places to the right
rand_bytes = random.randint(0,0xFFFFFFFF)
hex_rand_bytes = hex((rand_bytes ^ 0xAEB7037B) >> 2)[2:]
print("XORED Bytes:")
print(hex_rand_bytes)

# Have 7 characters be the value 'PWNADV3' Note: This needs to be backwards due to endianness
static_bytes="3VDANWP".encode("utf-8").hex()
print(static_bytes)
print("Bytes For Keygen:")
int_bytes=int(static_bytes+hex_rand_bytes,16)
print(int_bytes)

# Encrypt the bytes using RSA decryption with the e value 65537, p value 33759901540733 and q value 34719860683127
encrypted=RSA_encrypt(int_bytes,key)
print("Encrypted Bytes For Keygen:")
print(encrypted)
Encoding Encrypted Bytes
With the encrypted bytes we now need to use the custom Base32 routine to encode these bytes and show them as uppercase (because it’s easier on the eyes). We’ll also need to add in some logic to ensure that the last 8 characters (4 bytes) are equal to that of the original generated random bytes:
# Encode the encrypted bytes using the custom Base32 routine, and ensure the last 8 characters (4 bytes) are equal to that of the original generated random bytes)
hex_encrypted = bytearray(encrypted.to_bytes(12, byteorder='little'))
print(hex_encrypted)
hex_encrypted[11] |= int.from_bytes(rand_bytes.to_bytes(4, byteorder='little')[:1], byteorder='little')
hex_encrypted += rand_bytes.to_bytes(4, byteorder='little')[1:]
print("Hex Encrypted Bytes For Keygen:")
print(hex_encrypted.hex().upper())
print(hex_encrypted)
DLC_Key_bytes=b32encode(hex_encrypted)
print("DLC Key Bytes (No Checksum)")
print(DLC_Key_bytes)
Calculating Checksum
Finally we need to calculate a checksum value. This is done by using a custom alphabet and confirming the last byte of our key is equal to the sum of the submitted bytes mapped to this alphabet after performing an ‘&’ operation with the key 0x1f.
# With a provided DLC key, using a custom alphabet, confirm the last byte is equal to the sum of the submitted bytes mapped to this alphabet after performing an AND operation with the key '1f'.
checksum = 0
DLC_Key = ""
for value in DLC_Key_bytes:
	DLC_Key+=alphabet[value]
	checksum+=value
print("DLC Key (No Checksum)")
print(DLC_Key)
print("DLC Key (Checksum)")
DLC_Key += alphabet[checksum & 0x1f]
print(DLC_Key[:5] + '-' + DLC_Key[5:10] + '-' + DLC_Key[10:15] + '-' + DLC_Key[15:20] + '-' + DLC_Key[20:25])
Final Script
The final script with unnecessary methods removed is as follows:
import random

alphabet = '0123456789ABCDEFHJKLMNPQRTUVWXYZ'

def b32decode(mapped_alphabet):
	i = 0
	decoded = [0]*(int)(5/8*24)

	for ii in range(0,24):
		for iii in range(0,5):
			Var1 = mapped_alphabet[ii]
			if Var1 & (1 << iii) != 0:
				shift = (i+iii) % 8
				decoded[(int)((i + iii) / 8)] |= (1 << shift)
		i += 5;
	return decoded

def b32encode(decoded):
	i = 0
	encoded = [0]*24

	for ii in range(0,(int)(5/8*24)):
		for iii in range(0,8):
			Var1 = decoded[ii]
			if Var1 & (1 << iii) != 0:
				shift = (i+iii) % 5
				encoded[(int)((i + iii) / 5)] |= (1 << shift)
		i += 8;
	return(encoded)

# p = 33759901540733
# q = 34719860683127
# e = 65537
# n = 1172139078170334317196312091
# d = 117398124862438392921820577

def RSA_encrypt(message,key):
	encrypted_text = pow(message,key,1172139078170334317196312091)
	return(encrypted_text)

def RSA_decrypt(message,key):
	decrypted_text = pow(message,65537,1172139078170334317196312091)
	return(decrypted_text)

def lcm(a, b):
	return abs(a*b)

x = lcm(33759901540733-1,34719860683127-1)

key = pow(0x10001, -1, x)
print("RSA Key:")
print(key)
print("RSA Key Hex:")
print(hex(key))

# Perform an XOR operation on 8 characters with the value 0xAEB7037B and bitwise-shift the output 2 places to the right
rand_bytes = random.randint(0,0xFFFFFFFF)
hex_rand_bytes = hex((rand_bytes ^ 0xAEB7037B) >> 2)[2:]
print("XORED Bytes:")
print(hex_rand_bytes)

# Have 7 characters be the value 'PWNADV3' Note: This needs to be backwards due to endianness
static_bytes="3VDANWP".encode("utf-8").hex()
print(static_bytes)
print("Bytes For Keygen:")
int_bytes=int(static_bytes+hex_rand_bytes,16)
print(int_bytes)

# Encrypt the bytes using RSA decryption with the e value 65537, p value 33759901540733 and q value 34719860683127
encrypted=RSA_encrypt(int_bytes,key)
print("Encrypted Bytes For Keygen:")
print(encrypted)

# Encode the encrypted bytes using the custom Base32 routine, and ensure the last 8 characters (4 bytes) are equal to that of the original generated random bytes)
hex_encrypted = bytearray(encrypted.to_bytes(12, byteorder='little'))
print(hex_encrypted)
hex_encrypted[11] |= int.from_bytes(rand_bytes.to_bytes(4, byteorder='little')[:1], byteorder='little')
hex_encrypted += rand_bytes.to_bytes(4, byteorder='little')[1:]
print("Hex Encrypted Bytes For Keygen:")
print(hex_encrypted.hex().upper())
print(hex_encrypted)
DLC_Key_bytes=b32encode(hex_encrypted)
print("DLC Key Bytes (No Checksum)")
print(DLC_Key_bytes)

# With a provided DLC key, using a custom alphabet, confirm the last byte is equal to the sum of the submitted bytes mapped to this alphabet after performing an AND operation with the key '1f'.
checksum = 0
DLC_Key = ""
for value in DLC_Key_bytes:
	DLC_Key+=alphabet[value]
	checksum+=value
print("DLC Key (No Checksum)")
print(DLC_Key)
print("DLC Key (Checksum)")
DLC_Key += alphabet[checksum & 0x1f]
print(DLC_Key[:5] + '-' + DLC_Key[5:10] + '-' + DLC_Key[10:15] + '-' + DLC_Key[15:20] + '-' + DLC_Key[20:25])
Running the tool presents us with an output similar to the below:
RSA Key:
117398124862438392921820577
RSA Key Hex:
0x611c0519e05065e8f38da1
XORED Bytes:
2204a27a
335644414e5750
Bytes For Keygen:
62062599402264551976379002
Encrypted Bytes For Keygen:
565899084553166651480323623
bytearray(b"\'\xb6\xc3\x90g\xb7\x10\xd8\xca\x19\xd4\x01")
Hex Encrypted Bytes For Keygen:
27B6C39067B710D8CA19D4918AA526
bytearray(b"\'\xb6\xc3\x90g\xb7\x10\xd8\xca\x19\xd4\x91\x8a\xa5&")
DLC Key Bytes (No Checksum)
[7, 17, 13, 7, 12, 8, 30, 12, 23, 5, 4, 16, 13, 5, 7, 3, 20, 14, 4, 21, 24, 18, 26, 4]
DLC Key (No Checksum)
7JD7C8YCQ54HD573ME4NRKU4
DLC Key (Checksum)
7JD7C-8YCQ5-4HD57-3ME4N-RKU4T
At this point we can enter the generated key at the Pirate’s Treasure DLC chest.
If all has gone to plan, we see the Flag of the Pirate has been obtained.
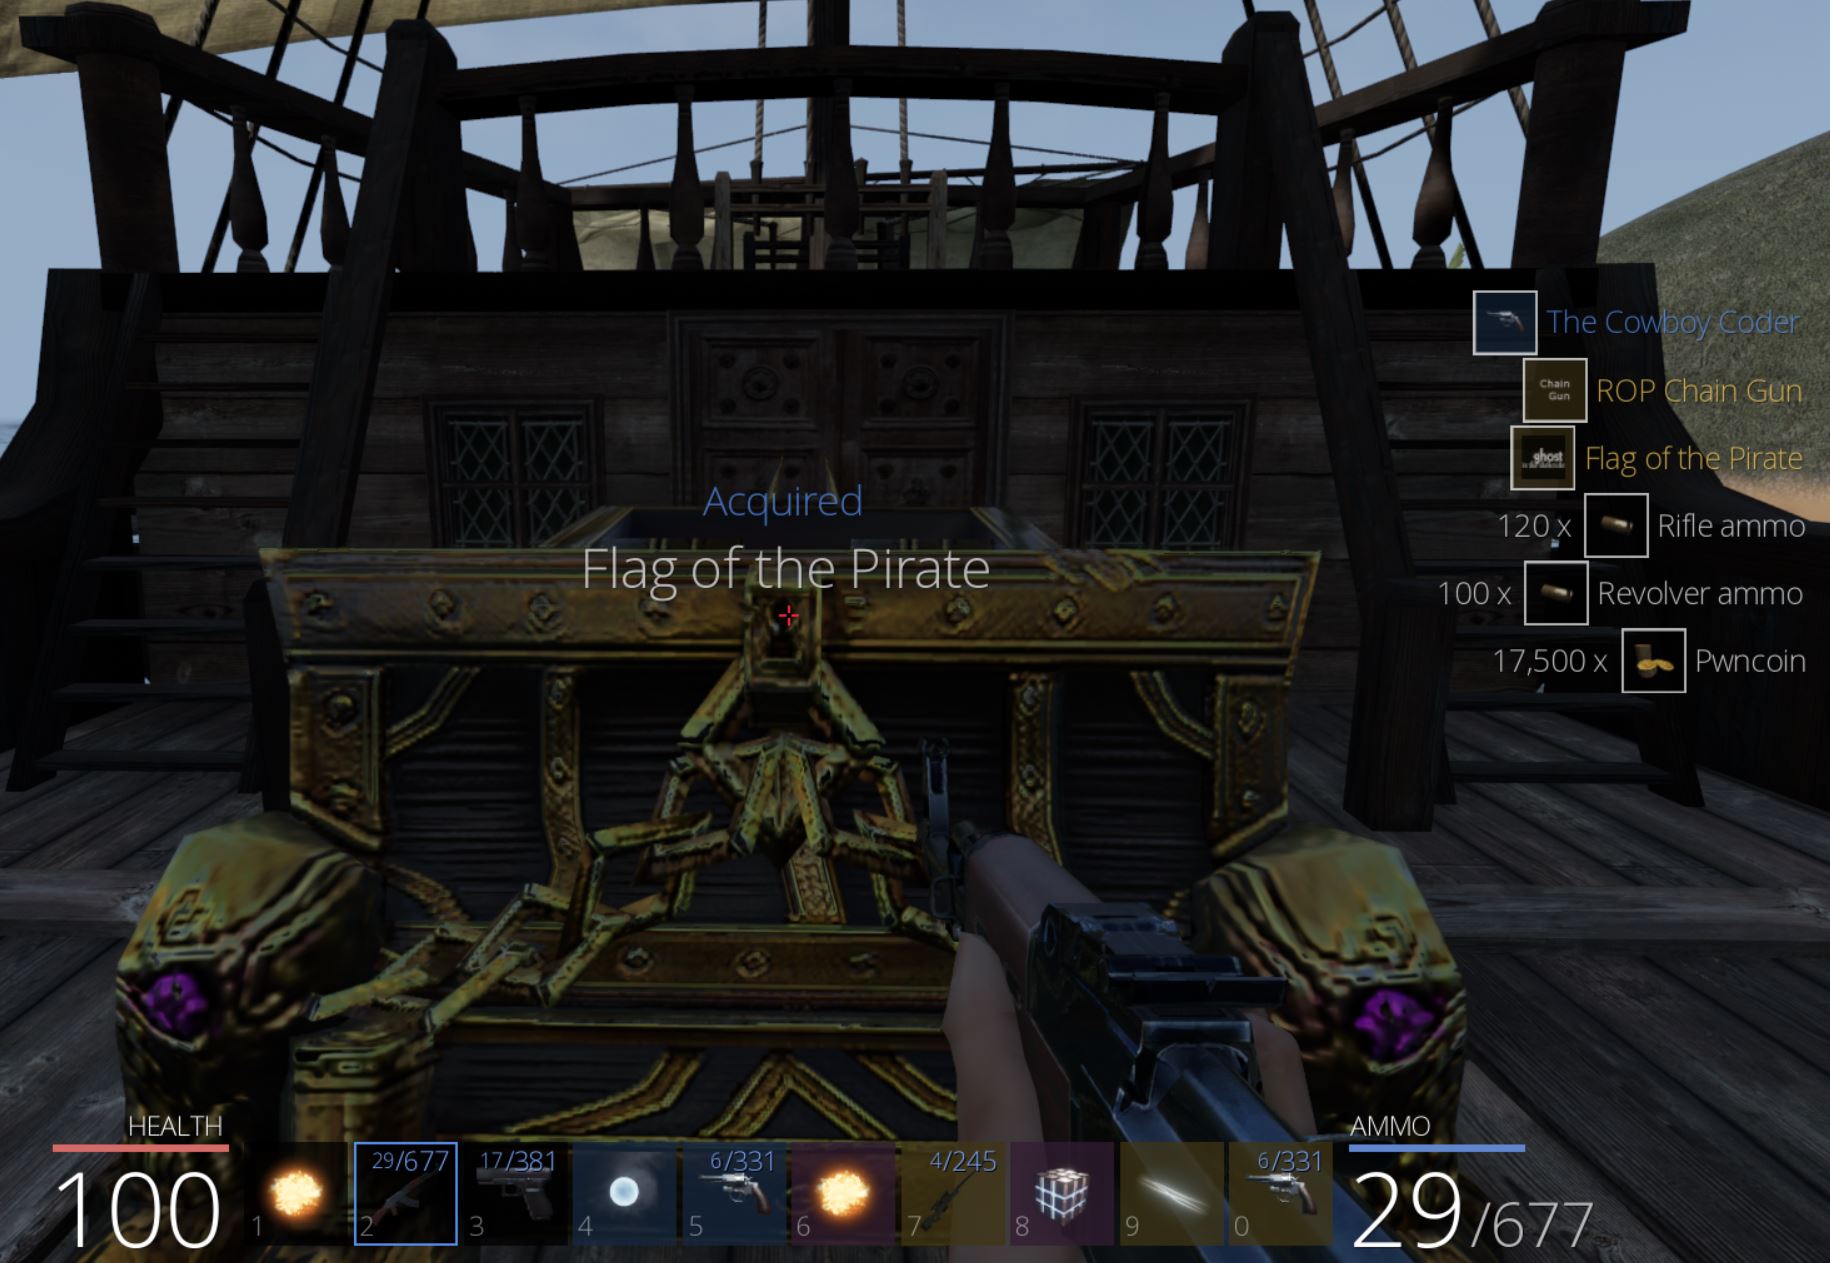
This has the key ‘Avast! Ya got my arrrr es eh’, which is our seventh and final flag of the game worth 500 points.
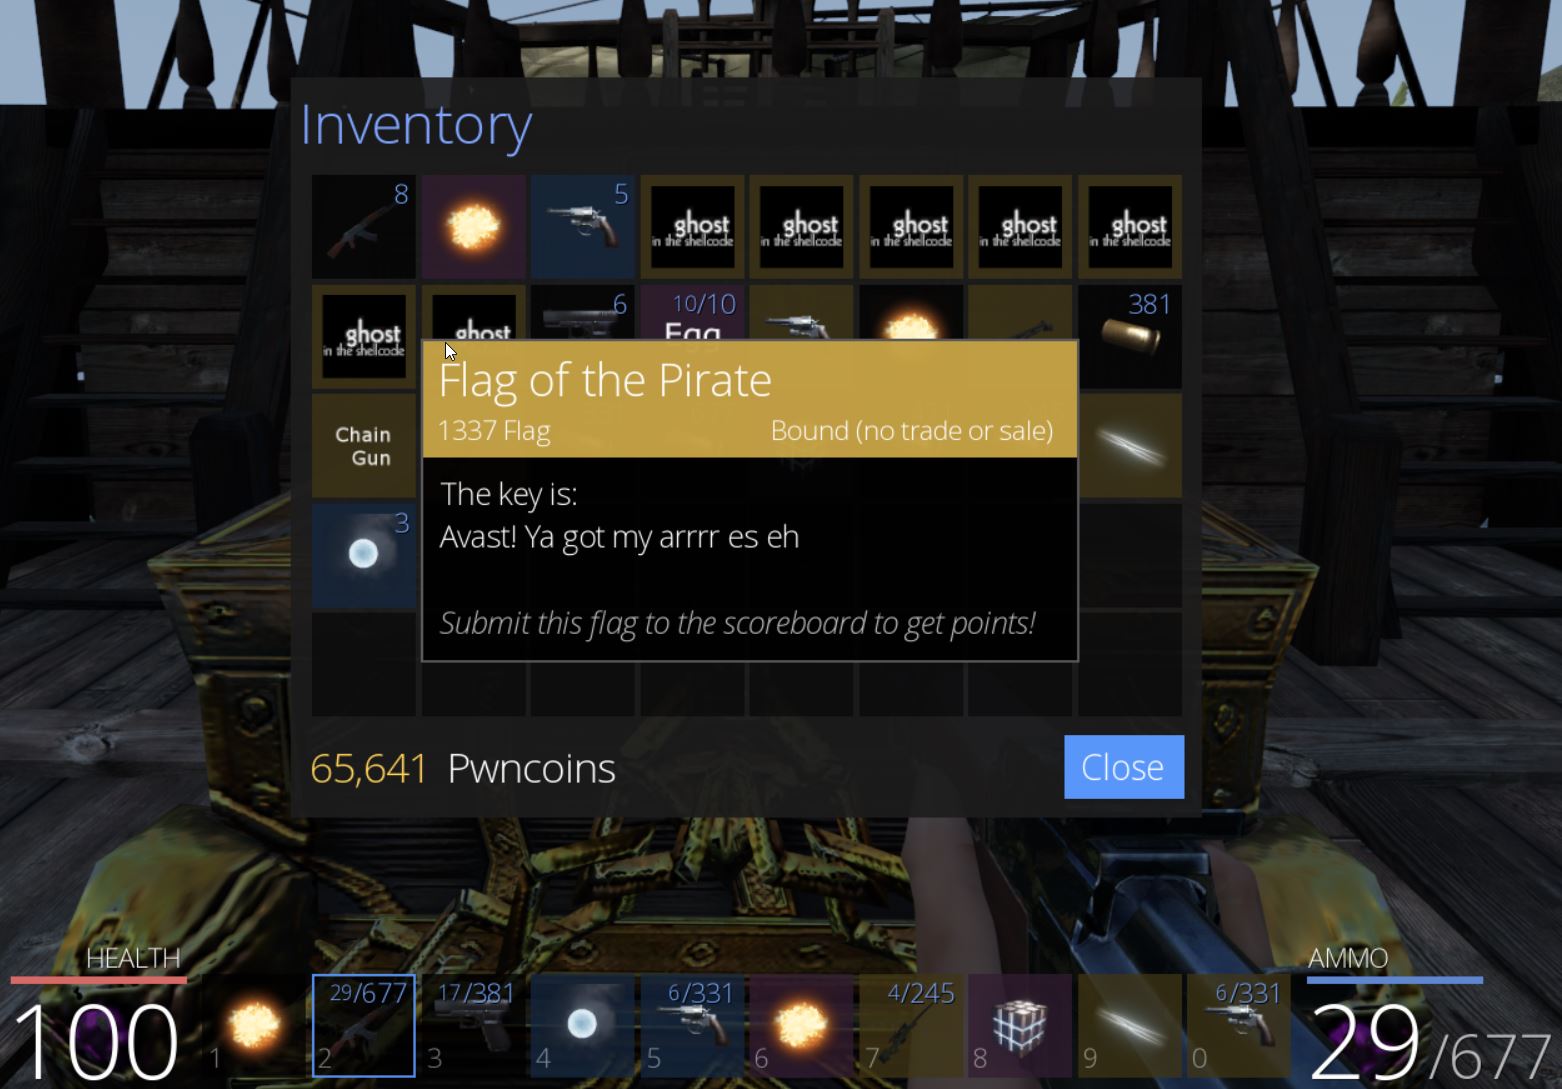
🎉 Wrapping Up
This concludes Pwn Adventure 3: Pwnie Island and how I solved the various challenges it entails. Tooling developed can be found on Github. I may continue this into the future by experimenting with other interesting hacks such as developing an aim-bot; however, at this point, after all those challenges, I’m content to have just made it through. To say this was difficult is an understatement. It was a real challenge with plenty of learning opportunities, so for now I’ll put it aside knowing the flags were obtained, and I managed to glitch the game into not despawning my character upon logging out of the game.